Building Voicemail with Twilio and Ruby
Time to read:
January 28, 2021
Written by
Reviewed by

One useful and common way to use Twilio is to create a phone number which forwards to your real phone. You can hand out the Twilio number to colleagues or customers and take business calls on your personal phone without worrying about handing out your real phone number. This also gives you a lot of options for how to handle these calls - you have the full power of Twilio at your disposal.
In this post I'll show you how to create a voicemail system that will jump in when your cell number is busy, or when you don't answer the call. It will play a message to your caller, then record their message and text you a link to the recording when it's done.
Primer: How Twilio Handles Calls
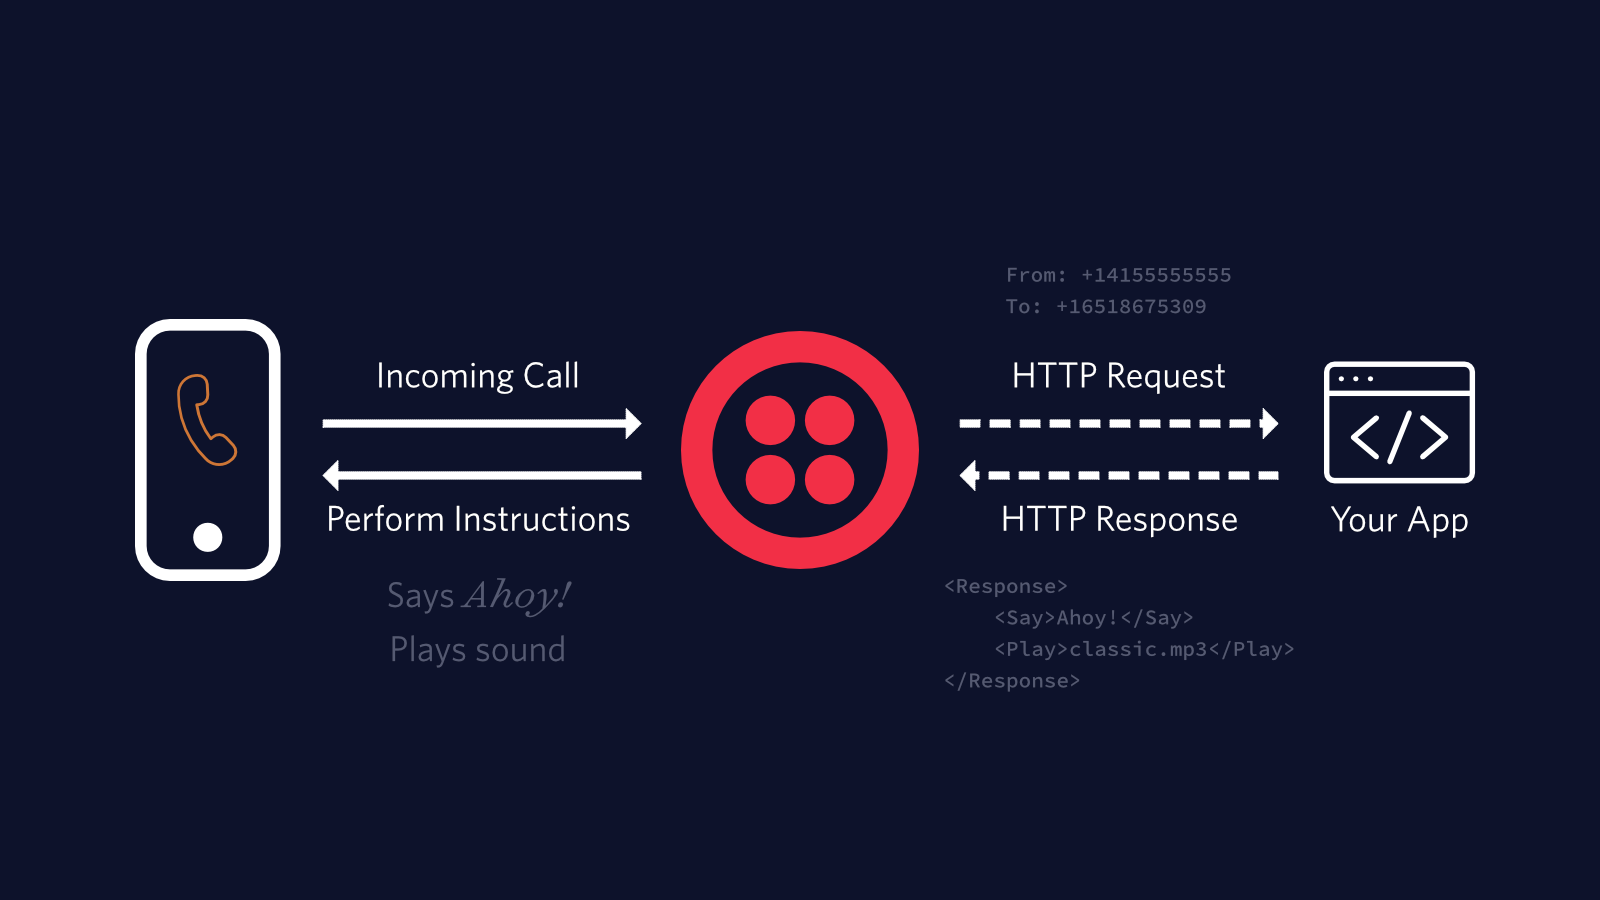
When someone dials your Twilio number, an HTTP request is sent to a URL that you provide. The web server handling that URL should respond with TwiML which will instruct Twilio what to do next. To program the behaviour of a Twilio number you will need to create a web server which can take requests from Twilio and respond with TwiML, a language based on XML that helps you define how Twilio should handle the call.
In this post I'll use Ruby with Ruby On Rails as the web framework, but you could use the same approach with any programming language, for example here is how to do it with Java.
Requirements
To create the same application you need to have
-
A Twilio phone number (we’ll go through this process together)
-
Ruby on Rails installed on your machine
Creating your new codebase
In an empty directory, initialize your project using the Rails CLI:
This creates a fresh Ruby On Rails project. Open the project with your favorite text editor and let's get cracking.
Dependencies and configuration
For this application we will use:
- the Twilio gem to interact with Twilio
- the Figaro gem to handle privacy
Open the Gemfile at the root of your project with your text editor and add the code below.
In your console install the gems and run the Figaro initializer
The figaro install command will create a new configuration file config/application.yml and append your .gitignore to tell git not to track this new file.
This is where you are going to put all your environment variables.
In this file add the following lines and replace each X with the corresponding values from your Twilio console. You must also add your own phone number - not your Twilio phone number - in the E.164 format.
Make sure you have run $ bundle exec figaro install otherwise your secrets might be compromised when pushing your code to git if you include the config file.
We can now create an initializer for our Twilio Client.
Under the folder config/initializers create a new file called twilio.rb.
This will create the Twilio client without having to hard code credentials or specify where they are.
Building up the app
One thing I love about programming is the way it forces you to break a problem apart into tiny pieces. So what are the pieces of this app? You need to instruct Twilio to:
- Answer incoming calls and redirect to your real cell phone number,
- If you answer it, nothing more needs to be done. However if the line is busy, or the call rings out, play a message and start recording,
- Once the recording is finished, send a notification that there is a new recording to listen to.
Each of these will be handled by a different endpoint on the web server, so let's create them now in our routes.
Open `config/routes.rb` and fill it with
As you can see there are three routes for our three actions and they all belong to a controller named twilio.
Let’s create it under our controllers folder as app/controllers/twilio_controller.rb
Here is a minimalist version of this controller with empty functions that we will fill right after.
Note here the skip_before_action :verify_authenticity_token. This line of code without other checks can lead to security issues in production. Here is a way to secure your application when going into prod.
Answering and redirecting incoming calls
In our TwilioController we will fill the initial_answer method first. This method returns the TwiML (Twilio Markup Language) for answering the call and redirecting to your cell phone:
There's a few things going on here, so let's step through it:
- We create a VoiceResponse that will send back TwilML to Twilio.
- We use the
DialTwiML verb to connect out to another number. - The
Dialverb takes a number of attributes:- the
numberto transfer the incoming call to, here our own we specified in the environment variableENV['my_phone_number']. - the
timeoutfor deciding when the call is unanswered. This timeout is configured as 10 seconds but feel free to change it (noting that Twilio adds a buffer of up to 5 seconds to account for the time taken to establish the call), - The
actionandmethodtell Twilio where to look for the next set of TwiML instructions after the call is established, rejected or timed out.
- the
- Finally we render this TwilML we created as xml using the helper
render
This is a good point to check that everything is working correctly in the project setup.
Start the server. You can do this with
in a terminal which will serve your application on localhost:3000.
Once it's started up, hit http://localhost:3000/initial-answer in your browser. It should respond with:
If you see that, you're good to go! If you see *almost* that but without your cell phone number then that means the my_phone_number environment variable hasn't been found so double-check that you are setting it correctly.
The voicemail message
Now let’s look at our handle_unanswered_call method. In TwilioController we will add the following lines to the method
Here we check from our request params from Twilio to see if we are in the case when we are busy or haven’t answered the call.
We do the check and if the condition matches we return the content of the voicemail_twiml function. But wait, where is this method ?
That’s right, we haven’t created it yet.
As this method doesn't need to be able to speak directly with the world wide web, we will define it as private.
Before the closing end of our TwilioController, add the method under private as follows:
This generates TwiML that pauses for a couple of seconds before playing a message and starting a recording. You could record your own message.mp3or use this one which is a classic. However you get it, put message.mp3 file in /public. Rails will automatically serve static files from that directory.
You could also use a Say verb if you don't want to record your own message - replace the line .play(url: '/message.mp3') with
The Record verb takes an action option that tells Twilio which endpoint to hit once the recording is complete. Here we are using /recordings
Handling completed recordings
The last endpoint is /recordings, called after someone has left you a message. Useful parameters passed by Twilio in here are:
RecordingUrl- you can download the recording from here inwavformat, or append.mp3to fetch it in that format.From- the caller's numberTo- the number they dialled, ie your Twilio number.
The Ruby code to handle this will take those parameters and send an SMS to your cell phone number with all the details:
Using your server to handle real phone calls
You need to do three things to get the web server connected and working:
- Make sure that Twilio can access the server,
- buy a phone number from Twilio,
- configure the phone number to call the
/initial-answerendpoint when there is an incoming call.
Serving our application to the world
For the first part, you need to make sure that your server can be reached over the internet: localhost isn't going to cut it here. There are a lot of choices for deploying Ruby apps publicly, but a simple way to get things going when testing is to use ngrok - a tool which creates a tunnel so that your localhost server has a public URL.
I use ngrok http 3000 to spin this up, but however you do it, you will need the full URL of the /initial-answer endpoint in the next step.
If you choose to do it using ngrok you should have a server running locally. If you haven’t done so yet, fire it up using
Now that your server is able to communicate with the world, from the Rails perspective we need to tell our application this is okay to handle requests coming from this url.
Since we are in development mode we will do it in the development configuration file but the process is the same for each environment, you just need to do it in the corresponding file.
For dev purposes we will just add before the closing end of config/environments/development
Note the dot before “ngrok.io”. As your ngrok subdomain will change each time, it tells Rails to allow ngrok.io and all it’s subdomains as hosts.
You can see the full code on my GitHub.
Getting a Twilio Phone Number
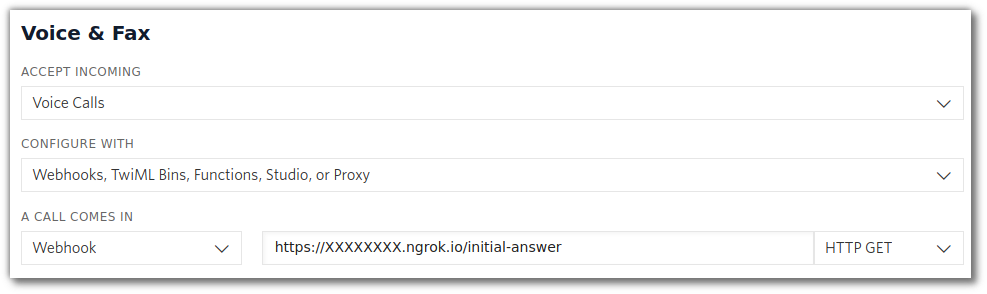
If you've already got a Twilio number that you want to use then great. If not then head over to the Twilio console to log in and pick yourself a new phone number. If you don't already have a Twilio account you can sign up for one here. Once you have the number, on the number's configuration page set the public URL of your web server as the webhook for "When a call comes in" - don't forget to set the method to HTTP GET in the console matching the initial_answer method in our TwilioController.
Make sure you don't forget to click "Save", and you're finished. Test it out by having someone call your Twilio number - you'll see a call come in from them on your cell phone, which you can answer, reject or ignore as you wish. If they leave a message you will get an SMS with a link to the recording which you should be able to listen to by clicking the link right from your messaging app.
Summing up
If you've followed along with this post, you now have a working voicemail for your Twilio number. You have also learned a bit about how Twilio uses webhooks to handle incoming calls, and how to build them out using Ruby and Rails. This is just one possibility for handling incoming calls with Twilio, if voicemail isn't quite what you want, how about...
- Generate cooking recipes with Twilio and OpenAI's GPT-3
- Build a one-time passcode protected conference line with Twilio Verify and Ruby
- Give Rails a rest and play with WhatsApp, Sinatra and Twilio to build a weather-bot
Whatever you're building with Twilio and Ruby, I'd love to hear about it. Get in touch by email or Twitter.
- 📧 vvenance@twilio.com
- 🐦@valeriane_IT
Related Posts
-
How to Make Your AI Voice Sound More Human and Less Robotic with PythonDylan Frankcom Amanda Lange
-
 How to Build An AI Phone Agent With Twilio Conversation Relay in PHPMatthew Setter
 -
Overcoming the Spam Epidemic: Twilio Branded Calling Enters Public Beta in the UK, Canada, and GermanyVinodhan Kaleeswaran
Related Resources
Twilio Docs
From APIs to SDKs to sample apps
API reference documentation, SDKs, helper libraries, quickstarts, and tutorials for your language and platform.
Resource Center
The latest ebooks, industry reports, and webinars
Learn from customer engagement experts to improve your own communication.
Ahoy
Twilio's developer community hub
Best practices, code samples, and inspiration to build communications and digital engagement experiences.