Building Voicemail with Twilio and Java
Time to read:
January 20, 2021
Written by
Reviewed by

One useful and common way to use Twilio is to create a phone number which forwards to your real phone. You can hand out the Twilio number to colleagues or customers and take business calls on your personal phone without worrying about handing out your real phone number. This also gives you a lot of options for how to handle these calls - you have the full power of Twilio at your disposal.
In this post I'll show you how to create a voicemail system that will jump in when your cell number is busy, or when you don't answer the call. It will play a message to your caller, then record their message and text you a link to the recording when it's done.
Primer: How Twilio Handles Calls
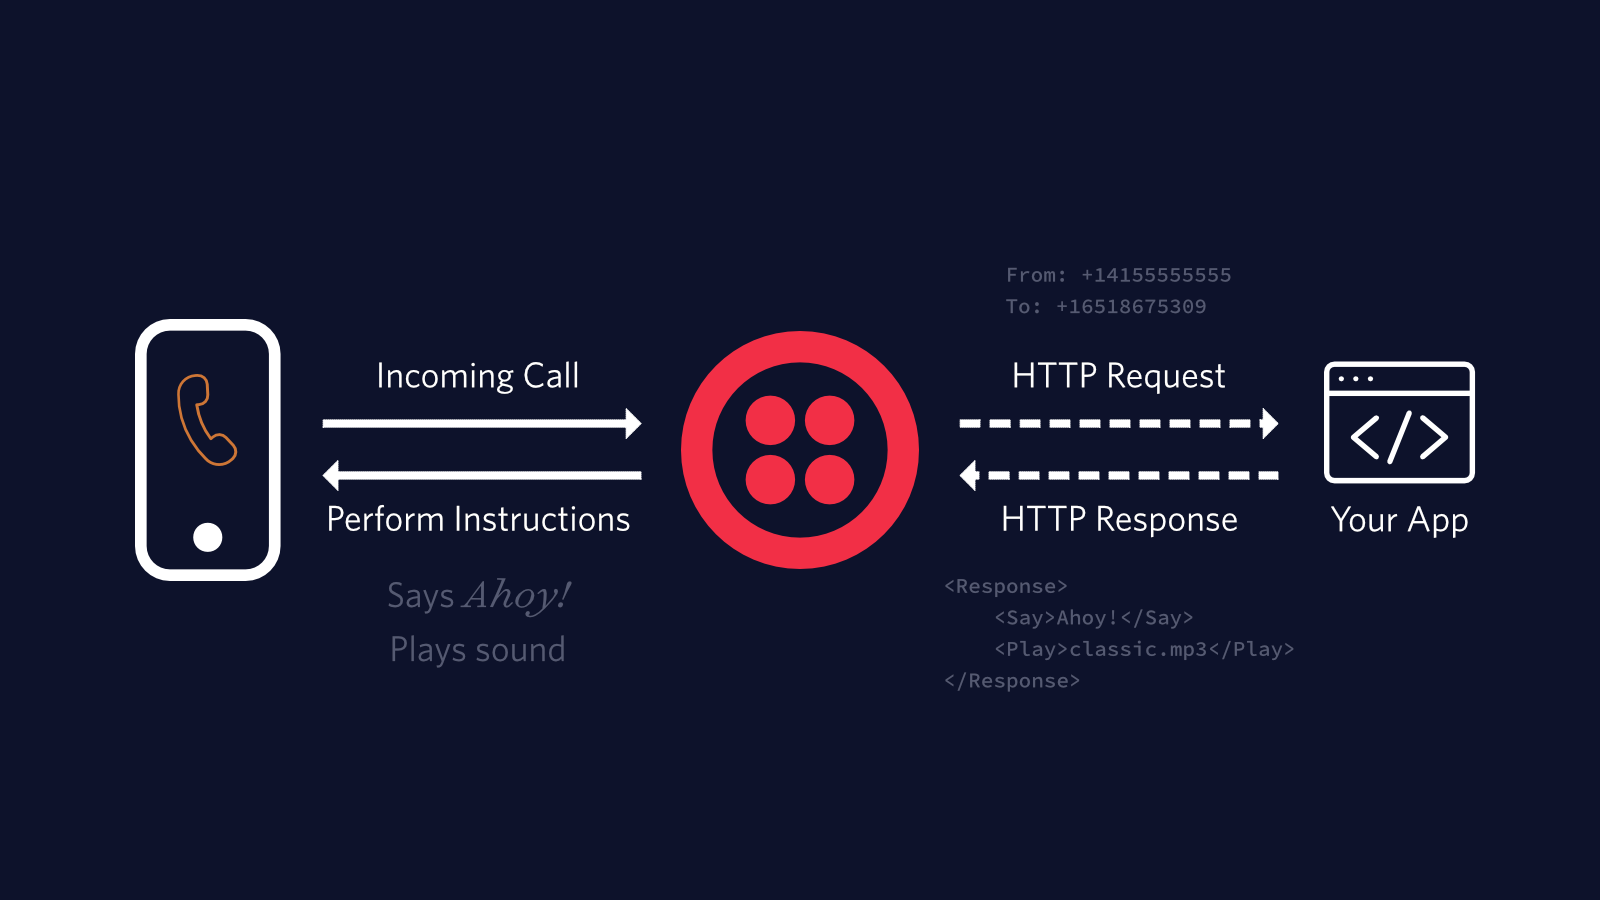
When someone dials your Twilio number, an HTTP request is sent to a URL that you provide. The web server handling that URL should respond with TwiML which will instruct Twilio what to do next. To program the behaviour of a Twilio number you will need to create a web server which can take requests from Twilio and respond with TwiML, a language based on XML that helps you define how Twilio should handle the call.
In this post I'll use Java with Spring as the web framework, but you could use the same approach with any programming language.
Project Setup
You will need:
Both of these can be installed using SDKMAN! which I highly recommend. Once you have installed SDKMAN! install Java and the Spring Boot CLI like this:
These commands will add some config to your shell environment, so it's a good idea to close the terminal and open a new one after running them.
You will also need a Java IDE. I like IntelliJ but Eclipse and VS Code are popular too.
Finally, you'll need a Twilio account.
Creating your new codebase
In an empty directory, initialize your project using the Spring CLI with:
This creates a fresh Spring Boot project, configured with the web dependency. Open it in your IDE and let's get cracking.
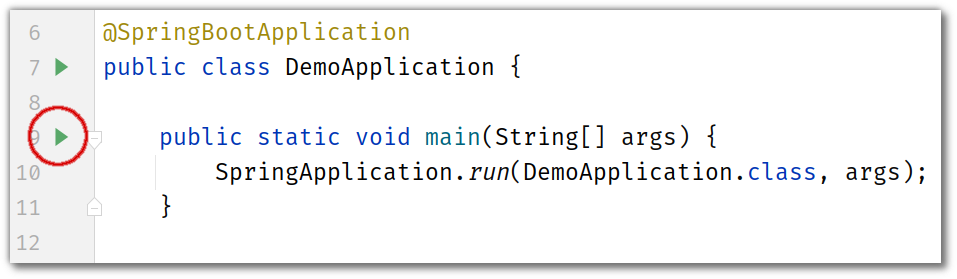
Find the class called DemoApplication in the com.example.twiliovoicemail package. You don't need to change anything in that class, but alongside it in the same package create a class called VoicemailHandler which will hold all your code.
In the project root there is a file called pom.xml which defines the build and all the dependencies for the project. You will need the Twilio Java Helper Library so add the following in the <dependencies> section:
As of right now, the latest version is 8.6.0 - you can (and should) always check for a newer version at mvnrepository.com.
Building up the app
One thing I love about programming is the way it forces you to break a problem apart into tiny pieces. So what are the pieces of this app? You need to instruct Twilio to:
- Answer incoming calls and redirect to your real cell phone number,
- If you answer it, nothing more needs to be done. However if the line is busy, or the call rings out, play a message and start recording,
- Once the recording is finished, send a notification that there is a new recording to listen to.
Each of these will be handled by a different endpoint on the web server, so you can build them in order. To mark the VoicemailHandler class as containing HTTP endpoints, use the @RestController annotation. The class should look like this:
It's necessary to give the annotation a value (I've used TwiML here) - we'll see why later.
Answering and redirecting incoming calls
Create a method called initialAnswer in your VoicemailHandler class which returns the TwiML for answering the call and redirecting to your cell phone:
[see this code on GitHub - necessary imports are at the top of the code]
There's a few things going on here, so let's step through it:
- lines 1-2 define some constants which will be used later in the code so it's helpful to have them defined outside of any method. Note that your real cell phone number is defined as an environment variable. More on those later.
- line 4 uses the
@GetMappingannotation to tell Spring to use this method for HTTP GET requests to the/initial-answerendpoint. You'll use that later when configuring the number in the Twilio console. It also sets the correct Content-Type. - lines 5-14 use the Twilio Helper Library to build up TwiML, which uses the
DialTwiML verb to connect out to another number. - the
Dialverb takes a number of attributes: - the
numberto transfer the incoming call to, - the
timeoutfor deciding when the call is unanswered. This timeout is configured as 10 seconds (on line 2) but feel free to change it (noting that Twilio adds a buffer of up to 5 seconds to account for the time taken to establish the call), - The
actionandmethodtell Twilio where to look for the next set of TwiML instructions after the call is established, rejected or timed out.
- the
The .toXml() method call at the end creates a String of TwiML. It is perfectly possible to write the XML by hand, but for this level of complexity I think it's worth using the library to make sure everything is correctly constructed.
This is a good point to check that everything is working correctly in the project setup. First thing to do is set the MY_CELLPHONE_NUMBER environment variable (How To Set Environment Variables) . Your IDE will have a way to set it. I use EnvFile for IntelliJ, or export MY_CELLPHONE_NUMBER=+44xxxxxxxx on the command line.
Start the server. You can do this with ./mvnw spring-boot:run in a terminal or by running the main method in DemoApplication through your IDE.
Once it's started up, hit http://localhost:8080/initial-answer in your browser. It should respond with:
If you see that, you're good to go! If you see *almost* that but without your cell phone number then that means the MY_CELLPHONE_NUMBER environment variable hasn't been found so double-check that you are setting it correctly.
The voicemail message
Add another annotated method for the /handle-unanswered-call endpoint, below initialAnswer:
[see this code on GitHub - necessary imports are at the top of the code]
One parameter passed in this request from Twilio is DialCallStatus. The voicemail code only needs to trigger on busy and no-answer statuses. This method does the check, and calls through to voicemailTwiml if necessary. Add the voicemailTwiml method below handleUnansweredCall:
[see this code on GitHub - necessary imports are at the top of the code]
This generates TwiML that pauses for a couple of seconds before playing a message and starting a recording. You could record your own message.mp3or use this one which is my best impression of Stephen Merchant as Wheatley in Portal 2. I recorded it using this website. However you get it, put message.mp3 file in src/main/resources/static. Spring will automatically serve static files from that directory as long as you have named all your @RestController beans, which is why we called ours TwiML above
You could also use a Say verb if you don't want to record your own message - replace the line 4 (starting with .play()) with this:
The Record verb takes an action option that tells Twilio which endpoint to call once the recording is complete.
Handling completed recordings
The last endpoint is /recordings, called after someone has left you a message. Useful parameters passed by Twilio in here are:
RecordingUrl- you can download the recording from here inwavformat, or append.mp3to fetch it in that format.From- the caller's numberTo- the number they dialled, ie your Twilio number.
The Java code to handle this will take those parameters and send an SMS to your cell phone number with all the details:
[see this code on GitHub - necessary imports are at the top of the code]
If you are using this code for voicemail on more than one Twilio number, you will want to include the twilioNumber in the message too.
There is one more thing to add to the code. To send the SMS, you need an authenticated Twilio client. This only needs to be done once for the whole app, so add a static block at the top of the class:
[see this code on GitHub - necessary imports are at the top of the code]
You need to set a couple more variables for this for TWILIO_ACCOUNT_SID and TWILIO_AUTH_TOKEN - you can find the values you need on your Twilio console. These should be set as environment variables like MY_CELLPHONE_NUMBER - make sure they never get committed into a public repo.
This is all the code you need - less than a hundred lines in a single class. Now move on to configuring it to handle real phone calls.
Using your server to handle real phone calls
You need to do three things to get the web server connected and working:
- Make sure that Twilio can access the server,
- buy a phone number from Twilio,
- configure the phone number to call the
/initial-answerendpoint when there is an incoming call.
For the first part, you need to make sure that your server can be reached over the internet: localhost isn't going to cut it here. There are a lot of choices for deploying Java apps publicly, but a simple way to get things going when testing is to use ngrok - a tool which creates a tunnel so that your localhost server has a public URL. I use ngrok http 8080 to spin this up, but however you do it, you will need the full URL of the /initial-answer endpoint in the next step.
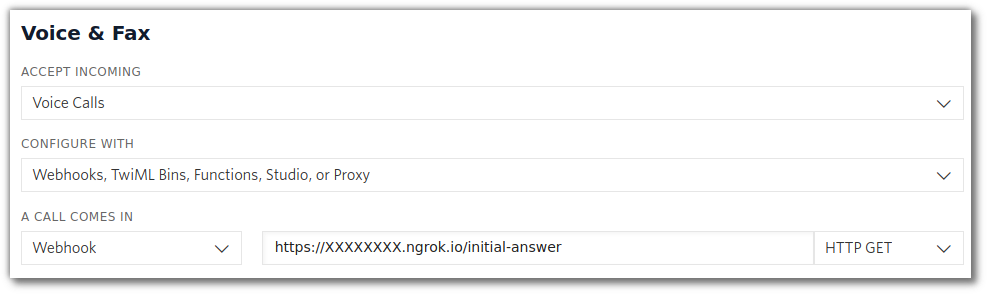
If you've already got a Twilio number that you want to use then great. If not then head over to the Twilio console to log in and pick yourself a new phone number. If you don't already have a Twilio account you can sign up for one here. Once you have the number, on the number's configuration page set the public URL of your web server as the webhook for "When a call comes in" - don't forget to set the method to HTTP GET in the console matching the @GetMapping annotation on initialAnswer().
Make sure you don't forget to click "Save", and you're finished. Test it out by having someone call your Twilio number - you'll see a call come in from them on your cell phone, which you can answer, reject or ignore as you wish. If they leave a message you will get an SMS with a link to the recording which you should be able to listen to by clicking the link right from your messaging app.
Summing up
If you've followed along with this post, you now have a working voicemail for your Twilio number. You have also learned a bit about how Twilio uses webhooks to handle incoming calls, and how to build them out using Java and Spring Boot. This is just one possibility for handling incoming calls with Twilio, if voicemail isn't quite what you want, how about...
- integrating your Google Calendar to automatically reject calls while you're in a meeting
- looking up the caller in a google sheet to decide how to handle the call
Whatever you're building with Twilio and Java, I'd love to hear about it. Get in touch by email, or Twitter, or leave me a voicemail:
- 📧 mgilliard@twilio.com
- 🐦@MaximumGilliard
- 📞 +44 7400 334725
Related Posts


Related Resources
Twilio Docs
From APIs to SDKs to sample apps
API reference documentation, SDKs, helper libraries, quickstarts, and tutorials for your language and platform.
Resource Center
The latest ebooks, industry reports, and webinars
Learn from customer engagement experts to improve your own communication.
Ahoy
Twilio's developer community hub
Best practices, code samples, and inspiration to build communications and digital engagement experiences.