Change the Background in your Video Calls with the Twilio Video Processors Library
Time to read: 5 minutes
July 05, 2021
Written by
Reviewed by

Background replacement and blurring is a great feature offered by the biggest players in the video conferencing space, especially appreciated by those who have been forced to improvise a working space in their homes as a result of lockdown and stay-at-home measures implemented to combat the spread of COVID-19.
This feature has now come to the Twilio Programmable Video product through the Twilio Video Processors JavaScript library. In this short tutorial, you are going to learn how to add video processing filters to a video stream captured by your web browser.
Prerequisites
At the time I’m writing this article, the Video Processors library only works in Chrome so you will need to use this browser. You can check the current list of supported browsers in the documentation for updates.
The example application you are going to build as part of this tutorial is a JavaScript front end application hosted in a Node.js Express web server. To run the web server, you need Node.js version 14 or newer installed on your computer.
Besides Chrome and Node.js, there are no additional requirements. The JavaScript libraries that you will use are all freely available and open source. A Twilio account is not necessary for this tutorial (but it is required to implement a complete video calling application).
Setting up a JavaScript project
To begin, you are going to create a base web application on which you will later add video features.
Open a terminal or command prompt window, find a suitable place and create a directory for this project:
The JavaScript dependencies needed for this project are the Express framework, an extension to serve static files, and the Twilio Video and Video Processors libraries. Install all these with npm as follows:
The client-side files for this project will be stored in a public directory. Create this directory now:
An Express web server to serve the front end can be written in just a handful of JavaScript lines. Put the following code in a server.js file inside your twilio-video-backgrounds directory:
This Express server is configured to run on port 3000. It will use three locations as source for static files: the public directory you just created and the two build directories for the installed twilio-video and video-processors packages.
The front end application will start from an index.html file in the public directory. This will be the entry point of the application, where all the JavaScript files are loaded. Copy the following code into this file:
This page loads the twilio-video and video-processors libraries. It then creates a placeholder <div> element where the video will be added, and finally imports the index.js file, which is where you will write the application code next.
You can start the web server with the following command:
With the server running, open http://localhost:3000 in your web browser to confirm that you have a working application. At this early stage you will only see the <h1> heading displayed on the page.
You can leave the server running while you work on the remaining steps of this tutorial. Whenever you update your JavaScript or HTML code, you can just hit refresh on your browser to load the updated application.
Displaying your webcam video
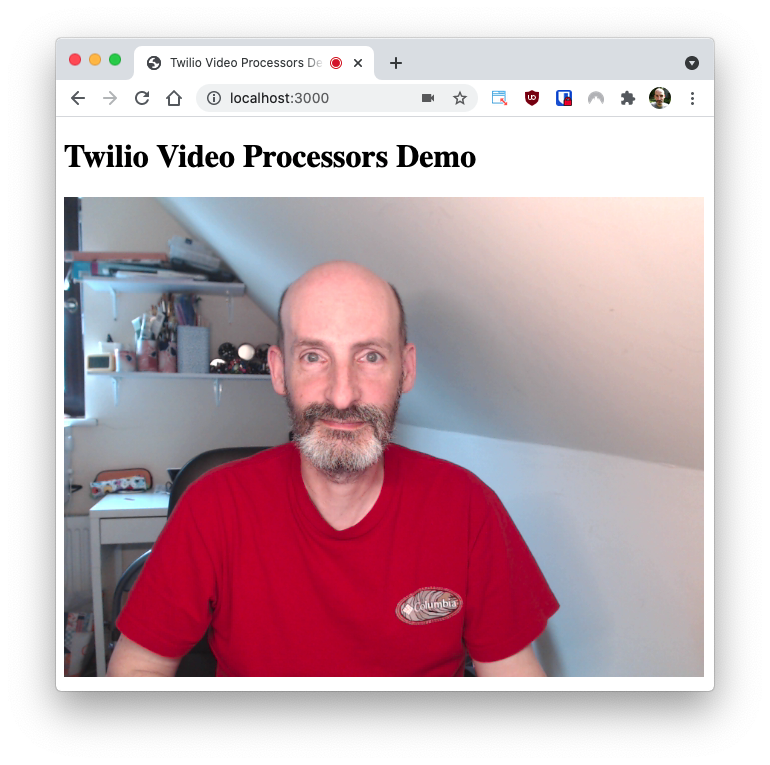
You are now ready to add video! To begin, you are going to display the unfiltered video from your webcam on the page. The Twilio Video JavaScript SDK makes this incredibly easy.
Remember the index.js file that was referenced in the html file? This file does not exist yet. It goes in the public directory, alongside index.html. Go ahead and create this file in your text editor or IDE and enter the following code in it:
The showLocalVideo() function uses the createLocalVideoTrack() from the twilio-video library to instruct the browser to create a video track with the given dimensions and frame rate. The second line in the function adds the HTML representation of this track (obtained by calling the attach() method) to the placeholder video element included in the index.html page.
Go back to your browser and refresh the page. You will be prompted to give permission to use your webcam, and a moment later you will have your own video displayed on the page.
Adding a background effect
Now that you have the video playing, you are ready to add a background replacement filter. The Twilio Video Processors library gives you two options: blurring the background, or replacing it with a picture of your choice. Let’s look at both options in order.
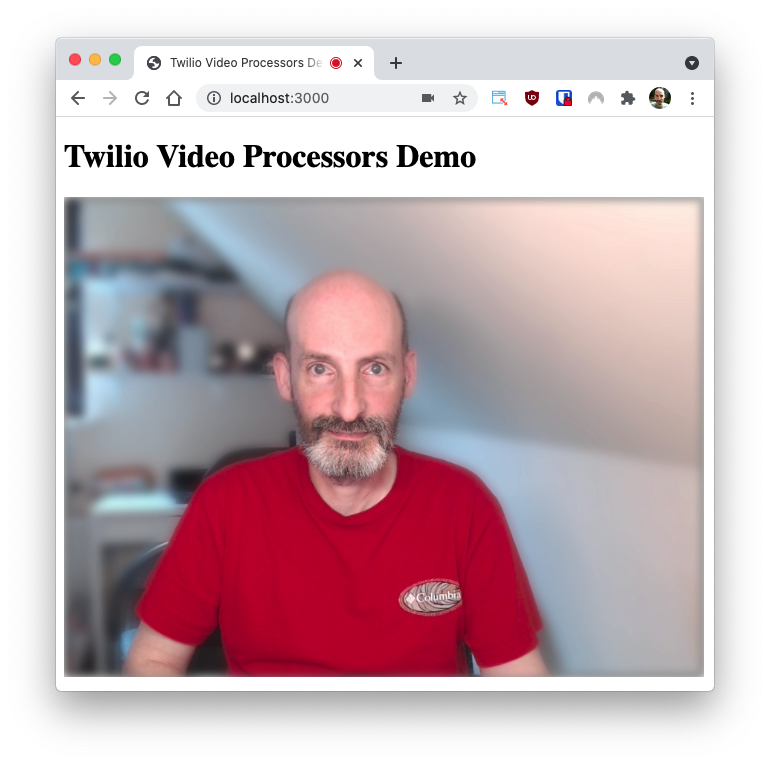
Blurring the background
To blur the background, the GaussianBlurBackgroundProcessor class from the Twilio Video Processors library needs to be attached to the video track. Below you can see an updated version of index.js with the added lines highlighted:
The GaussianBlurBackgroundProcessor class constructor needs three arguments:
assetsPath: the URL or relative path from where additional resources from the Twilio Video Processors library can be downloaded. In this project, the build directory from this library is added as a static directory without a path, so/is used.maskBlurRadius: the blur radius to use when smoothing out the edges of the mask that separates the foreground from the background. You have to play with different values to find what works best. I’ve found10to be a good starting point.blurFilterRadius: the amount of gaussian blur to apply to the background. The higher the number the more blurred the background will be. In my experimentation I’ve found that only a small amount of blur is what looks best for me, but you can experiment with larger values to see what the effect looks like.
The process that separates the subject from the background uses an image segmentation model that needs to be loaded. The loadModel() method is called to do that.
Once the model is loaded, the processor is added to the video track with the addProcessor() method, and this is going to apply the effect to every captured frame before it is delivered to the page.
Refresh your page to see how the background blurring filter works.
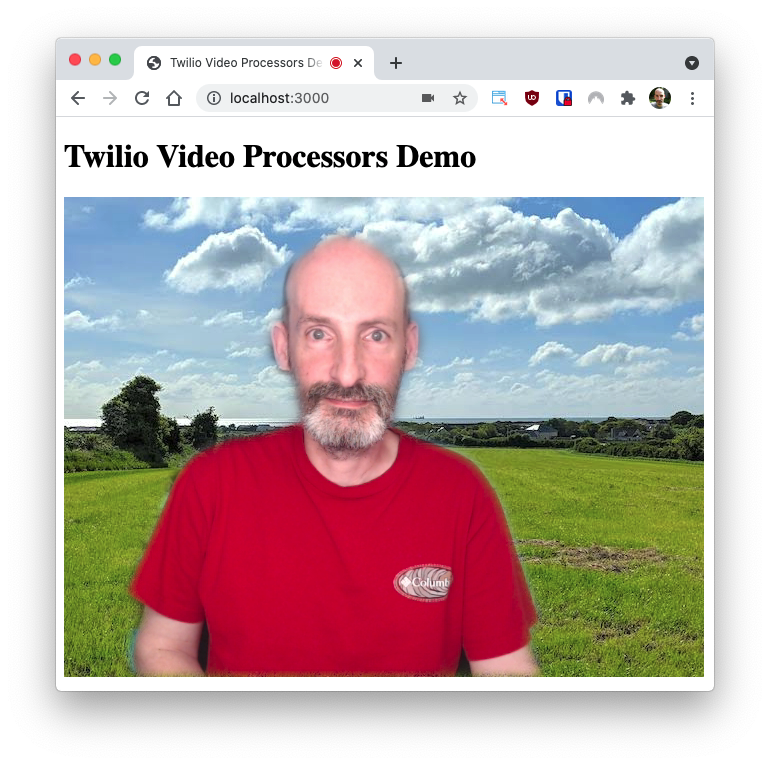
Replacing the background
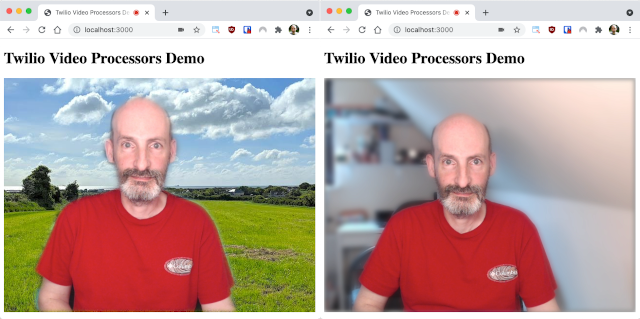
For the next effect, you are going to need a background image. If you don’t have one at hand, you can use this one of an Irish field close to where I live. Name the image background.jpg and put it in the public directory.
Background replacement is implemented by the VirtualBackgroundProcessor class. The next version of index.js has the code required to replace the background highlighted:
Replacing the background takes a little extra work compared to blurring because before the effect can be added to the video track the background image needs to be loaded. In this example the background.jpg image is loaded into a new Image object, and the logic that adds the video processor is attached to its onload event, so that it is done once the image is loaded and available to use.
The arguments that can be passed to the VirtualBackgroundProcessor class are:
assetsPath: same as for blurring, this is the location from where additional resources needed to perform the image analysis can be downloaded.backgroundImage: the image that will be displayed in the background.maskBlurRadius: same as for blurring, the amount of blur applied to the computed mask. The value depends a lot on your personal taste. I’ve reduced it to 5 for this effect.
The result is actually quite good, as you can see below.
Virtual backgrounds in your Programmable Video application
You may be wondering how to incorporate the background effects you’ve just learned into a video calling application built with Twilio Programmable Video. The important thing to check is that your video application is using a twilio-video.js version 2.15.1 or newer, as this is the release in which this feature became generally available.
The great news is that once you add a background processor to a local video track as shown above, this track is configured to push the processed version of the video stream to other participants in the video call, so they’ll see exactly what you see. There is nothing else to do!
For your reference, the complete code for this project is available on this GitHub repository.
I’d love to see what you build!
Miguel Grinberg is a Principal Software Engineer for Technical Content at Twilio. Reach out to him at mgrinberg [at] twilio [dot] com if you have a cool project you’d like to share on this blog!

Related Resources
Twilio Docs
From APIs to SDKs to sample apps
API reference documentation, SDKs, helper libraries, quickstarts, and tutorials for your language and platform.
Resource Center
The latest ebooks, industry reports, and webinars
Learn from customer engagement experts to improve your own communication.
Ahoy
Twilio's developer community hub
Best practices, code samples, and inspiration to build communications and digital engagement experiences.