Create a Smart Voicemail with Twilio, JavaScript and Google Calendar
Time to read: 4 minutes
July 03, 2019
Written by

We’ve all been there, in an important meeting, you’ve forgotten to mute your phone and all eyes turn to you as you frantically search through your pockets to silence it. That feeling of embarrassment is only matched by the frustration of listening to your voicemail. I dread hearing the robotic voice telling me what numbers to press only to be presented with the sound of somebody hanging up the call.
To take the hassle out of handling missed calls, today we are going to look at how to create a virtual office manager that is aware of your busy schedule, to handle calls and voice messages for you.
What We Need
- A Twilio Account (Get one here for Free)
- A Twilio Phone Number
- A Google Calendar
- Google Calendar API Key
Before We Begin
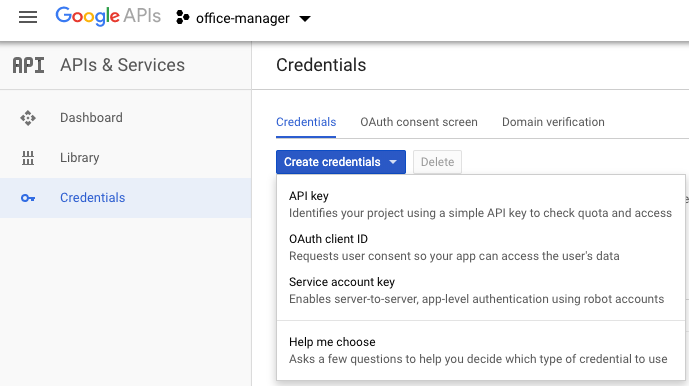
To start off, we need to create a Google Project and enable the Google Calendar API. From the project dashboard, select the credentials tab, click create credentials and select the API Key Option. Hold on to this API Key, we’ll need it later.
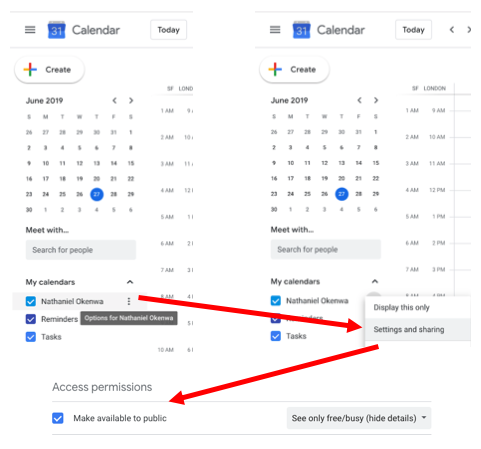
We also need to head over to our Google Calendar and make sure that our calendar’s Free/Busy states are public. Don’t worry this doesn’t share any event details, it just allows us to check if we are busy or free during a specific timeframe. Click on the calendar you want to use, select Options and chose the ‘Settings and sharing’ option. Under ‘Access Permissions’, make your calendar ‘available to public’.
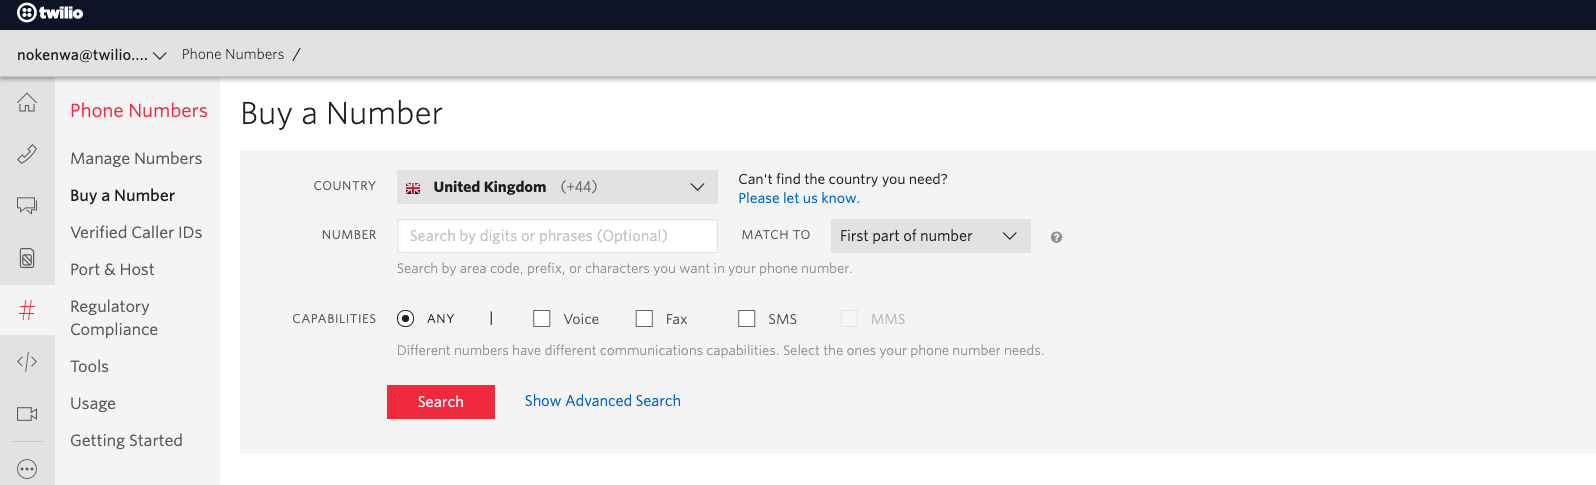
Lastly, we need a Twilio phone number. Head over to the Twilio console and buy a new phone number.
Setting Up Our Function
In this project, we will be using Twilio Functions. It allows us to host JavaScript code directly on Twilio and is one of the easiest ways to have our code respond to an incoming phone call.
Head on over to the Twilio Functions page and create a new function. There are a few templates we could use, but let’s start with a blank function. Let’s give our function a name and set its path to /call

Make sure to press Save to secure your changes. We are going to use a couple of extra npm modules in our code. To add these to our environment, head to the Configure section on the left-hand side and add googleapis and moment to our dependencies. For the versions enter ^40 for googleapis and ^2.24 for moment.
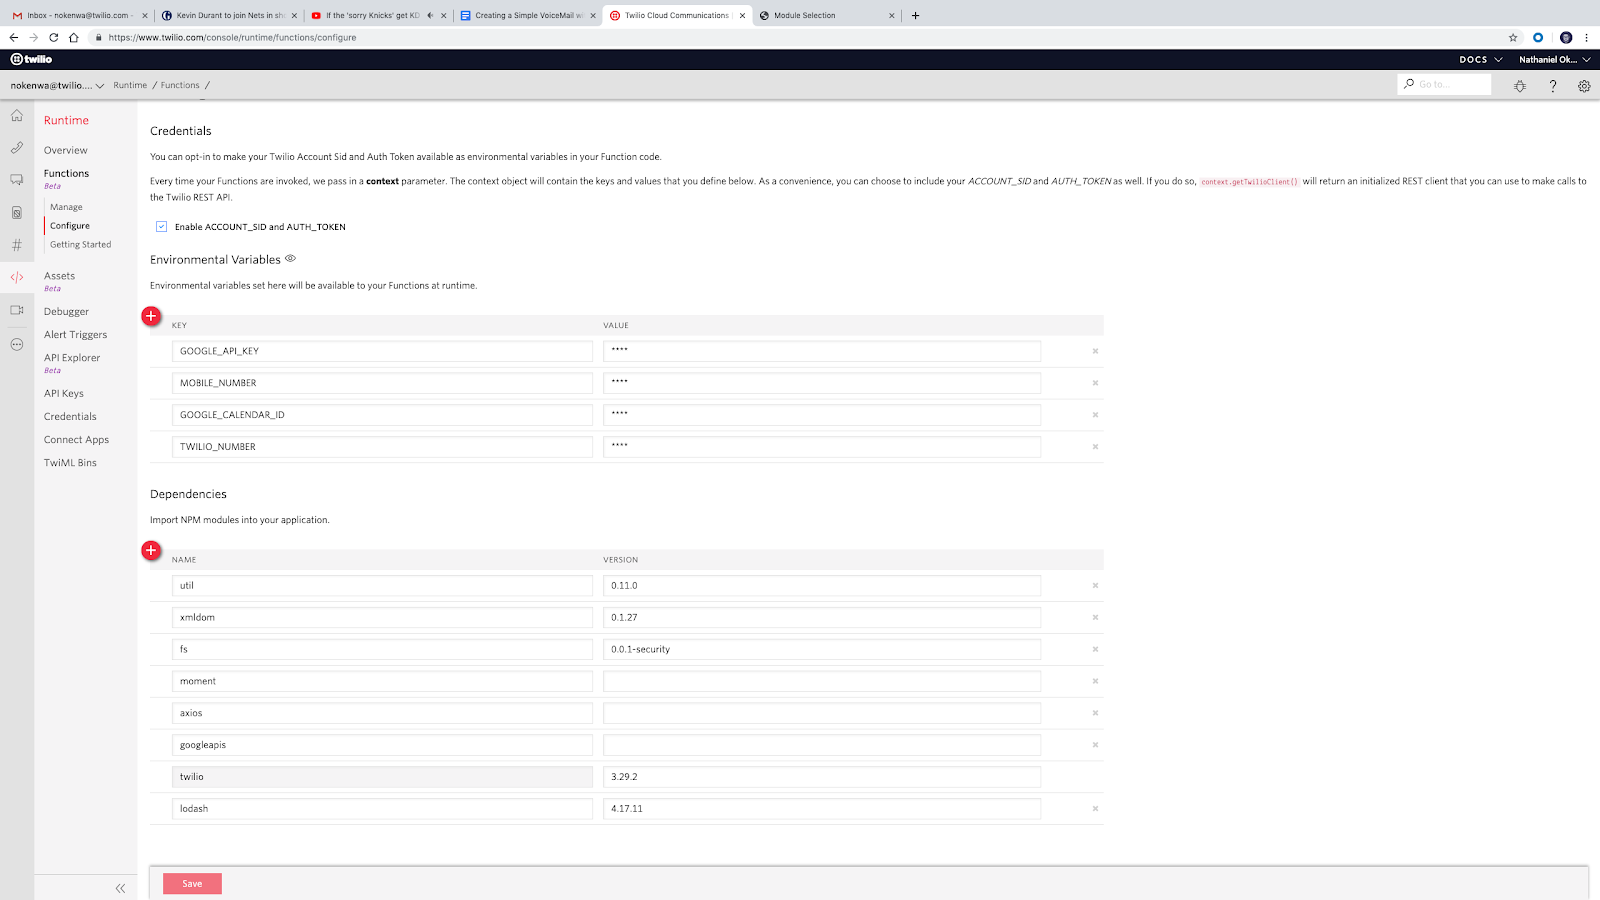
We can also add any environment variables we might need here. Add a new Variable GOOGLE_API_KEY with the value of your Google API key. Also add your MOBILE_NUMBER, GOOGLE_CALENDAR_ID (usually username@domain.com), and add your TWILIO_NUMBER. This way we can call them directly from within our functions using context.
Don’t forget to Enable ACCOUNT_SID and AUTH_TOKEN, to authenticate the Twilio client from within your Function. Afterwards press Save to apply your changes.
Forwarding Calls
The first thing we want to do is forward calls from our new Twilio number to our personal phone. Head back to the blank Function we created earlier and replace the code with the following:
This will create a TwiML voice response that will dial our mobile number and connect the call. Press Save to deploy your changes and head back to your Twilio phone number and set our number to trigger our new function when a call comes in.

To try it out, ask a friend to call your Twilio phone number and say Hi. Alternatively get a second Twilio number and use the API Explorer's "Make a Call" functionality to call to your forwarding number.
Google Calendar FreeBusy Queries
Now that we know our phone number is set up, we have to send a ‘FreeBusy Query’ to the Google Calendar API to check whether we are free or busy at the moment.
We’ll be using moment.js to handle dates and time, and the Google Calendar API to check our availability. Replace your current Function code with:
Next, let’s send our FreeBusy query to the Google Calendar API. Using the moment notation, we can check between ‘now’ and ten minutes from ‘now’. We’ll also pass our Google Calendar ID that we saved in our environment variables. The API takes an array so if we have more than one calendar, we can just pass in all of our calendar ids. For this add the following lines to your code:
We can check if there are any events happening and then either say that we’re unavailable or forward the call to our phone number. The Google API call will return a Promise and we can use the .then() syntax to handle the results. If you’ve never used promises before my colleague Dominik has made a post explaining how they work.
Once we know if we are currently busy or not, we can then use TwiML to either say something in a robot voice using twiml.say or forward the call using twiml.dial to our current number. Make the following changes accordingly:
Don't forget to save your changes. Create a test event on your Google calendar and try calling your Twilio number. You should now get a response telling you that you’re unavailable.
Recording VoiceMails
If I’m unavailable, I want callers to have the option to send me a voicemail. Twilio makes this really easy with the record verb.
Let’s change our twiml.say and add recording functionality.
The ‘recordingStatusCallback’ specifies a URL to send a request to when the recording emits a specified status event. Let’s set it to call the ‘/voicemail’ path when the recording is ‘completed’.
Retrieving Voicemails
Create a new Function to handle our recording with the path /voicemail.

When a voicemail is recorded, we want to use the Twilio Client to send a message to our personal number with a link to the voicemail audio with information about who the voicemail came from.
Add the following code to the Voicemail function.
Here we used the Twilio Client to also get information about the missed call using the CallSid passed in the event, and then sent a message informing us about our new Voicemail and a link to the Voicemail audio.
Wrapping Up
We’ve created a simple voicemail using Twilio Functions, and Freebusy Queries to the Google Calendar API.
Now it’s your turn, try adding more functionality to your new twilio number. If you're looking for inspiration you could forward any SMS messages or faxes to your email inbox, or create an assistant to schedule phone calls to ring people back. I can’t wait to see what you build!
- Twitter: @ChatterboxCoder
- Instagram: @ChatterboxCoder
- Email: nokenwa@twilio.com


Related Resources
Twilio Docs
From APIs to SDKs to sample apps
API reference documentation, SDKs, helper libraries, quickstarts, and tutorials for your language and platform.
Resource Center
The latest ebooks, industry reports, and webinars
Learn from customer engagement experts to improve your own communication.
Ahoy
Twilio's developer community hub
Best practices, code samples, and inspiration to build communications and digital engagement experiences.