Save the Earth – Complete Eco Friendly Tasks with Friends Using a Twilio SMS and Spring Boot App
Time to read:
May 25, 2023
Written by
Reviewed by

The world is facing a major crisis when it comes to the environment. Climate change is real, and it is happening right now. It is a problem that affects us all, and it is our responsibility to take action to protect our planet for future generations. An "Eco-Challenge" app can be a great way to inspire people to make small but impactful changes in their daily lives to reduce their carbon footprint, protect wildlife, and keep our oceans clean.
In this article, we will discuss how to build an "Eco-Challenge" app using Java Spring Boot that allows users to create a series of tasks to complete over the course of Earth Day. The app will use the Twilio Programmable SMS API to send text messages reminding users to complete their eco-challenges or to share updates on their progress with other users, friends and family.
Prerequisites
To make the most of this tutorial, readers are expected to:
- Have a sound knowledge of Java and Spring Boot.
- Have a standard IDE like IntelliJ IDEA.
- Have a working knowledge of SDKs and integrations.
- Have Postman installed and understand how it works.
Set up the environment
Before diving into the development of the app, you need to make sure that your environment is set up correctly.
The first step in building our "Eco-Challenge" app is to create a new Spring Boot project. Use the Spring Initializr to set up a new project in Spring Boot. Choose "Java" as the language under Project, followed by "Maven." Choose the most recent and stable version of Spring Boot, which is 3.0.5 at the time this article is written.
For the Project Metadata, rename the application Artifact to a name such as "ecotaskapp". This name is the display title that also serves at the project's entrance point. If it may help you organize better, feel free to include a project description.
Choose "Jar" as the Packaging type since the application will function with Java 17 and the integrated Tomcat server that Spring Boot provides.
Click on the Generate button at the bottom of the page and the browser will download a .zip file containing the boilerplate code for the project. Extract the .zip file and open the project in your IDE. For dependencies, ensure that the following dependencies are present in your pom.xml file. You can copy and paste them into the file.
- Spring Web: Spring Web is a part of the Spring Framework that provides support for building web applications. It provides a set of tools and libraries that make it convenient to build web applications by providing features such as handling HTTP requests and responses, working with templates, and managing sessions.
- Spring JPA: Spring JPA is a part of the Spring Framework that provides support for working with the Java Persistence API (JPA). JPA is a standard API for working with relational databases in Java, and Spring JPA provides a set of tools and libraries that make it convenient to work with JPA.
- Lombok: Lombok is a Java library that provides annotations to help reduce boilerplate code. It provides annotations that generate code at compile time, such as getters and setters, constructors, and equals and hashCode methods. This can help to make code more concise and easier to read, as well as reducing the potential for errors in manually-written boilerplate code.
For database, this project will use the redis dependency for its database function. Redis is widely known for its caching capability, but seeing that it serves the purpose of a database, it fits perfectly to make use of it. Essentially, if the app needs caching, you could continue working with what you have. Follow this tutorial to set up redis according to your operating system.
Follow the first instruction if your OS is a Debian or an Ubuntu-based Linux OS. Otherwise, follow the RPM Feed instructions to install the redis server. Conversely, if you use Windows or Mac, you can follow instructions for your operating system, on the left pane of that link. Add the following dependencies to the pom.xml file to enable redis.
Save the file.
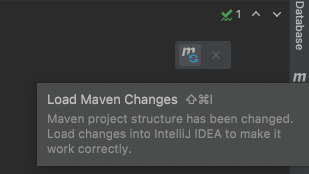
Look at the top-right corner of IntelliJ IDEA and find the little icon with an "M" shape. Click it to load Maven changes.
Create Models and Configurations
In your project, create the model, repository, service and web packages under the com.example.ecotaskapp subfolder.
- Model - This is where the models or entities will be placed.
- Repository - To store the connection to the database.
- Service - To store the logic for the eco-challenge app.
- Web - To build out the web controller for the app.
- Config - All configurations for classes and dependencies will be placed here.
Configure the Redis Database
Create a file named RedisConfiguration.java under the config subdirectory. Copy and paste the following code into this file:
The @Configuration annotation tells Spring that this class contains bean definitions that should be used to configure the application context.
The @EnableRedisRepositories annotation is used to enable Spring Data Redis repositories in the application context.
The JedisConnectionFactory bean defines the connection to the Redis database. It creates a RedisStandaloneConfiguration object that contains the host and port of the Redis server. This object is then used to create the JedisConnectionFactory object.
The RedisTemplate bean is used to interact with Redis. It sets the connection factory created earlier and configures the serializers used to convert Java objects to and from Redis values. The setKeySerializer() and setHashKeySerializer() methods set the serializer used for keys and hash keys respectively. The setValueSerializer() method sets the serializer used for values. In this case, the JdkSerializationRedisSerializer is used which is a standard Java serialization mechanism.
The setEnableTransactionSupport() method is used to enable transaction support for Redis. If a Redis transaction is used in the application, the RedisTemplate will execute all Redis commands inside a transaction. Then, the afterPropertiesSet() method initializes the RedisTemplate object.
Overall, this configuration file sets up the necessary beans for connecting to Redis and interacting with Redis in a Spring Boot application.
Create the User model
Create a file named User.java under the model subdirectory. Copy and paste the following code to the newly-created file:
The class has four instance variables:
idis a unique identifier for the user and is annotated with @Id to indicate that it is the primary key of the corresponding database table. It is also annotated with @GeneratedValue to indicate that the value of this field will be automatically generated by the database, based on the specified strategy (in this case, "GenerationType.IDENTITY").firstNameandlastNameare strings that represent the user's first and last name, respectively.phoneNumberis a string that represents the user's phone number.followersis a List of strings that represents the usernames of other users who are following this user.
Build the EcoTask model
Just as you did with the user model, create a file named EcoTask.java under the model subdirectory. Copy and paste the following code to the newly created file:
The class has four instance variables:
idis a unique identifier for theEcoTaskclass and is annotated with @Id to indicate that it is the primary key of the corresponding database table. It is also annotated with @GeneratedValue to indicate that the value of this field will be automatically generated by the database, based on the specified strategy (in this case,GenerationType.IDENTITY).taskNameis a string that represents the name of theEcoTaskobject.completedis a boolean value that indicates whether or not theEcoTaskobject has been completed.phoneNumber: is a string that represents the identity of the user, whose task is being created and saved.
Create the task request model
Navigate to the model directory and create a file called EcoTaskRequest.java. With this class, the controller receives inputs from the client of our application - web or mobile interface. Paste the code below into this file:
The taskName here is similar to that in EcoTask.java and is a string that represents the name of the EcoTask object. The userPhoneNumber represents the phone number (or means of identification) of the user who is creating the task.
Create the FollowUserRequest model
In the model directory, create a file named FollowUserRequest.java and paste the code snippet below in this file. The purpose of this class is to receive requests for adding a follower to a user or following a user.
Repository interfaces
Create two new files under the repository subdirectory: UserRepository.java and EcoTaskRepository.java. Paste the following code snippets below in each of their respective files:
By extending JpaRepository, the UserRepository and EcoTaskRepository classes inherit all of its CRUD methods such as save(), findAll(), findById(), delete(), etc. In addition to these methods, these repositories can also define custom methods to retrieve data from the database.
Create Services
In this section, you implement the actual business logic for the user to interact with the app.
Build the UserService Class
This class is responsible for the logic of our application. Inside the service sub directory, create a file called UserService.java and paste the code snippet below in it.
The UserService class has three private instances: userRepository, ecoTaskRepository, and twilioService. These objects are annotated with @Autowired, which means that Spring will automatically inject the appropriate implementations of these interfaces into the class.
The addUser() method adds a new user to the database by calling the userRepository.save() method. The getUser() method retrieves a user from the database by calling the userRepository.findById() method.
The addEcoTask() method adds a new eco task to the database and associates it with the specified user. It first retrieves the user from the database using the userRepository.findById() method and then sets the user for the eco task using the ecoTask.setUser() method. Finally, it saves the eco task to the database using the ecoTaskRepository.save() method.
The completeEcoTask() method sets the specified eco task as completed by setting the completed attribute to true. It then saves the updated eco task to the database using the ecoTaskRepository.save() method.
The sendTaskUpdates() method sends a task update message to all followers of the user who created the specified task. It retrieves the eco task from the database using the ecoTaskRepository.findById() method, and then retrieves the user who created the task using the ecoTask.getUser() method. It then retrieves the list of followers for the user using the user.getFollowers() method and sends a message to each follower using the twilioService.sendMessage() method.
By annotating the UserService class with @Service, you are telling Spring that this class is a service component and should be managed by the Spring container. This allows you to inject dependencies into the class using the @Autowired annotation and use the service in your controller or other components in your application.
Integrate the Twilio API
The TwilioService class is responsible for implementing the logic for interacting with the Twilio Programmable SMS API. Always abstract your Twilio credentials from being explicitly displayed in this file or any other file. There are a number of ways to achieve this. However, one popular approach is to declare your environmental variables in the application.properties (or application.yml) file.
Open the resources folder and navigate to the application.properties file and paste the following code snippet into it:
This configuration is domiciled in the same file housing your database variables and so on. Inside the service subdirectory, create a file named TwilioService.java and paste the code snippet below into it.
This is an implementation of the TwilioService class that sends SMS messages using the Twilio API. The class has three private instance variables: accountSid, authToken, and fromNumber. These variables are used to store the Twilio ACCOUNT SID, authentication token, and the phone number that will be used as the sender for the SMS messages.
The sendMessage() method takes two parameters: toNumber, which is the phone number of the recipient, and messageBody, which is the text message that will be sent to the recipient.
The Twilio.init() method initializes the Twilio API client with the ACCOUNT SID and authentication token. The Message.creator() method creates a new SMS message and specifies the recipient phone number, sender phone number, and message body. The create() method sends the message and returns a Message object that contains the message details, such as the message SID.
To use this TwilioService class, you need to replace the placeholder values for accountSid, authToken, and fromNumber with your Twilio account SID, authentication token, and phone number found on the Twilio console. Then, you can then create an instance of this class in your application and call the sendMessage() method to send SMS messages using the Twilio API.
Write the controllers
All controllers would be placed within the web subpackage. Inside this directory, create a file named EcoChallengeController.java and paste the code below. In this article, you have put controllers for the User and EcoTask models in the same file. It is advisable that you split these up into separate files as your requirement or project demands.
The @PostMapping("/user") annotation specifies that this endpoint will handle HTTP POST requests with the URL path "/user". The @RequestBody annotation is used to indicate that the request body should be parsed as a User object. The createUser() method calls the addUser() method from the userService object and returns a ResponseEntity object that wraps the newly created User object and an HttpStatus of CREATED.
The @PostMapping("/task") annotation specifies that this endpoint will handle HTTP POST requests with the URL path "/task". The method takes two parameters, task and userId, which are parsed from the request body as a EcoTask object and a Long integer respectively. The createTask() method calls the addEcoTask() method from the userService object with the task and userId parameters, and returns a ResponseEntity object that wraps the newly created EcoTask object and a HttpStatus of CREATED.
The @PutMapping("/{id}") annotation specifies that this endpoint will handle HTTP PUT requests with the URL path "/{id}" where {id} is a placeholder for the id variable. The @PathVariable("id") annotation is used to indicate that the id variable should be parsed from the URL path. The completeEcoTask() method calls the completeEcoTask() method from the userService object with the taskId parameter and returns the completed EcoTask object.
The @PostMapping("/{taskId}/send-updates") annotation specifies that this endpoint will handle HTTP POST requests with the URL path "/{taskId}/send-updates" where {taskId} is a placeholder for the taskId variable. The @PathVariable annotation is used to indicate that the taskId variable should be parsed from the URL path. The sendTaskUpdates() method calls the sendTaskUpdates() method from the userService object with the taskId parameter and returns a ResponseEntity object with a string message and an HttpStatus of OK.
These endpoints can be used to create, update, and retrieve user data and eco tasks from a front-end application or any other client that can make HTTP requests.
Run the application
Now, the app will be tested to see that it works as expected. On the top-right corner of your IDE, click the play button to run the project. You should see a message on your IDE’s terminal reading “Started application…”.
Open Postman to try out the endpoints created in the controller class. Postman is a platform for testing APIs. In this section, you will create a dummy user, a dummy task, and update the task to completed status. As practice, you can try to send notifications to the user on this achievement. You will see that the app works!
Create a user
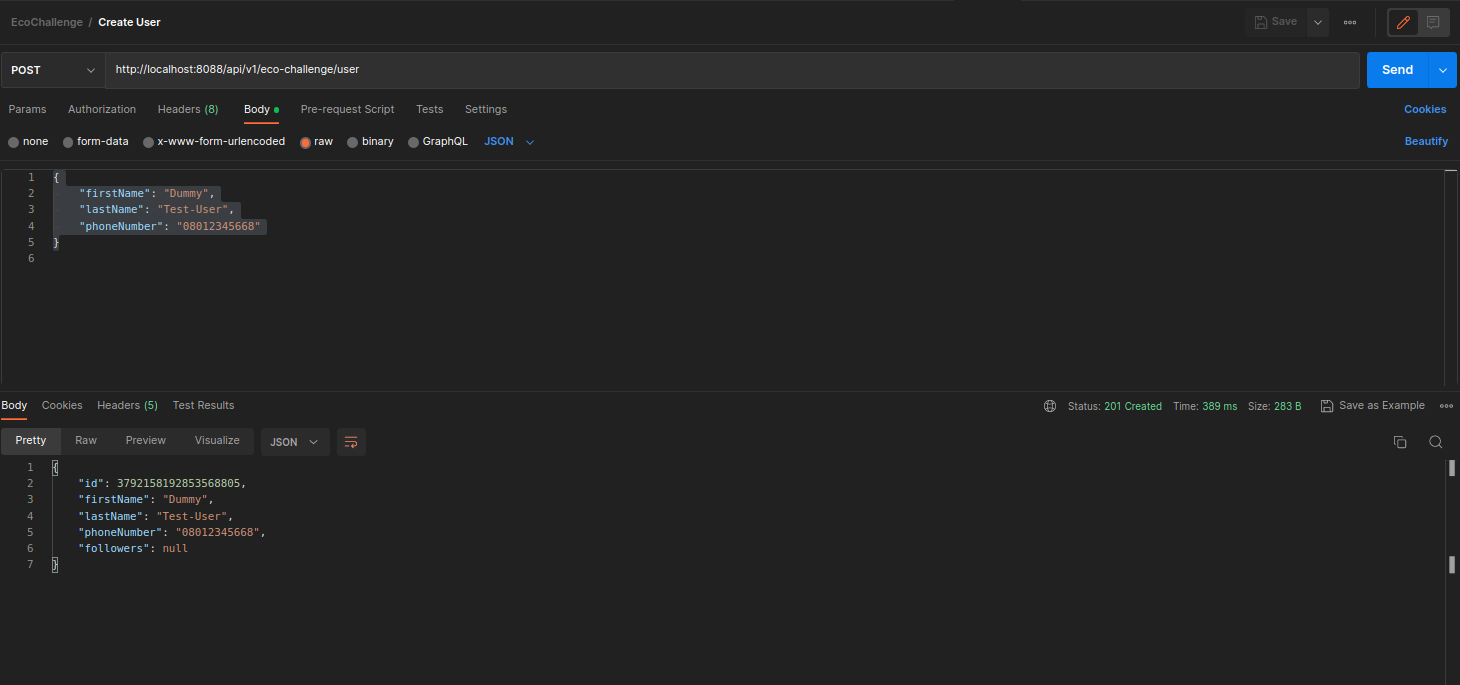
Open your Postman application, navigate to the URL box, and paste the URL “http://localhost:8088/api/v1/eco-challenge/user”. Click on the Body tab. Underneath it, select raw and the extreme right of the same list of options, click the dropdown and select JSON. In the text area, paste the following snippet:
And click the send button. A dummy user would be successfully created.
Create a task
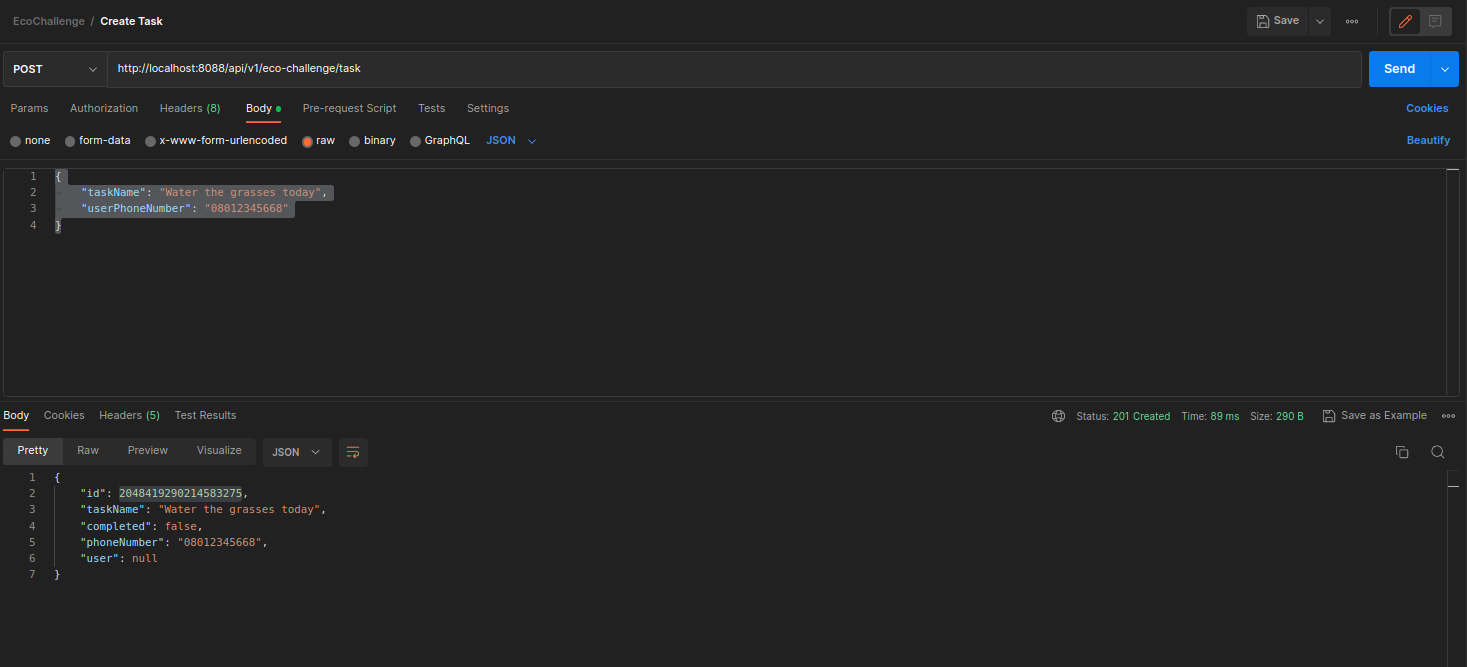
On Postman, make a POST request to the URL "http://localhost:8088/api/v1/eco-challenge/task" to create a sample task. The EcoTaskRequest is shown below:
Supply a name for the task and the phone number of the user, who is creating the task. The response you receive should be the created EcoTask object for the user with the phone number in that request body, as shown below:
Please note that exceptions for non-existent users have not been handled in this tutorial. In your real-world application, this should be among many exceptions you will be handling.
Update the task
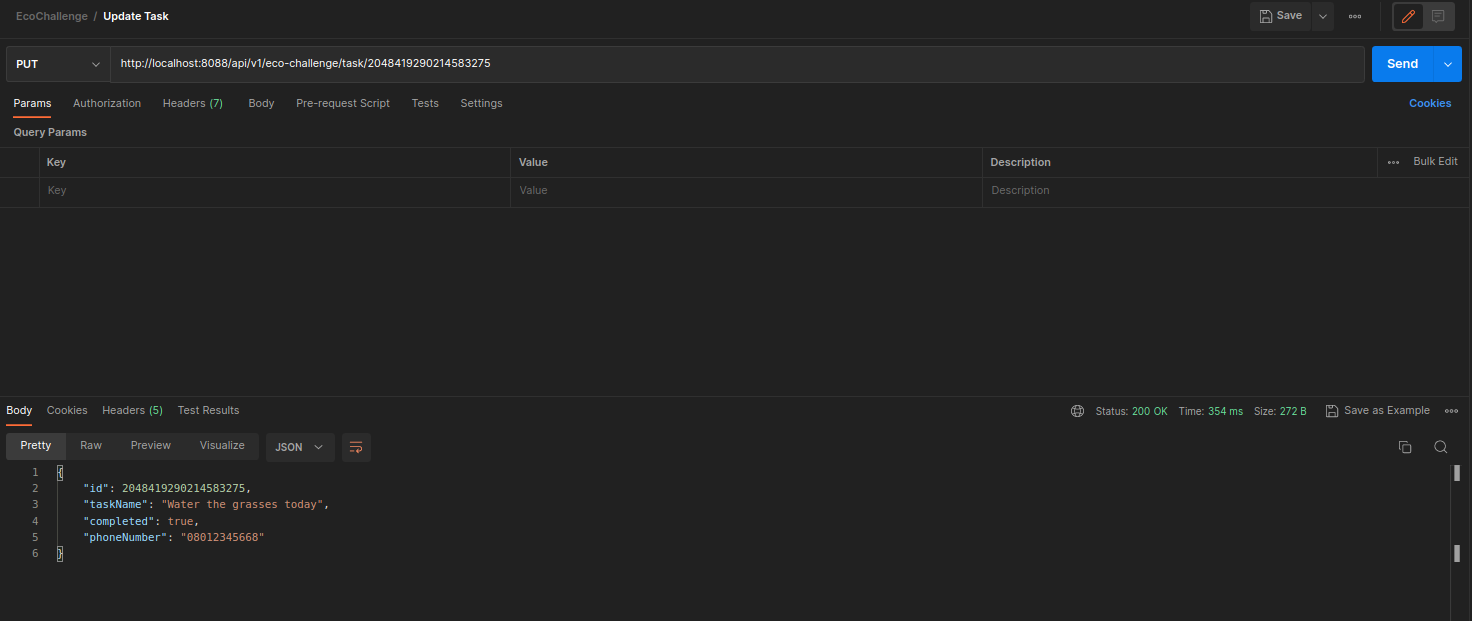
Let us update the status of this EcoTask to completion. When a task is created for a user, it is incomplete by default. Therefore, the user would need to carry out the task before they can update this task to complete status.
To do this, you will need the ID of the task supplied from the section before as a path variable to the URL “http://localhost:8088/api/v1/eco-challenge/task/:taskId” as shown below.
Set this to a PUT request. The task is returned with a true statement for the completed field. This means that task has been successfully completed by the user.
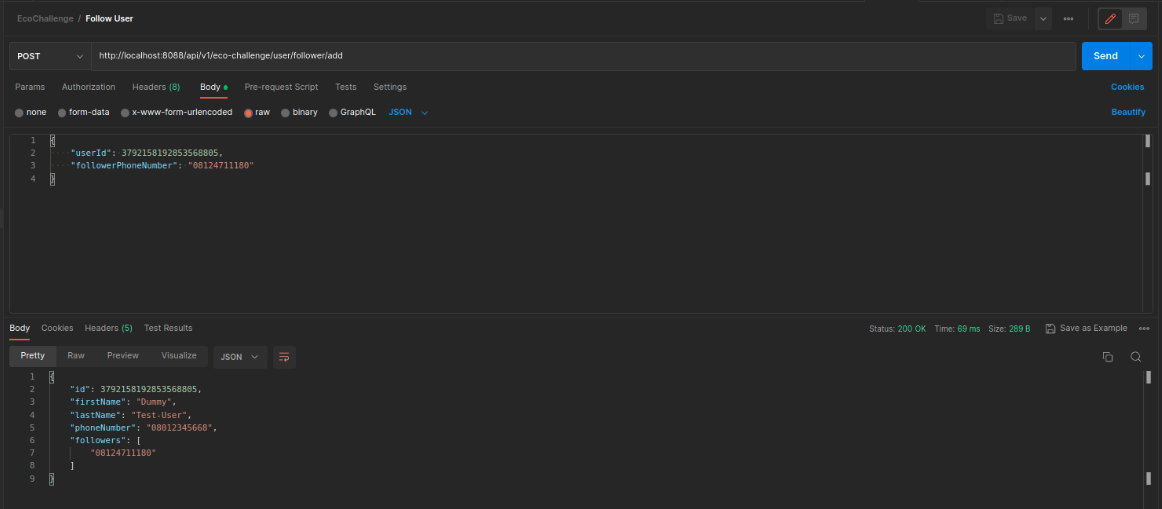
Follow a user
One of the ways for us to test that the SMS Service works is to “add followers” to the user. Go to Postman and paste the URL “http://localhost:8088/api/v1/eco-challenge/user/follower/add” in the URL bar. Set this request to POST. The request body requires the database ID and phone number of the user to whom the follower is to be added. An example is shown below:
When you click send, the operation will return the user object, with the updated followers list, displaying the newly-added follower.
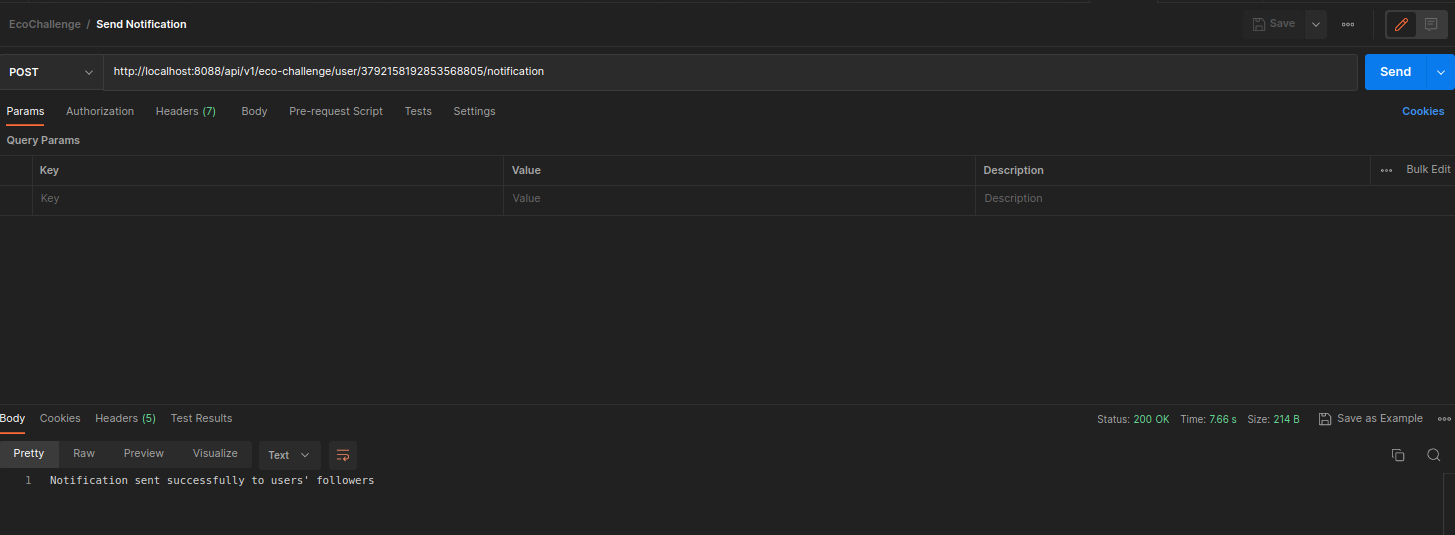
Send notifications to user’s followers
It is time to let the user’s followers know about their task completion. Paste the link on your Postman URL bar “http://localhost:8088/api/v1/eco-challenge/user/<userId>/notification”. Replace <userId> with the user’s database ID. Make a POST request to the URL and notification messages will be sent to the user’s followers. The image below shows the request and the corresponding response, which is just a message in this case.
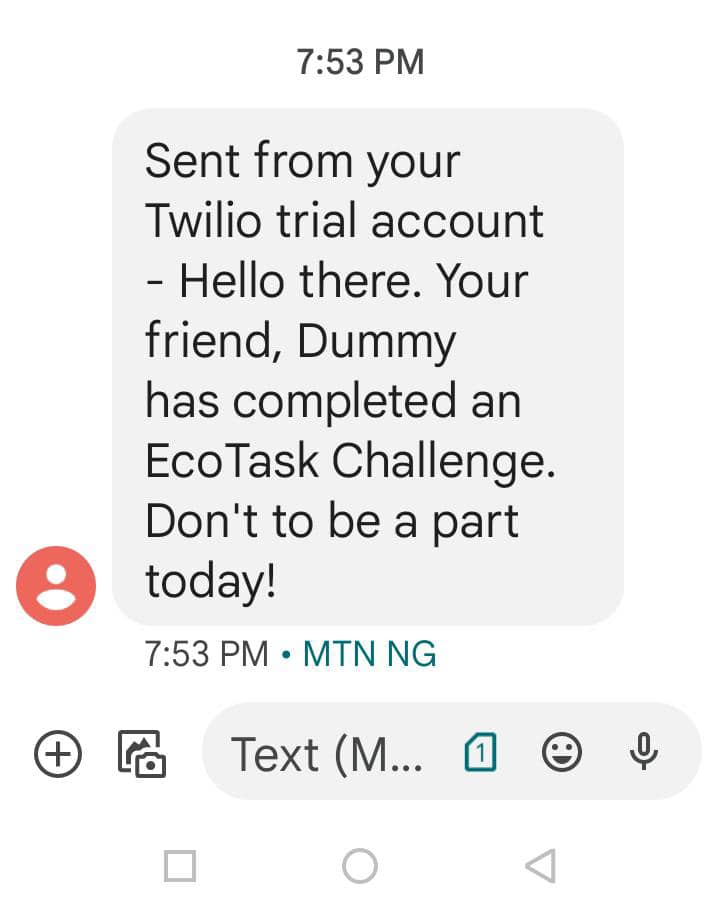
The screenshot below showed the logged message with the message SID in the IDE console.

And finally, a screenshot of the SMS sent to the mobile number is shown below:
Add new features to a task challenge app
The app is open for even further improvements, depending on what is required per time. The code for this app can be found in this GitHub repository. For example, users might be inspired by other users on the app and want to follow them. Or they might need to be reminded intermittently about challenges they opted to complete.
You might also want to let users know how well they are doing on the app. A milestone tracker would be a great feature to implement. For these, you might create methods to: followUser(), sendReminder() and sendMilestoneNotification() in the UserService.java class and corresponding methods for them in the controller as shown below:
Navigate to the EcoChallengeController.java file and add the following endpoints:
The app is functional enough to be connected with a frontend and ready for use. Our app allows users to take their places in the EcoChallenge, by allowing users to complete tasks that are beneficial to their environment, and the Earth, by extension. You built in Java and provided endpoints to which a frontend technology can connect.
Tolulope is a growing software engineer who loves coding and writing about what he does. When he's not coding, he enjoys his time as a disc jockey.

Related Resources
Twilio Docs
From APIs to SDKs to sample apps
API reference documentation, SDKs, helper libraries, quickstarts, and tutorials for your language and platform.
Resource Center
The latest ebooks, industry reports, and webinars
Learn from customer engagement experts to improve your own communication.
Ahoy
Twilio's developer community hub
Best practices, code samples, and inspiration to build communications and digital engagement experiences.