Engineering for Peace of Mind with Twilio SMS and the AWS IoT Button
Time to read: 10 minutes
July 16, 2019
Written by

My octogenarian dad still lives independently.
He does not enjoy his son calling him every night and interrupting his movie-watching. Some nights he's not even at home yet because he's chilling at the pub across the street. He also forgets to charge his cell phone on a regular basis.
These are all the things running through my mind when I want to check in with him and know everything is fine.
What are we going to build
As a software developer, I want my dad to have a button handy where he can "SINGLE click" to tell me "I'm fine, good night" with a text message. After a "DOUBLE click" I want to receive a text message like "Call me when you have time." When dad gives the button a "LONG click" I want to receive a text message and a voice call with "I need your help now!".
(Sometimes he runs out of brandies.)
Let's build this.
Register a Twilio account and create a Studio flow
Before we get started:
- You will need a Twilio account
- You will need to purchase a Twilio phone number
We're going to create a new Twilio Studio flow made of a “SPLIT BASED ON...” widget, 4 “SEND MESSAGE” widgets, a “MAKE OUTGOING CALL” widget and a “SAY/PLAY” widget.
Here is a bird's-eye view of the flow you’re building:
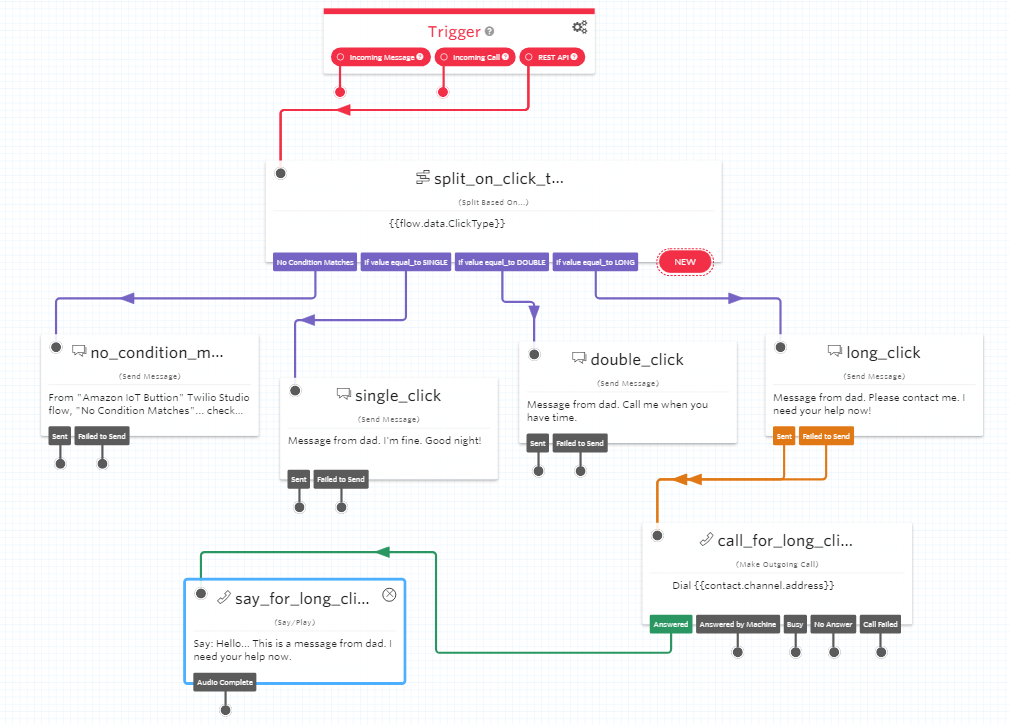
For now, here is what this flow does:
- Listens for a
POSTrequest trigger - Takes in two required parameters:
ToandFromphone numbers Tois my phone number where I want to receive the text messages and the voice callFromis the phone number I purchased from Twilio ( where the voice messages and calls come from)- The flow also takes in another parameter with the name of
ClickType ClickTypecan have as value one ofSINGLE,DOUBLEorLONG- Based on the value of
ClickTypethe flow sends a specific text message and if the value isLONGalso makes a voice call
Part One: Build the Studio flow
Twilio Studio flows are easy to build and if you look at the flow's diagram you should have a good understanding of what's needed.
Create a flow and our first widgets
- Head to the Studio dashboard in your console (https://www.twilio.com/console/studio/dashboard)
- Click on “Create a flow” and choose a name, for example “IoTButtonFlow”
- Choose “Start from scratch” to begin a new empty flow
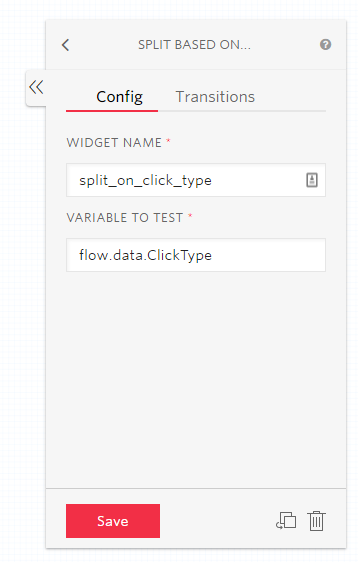
- Add a "Split Based On..." widget and connect the “REST API” from the “Trigger” to its entry point
- Enter a “WIDGET NAME” (for example “split_on_click_type”)
- For "VARIABLE TO TEST" enter
flow.data.ClickType
- Next, we’ll set up our “split_on_click_type” widget to have 4 transitions to 4 "SEND MESSAGE" widgets for the different types of clicks from the IoT button
- Add 4 “SEND MESSAGE” widgets and name them “no_condition_matches”, “single_click”, “double_click” and “long_click” (don’t forget to save)
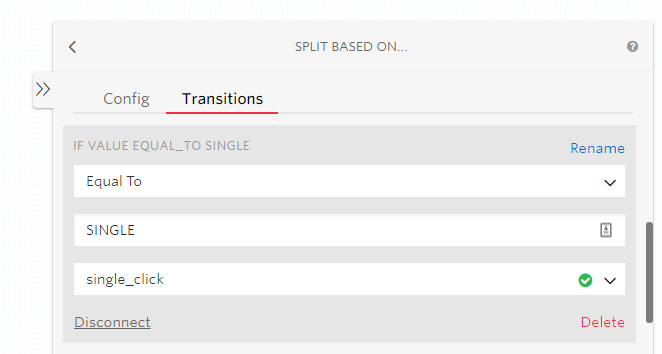
- Come back to “SPLIT BASED ON...” widget and select the “Transitions” tab
- Start with one default condition for "IF NO CONDITION MATCHES" and connect it to the "SEND MESSAGE" widget named "no_condition_matches"

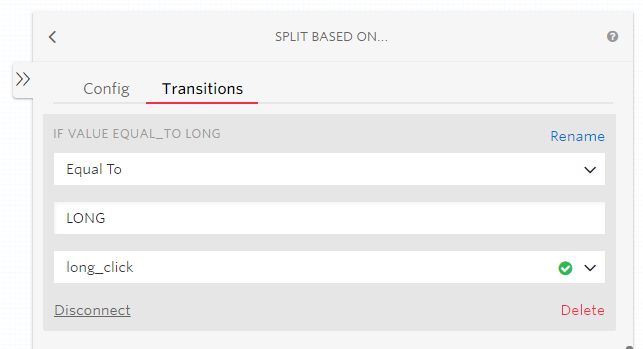
- Add a second condition (by clicking on the “NEW” button on the “SPLIT BASED ON” widget, or the NEW CONDITION “+” button) for "IF VALUE EQUAL_TO" the string
SINGLEwhich connects to the "SEND MESSAGE" widget named "single_click"
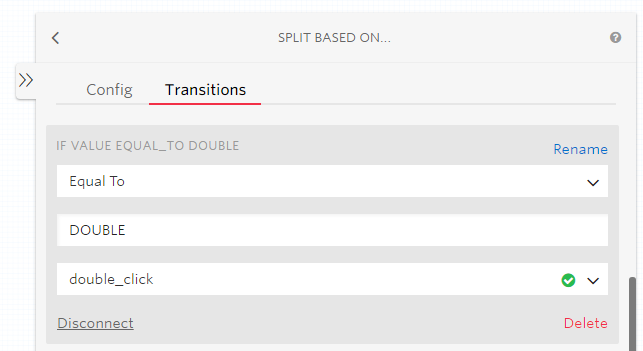
- Add a third condition for "IF VALUE EQUAL_TO" the string DOUBLE which connects to a "SEND MESSAGE" widget named "double_click"
- Last add a fourth condition for "IF VALUE EQUAL_TO" the string LONG which connects to a "SEND MESSAGE" widget named "long_click"
Now, let’s turn our attention to the four “SEND MESSAGE” widgets. For each widget, set the "MESSAGE BODY" to the following:
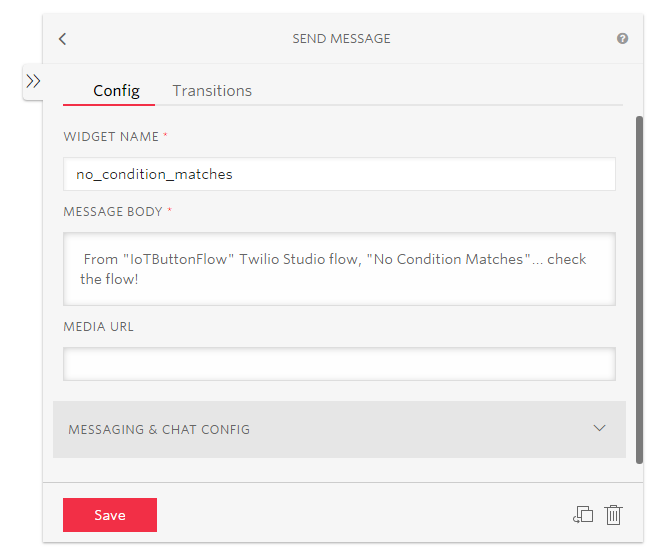
- For the "no_condition_matches" widget "MESSAGE BODY" enter "From "IoTButtonFlow" Twilio Studio flow, "No Condition Matches"... check the flow!"
- For the "single_click" widget "MESSAGE BODY" is "Message from dad. I'm fine. Good night!"
- For the "double_click" widget "MESSAGE BODY" is "Message from dad. Call me when you have time."
- For the "long_click" widget "MESSAGE BODY" is "Message from dad. Please contact me. I need your help now!"
Feel free to change the messages as you see fit.
Here is a screenshot to help you check that you have everything correct so far:

Next, let’s add the phone call on the long click. Let’s continue…
Add an Outgoing Call and Say/Play Widget for long clicks
Next, we’re going to add call functionality for long clicks.
Add a “MAKE OUTGOING CALL” widget and name it “call_for_long_click”. Then add a “SAY/PLAY” widget and call it “say_for_long_click”.
From the fourth "SEND MESSAGE" widget ("long_click"), connect the transitions (exit routes) from both “Sent” and “Failed to Send” to the "MAKE OUTGOING CALL" widget.
Next, when answered we want to trigger the "SAY/PLAY" widget:
- Connect the "Answered" transition of the "MAKE OUTGOING CALL" widget to the entry point of the "SAY/PLAY" widget
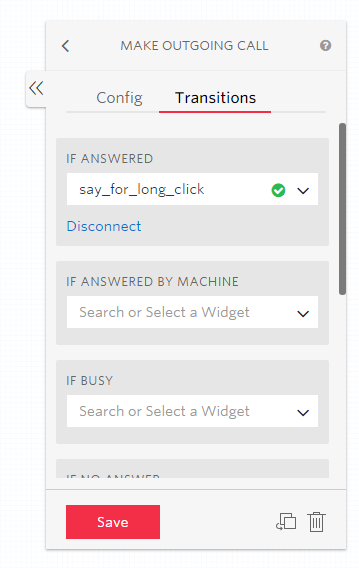
- (No other configuration is needed for the "MAKE OUTGOING CALL" widget)
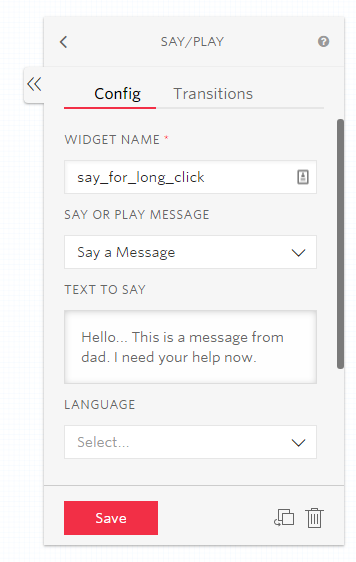
- On the "SAY/PLAY" widget, set the "TEXT TO SAY" to: "Hello... This is a message from dad. I need your help now."
- Also for this "SAY/PLAY" widget I set the "NUMBER OF LOOPS" value to 3 (you can find it if you scroll down the "Config" panel a little bit).
Finally, check that all widgets are connected, save them, and publish the flow.
Let's test it now with a POST request.
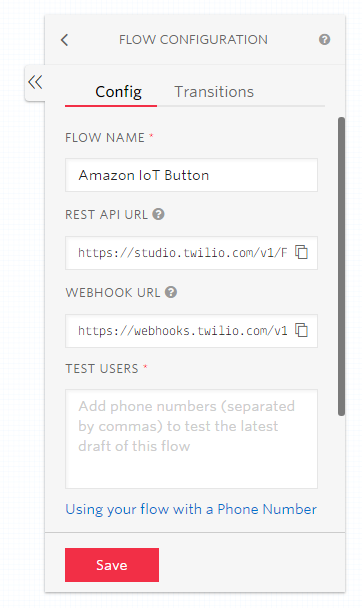
Testing the "Amazon IoT Button" flow with POST
Among other tools, we could use cURL, Postman to make a POST request. I'm going to use a Visual Studio Code extension named "REST Client" which lets us make requests right from the editor.
- Install Visual Studio Code
- Bring up the Extensions view by clicking on "View > Extensions" menu , then search and install the "REST Client" extension (https://marketplace.visualstudio.com/items?itemName=humao.rest-client)
- In Visual Studio Code, open a "New File", you can name it anything you want, but the extension needs to be
.httpor.rest - I named my file
req.http, here is the code:
- The "REST API URL" looks like:
https://studio.twilio.com/v1/Flows/FWXXXXXXXXXXXXXXXXXXXXXXXXXXXXXXXX/Executionsfor your flow. You can find it in the "FLOW CONFIGURATION" when the "Trigger" widget is selected on your Studio canvas.
- For "Authorization", your Twilio account sid ACXXXXXXXXXXXXXXXXXXXXXXXXXXXXXXXX and auth token your_auth_token can be found on your Twilio's account (or sub-account) dashboard.
- For "To" replace +17775553333 with your cell phone number, for "From" replace +13335557777 with your Twilio number
Save the .http file and you'll notice a Send Request clickable link right above the word POST. Click on it to make the request and check that you got a text message on your cell phone and a response in Visual Studio Code.
We're done with this part, you can take a break if you wish. In part two and three, we'll set up the button and have it make POST requests to our Studio flow endpoint when clicked.
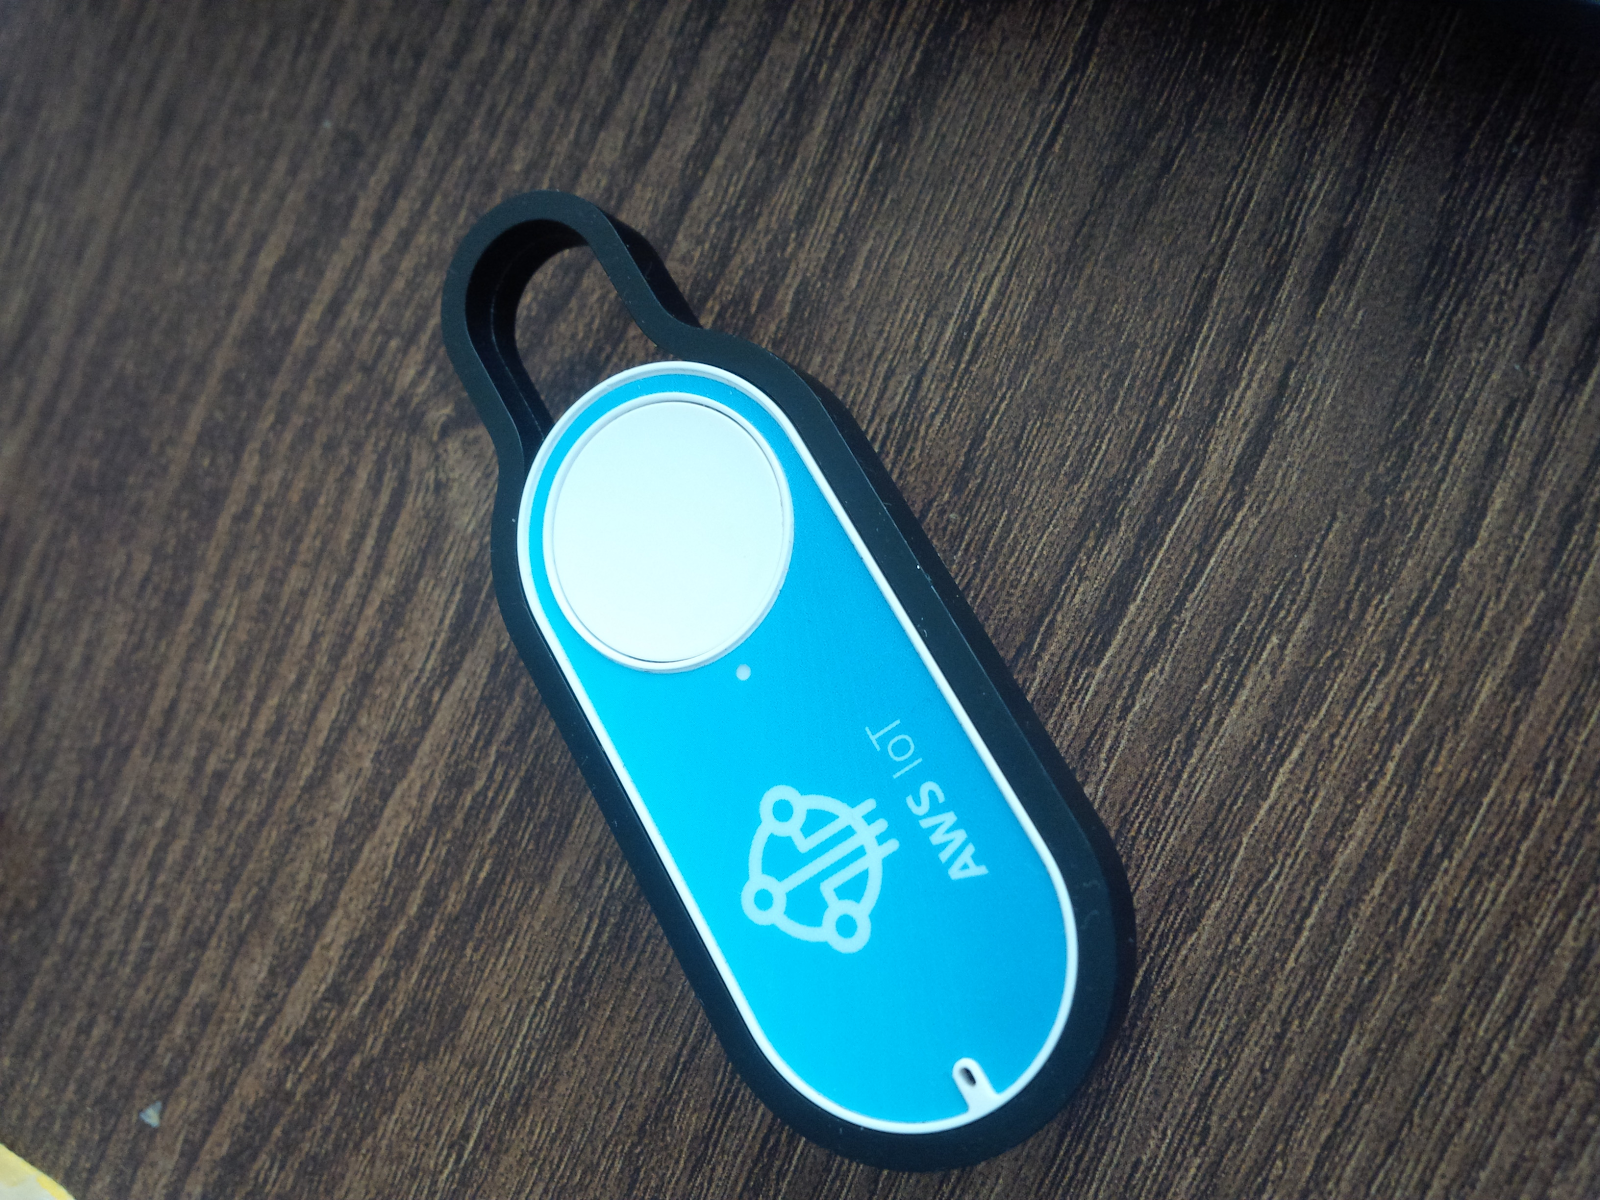
Part Two: Add the Amazon IoT Button
At this point, we have the Studio flow working. Let’s next configure the button so that when we click on it, it will send us an email.
We'll install an app (made by Amazon) on our phone which we'll use to configure the button to be able to connect to our Wi-Fi. The app also makes the necessary configurations needed on our AWS account (there’s a little trickiness with the Android App but we’ll work around it).
What you need
- An Amazon AWS IoT button (https://aws.amazon.com/iotbutton/)
- Your button serial number (each button has a unique serial number which can be found on the back of the button)
- The "AWS BTN Dev" app installed on your phone (Android: https://play.google.com/store/apps/details?id=com.amazonaws.iotbutton&hl=en)
- Your Amazon AWS account (username and password) (https://aws.amazon.com/account/)
- Your Wi-Fi ID and password
Begin by installing the app. Then launch the app on your phone and login with your Amazon AWS credentials.
- On the welcome screen, tap on "SET UP AWS IOT BUTTON"
- Tap on "AGREE & GET STARTED"
- Next, "SCAN BARCODE" or "enter serial number"
- Once you enter the serial number or scan the code, tap on "REGISTER BUTTON" and follow the instructions
- Enter your Wi-Fi credentials (wait for the button configuration to finish)
- You should be on "Button action" screen with options to "CREATE LAMBDA FUNCTIONS"
- Select "Send Email (nodejs)" and enter your email address
- Tap on "SET ACTION"
At this point if you click the button, you would expect to receive an email. If you received the email, you can skip the next section.
If you didn’t receive the email, don’t worry. The app had a problem and could not finish the configuration at AWS. To fix this, follow these instructions below.
Failed email delivery: How to configure email in Lambda
First, login into your Amazon AWS account and change a few things (okay, maybe more than a few things... but it's not that bad).
- Login into your Amazon AWS account
- Go to "AWS Lambda" Dashboard
- Click on "Create Function" then click on "Use a blueprint"
- Search for "iot" and from the results click on "iot-button-email" (nodejs . iot . button)
- Click on "Configure"
- Enter a function name something like "my-iot-button-twilio"
- From "Execution role" drop-down select "Use an existing role" (when we went with the app setup, a role was created)
- In the "Existing role" drop-down select the one which looks like "service-role/iotbutton_G0XXXXXXXXXXX_iot-button-email-ses-nodejs"
- Next, in the "AWS IoT trigger" panel, select "IoT Type" as "IoT Button"
- In "Device Serial Number", enter your button's serial number (no spaces, uppercase)
- Click on "Generate certificate and keys"
- Next, scroll down and check the box for "Enable trigger"
- Next, scroll down more, right after the function code, you'll find the "Environment variables" section
- Enter your email address, replace "<enter value here>" in the field for "email"
- Click on "Create function"
Next, let's go back to the app.
- Tap on the icon for the button
- Tap on the "lambda sign" icon (it's between the wifi and trash icons)
- Tap on "USE EXISTING LAMBDA FUNCTION" tab (at the top)
- Select our "my-iot-button-twilio" function
- Tap on "CHANGE ACTION"
Click your button and check your email. Hopefully it worked this time.
I understand this it seems like a lot (and it is). But – you’re done, and we’re ready to move to the next step.
Test emails triggered from the IoT button
You're done. Take a break if you wish and play with the button.
Try: single click, double click, and long click (keep the button depressed for 3 seconds).
When you press the button, the LED will blink. It will first blink white then go solid green which means things worked. If you check your email, you should have test emails in your inbox!
Part Three: modify the Lambda function to call the Studio flow
Now let's go back to our Lambda function and change the boilerplate by adding a few more values to the environment variables.
- Under the function's code, scroll to the "Environment variables" section
- Remove the "email" key then add other keys for:
twilio_account_sid: enter your Twilio account sidtwilio_auth_token: enter your Twilio auth keytwilio_number: enter your Twilio number in E.164 formatmy_number: enter your cell phone number in E.164 formattwilio_flow_id: add the Studio flow's ID (it looks like FWXXXXXXXXXXXXXXXXXXXXXXXXXXXXXXXX)
Click on "Save" button at the top right.
Next, select and then delete all the code in the editor so we can start with an empty index.js
In the editor enter the code below:
Click "Save" at the top right and test all the click styles with the AWS IoT button. And you did it! You built an IoT Button lifeline with Twilio Studio.
How the Lambda code works
Wondering how that all came together? Here’s how the function works:
- First, we import two Node.js modules
httpsandquerystring. We’ll use them to make the HTTP request to Twilio’s API and format (serialize) the parameters we pass with our request, respectively. - Next, we build an authentication string by
base64encoding our Twilio credentials and then passing the string as the value of theAuthorizationheader - Next we create a
postDatawhich contains the body of our request, the parameters name/value pairs - We then prepare the
optionsentity required by the request method and this one contains Twilio’s API endpoint URLs and paths to reach our Studio flow, the method of the request, and the request headers - Next we configure the request with the https.request(...) method which takes in our
optionsobject and a callback function which runs once we get the response back from Twilio - With the
write()andend()methods, we execute then close the request
Building an IoT Button and Twilio integration for peace of mind
We started by creating a Twilio Studio flow and configured the necessary widgets to send text messages and make calls. Next we tested the flow by making an HTTP request using a Visual Studio code extension.
After that, we configured our AWS IoT button with the help of the “AWS IoT Button Dev” app and made the necessary changes to get the button working (and send us emails when we click).
Finally we changed the AWS Lambda function so that instead of sending emails, it will trigger our Twilio Studio flow.
A few more things about the AWS IoT button:
- If all goes well when we use it, the light on the button will blink white then green
- If something goes wrong (for example, no Wi-Fi connection) the button will blink white then red
- The button connects to Wi-Fi and AWS immediately after is clicked, then automatically disconnects (enters in sleep mode) once it does its job
- If we click the button and the light does not blink at all, then something is wrong with the button (maybe the battery is discharged)
- The button’s battery should be good for at least 2000 clicks, that's about 5 years
A big thank you to Megan Speir from Twilio’s Developer Network team for choosing a great title and overall help with bringing this post to life.
Thanks for your interest in this post. I hope you’ve gotten a lot out of it – I certainly have learned a lot creating it. If you have any questions, please reach out - I can’t wait to see your builds.
Alex Baban is a Canadian web and mobile developer and is a Twilio Champion. Alex has been working on web sites in various capacities for over 15 years. In addition to development, Alex has a background in electronics, with a Bachelor of Science in Electrical Engineering from the Technical University of Cluj-Napoca, Romania. Alex can be reached on Twitter @alexbaban.
Related Resources
Twilio Docs
From APIs to SDKs to sample apps
API reference documentation, SDKs, helper libraries, quickstarts, and tutorials for your language and platform.
Resource Center
The latest ebooks, industry reports, and webinars
Learn from customer engagement experts to improve your own communication.
Ahoy
Twilio's developer community hub
Best practices, code samples, and inspiration to build communications and digital engagement experiences.