How to get secrets from HashiCorp Vault into .NET configuration with C#
Time to read: 9 minutes
November 28, 2022
Written by
Reviewed by

Configuration management has always been a challenge for developers. It gets especially tricky when it comes to storing sensitive configuration values such as API keys, tokens, certificates, passwords etc. In this article, you will learn how to use HashiCorp Vault with C# .NET to manage your application’s secrets.
Prerequisites
You'll need the following things in this tutorial:
- A free Twilio account
- A Twilio Phone Number with SMS capabilities.
- An OS that supports .NET (Windows/macOS/Linux)
- .NET 6.0 SDK (newer and older versions may work too)
- A code editor or IDE (Recommended: Visual Studio Code with the C# plugin, Visual Studio, or JetBrains Rider)
- Docker Engine (You can install the engine using Docker Desktop (Windows, macOS, and Linux), Colima (macOS and Linux), or manually on any OS.)
Problem Statement
Let’s start by implementing a simple application to demonstrate the issue. It’s a simple .NET console application that sends a single SMS via Twilio.
Run the following commands in a terminal to create the project and add the Twilio NuGet package:
Open the project with your IDE and replace the contents of Program.cs with the code below:
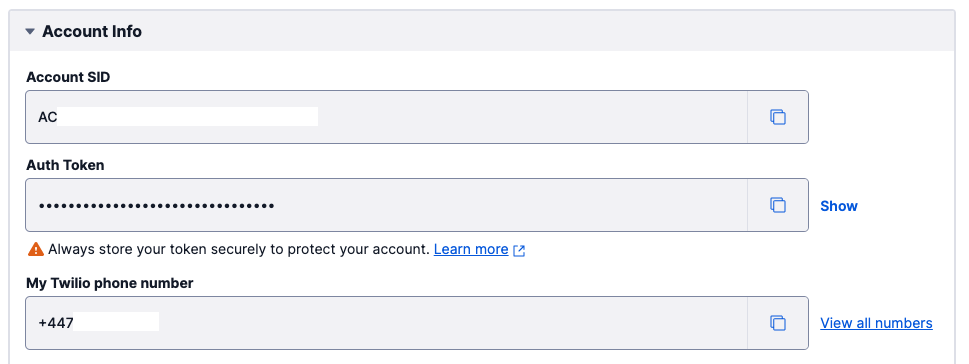
Replace the placeholders with actual values. To obtain your Twilio Account SID, AuthToken, and Twilio Phone Number, log in to the Twilio Console and copy the values shown in the account info section:
For the recipient phone number, use your actual phone number so that you can receive the SMS and confirm the application is working.
Run the application by running the following command in the terminal:
You now have a working, standalone application without any dependencies on external configuration. Hardcoding secrets this way might only work for throw-away code. Even then, it’s ill-advised, and you should never use this approach. If you forget to delete the code, you will expose your secrets in cleartext.
Most applications use a version control system (such as GitHub, GitLab etc). In enterprise, it’s safe to say all code is pushed to a source code repository. If you hardcode your secrets and push your secrets to the version control system, anybody who has access to the code will have access to your secrets too. If you’re working on a public open-source project, you have now exposed your secrets to the entire world.
As a general rule of thumb, putting secrets in your source code is considered to be a terrible practice.
Environment Variables
A better approach is using environment variables. This way, you can completely separate your code from your config. If you subscribe to the Twelve-Factor-App philosophy, you can see they describe this approach as “Store config in the environment”. You can read more about it in their Config section.
Now, update your application and replace the hardcoded values with the following lines:
For macOS and Linux, set the environment variable like this:
If you're using PowerShell on Windows or another OS, use this command:
If you're using CMD on Windows, use this command:
Replace {KEY} with the name of the configuration/secret key (such as TWILIO_ACCOUNT_SID). Replace {VALUE} with the value of the configuration/secret (the values you hardcoded in the previous example).
Repeat the above for all 4 configuration values (TWILIO_ACCOUNT_SID, TWILIO_AUTH_TOKEN, TWILIO_PHONE_NUMBER and RECIPIENT_PHONE_NUMBER).
Run the application and confirm it’s still working. Now you have given yourself the opportunity of checking in your code to the version control system as there are no sensitive values in it anymore.
User Secrets
You can also improve the local development environment security by using .NET user secrets. This way, the secrets are stored in a JSON configuration file in the user profile directory. Since the secrets are persisted, you don’t have to enter them over and over again, whereas with the environment variable you will lose the values if you close the terminal.
To use user secret in the demo application, run the following command:
Now you can add the secrets by running the following commands:
To be able to read these values back, you will need configuration extension NuGet packages from Microsoft. Run the following commands to add those libraries:
Update Program.cs as shown below:
Run the application, and it should still work.
This example leverages both user secrets and environment variables. You can still add environment variables to overwrite the values in user secrets. The last key loaded wins, and all the other ones are overwritten. So be careful when specifying multiple providers. The benefit of this approach is now you are not directly reading from environment variables, which means you have more control over where you store your configuration.
Now you’re in a more secure position when storing the secrets locally in your development environment. What about deployments, though? When you deploy your application, it will fail because it won’t find the secrets. You can choose to remotely log in to your servers and set the environment variables or user secrets, but it’s impractical and doesn’t scale.
A better approach is to use a central, secure place to store your configuration so that all instances of your application can easily read those values.
Many services provide this functionality, such as Azure Key Vault, AWS Secrets Manager, and HashiCorp Vault. In this article, you will learn how to set up HashiCorp Vault using Docker and configure your application to get your configuration from it.
Set Up HashiCorp Vault
Vault is an open-source project and can be found on HashiCorp’s GitHub repository. Since it’s open-source, you have a few alternatives for using Vault:
- Clone/fork the GitHub repository and build it yourself
- Download and run one of the installers created for your platform
- Run it in a Docker container
- Sign up and use their cloud-based solution
The first 3 options are self-hosted and completely free. For the hosted solution, you can sign up for free and evaluate it for 30 days. In this article, you’ll run it in a Docker container.
Vault is one of the select few official images, and it’s quite popular on Docker Hub:

Run the following command to pull the latest Vault image and run Vault in a container:
In the command above -d flag indicates to run it in the background. --cap-add=IPC_LOCK prevents sensitive values from being swapped to disk. As the name of the container implies, this is for development only. Everything runs in memory and all the secrets will disappear if you stop the container.
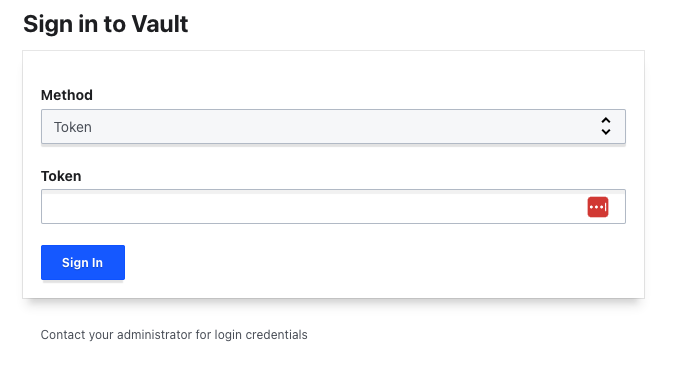
Now, open a browser and go to http://localhost:8200. You should see a sign-in screen like this:
To get your token, first, find the container id by running the command below:
You should see something like this:

The first value you see is the container id (in this example it’s 892327726ea3)
Copy that value and run the command below by replacing { YOUR CONTAINER ID } with the value you copied:
At the end of the logs, you should see your root token:

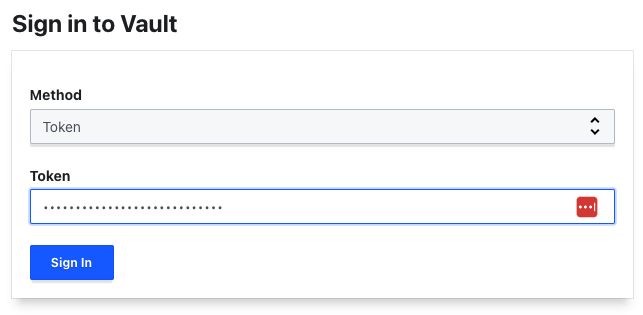
Copy your root token and use it in the sign-in screen.
You should see the default secrets engines:
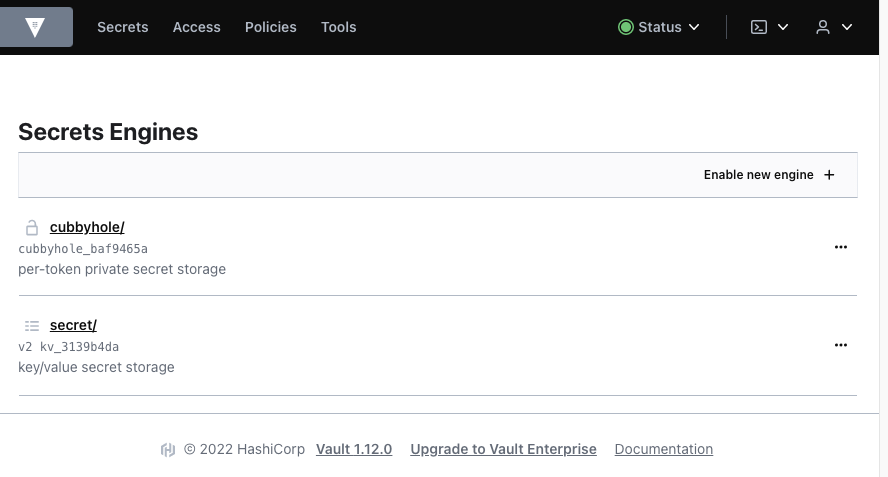
Cubbyhole and key/value secret engines are enabled by default (and they cannot be disabled). The cubbyhole secrets engine is used to store arbitrary secrets. Paths are scoped per token, and no token can access another token's cubbyhole. In this article, you will use Key/Value secret engine, which is a generic secret engine.
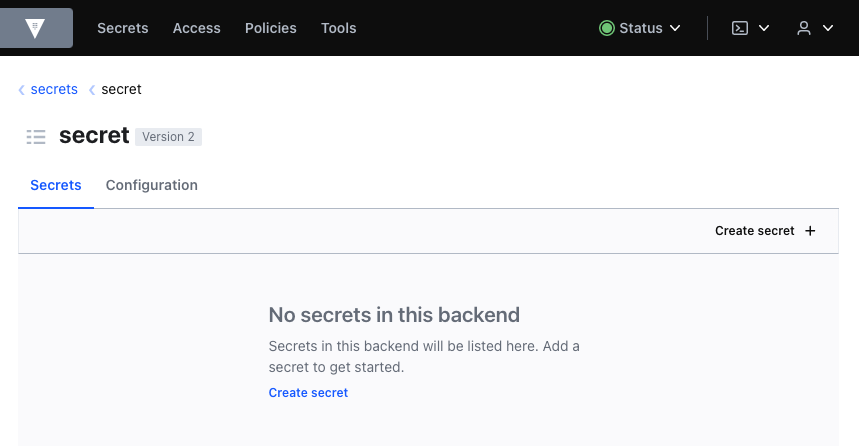
Click secret to view the existing secrets (which are none at the moment). You should see a screen like this:
Click the Create secret button.
Set the path to your secret as twilioapp. Add your config values as you did in the previous examples. Your screen should look like this:

Click the Save button. Now you should see the values saved as Version 1 of your configuration.
Now that your secrets are Vault, it’s time to modify the application to read these values.
Using Vault C# Client
To access Vault with C#, you are going to use a library called VaultSharp. Run the following command to add the NuGet package to your project:
Set the user secret VAULT_ADDR to http://127.0.0.1:8200.
Set the VAULT_TOKEN user secret to your root token.
Update Program.cs as shown below:
Run the application again, and you should now be able to get the secrets from your Vault instance.
The implementation above first gets the user secrets to be able to access Vault. Then, reads the secrets from Vault and adds them back to the .NET configuration so that all configuration values can be managed in one place. To make it more reusable, you can refactor it to use an extension method.
Vault supports various authentication methods such as app role, AWS auth, Azure auth, etc. Since my focus is on the programming side, I used the basic token authentication method. You can find out more about the other auth methods on the library’s GitHub repo.
Now stop the container by running:
Run the application, and it will get an error as the Vault is not running anymore. Start the same container again by running:
Run your application again, and this time it will fail due to the following error: Unhandled exception. VaultSharp.Core.VaultApiException: {"errors":["permission denied"]}
If you check the logs of the container again, you will see the root token is different. Copy that one and sign in to your Vault via UI again, and you will see that your previous secrets are gone now. This is, as discussed before, because we didn’t provide a persistence engine, and everything was kept in memory. In the next section, you will learn how to fix this issue.
Persisting Secrets
When you run HashiCorp Vault in dev mode, everything is stored in-memory, and the web UI is enabled automatically. To persist secrets, you need to run Vault in server mode.
Vault has an extendable model and supports various storage providers for persisting secrets. You can use the file system, an RDBMS such as MySQL or MSSQL, a NoSQL database such as CouchDB or Amazon DynamoDB, or even a cloud-based storage service such as Google Cloud Storage or Amazon S3. You can find the full list of supported providers here. All the data will be encrypted at rest (as well as in transit), so even if a 3rd party gains access to the stored secrets, they wouldn't be able to read them. In this article, you will use the local file system to persist your secrets.
If you created a container in the previous section, stop and delete it by running the following commands:
Then, create a folder to store the Vault configuration. It can be placed anywhere you like on your filesystem. The following example uses /dev/vault/config under your user's home directory.
Create a file named config.hcl under that folder and update its contents as shown below:
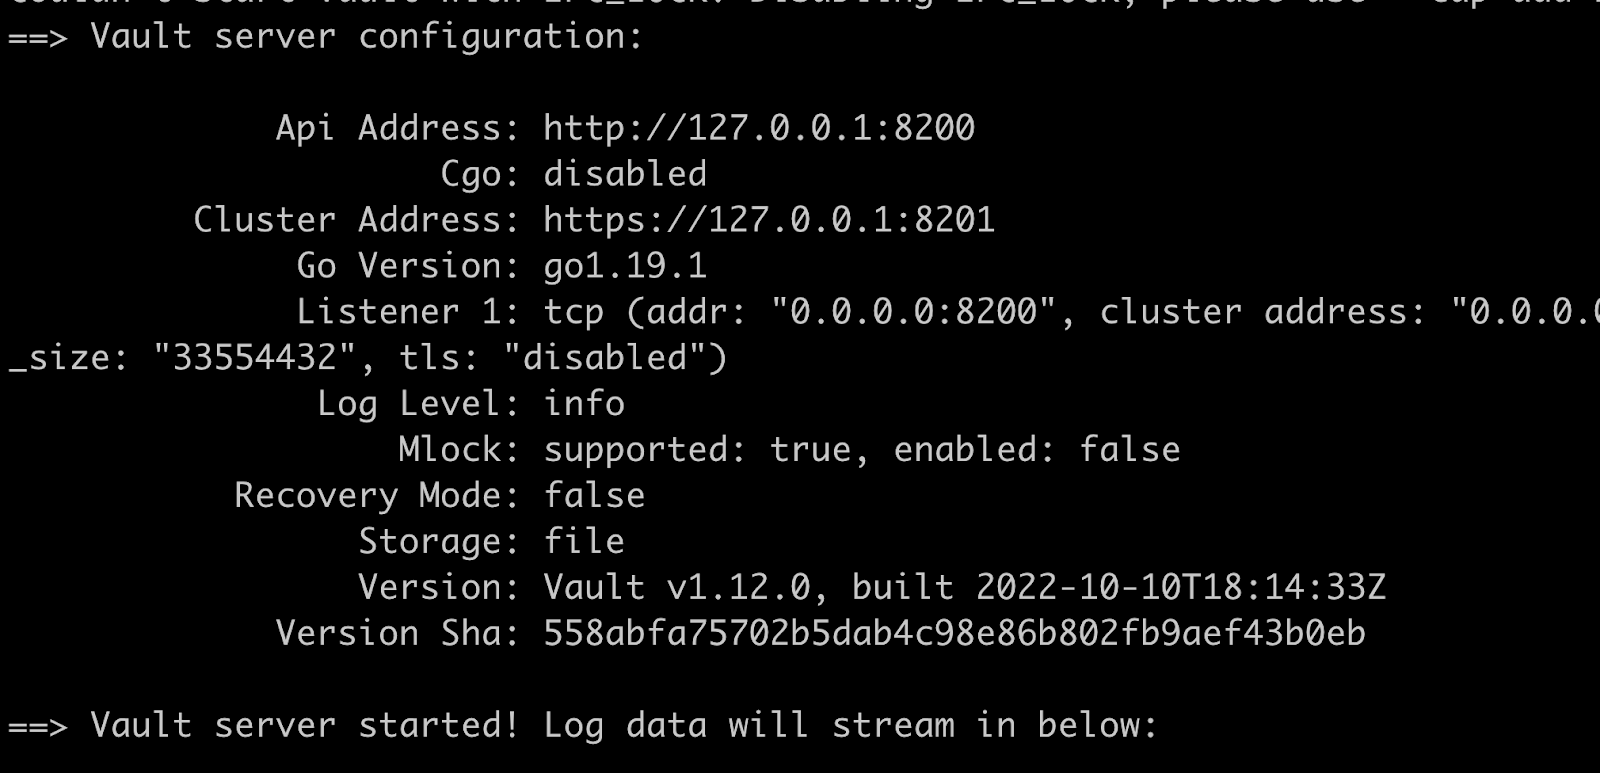
Then, run the following command to create the Vault instance:
Open a browser tab and go to http://127.0.0.1:8200.
This time, you will see a more involved setup since you are now running Vault in server mode:

Enter 1 in both key shares and key threshold fields.
You should see a successful initialization screen:
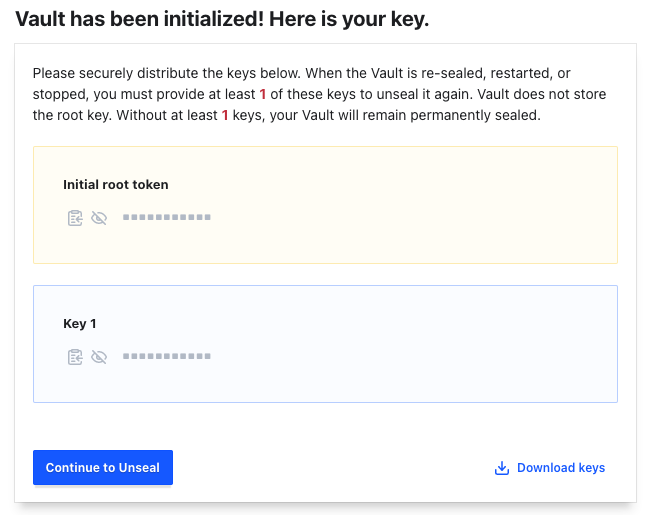
Click the Download keys button and get a copy of your keys. Then click the Continue to Unseal button to proceed.
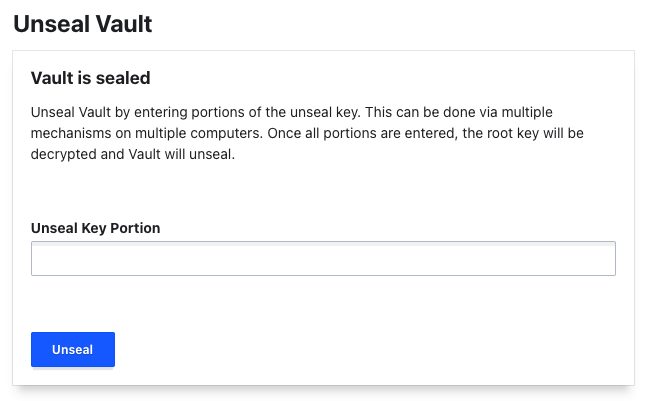
You will then be prompted your Unseal key:
Open the JSON file you just downloaded which looks like this:
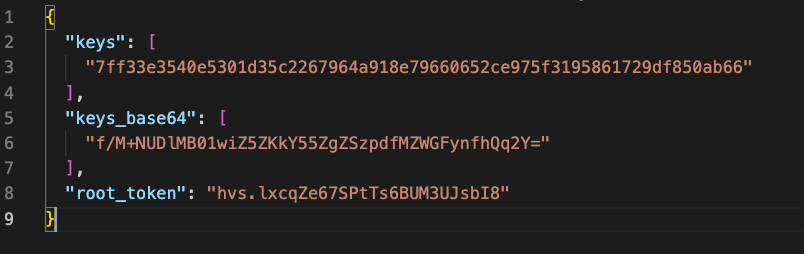
Copy the value of the keys property (this is an array but since you requested 1 key share, it only has 1 element.
Click the Unseal button.
Now you should be redirected to the sign-in page. Copy your root token from the JSON and use it to log in.
You must have noticed it looks different from the dev mode. There is no secret engine called secret. To fix this, click Enable new engine.
Select KV and click Next.
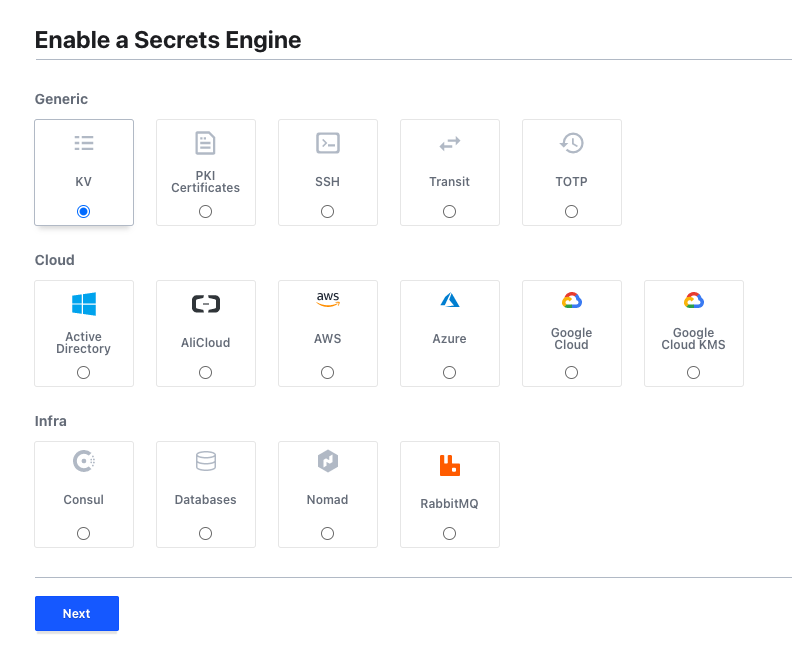
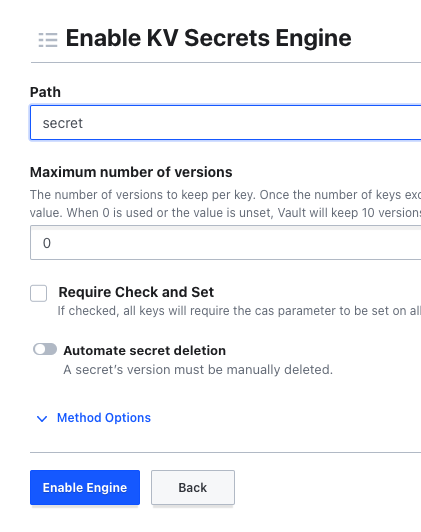
Enter "secret" in the Path field just to match the previous example and click Enable Engine.
Now click the Create secret button as you did in the previous section and create secrets.
Update your new Vault token by running the following command:
Replace { YOUR NEW ROOT KEY } with the value you copied from the file you downloaded.
Run your application again and you should receive an SMS as you did before.
Here's the difference though:
Open a terminal and find the container id by running
Now run the following command:
Replace { YOUR CONTAINER ID } with the id you noted from the previous command.
Check the container logs by running
If you recall, the last time you did this you saw an error. This time you should see something like this:
So the Vault server is still running.
Go back to the Web UI, and it will ask you for the unseal key again. After you enter the unseal key and the root token, you can see the secrets you entered have persisted successfully.
Conclusion
In this article, I wanted to demonstrate the necessity and benefit of having a centralized, secure system to manage application secrets and configuration. You started from the very primitive hard-coding secrets to code approach to using an external service which is highly reputable and used by many top-level companies all around the world. Granted, your Vault installation is for development only, but the underlying principles still apply to production. I hope you found this article helpful. If you'd like to keep learning about .NET configuration and containerizing applications, I recommend taking a look at these articles:
- How to better configure C# and .NET applications for Twilio
- Provide default configuration to your .NET applications
- Dockerize your SQL Server and use it in ASP.NET Core with Entity Framework Core
- How to containerize your ASP.NET Core application and SQL Server with Docker
Volkan Paksoy is a software developer with more than 15 years of experience, focusing mainly on C# and AWS. He’s a home lab and self-hosting fan who loves to spend his personal time developing hobby projects with Raspberry Pi, Arduino, LEGO and everything in between. You can follow his personal blogs on software development at devpower.co.uk and cloudinternals.net.
Related Resources
Twilio Docs
From APIs to SDKs to sample apps
API reference documentation, SDKs, helper libraries, quickstarts, and tutorials for your language and platform.
Resource Center
The latest ebooks, industry reports, and webinars
Learn from customer engagement experts to improve your own communication.
Ahoy
Twilio's developer community hub
Best practices, code samples, and inspiration to build communications and digital engagement experiences.