Build a Video API with Twilio Programmable Video, Node.js, TypeScript, and Express
Time to read:
March 19, 2021
Written by
Reviewed by

Have you ever wanted to include video in your app but weren’t sure how to get started? Well, Twilio Programmable Video provides a friendly API you can use to make this happen.
This tutorial will show you how to build an API to create and manage video rooms programmatically using Twilio Programmable Video, Node.js, TypeScript, and Express.
Prerequisites
- A free Twilio account. (If you register here, you'll receive $10 in Twilio credit when you upgrade to a paid account!)
- Node.js installed on your machine.
- HTTPie or cURL.
Set up your environment
Open your terminal, find the place you want to set up your project, and create a new directory called express-video-api where your project will live:
Next, set up a new Node.js project with a default package.json file by running the following command:
Install dependencies
Express is the backend framework for Node.js that you'll be using in this tutorial to build out your API. Add Express to your project by running the following command:
Then, add TypeScript and the required types for Node.js and Express to your project. Since you only need these during development, you can add them as devDependencies by running the following command:
Add ts-node and node-dev to the project as well, using the command below. These packages will allow your Node.js process to reload whenever you change something in your files. Adding dotenv also allows you to load environment variables into your project from a .env file.
Finally, install the twilio package, using the command below. This package will let you access the Twilio Programmable Video APIs.
If you check your package.json file now, you should notice that all of the packages above have been installed as either dependencies or devDependencies.
Secure and configure environment variables
Generate an API key
The next step is to generate an API key. Log in to the Twilio console, and from the Dashboard, click on Settings in the left menu. Then click on the API Keys submenu item.
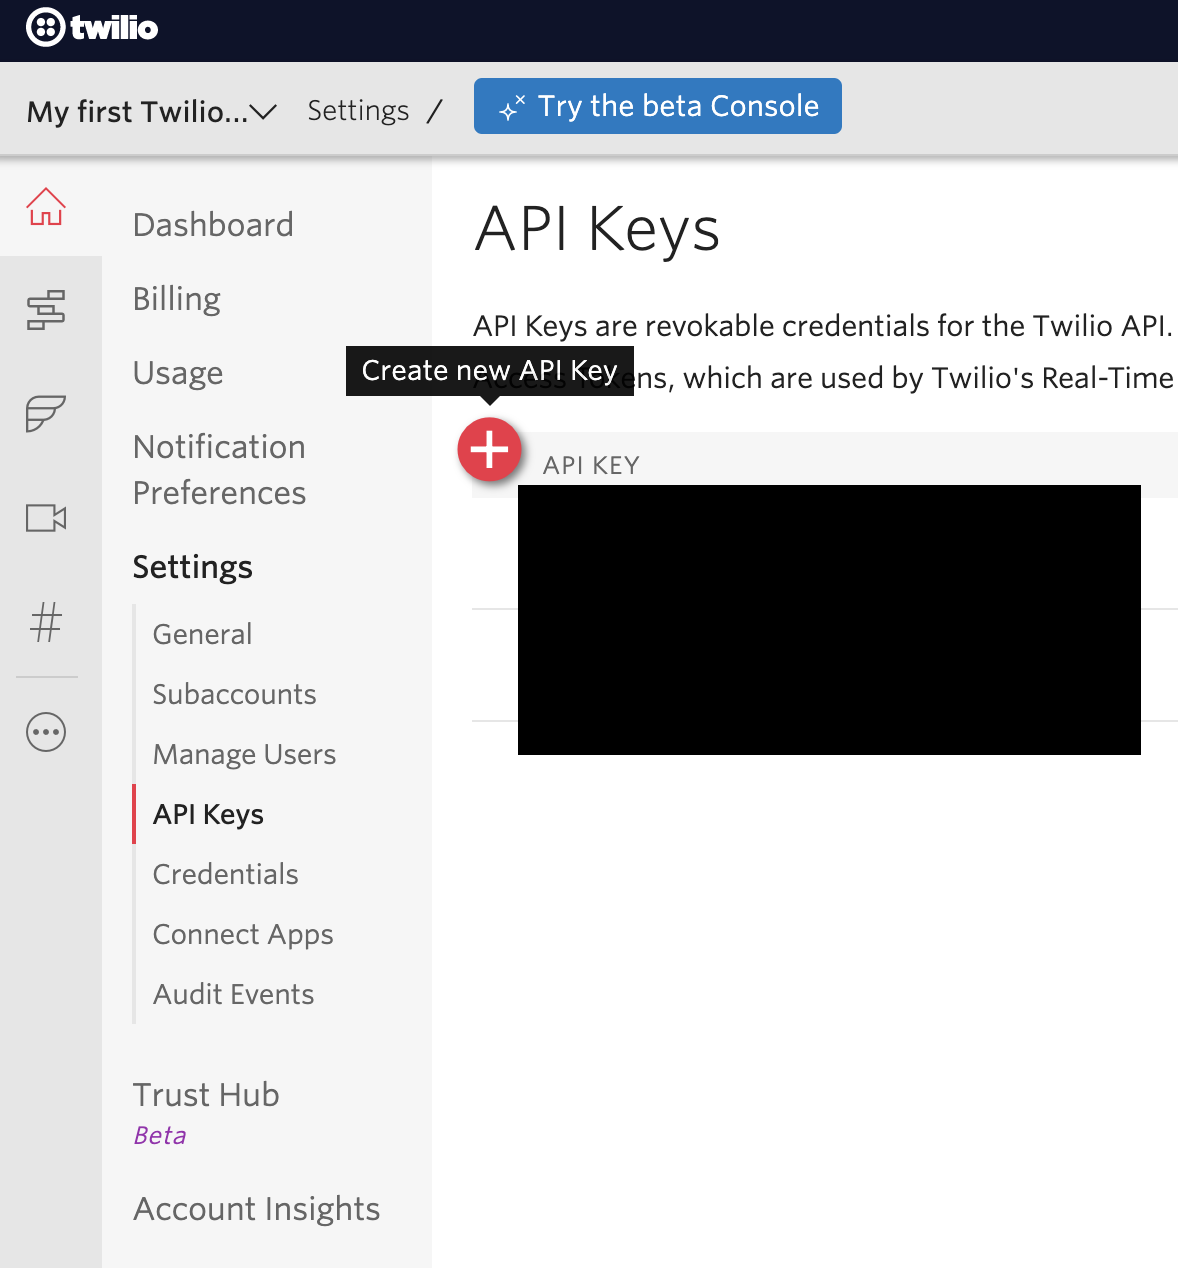
Click on the red plus (+) icon (shown above) if you have other API keys already; otherwise click the Create new API Key button.
When prompted, give your API key a friendly name like "Video API Tutorial Key", so you'll remember what this key is for in the future. Then, select your key type. For this tutorial, a Standard key will work fine. Take note of the API key and secret that are generated, and keep them in a secure place.
Store environment variables in a .env file
Next, create a .env file at the root of your project. This is where you will keep your Twilio account credentials.
Open the .env file in your text editor and add the following variables:
You’ll need to replace the placeholder text above with your actual Twilio credentials.
Replace the placeholders for TWILIO_API_KEY and TWILIO_API_SECRET with the API key and secret you generated in the previous step.
Then, return to the Twilio Console to find your Account SID.
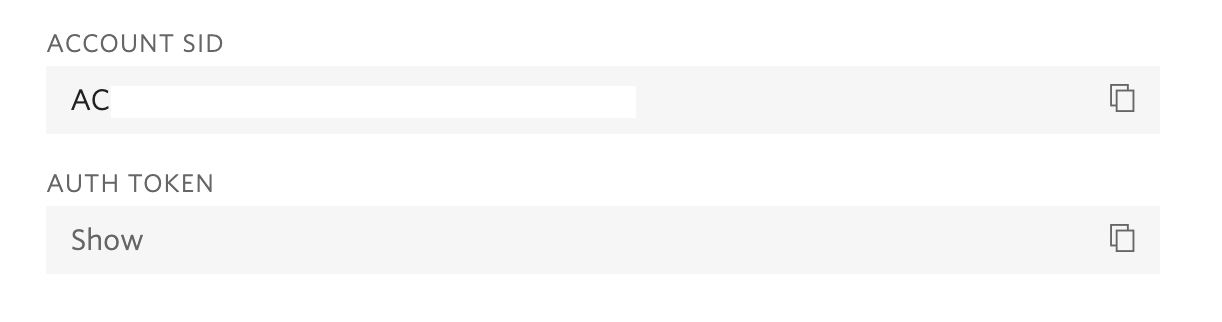
Copy and paste the value for Account SID into your .env file.
Now you have all of the credentials you will need for this project. It’s very important to keep these credentials safe, so you’ll want to create a .gitignore file to avoid committing the .env file to your git repository.
In the root directory of your project, create the .gitignore file using the following command:
Then open .gitignore in your code editor and add the .env file:
Access environment variables from a config.ts file
Now that you’ve got your environment variables set up, create a new directory named src, where your source files will live. Inside that directory, create a new file called config.ts that will allow your API to access these variables:
Adding the following code to src/config.ts:
Now you’re ready to configure your TypeScript setup.
Set your TypeScript configuration with a tsconfig.json file
Move up one directory, if you’re still inside the src folder. Then run the following command to create a tsconfig.json file:
If you review this file in your code editor, you’ll find that there are a ton of possible settings for your TypeScript compiler there. To learn more about these settings, you can check out the documentation for TSConfig.
You’ll only need to set a few of the settings for this project, so replace the contents of tsconfig.json with the lines below:
The most important settings to notice here are:
target: This sets the particular version of JavaScript you want to target in your project. For this project we’re targeting ES5.rootDirandoutDir: In this project, the compiler will look for TypeScript files in src (rootDir) and output the processed files to the build directory (outDir).
Okay, now that you’ve got your project set up, it’s time to start building the video API!
Build the video API
Configure the Express server
Start by setting up your Express server and getting it running. Inside the src directory, create a file called index.ts.
Create another directory inside src called routes. Inside this folder, create a file called room.ts. This is where you'll build the routes for your video room API.
When you’ve completed this step, you should have a file structure like this:
Open src/index.ts in your code editor and add the following code to create your Express server:
Locate the scripts section of your package.json file. Add a comma after the test script, then add the following start script on the line below that:
It’s time to run your server! From the command line, run the following command:
You should notice log records similar to these printed in your terminal:
You may or may not have a longer file path before express-video-api@1.0.0 start, but as long as the Express server listening on port 5000 log is present, you’re ready for the next step.
Because you're using node-dev here, the server will automatically reload when you change the code in your *.ts files. So there's no need to worry about stopping and restarting the server every time you make a small change. It’ll happen automatically! Isn’t that cool?
Leave the server running in one tab of your terminal window. Open another tab to continue on with the rest of the tutorial.
Build the routes
To manage your video rooms, you'll want a way to create a new room, list all of the in-progress rooms, get a specific room by its unique ID, and change a room's status from in-progress to completed when it's time for the video call to end. In this tutorial, you'll be using the Express router to handle these requests. The following sections will walk you through building each of these routes in your API.
Initialize the Twilio client
Begin by initializing the Twilio client in src/index.ts. Just below your import for express, add the following lines of code:
This will create a new Twilio client using the environment variables in your config file, and then export that twilioClient so that it can be used across your API.
Create a new video room
The next step is setting up a new router. Open src/routes/room.ts and add these imports at the top of the file:
Then, create an interface to work with room data. Interfaces are TypeScript’s way of defining the syntax that a particular data type—in this case, an object—should conform to.
Add the following to the room.ts file:
Next, create a new router called roomsRouter below the newly defined interface.
Then, export roomsRouter so it can be used elsewhere in your API.
Your file should look like this now:
It's time to add your first route. In room.ts and right above the export line, add the following code:
When you POST your request to this /create endpoint with a room name in the request body, the code will call the Twilio Video Rooms API to create the video room. The API will respond with a 200 OK response along with the details of the created room, which you will be able to find in your terminal window. Once you create a room, it will stay active for 5 minutes even if no one joins the video chat.
In the case that something goes wrong, the error is caught in the catch statement, and a helpful error message will show up in your terminal.
Now that you've got a new route in your router, make sure to include the router in your main src/index.ts file so that the file looks like the example code below.
Or, if you prefer to use a cURL request, run the following command:
When you make your request to the /create endpoint, a response should appear in your terminal similar to the one below:
If you check the uniqueName field for this created room, it should match the "Room 1" that you entered above. This means that your video room is created and alive online!
List active video rooms
Now that you are able to create new video rooms, wouldn’t it be great to get a list of all the in-progress rooms?
This next route has a similar structure to the one you wrote in the previous section. In this one, however, you’ll use the interface you created earlier in the tutorial to return only select data about each room—the room’s unique identifier (sid) and its name (uniqueName).
Add the following code below the /create route and just above the export line:
Using the HTTPie or cURL commands from the previous section, create new video rooms called “Room 2” and “Room 3”.
When you've created the new rooms, try listing these in-progress rooms by running the following command with HTTPie:
If you’re using cURL, you can run this command:
The response will contain a list of the active rooms, as shown below:
If there are no active rooms, you’ll see the message No active rooms found.
Get details about an existing video room
Now that you can list the video rooms, what if you wanted to get details about a specific room? It’s time to add a route that will return that room for you.
In the room.ts file, below the route for listing rooms, add the following code to retrieve a room by its unique identifier (sid):
Create a new video room called "Room 4" using HTTPie or cURL. Take note of the room's sid from the response in your terminal. Then try calling the new endpoint to get this room by its sid.
Here's the command if you are using HTTPie:
Here's the cURL command:
The response in your terminal will contain the details of the selected room:
Close a video room
To complete your API, add a route for closing a video room. This will end the video chat and also disconnect any participants who are still connected to the room. With the Twilio Video Rooms API, all you need to do to close a video room is change its status from in-progress to completed.
For this route, you'll pass in the sid of the room you want to change. Add the following code just above the export line in room.ts:
Create another video room called “Room 5”. Once you’ve created this room, take note of the room’s sid in your terminal. You’ll also notice that the room has a status of in-progress.
When you’re ready to try closing the room, run the following command with HTTPie:
If using cURL, run this command instead:
The response in your terminal will let you know that the room is now closed:
What to build next with your video API and Twilio Programmable Video
Being able to create and manage video rooms programmatically is a great step towards building the video-enabled app of your dreams. With this as a starting point, you could build all sorts of ideas, from EdTech to social media to telemedicine.
If you want to take a look at the code from this tutorial in its entirety, you can find it here on GitHub, on the getting-started branch.
In future tutorials, you’ll have a chance to build on this API to create other interesting projects. Or perhaps you already have an idea in mind and are ready to give it a go. I can’t wait to see what you build!
Mia Adjei is a Software Developer on the Developer Voices team. They love to help developers build out new project ideas and discover aha moments. Mia can be reached at madjei [at] twilio.com.


Related Resources
Twilio Docs
From APIs to SDKs to sample apps
API reference documentation, SDKs, helper libraries, quickstarts, and tutorials for your language and platform.
Resource Center
The latest ebooks, industry reports, and webinars
Learn from customer engagement experts to improve your own communication.
Ahoy
Twilio's developer community hub
Best practices, code samples, and inspiration to build communications and digital engagement experiences.