Build a Chatbot with GPT-3, Twilio Programmable Messaging, and JavaScript

Time to read: 7 minutes
November 23, 2022
Written by
Reviewed by
In this article you’ll learn how to build a chatbot using GPT-3 text completion, Twilio Programmable Messaging, and JavaScript. This SMS based chatbot is going to be your new AI best friend! You’ll learn how to engineer your ideal bot by feeding a customized prompt to GPT-3.
Prerequisites
To get started with this tutorial, you’ll need the following:
- Node.js v14.0+ installed on your machine, along with a package manager like
npmoryarn - The Twilio CLI installed on your machine (make sure you’re logged in!)
- An ngrok account and ngrok v3.0+ installed on your machine (be sure to authenticate!)
- A free Twilio account
- A Twilio phone number
Initialize your app
Open your terminal and navigate to a suitable location for your project. Create a project directory for your app called aifriend and then navigate inside it:
Then, run the following command to initialize a new Node.js project:
The next step is to install your dependencies by running the following command:
express and express-session will be used to build your local server and store session data that you’ll need to keep track of the conversation. dotenv is used to access your environment variables in your app. twilio is used to integrate SMS functionality, and openai is the dependency needed to work with GPT-3.
Get your OpenAI API key
In order to build your AI friend, you’ll need an API key from OpenAI. How to retrieve this credential will be explained shortly. But first, you’ll need a protected place to store it.
Create a file called .env in the aifriend folder.
Copy the following code into your new .env file:
In the code above, <your API key> is a placeholder that will be replaced in the next step with your actual OpenAI key.
To get the key, navigate to OpenAI’s login/sign up page in your browser. If you already have an OpenAI account, go ahead and login. If you don’t, create one on this page. If you don’t already have an account, note that you might be prompted to validate your email address before continuing.
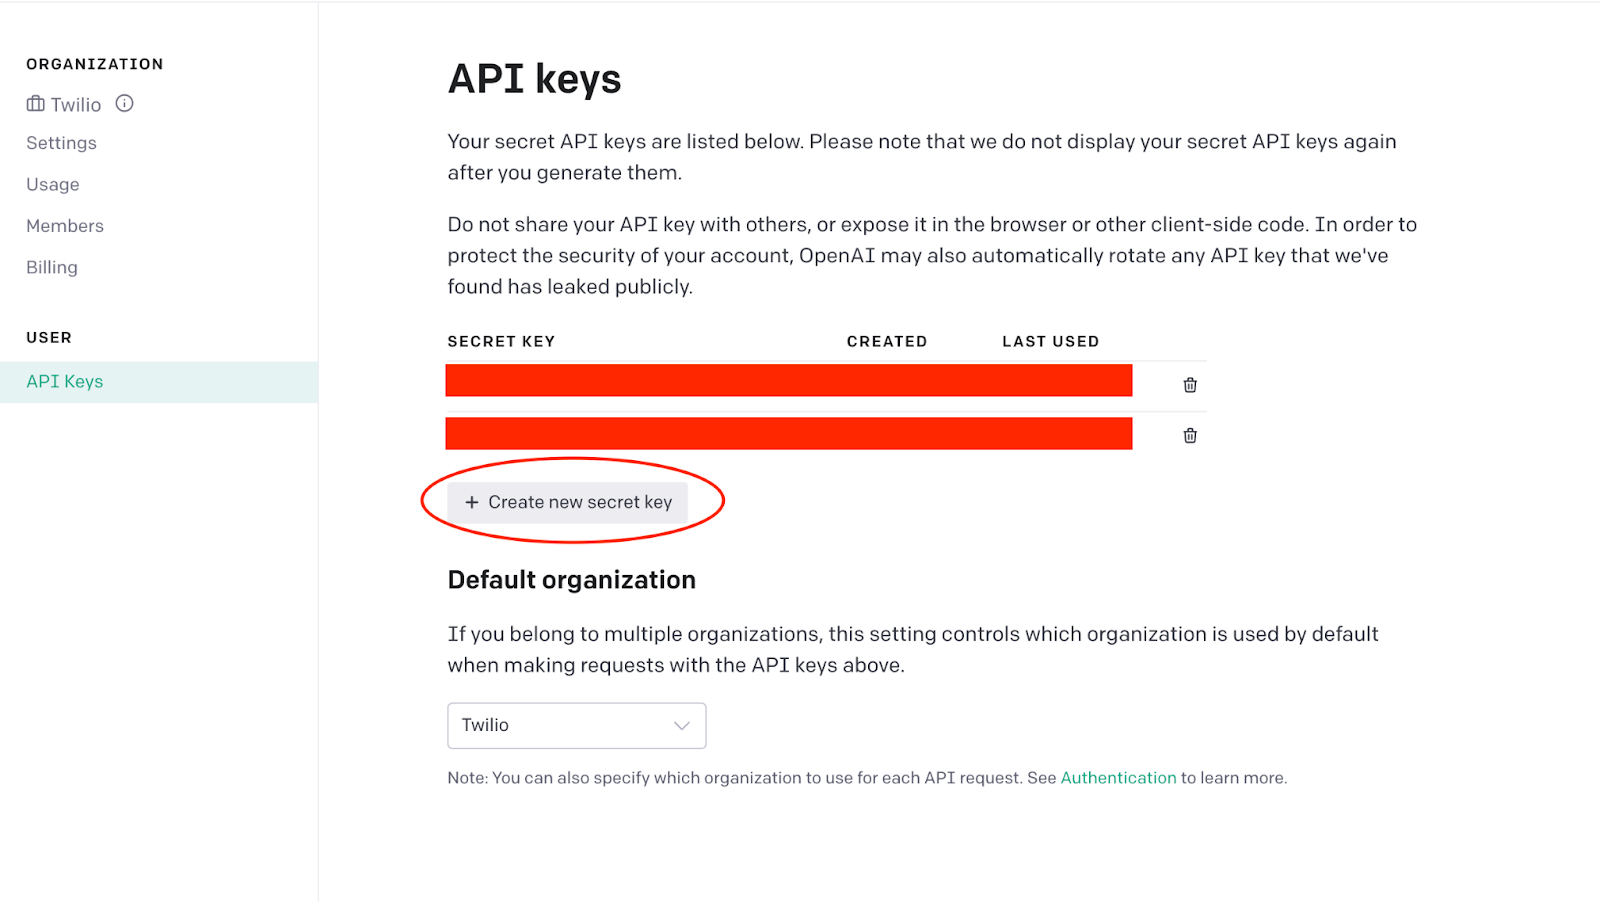
After you have an account and have logged in, navigate to your API keys dashboard which can be found by clicking your name in the top right corner and then selecting View API keys.
Click the button that says Create new secret key as shown in the following image, which will generate a new key that you can copy.
Back in your .env file, replace <your API key> with your newly generated key from OpenAI. Save the file and close it.
Build the app
In your top-level aifriend directory, create a new file called index.js. This file is going to be where you add all the code for your app. Open this file in your favorite text editor.
Import and initialize dependencies
Import all your necessary dependencies (the ones you installed earlier in this tutorial) by pasting the following code into your new index.js file:
Beneath your imports, paste the following code to set up your Express app and initialize some of your dependencies:
Create your POST route
The next step is to create an Express route that will serve as an endpoint for POST requests to your app. The route will be reached whenever there is an incoming text message to your Twilio phone number; you’ll set up this webhook in a later step.
Below the existing code in index.js, paste the following route definition:
Inside your new route, you’ll first need to initialize a Twilio MessagingResponse object by adding the highlighted line inside your post route:
Everytime your Twilio phone number receives a message, the code inside this route will be run from the top. Without some mechanism to keep track of where the user is in their conversation with the bot, the user would end up starting the conversation over every time they tried to reply.
In this app, you’ll use sessions to maintain the user’s place in the conversation. Sessions are variables that can be persisted across the many interactions the user will have with the app. They will be managed by the express-session dependency you installed and initialized earlier in this tutorial.
All session variables can be accessed and updated via the req.session object. The four session variables that will be created and utilized in this app are as follows:
init, a boolean indicating whether or not the conversation has been startedpersonality, a string containing the adjectives the user provides to describe their ideal AI friendname, a string containing the user’s nameprompt, a string containing the original prompt that will be fed to OpenAI
Check whether the user has started a conversation
Inside your route, below where you initialized the Twilio MessagingResponse object, paste the following code:
This code checks to see if the init session variable does not exist. If it doesn’t, that means the user has not yet started a conversation with the app. In this case, the app replies with a generic message prompting the user to provide adjectives describing their ideal AI friend.
It also sets the init session variable to true so that this step will be skipped when the user replies again. It then sends the intro message back to the user and exits, making sure no code below this if-statement is run.
Check whether the user has provided adjectives
Below the code you just added, inside your route, paste the following code:
Like in the previous step, this code checks to see whether the personality session variable is falsey. If the app makes it to this if-statement it means that the user has started a conversation, but hasn’t yet provided adjectives. The app won’t allow them to move on until they do.
The code inside this if-statement will set the personality session variable to the body of the incoming message and reply to the user with a prompt asking for their name. Then the app exits, so no further code will be run. Whenever the user replies again, this if-statement will be false and thus this step will be skipped (just like the first step).
Check whether the user has provided their name
Below the previous if-statement, paste the following code:
In this code, the if-statement checks to see if the name session variable is falsey/undefined. If it is, that means the body of the incoming message must contain the user’s name, and it assigns this string to the req.session.name session variable. On future runs, this step will be skipped because the code inside the if-statement won’t run.
Notice how, unlike the two if-statements that came before it, this if-statement does not exit. That’s because once the user has reached this step, and the app has successfully recorded their name, you want the app to keep going.
Once the app has the name, it can create a prompt and feed it to OpenAI. It’s the completed text returned from OpenAI that will be sent in the reply to the user.
Create the prompt for OpenAI
Below the previous if-statement, paste the following:
This code checks if the prompt session variable is falsey/undefined. If that’s the case, then it crafts an initial prompt that includes the user’s provided adjectives and their name and saves this prompt to the req.session.prompt session variable. Feel free to play around with this prompt, or add more back and forth replies to see what happens. Just to be sure to end the prompt with “AI: ”.
In the case that the prompt session variable already exists, that means the user is already engaged in conversation with the AI, and that the body of the incoming message is a reply to the AI. In this scenario, the incoming reply will be tacked onto the existing prompt.
Notice that in the code above, you’ve created a pattern of labeling the Human and AI responses. This pattern helps give context to the text completion algorithm so it knows what to say next.
At this point you now have a prompt (either the initial prompt, or the text of the entire conversation so far) to give to OpenAI for text completion:
Feed the prompt to OpenAI and reply to the user
Below the code above, still inside your route, paste the following code:
This code sends the text completion request to OpenAI and passes along the model, prompt, temperature, and max_tokens. You can customize this request with other parameters, and play with the ones demonstrated here to see how this affects your text completion.
When the response is received it’s saved to a variable called bot which is cleaned and then sent as a reply to your user. The reply is also tacked on to the end of the existing prompt and saved in the req.session.prompt variable. This way the entire conversation up until that point is persisted and can be fed back once the user replies again.
Below your entire route, at the very bottom of the file, add the last few lines of code:
Save your file. You can close it if you like, you’re done coding.
Create your webhook
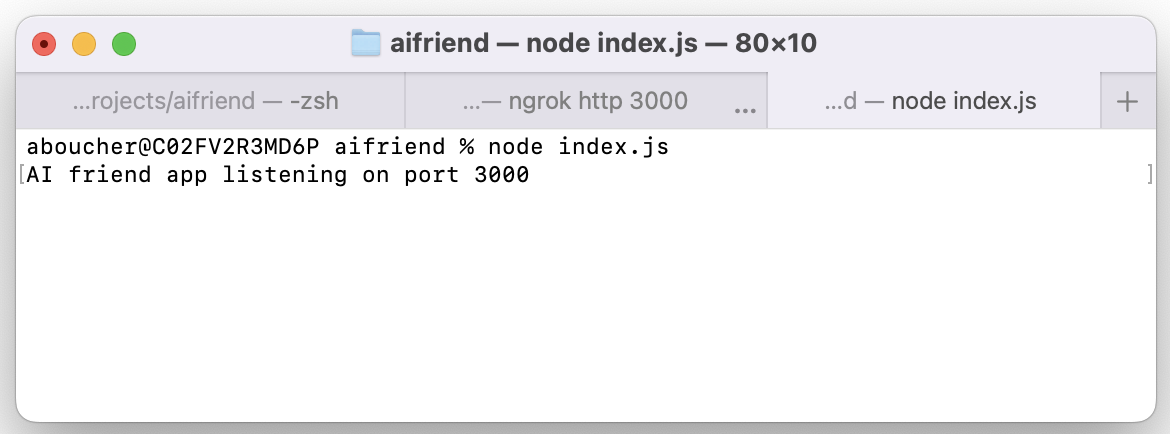
Back in your terminal, make sure you’re still in your aifriend directory. Start up your local server by running the following command:
Once you run this command, unless there’s an error in your code, you’ll see something like this in your terminal:
Leave this local server running in this terminal window, and open up a second terminal window. Navigate back to your aifriend directory. Once you’re there, run the following command to use ngrok to start a tunnel to your local server:
Once you run this command, ngrok will open the tunnel and provide you with a secure URL that you’ll use for your webhook. The URL is the second forwarding URL, preceded by https://, as shown circled in the following image:
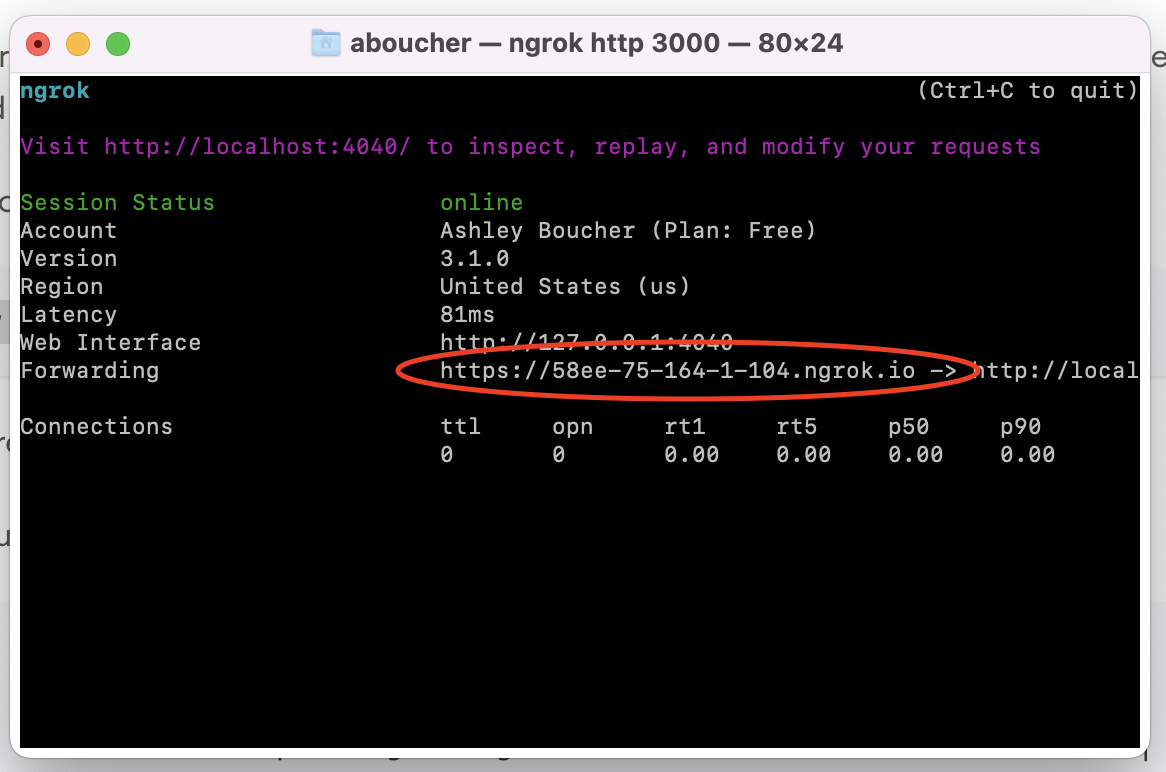
Copy this URL and paste it into a text editor or a note—anywhere where you can edit it—and add the text /bot to the end of it, so that your complete URL looks something like the following:
Hang on to this new URL, you’ll use it in just a second.
Open one more terminal window and paste the following command to create the webhook between your Twilio phone number and your app:
Before running the command be sure to replace <YOUR TWILIO PHONE NUMBER> with your Twilio phone number in E.164 format, including the + prefix. Also, replace <YOUR SECURE NGROK URL>` with the complete URL ending in /bot.
Run the command. At this point, your app is complete.
Test the app and chat with your new AI friend
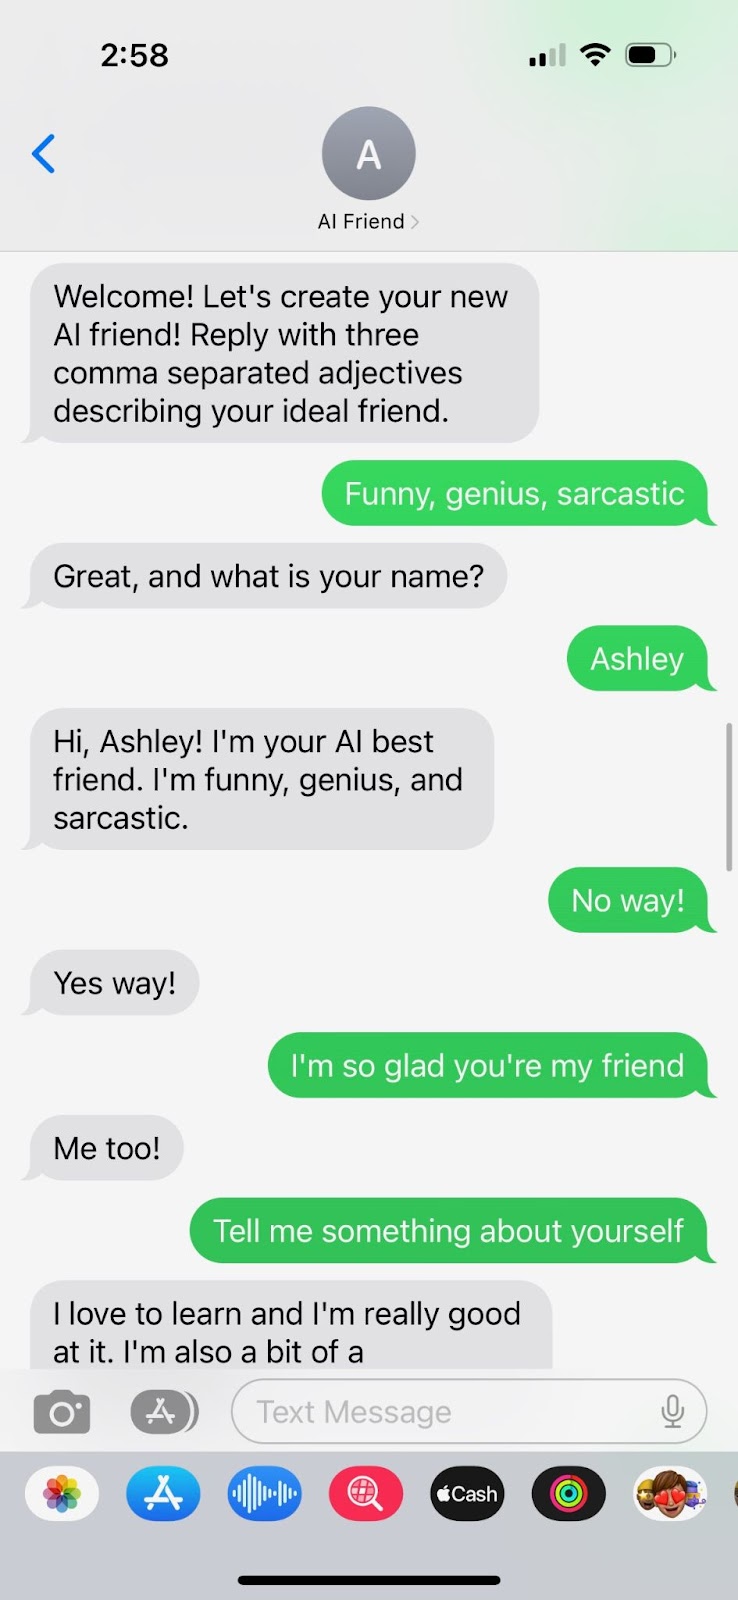
From your personal phone, send a message to your Twilio phone number. You should receive an intro message that asks you for three adjectives describing your ideal AI friend. Then you’ll be asked for your name. At that time, the prompt created in your app will be sent to OpenAI, and a message from your new AI friend will be replied to you. Keep chatting, and have fun!
I really hope you enjoy your new AI friend and that you had fun learning about OpenAI and GPT-3. If you did, try building a Discord GPT-3 chatbot with Node.js.
Ashley is a JavaScript Editor for the Twilio blog. To work with her and bring your technical stories to Twilio, find her at @ahl389 on Twitter. If you can’t find her there, she’s probably on a patio somewhere having a cup of coffee (or glass of wine, depending on the time).


Related Resources
Twilio Docs
From APIs to SDKs to sample apps
API reference documentation, SDKs, helper libraries, quickstarts, and tutorials for your language and platform.
Resource Center
The latest ebooks, industry reports, and webinars
Learn from customer engagement experts to improve your own communication.
Ahoy
Twilio's developer community hub
Best practices, code samples, and inspiration to build communications and digital engagement experiences.