Hello Deno
Time to read:
October 20, 2020
Written by
Reviewed by
This post is part of Twilio’s archive and may contain outdated information. We’re always building something new, so be sure to check out our latest posts for the most up-to-date insights.

Deno is a new runtime environment for JavaScript and TypeScript. Deno founder Ryan Dahl, who was also the founding developer of Node.js, says Deno is intended to be a more modern version of Node.js.
When Node.js was first released, in 2009, JavaScript didn’t have the async-await mechanism, typed arrays, or the ECMAScript module system. At the time, Dahl recognized that an event loop would be an essential resource for server-side JavaScript and set to work on creating a runtime environment that included one.
By 2012, Dahl felt the primary goal of creating a user-friendly non-blocking framework had been achieved, with Node.js having support for multiple protocols, cross-platform support, a relatively stable API, and a growing ecosystem of external modules distributed through npm.
But over time it became apparent to Dahl that a number of design decisions, like the early removal of Promises, caused problems. Security, the GYP build system, and the lack of a core foreign function interface (FFI), index.js, and package.json + node_modules are persistent problems.
Rather than try to fix all the problems of Node.js and deal with the tons of legacy APIs, Dahl decided to build a new runtime system born of the wisdom and experience of the past decade. You can—and should—learn more about the origins of Deno in his 2019 JSConf EU talk, 10 Things I Regret About Node.js.

Deno characteristics
Deno is built with the Rust programming language and uses the V8 JavaScript engine, like Node.js.
Node.js and Deno have a lot in common, but there are a number of key differences:
- Deno supports TypeScript out of the box without requiring transcompilation into JavaScript.
- Deno’s main function is asynchronous, so you can use the
awaitkeyword in top-level code. - Deno is secure by default; it has no access to the file system, network, or environment variables as long as the user does not explicitly grant that access using command-line permission flags like
--allow-read,--allow-write, and--allow-net. - The Deno project doesn’t include the package.json file and node_modules directory. All dependencies are included as native ECMAScript modules using the import statement, including a URI. (Node.js uses the CommonJS API for loading dependencies from the file system.)
- Downloaded dependencies are kept in the global cache directory and can be reused by other applications.
- Deno can run applications directly from a specified URL; there is no need to download the application to the disk.
- Deno ships with useful CLI tools like a dependency inspector (
deno info) and code formatter (deno fmt).
What you’ll learn in this post
In this post you’ll get hands-on experience programming in Deno. You’ll learn how to pass command-line arguments to Deno and use it to read files from the disk. You’ll also learn about the Deno security system and where to find third-party libraries for Deno programs. You’ll use the underscore.js library to compare objects for equality as a practical example of importing and using an external library.
Prerequisites
You’ll need the following tools to accomplish the task in this tutorial:
- Deno – Installation instructions are included in this tutorial.
- Git – Required to clone the companion repository or if you want to use it for source code control.
- Visual Studio Code – You can use another IDE or code editor, but these instructions are written with VS Code in mind.
- Deno extension for VS Code (denoland.vscode-deno) – If you’re using Visual Studio Code, this official extension provides Intellisense support and other important features.
Twilio account – It’s not required for this tutorial, but readers of this post can receive an additional $10 credit on their Twilio accounts when they sign up with this link.
To get the most out of this post you should also have a basic working knowledge of JavaScript. An understanding of the JavaScript callback loop, event queue, and Promises will also be helpful. See the other posts in this series listed in the Additional resources section if you need to get sharp on those concepts.
There is a companion repository containing the complete source code for the project available on GitHub.
Installing Deno
Deno is available through most of the popular package managers and the PowerShell Invoke-WebRequest utility: Pick the one that’s appropriate to your development environment and execute the command.
PowerShell (Windows, macOS, Linux):
HomeBrew (macOS):
Shell (macOS, Linux):
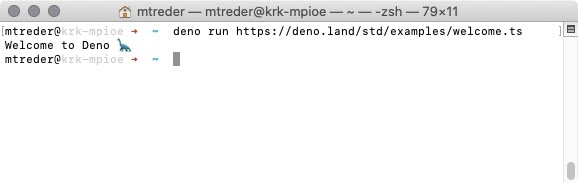
Once the installation is done, you can verify it by running the “Hello World” program:
In the output you should see the “Welcome to Deno” message in your console window:
Understanding the case study project
In the tutorial presented in this post you will create a program that compares objects for equality. You will define a Person interface that specifies three attributes: name, surname, and age.
You will create three objects that implement the Person interface. The first object by providing attributes in code, the second object by passing a reference to the first one, and the third by loading and parsing content from a file.
Finally, you will compare those three objects for compatibility using pure TypeScript and learn how to utilize underscore.js to make a deep comparison of the objects.
Setting up the project
Create a new file called index.ts in the directory which you’d like to be the project root directory. Once you’ve done that, the Deno project is ready to use: no package.json, dependencies, or package installations are required.
If you’re using Visual Studio Code with the Deno extension, open the command palette (Ctrl+Shift+P/Cmd+Shift+P) and run deno: Init. This will create a settings.json file in the .vscode folder containing the settings necessary to use Deno in VS Code.
Start coding by defining the interface that you’re going to use in the project. Create a new file called person.model.ts and place the following TypeScript code into it:
Import the interface into the index.ts file and create person1 and person2 objects:
Notice that the import statement you’ve introduced uses the full file name including the extension. Because Deno can run code from the Internet, specified by the URL to the file, it’s crucial that all dependencies are specified with the full file path and means of access, so Deno is able to find and download those files.
Assume that you are going to publish index.ts at the URL http://my-website.com/index.ts. Once you ask Deno to run this application, it will first examine the file and download all the import statements. If you provide the file without its extension, Deno will try to download it from http://my-website.com/person.model and receive a 404 error.
Passing arguments to the application
You’re about to initialize the third object that will be loaded from the file system. Create a file called person.txt and place a serialized object representation to it:
Rather than hardcoding the file path, you will let the end-user specify it with a command‑line argument while starting the program. In Deno it’s easy, as all arguments are accessible under the Deno.args variable. Place the following code at the bottom of the index.ts file:
To pass arguments to the application, list them after specifying which program you want to run. Try this by executing the following command-line instruction in the project root directory:
If you’d like to easily access a given parameter value without needing to traverse the array of strings, you need to use the parse function available in the std/flags library, one of the Deno standard libraries. This function transforms a list of parameters to an object representing key-value pairs. Whenever it encounters the -- characters in the argument list, it treats that entry as a key name. The string following the key name is considered the value corresponding to that key. If the argument list doesn't contain -- the parse function doesn’t do anything and leaves the list intact.
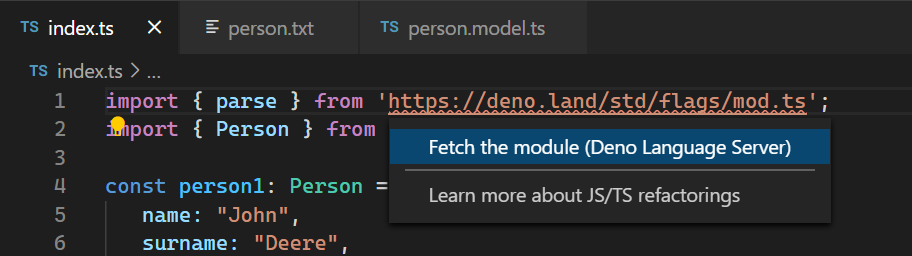
Add the following import statement at the top of the index.ts file:
If you’re using VS Code and the Deno extension, you can open the quick fixes (Ctrl+. / Cmd+.) for the URL and select Fetch the module (Deno Language Server). This will remove the lint.
Alternatively, when you execute deno run to start the program Deno will download the dependencies for the imported libraries.
Locate the following line of code:
Replace it with the following code:
Re-run the program and check the output:
The command-line arguments are now represented by an easy-to-access object rather than an array of strings.
Note: If you want to specify parameter names, always precede them with two dashes: --fileName. If your parameter name is a single character you can precede it with one dash: -f. If you precede a multi-character parameter name with a single dash, -fileName, each character from the parameter name will be treated as a separate argument.
If the command is:
The results are:
Probably not what you intended.
Remove the console.log(parse(Deno.args)); line to simplify the output.
Reading files from the disk
Reading files in Deno can be done by using the Deno.readFile function. This function returns a Promise that resolves with the array of bytes read from the file. To transform the bytes into a string, you need to use the TextEncoder object.
Insert the following code into the index.ts file after the other constant declarations:
The above code reads the file content, transforms bytes to a string, and uses the JSON.parse method to parse it into the Person object.
Using underscore.js to compare objects for equality
JavaScript and TypeScript are good at comparing primitive types: numbers, strings, and booleans. The problem arises when you need to compare complex types: objects and arrays.
Similar to JavaScript, TypeScript doesn’t provide a function to compare objects for equality. The only thing you can do in pure TypeScript is to compare object references. In other words, you can check to see if variables point to the same place in memory:

The diagram above shows how the variables person1, person2, and person3 point, by reference, to different memory locations. As you can see, person1 and person2 point to the same place, addr1, while person3 points to addr5.
Add the following code at the bottom of the index.ts file:
Run the program. This time you need to permit it to read the person.txt file by adding the --allow-read flag:
The output should be:
The application compared the variables’ references, rather than their content. Fortunately, some libraries address this pitfall. One of them is underscore.js, which ships with multiple functions that provides a whole mess of useful functional programming helpers without extending any TypeScript built-in objects.
One of those helpers is a function called isEqual. It provides a mechanism that performs a deep comparison of objects passed as arguments, and tells if they are equal, consisting of the same fields and values, rather than the same, having the same variable reference.
How to find external libraries for Deno
To enhance a Deno application with non-standard functionality you can import additional capabilities using the ECMAScript module (ESM) syntax:
In a Node.js application you would use the npm repository to find dependencies and install them under the node_modules directory, and import them into the application bundle.
Deno is a bit different. A Deno application provides a single executable file; no package.json or dependency manager is involved. Accordingly, you need to specify the URL at which each library can be found. Moreover, the package must be a native ECMAScript module; it must contain a web-friendly entrypoint. An ECMAScript module uses the export statement to publish module parts for use by external code using the import statement.
An alternative system, CommonJS, uses module.exports and require syntax.
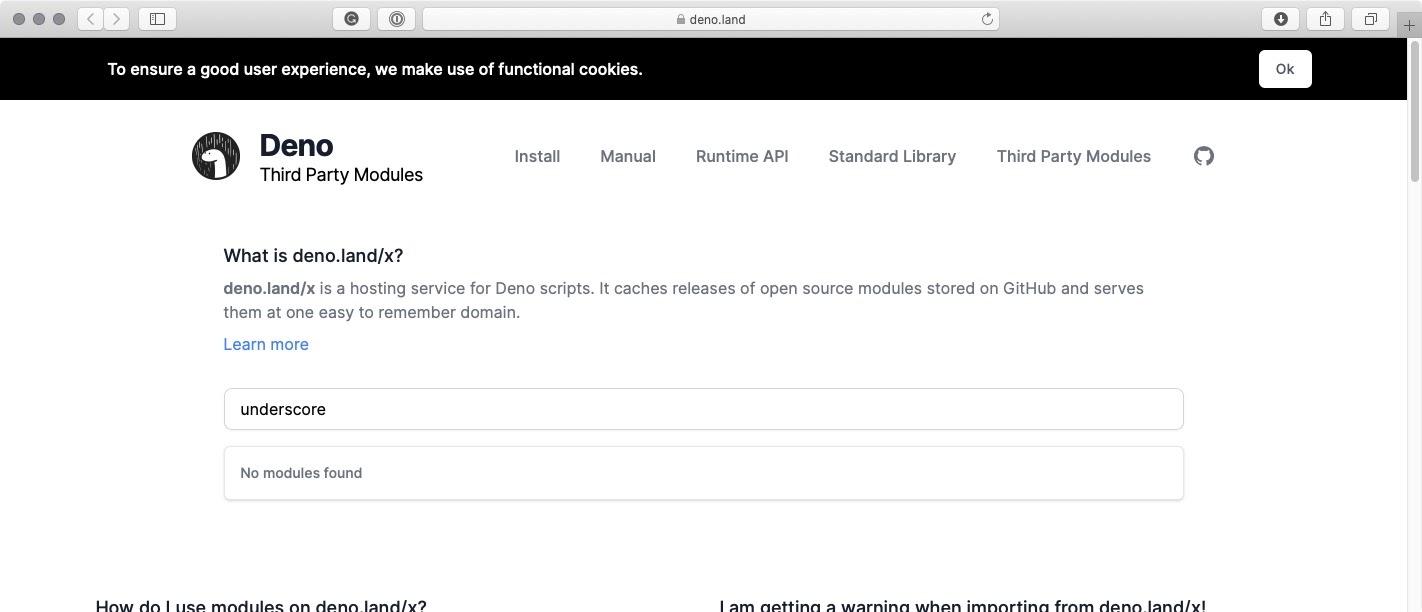
To find packages you can use in Deno, you use the official modules repository available at https://deno.land. Unfortunately, this repository doesn’t contain a lot of libraries. Even some widely-used libraries like RxJS are not included at this time. Underscore.js is missing as well:
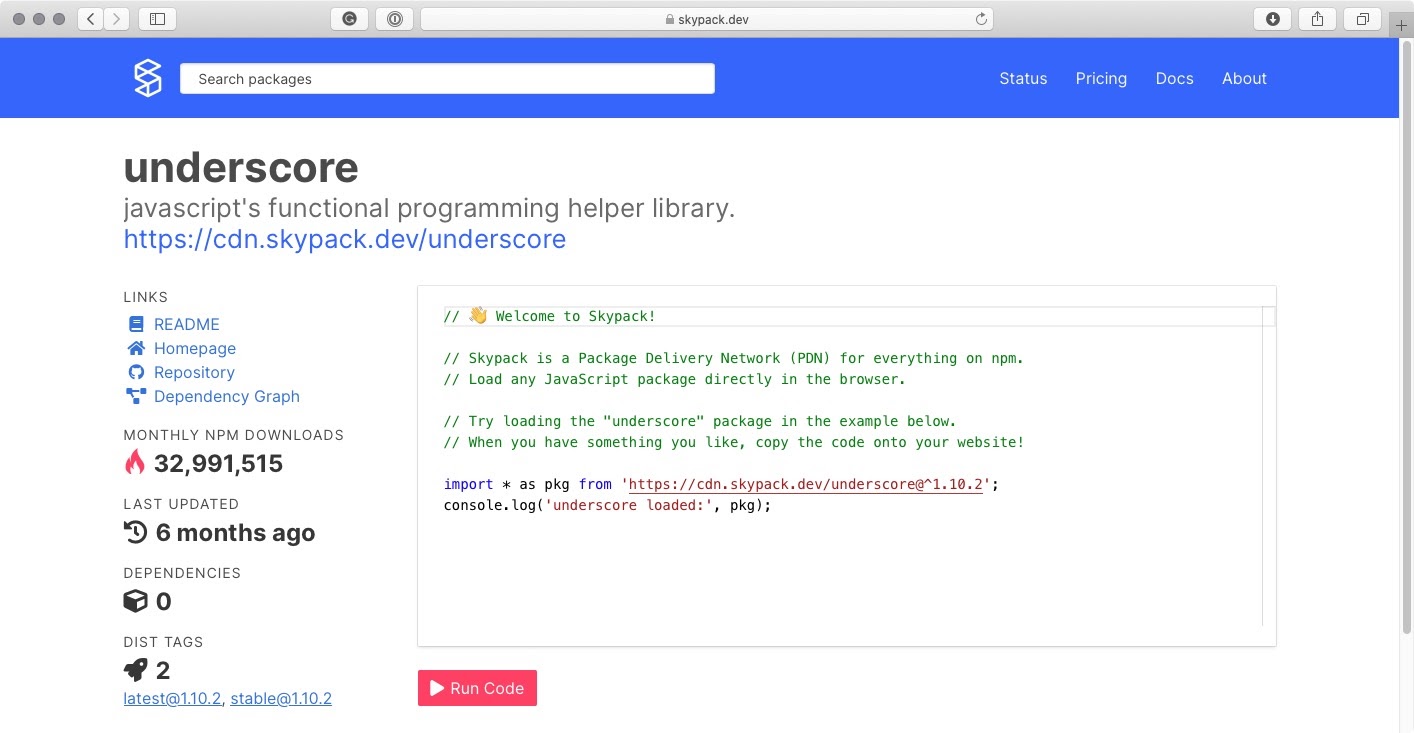
Fortunately, there are other places where you can find web-friendly programming libraries. One of them is Skypack (previously known as Pika). You can search the Skypack directory for npm packages that are web-optimized. If they are, you can import them into your Deno application from the Skypack package delivery network (PDN), which is like a content delivery network (CDN) for code.
Navigate to https://skypack.dev and type “underscore” in the search box. Follow the first link in the result list. You should see a directory page that tells you how to use the underscore.js library in your web-optimized application:
Add the following import statement at the top of the index.ts file:
This is how the index.ts file should look like after all the changes above:
Run the program with the same command you used before:
Examine the output. You should see that the last three lines, which are produced by the _.isEqual method, show that the person variables are equal even though they aren’t all the same:
As you can see, _.isEqual doesn’t compare variable references; it compares each attribute of the objects passed as arguments for equality.
Cloning and running the completed project
If you haven’t been following along, but would still like to run the program in this tutorial, you can find the complete code in the companion repository. To clone the repo, execute the following command-line instructions in the directory where you would like to create the project root directory:
But if you’re really into labor-saving techniques, you don’t even have to download the code to run it. Deno has another cool feature.
Running a Deno app from a GitHub repo
To demonstrate how versatile the Deno deployment system is, and how versatile the Skypack PDN is, you can run this program directly from the companion repository on GitHub without doing any local code installation at all.
Create a new directory wherever it’s convenient and copy the person.txt file into it. Change to that directory. Execute the following Deno command-line instruction:
How cool is that?
Summary
This post provided you with a brief introduction to the Deno runtime environment for JavaScript and TypeScript and showed you some of its unique features. You learned how to install Deno and create a Deno program. You also saw how to find and import libraries from Skypack and how to use underscore.js to compare objects.
Additional resources
Refer to the following sources for more information on the topics discussed in this post:
Asynchronous JavaScript: Introducing async and await – Learn to program with the JavaScript async and await keywords.
Underscore.js – This library is a mesh of related tools you can use to enhance your JavaScript and TypeScript applications.
TwilioQuest – Defeat the forces of legacy systems with this 16-bit style adventure game.
Maciej Treder is a Senior Software Development Engineer at Akamai Technologies. He is also an international conference speaker and the author of @ng-toolkit. You can learn more about him at https://www.maciejtreder.com. You can also contact him at: contact@maciejtreder.com or @maciejtreder on GitHub, Twitter, StackOverflow, and LinkedIn.
Gabriela Rogowska contributed to this post.
Image credit: The Deno dinosaur illustration is by Kevin (Kun) "Kassimo" Qian.

Related Resources
Twilio Docs
From APIs to SDKs to sample apps
API reference documentation, SDKs, helper libraries, quickstarts, and tutorials for your language and platform.
Resource Center
The latest ebooks, industry reports, and webinars
Learn from customer engagement experts to improve your own communication.
Ahoy
Twilio's developer community hub
Best practices, code samples, and inspiration to build communications and digital engagement experiences.