How to Send Automatic Recurring Emails in Python With SendGrid
Time to read: 6 minutes
February 06, 2023
Written by
Reviewed by

Businesses often need to send emails programmatically at specific times or regular intervals. You can set this up in Python using the Twilio SendGrid API with the Redis Queue and RQ Scheduler. Let's walk through how to automate email sending one step at a time.
What is the benefit of automated emails?
With automated emails, businesses can email customers based on event triggers or scheduling strategies. For example, in response to a webhook, a Python application can prepare an email and schedule it to send later.
Then, say a customer signs up for promotions by entering their email address in a web form. When they submit the form, this triggers a Python application that immediately sends a welcome email and schedules a follow-up email with a promotional discount for the next morning.
Sending emails programmatically with a service like SendGrid means you don’t risk forgetting about routine customer communication tasks. Gone are the days of time-consuming and error-prone manual emailing.
When you couple your Python application with SendGrid and take advantage of libraries like Redis Queue and RQ Scheduler, you’ll enter an email automation world with endless possibilities.
Prerequisites and dependencies for Python email automation
Before you start writing code, ensure you have the following:
- The Python 3 software installed on your machine
- A SendGrid account (the free tier is adequate for this demo)
- An email address for testing out our email sending automation
With those pieces in place, install the following Python library dependencies:
sendgrid: You’ll need this to work with the SendGrid Web API.rq-scheduler: You’ll need this lightweight, elegant solution built on top of the Redis Queue (rq), which we’ll use for simple task scheduling
Let’s walk through the following initial setup steps:
1. Create a virtual environment
First, create a virtual environment and activate it.
Working within our virtual environment, we’ll create a project folder called demo.
If you're working within a Windows environment, the commands to activate a virtual environment and create a demo directory would look like this:
2. Install the Python dependencies
Now, in our project folder, we can install the Python dependencies we’ll need:
We can verify our properly installed dependencies by running a pip list. The resulting list shows the dependencies we’ll need.
3. Ensure Redis server is installed and running
The rq and redis Python modules will install as dependencies with the rq-scheduler. However, these modules depend on installing Redis on your local machine. So if you need to install Redis, do so, then run the following command:
Ensure the Redis server is up and running—either as a foreground process in a separate terminal window or as a background daemon service. To start up the Redis server manually, do the following:
Now that we’ve installed all our dependencies, we can begin working on our demo application.
Steps for using Python and Twilio SendGrid to send automated emails
Follow these steps to enable your Python application to use the SendGrid API for sending emails, starting by creating an API key for authentication.
1. Sign up for SendGrid and create an API key
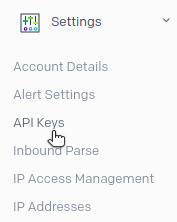
After creating and logging into your SendGrid account, navigate to Settings > API Keys.
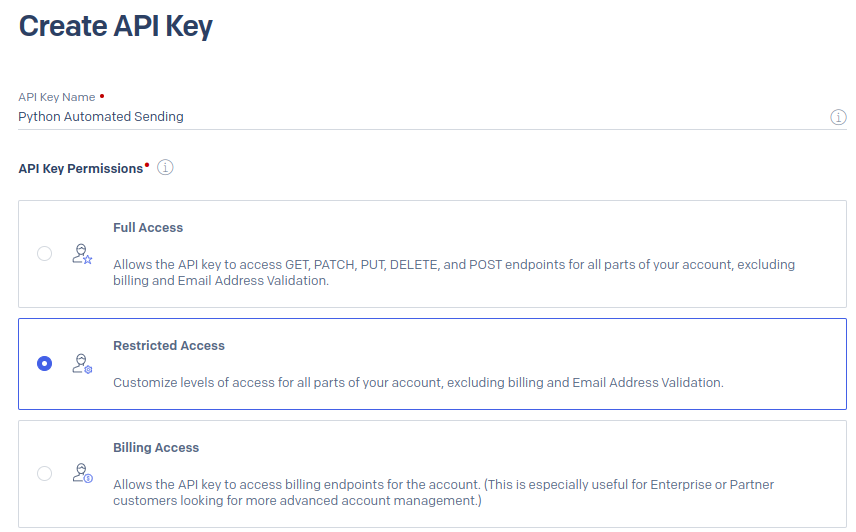
Click on Create API Key. Provide a name for the API key. However, to keep the API key privileges minimal, select Restricted Access.
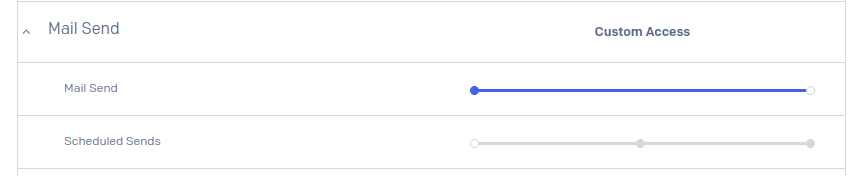
Then, under Access Details, turn on access for Mail Send.
Click on Create & View to complete the creation of your API key. However, don’t forget to copy the value of your new API key before proceeding.
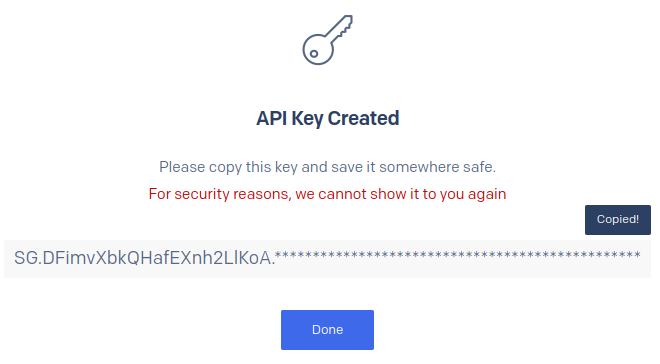
We’ll need this API key in our Python application. However, referencing this API key as an environment variable is a more secure approach than hard coding it into your Python code. So set a new environment variable called SENDGRID_API_KEY, giving it the value you just copied from SendGrid.
If you need help with setting environment variables, we have a useful tutorial.
2. Send an email with Python
Now that you have a SendGrid API key, you're ready to dive into some code and send emails. Let’s start by verifying that we can send emails through the SendGrid API.
In your project folder, create a new file called send_email.py with the following code:
However, before running this code, remember to replace the from_email value with an address for a verified sender identity for your SendGrid account and the to_emails value with an email address that you can access. If the SendGrid API key environment variable is correct, this code should work.
Note that in production applications, you should verify your sender identity by completing domain authentication. A sender identity represents your “from” email address—the address your recipients see as the sender of your emails. For a step-by-step tutorial, check out How to Set Up Domain Authentication for Twilio SendGrid.
Use the following command to run your Python code:
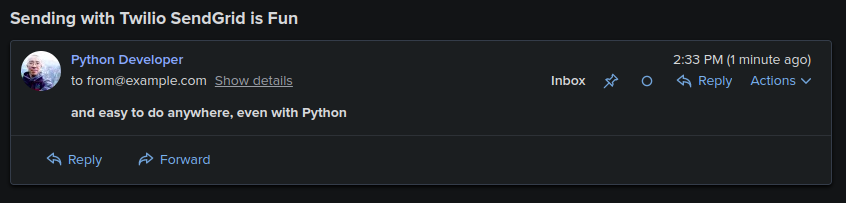
If your test send was successful, you’ll see a 202 HTTP response code. Then, check your inbox to verify you received the email.
However, if running the Python script yielded an error, these troubleshooting tips may help you:
- 401 response: If you received a
401response, it’s likely that your SendGrid API key was invalid. Ensure that you copied the entire key correctly and have set theSENDGRID_API_KEYenvironment variable in this terminal window. - 403 response: If you received a
403response, it’s possible that thefrom_emailaddress you’re using is not a verified sender identity for your SendGrid account. Ensure that you used the correct email address or go through these steps for single sender verification.
With our email-sending capability verified, we can build on top of this to incorporate scheduled automation with the rq-scheduler.
3. Schedule a task with RQ Scheduler
You can use the rq-scheduler to execute specific code at a specific time by creating a Scheduler object and passing it a function to execute, a Python datetime, and any arguments you want to pass to the function.
For example, we’ll create a module log_to_tmp.py that writes the current time stamp to a file in /tmp. Our code looks like this:
Then, we have our main program in main.py:
In a separate terminal window, we need to start up the rq-scheduler.
The RQ Scheduler will check Redis for scheduled jobs. Once it finds jobs ready to execute, it queues them up with RQ. This is why we need to ensure an RQ worker is also running to perform the jobs in the queue.
Note the following caveats for running your RQ worker:
- The
rqworkermust launch from the folder where you house yoursend_email.pymodule. In our example, this is the~/demofolder where we put all our code. - The
rqworkermust also have access to theSENDGRID_API_KEYenvironment variable. Before starting up therqworker, ensure you set the environment variable in the terminal window where you’ll run therqworker.
Then, we run our Python program:
Within a few minutes, the RQ Scheduler sees it’s time to enqueue the job:
Next, the RQ worker detects a new job in the queue and performs it:
When we check our TMP file, this is what we see:
We’ve successfully verified that we can schedule tasks with the RQ Scheduler. Now, we’re ready to schedule automated emails.
4. Create a send_email module
First, we’ll encapsulate our original email sending function into a module so we can pass that function to the Scheduler object. We do this by modifying the code from the send_email.py and putting it in a function:
Then, we update our main.py program, which will schedule this function so that it looks like this:
Just as you did with the previous email-sending attempt, replace the from_email argument with your SendGrid account email address and the to_email argument with an email address that you can access.
In our example, we used timedelta and called enqueue_in() to schedule our email to send in 30 seconds. For testing purposes, you can also use enqueue_at() and supply an absolute time, such as datetime.now(), to schedule the email for immediate sending.
After ensuring you have your Redis server, RQ Scheduler, and RQ worker all running, you can run your code to schedule an email:
Then, after approximately a minute, your email should send. Check your email inbox to verify you received it.
Note that if you’re running on iOS, you may encounter an error involving __NSCFConstantString initialize. This relates to multiprocessing and fork processes in Python. However, there’s a quick fix.
Success! You now have all the building blocks in place to automate email sending from within a Python application.
What's next?
In this tutorial, we discussed how to use the RQ Scheduler to schedule and automate email sending with SendGrid. Now you can use the RQ Scheduler for all your Python email automation needs, such as sending a notification when the International Space Station flies by a location.
You can also connect your Python application to webhook integrations for event-based triggering and schedule more complex tasks than just simple email sending. For example, at the scheduled time, your email sending module can make requests to gather up-to-date information for inclusion in the email body, or ensure certain conditions exist before sending the email.
Engage more customers with Twilio SendGrid and Twilio Programmable Messaging
Now that you know how to send automated emails with Twilio SendGrid and Python, why not experiment with sending SMS using Twilio Programmable Messaging?
Read more about what you can achieve with these channels in our guide Using Email and SMS to Engage Your Customers. Then, sign up for a free Twilio account to get started.

Related Resources
Twilio Docs
From APIs to SDKs to sample apps
API reference documentation, SDKs, helper libraries, quickstarts, and tutorials for your language and platform.
Resource Center
The latest ebooks, industry reports, and webinars
Learn from customer engagement experts to improve your own communication.
Ahoy
Twilio's developer community hub
Best practices, code samples, and inspiration to build communications and digital engagement experiences.