I Sent Valentine’s Day Text Reminders to My Boyfriend Using Twilio Studio
Time to read: 5 minutes
February 14, 2018
Written by

Plot Twist, he didn’t know it was me!
Last year, my partner and I didn’t plan anything for Valentine’s day because we were super caught up with our own personal schedules. This year, I’ve realized that we, again, haven’t had a chance to plan anything for the holiday because he has been incredibly busy with work. Considering I still want to be able to celebrate the day, I wanted to find a way to subliminally remind him that Valentine’s day is upon us!
With the latest Visual Interface Application along with Valentine’s Day landing on a weekday, I found an ingenious plan to send text messages to your significant other who may have forgotten about the love-celebrating holiday. Of course, to avoid confrontation with my partner, I didn’t tell him it was me.
I’m a first-time app-builder. If I wanted to appropriately execute this tiny… devious… plan, I would need to use a simple software application (because I know slim to nothing about code) – and this is where Twilio Studio comes in.
If you have never heard of it, Twilio Studio is basically a VISUAL ROADMAP-LIKE application to help build whatever you need in a simple way. If you’re a first-timer like me, then experimenting with a “tree system” like Studio would be a great way to start learning about such Tools and Application.
Obviously, anyone who receives this text can still unsubscribe by replying “STOP”, but the nature of this point is to subliminally remind your partner that the day is upon us.
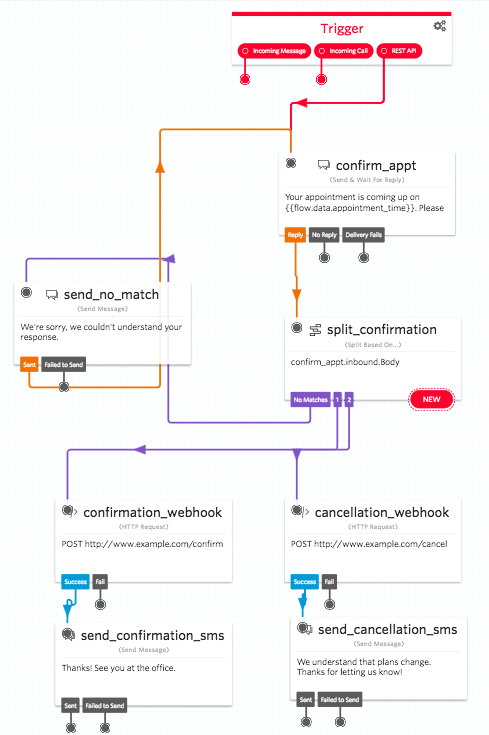
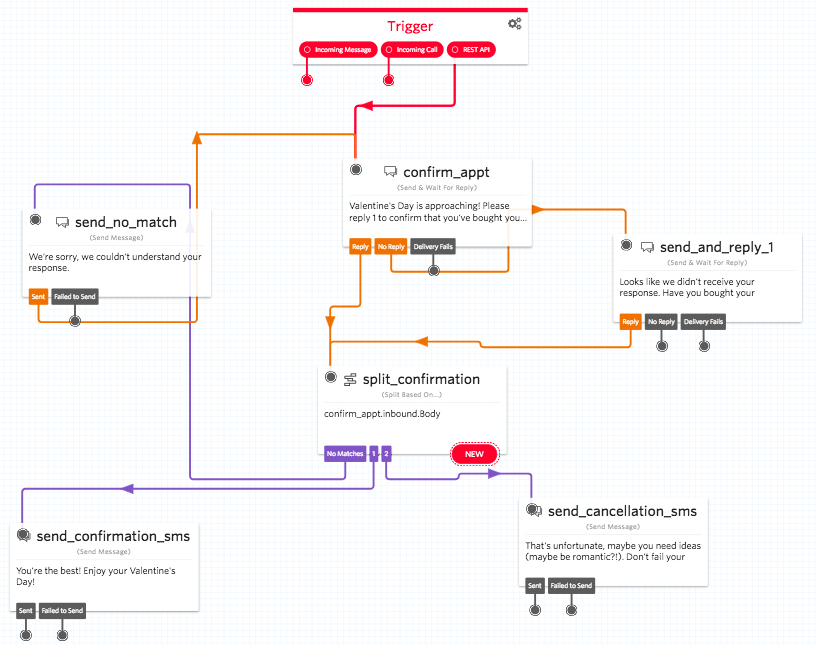
With a Twilio Studio template, we will be turning Example 1 into Example 2:
Studio Example 1:
Studio Example 2:
Here’s How I did it:
Step 1: Get the Phone Number Together
First things first, if you do not have a Twilio Phone Number, buy one.
Through Twilio Home, you will need to search through and “Buy a Number” > “Pick your Capabilities” (be sure to check off messaging) > then choose a number to your liking. BUY!
(You would need to buy a phone number to remove the Trial Message in the app).
Step 2: Get Started on Twilio Studio Interface
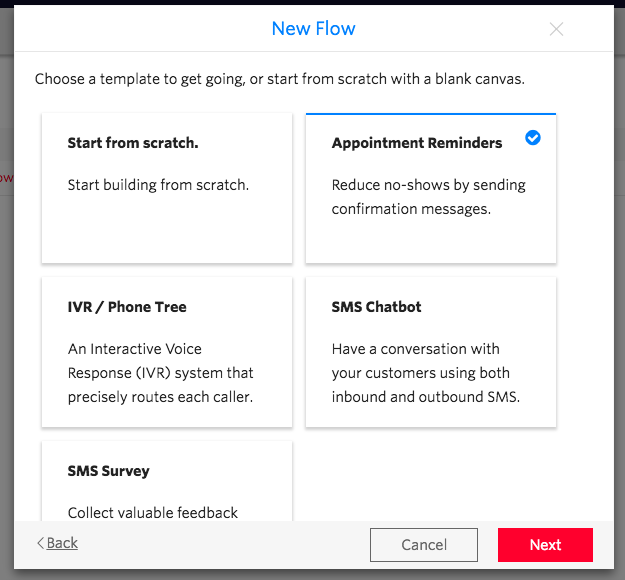
Open All Products & Services > Click on Studio > New Flow – in which you would then have to name your flow.
What’s great about Studio is that the application already has templates for you to start out with. Considering the simplicity of what we are doing and because we only need simple features, we will start out with the “Appointment Reminders” template.
The Studio Example 1 template should now appear!
Step 3: Format Necessary Widgets
Let’s make things a little more beautiful with a few adding, deleting, and directing widgets.
First, Let’s delete two widgets in the map: “confirmation_webhook” & “cancellation_webhook”. (You can find these widgets connected to the “split_confirmation” widget)
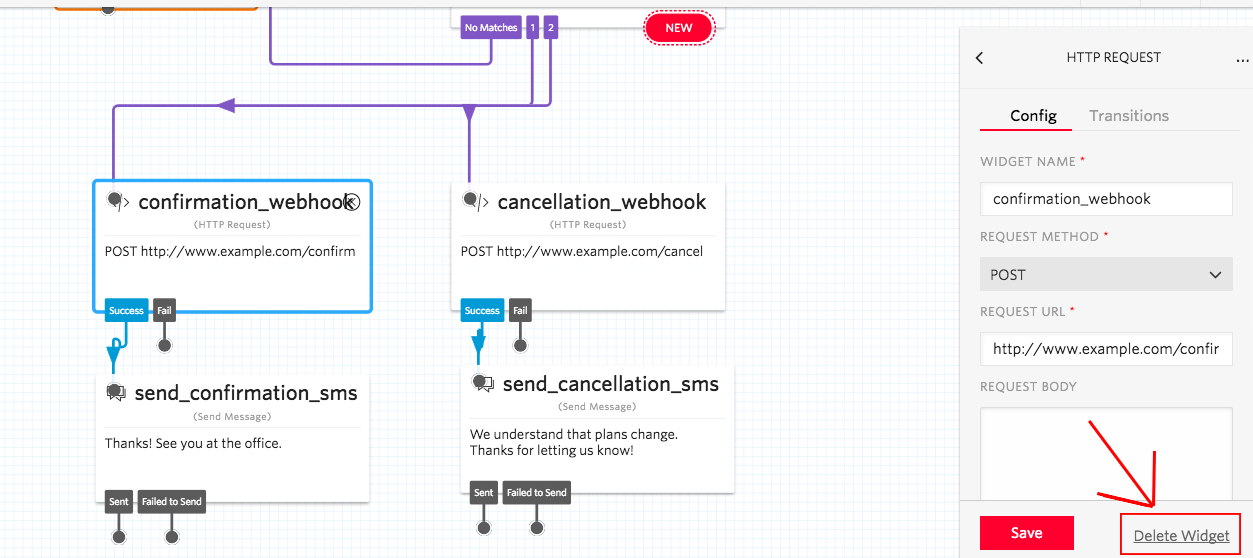
Highlight over either the “confirmation_webhook” or “cancellation_webhook” widget (doesn’t matter which, we will need to delete both). Once the widget highlights blue, a window will pop on the right side of the browser. Click on “Delete Widget”.
You will then need to connect the “split_confirmation” widget to continue the tree.
Click on the “1” or “2” on “split_confirmation” widget and drag/connect each accordingly to the “send_confirmation_sms” and “send_cancellation_sms” widgets (example below).
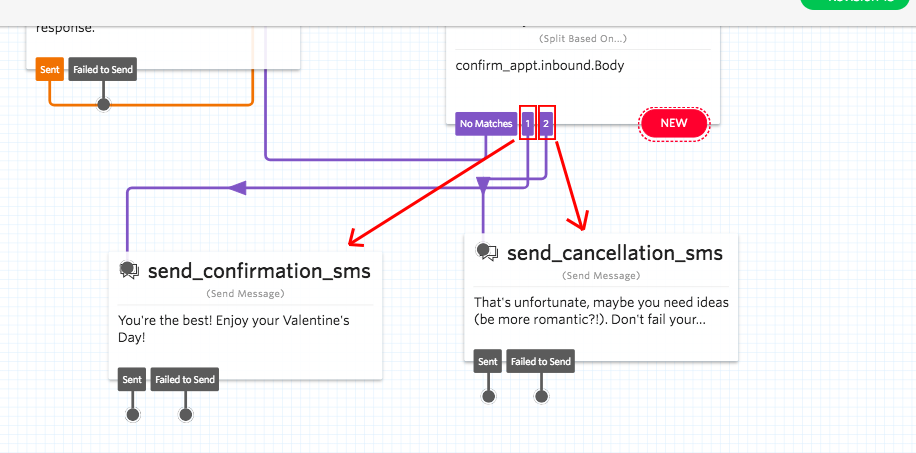
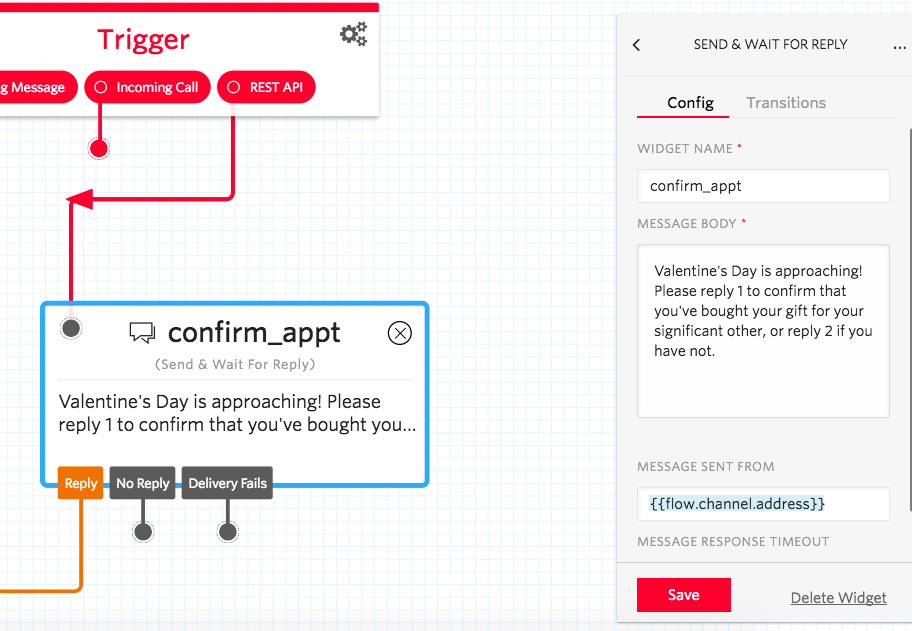
Second, let’s edit the texts to your liking. All you have to do is just click on the widget that you would like to edit and change the Message Body. Be sure to click “Save”!
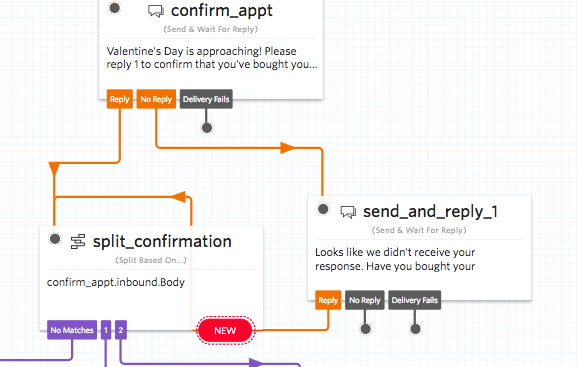
Third, let’s add a NEW widget for your No Reply Response (because, obviously, if we don’t get a text back).
Click on anywhere on the grid (to deselect any widget you’re currently highlighting), and a “Widget Library” will appear on the right side of your browser.
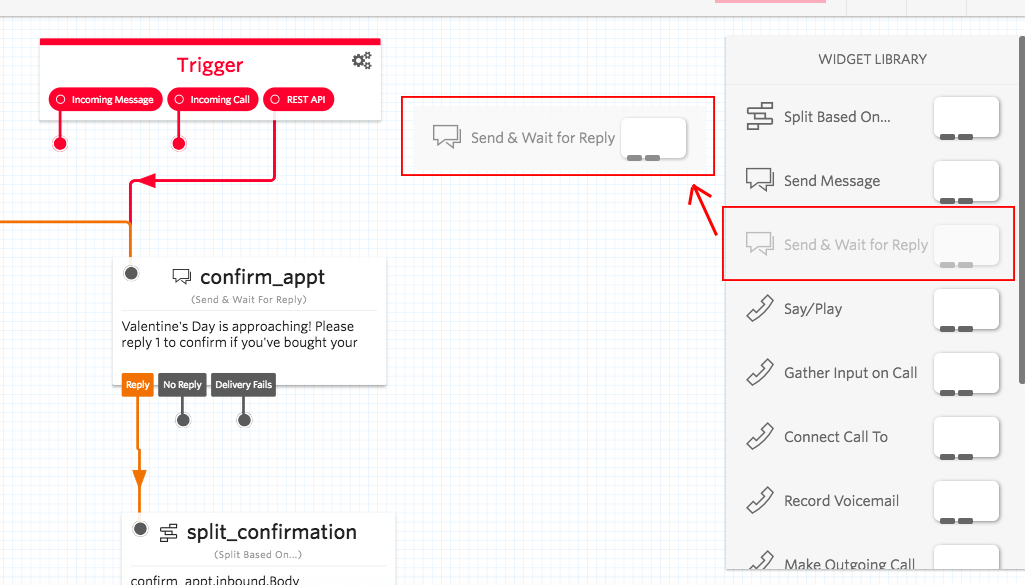
Click on the “Send & Wait for Reply” widget and drag onto the grid. Let it go and a new widget “send_and_reply_1” window will appear!
We would need this new “send_and_reply_1” widget get to working. (I went ahead and dragged the “NO REPLY” from “confirm_appt” to the new “send_and_reply_1” widget). However, there is also another way for you to transition the widget.
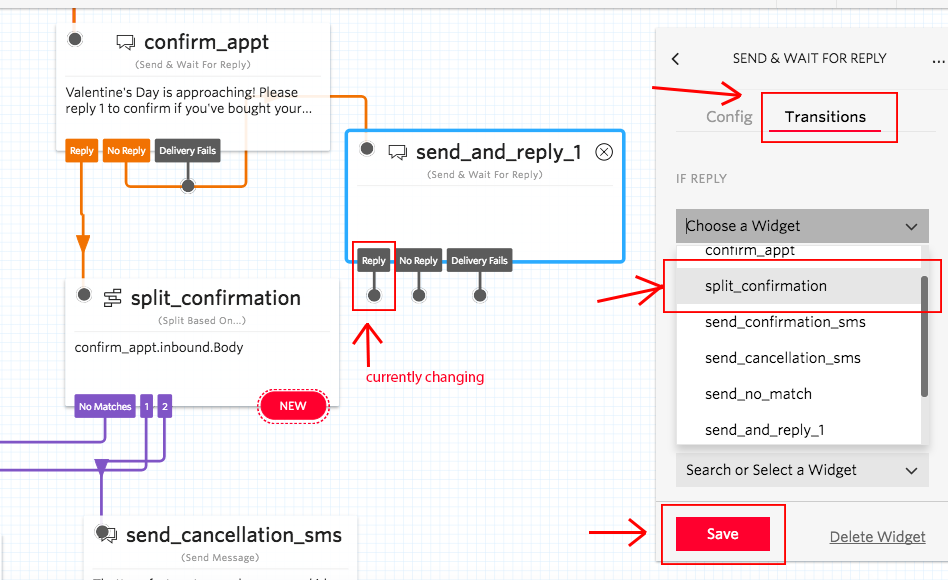
For this “other way”, you can click on “Transitions” of the specific widget upon highlighting and connect with the Drop Down Bar.
The “send_and_reply_1” transition would appear like so:
Last but not least, I made changes to the “send_no_match” widget in case my boyfriend tries to reply anything other than “1” or “2”.
I first linked “incoming message” from “trigger” to “send_no_match”, then I linked “sent” with “confirm_appt”. (example below)
“No Matches” from the “split_confirmation” widget should already be connected to the “send_no_match” widget.
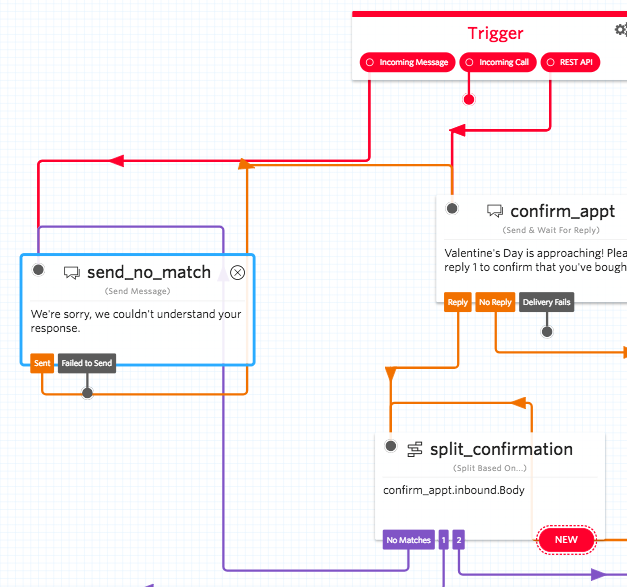
VOILA! Your map should now look like Studio Example 2.
Step 4: Put that code together
Now let’s take the necessary code below placed into terminal so we can send out this message!
First, you will need to find the following:
- YOUR_FLOW_SID: can be found in the url of the roadmap browser
- To: the number you are sending to
- From: the Twilio number you are sending from
- ACCOUNT_SIDE: can be found in your Twilio Home Dashboard
- AUTH_TOKEN: can also be found in your Twilio Home Dashboard
Input above to the code below:
curl ‘https://preview.twilio.com/Studio/Flows/YOUR_FLOW_SID/Engagements’ -X POST —data-urlencode ‘To= 1XXXXXXX‘ —data-urlencode ‘From= 1XXXXXXX‘ -u ACCOUNT_SID:AUTH_TOKEN
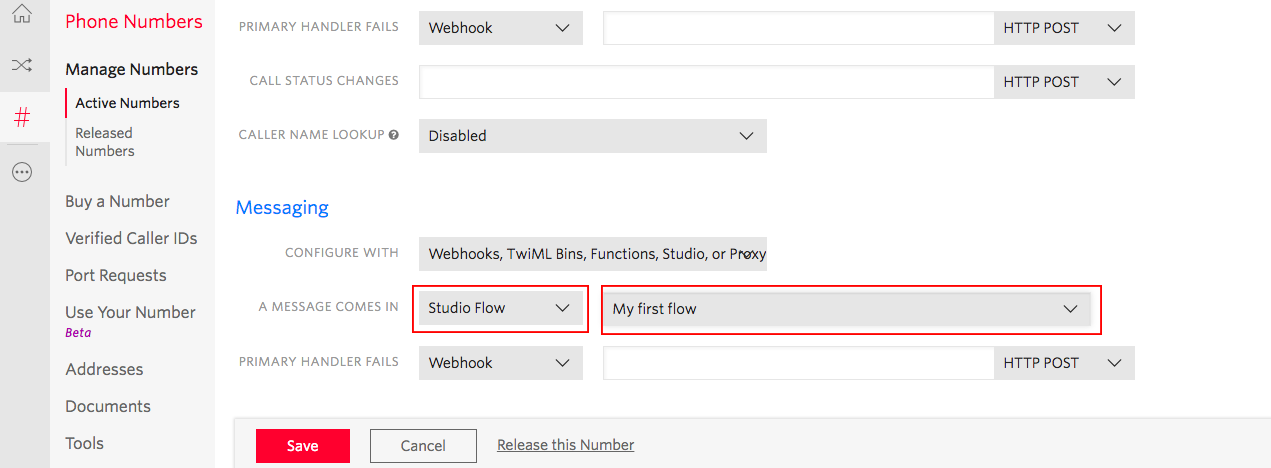
Step 5: Configure the Phone Number
We will now have we to configure the phone number accordingly. In order to do so, you can go back to Twilio Home and Click on “Manage your Numbers” which falls under the “Phone Number” section.
Click on your chosen number that you will be using for the Studio flow. Scroll down to messaging and change settings to “Studio Flow” and the name of the flow you choose.
Step 6: Test it, Tweak it.
Now grab the code you’ve placed together in Step 4. I would totally try out your own number first to test out the application.
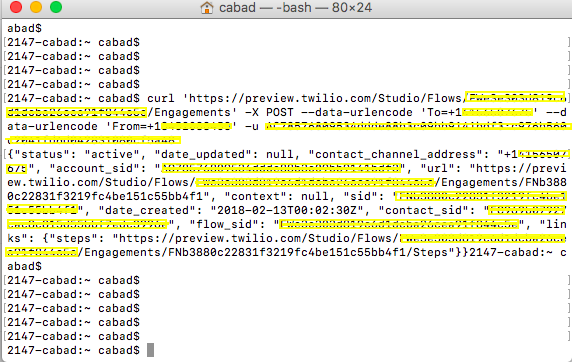
You would have to open up your terminal. (Search in the mac for terminal, and a window would pop right up). You can also find more info here under “send a message with an url”.
Copy the code into the terminal, and the text should send right through!
If your terminal looks something like below, then it looks like it’s a success!
Step Lucky Number 7: Execute Order 66
After tweaking and testing, it’s time to send.
Change the “TO” number in the code to the number to your liking – then send right along to your mate!
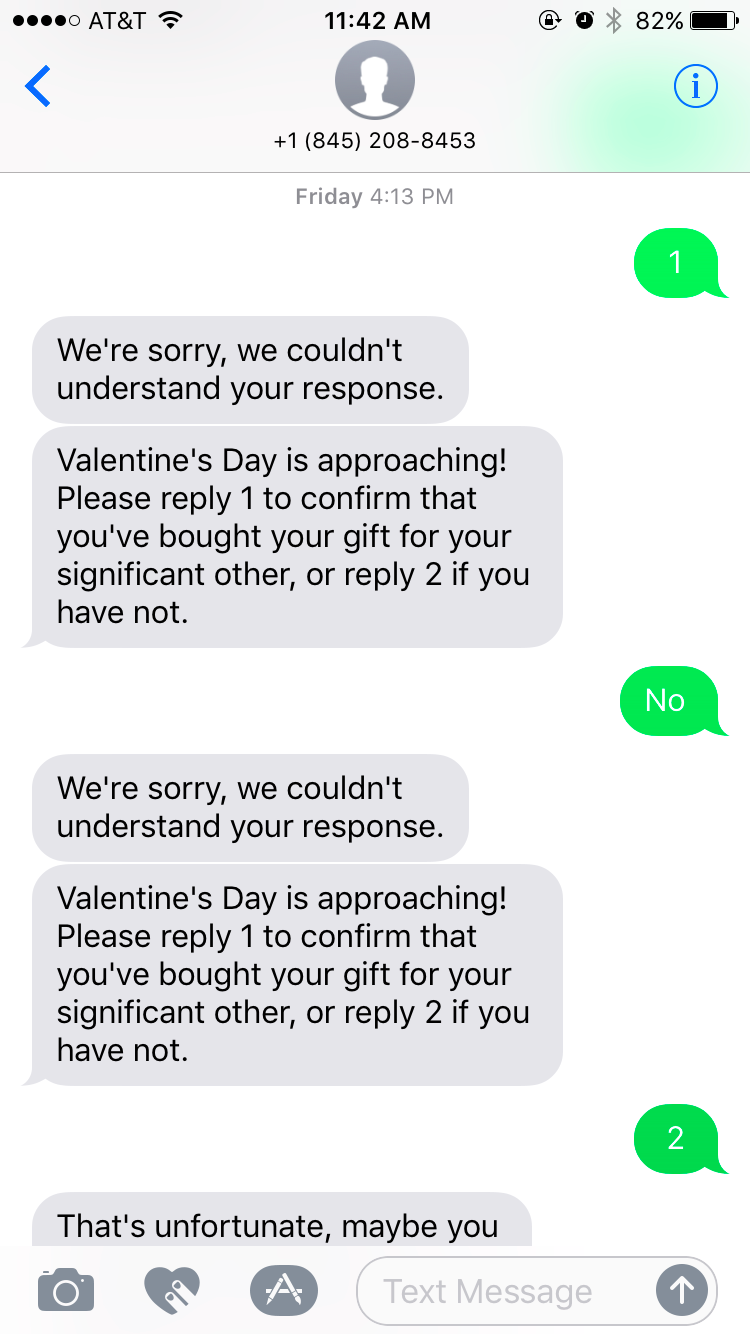
Text Messages will appear like so:
You can also review your phone number logs to see if anyone sends back a message to the text as well.
There is room to play around with the tree/map to whichever preference you like. You can also stop an engagement anytime by clicking on “logs” (this can be found on the left side of your browser in your Twilio Studio Flow).
With a few days left, I sent this text to my partner and a few friend’s significant other for experimentation (must I say it looks like it is working!!!). It’s just another simple and funny tool that you can use to remind anyone of anything other than Valentine’s Day.
Read more about Twilio Studio here: https://www.twilio.com/blog/2017/09/introducing-twilio-studio.html
Related Resources
Twilio Docs
From APIs to SDKs to sample apps
API reference documentation, SDKs, helper libraries, quickstarts, and tutorials for your language and platform.
Resource Center
The latest ebooks, industry reports, and webinars
Learn from customer engagement experts to improve your own communication.
Ahoy
Twilio's developer community hub
Best practices, code samples, and inspiration to build communications and digital engagement experiences.