Integrate Twilio Flex with Microsoft Dynamics 365
Time to read: 12 minutes
May 29, 2020
Written by
Reviewed by

Twilio Flex is an open contact center platform based on web technologies that enable integration with just about any CRM. So why not Microsoft Dynamics 365?
Lots of organizations use CRM applications to store customer information and up to the minute contextual information about a customer’s past engagement with the organization.To provide a better experience when engaging with their customers, organizations should use this information to increase the timeliness and relevance of their conversations.
In this tutorial you will learn how to use customer data within Dynamics 365 to provide a contextually relevant conversation during self service and escalations to agents using Dynamics 365 with Twilio Flex. We’ll cover the steps required to integrate Twilio Flex with Dynamics 365 by leveraging Microsoft Dynamics 365 Channel Integration Framework, as well as Twilio components including Studio and the Runtime environment.
We’ll also show you how to create a Twilio Flex Plugin to enable screen pop and click-to-call all from within Dynamics 365.
Tutorial Requirements
To follow this tutorial you’ll need the following items:
- A Twilio account – If you sign up and upgrade through this link, you'll get an additional $10 credit.
- A Twilio Flex Project – see this link for more info and to create a Flex project
- A Microsoft Dynamics 365 – find out more here
- A local Node JS environment set up
- The create-flex-plugin application
How the Twilio and Microsoft Dynamics integration works
Before we dive into the setup, let’s walk through how it works.
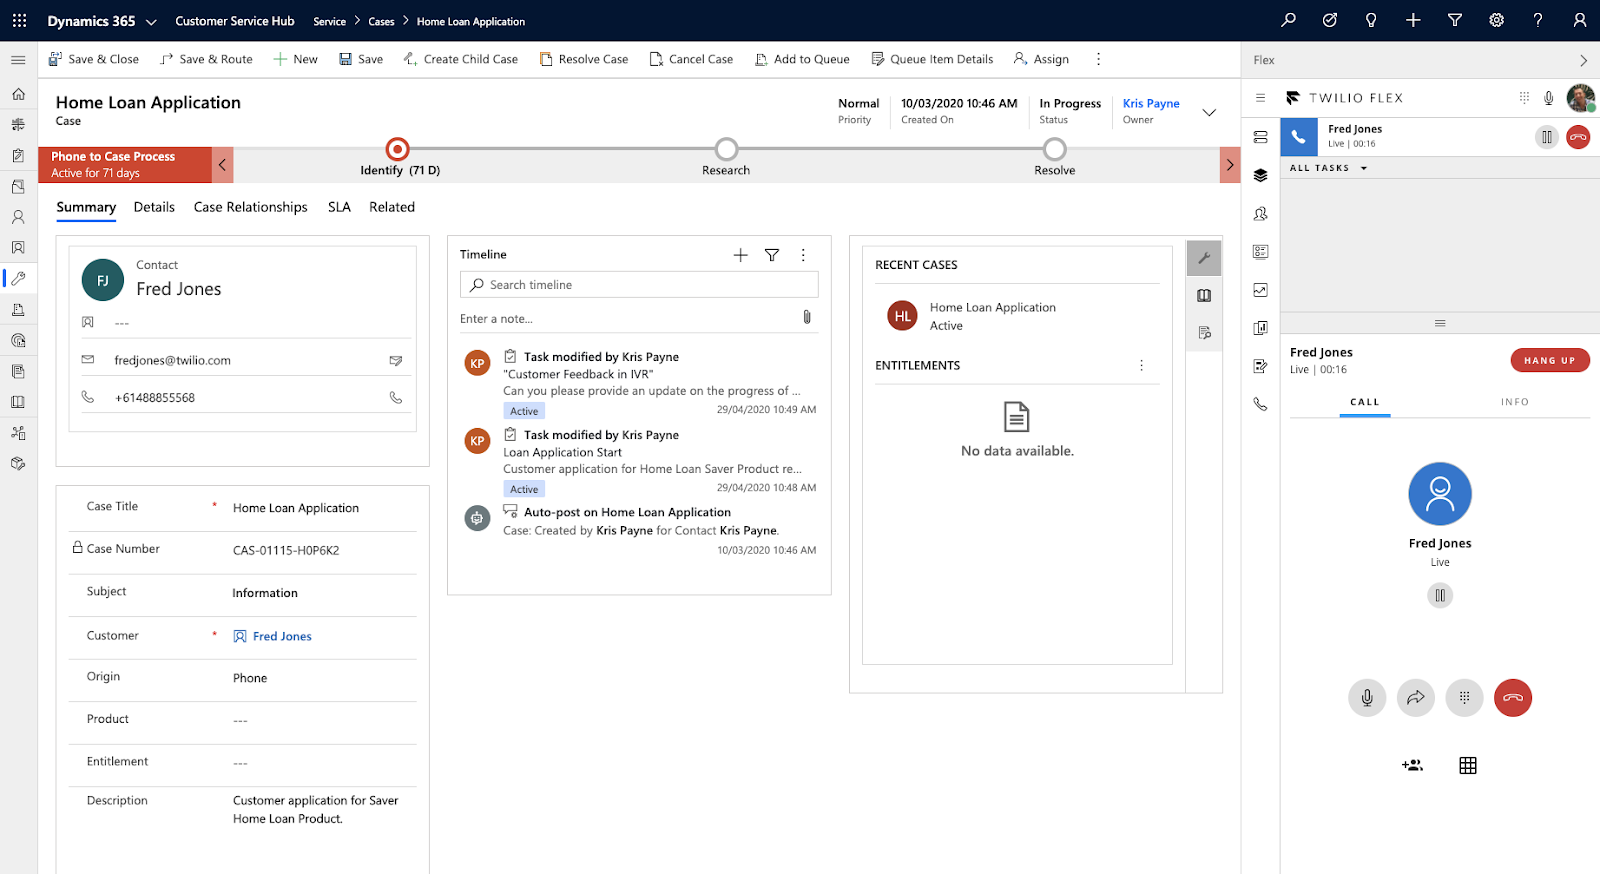
When a call is placed to your Twilio phone number, we’ll route this call to a Studio Flow. The Studio Flow will then execute a number of steps, starting with calling a Twilio Function that passes the Customers Phone number to Dynamics to lookup a record. Once this record has been received, we are able to use this information during the rest of the Flow – for example, we can greet the customer by name and inquire if they’re calling about a particular case. From here we can deliver the call (interaction) to a Twilio Flex agent within Dynamics.
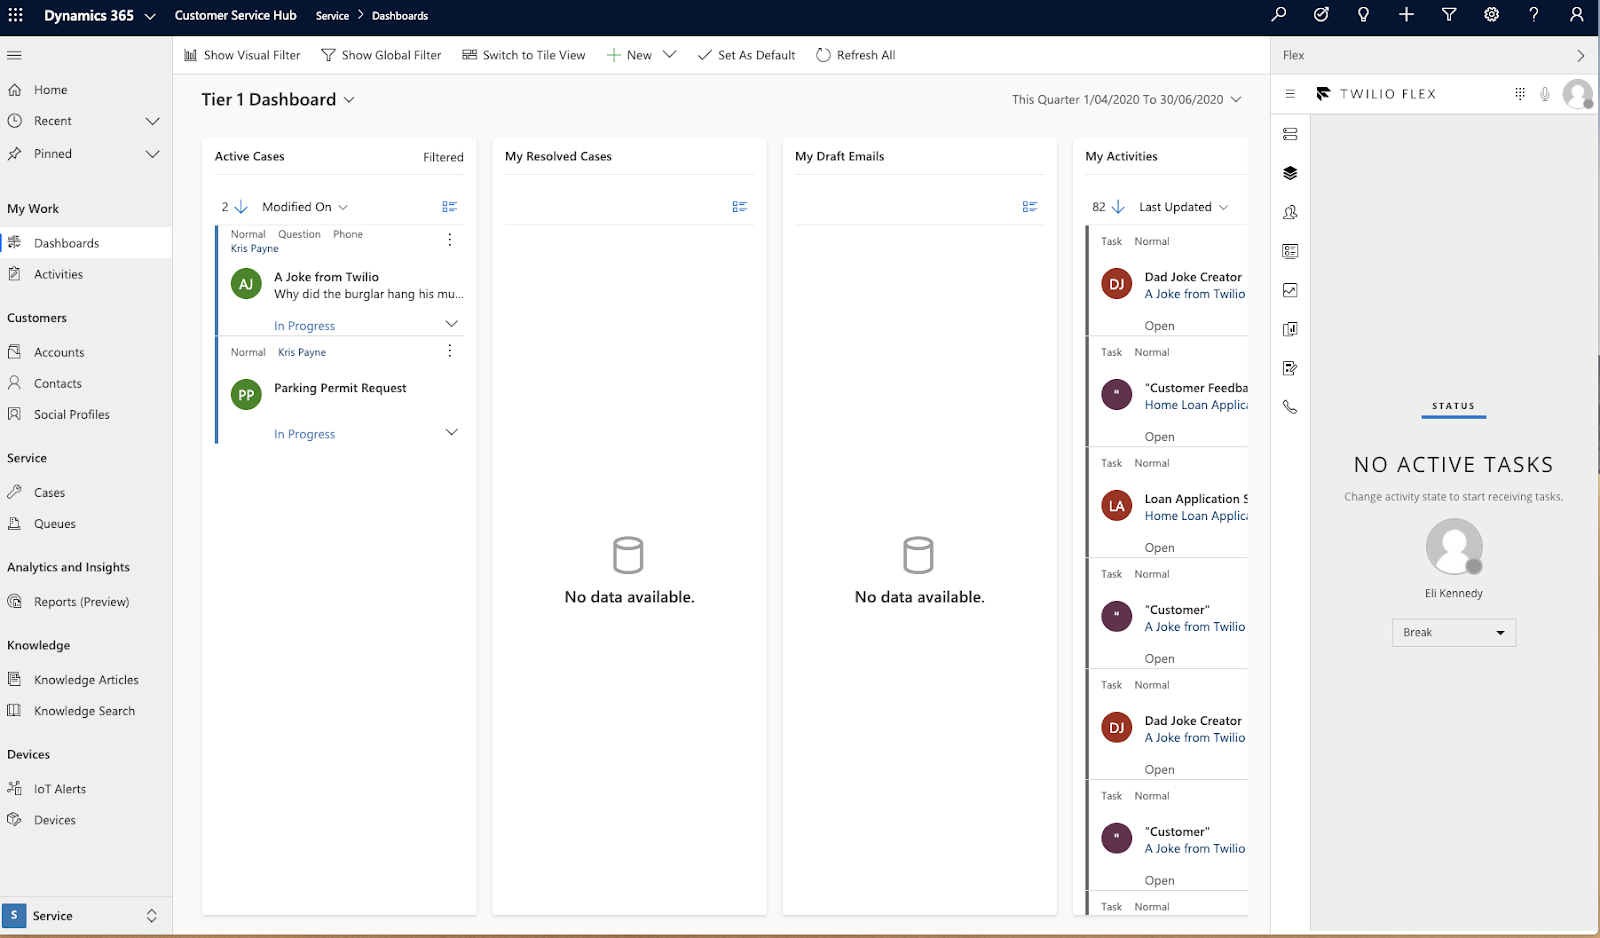
We included an example screenshot below to give you an idea of the integrated solution:
Dynamics Setup
Install the Channel Integration Framework
Before you can complete this step, you’ll need to ensure you have a fully functional Dynamics 365 environment. The first step is to install the Channel Integration Framework (CIF). See this guide for instructions to complete this step.
Once you have the CIF installed we need to configure it for Twilio Flex. See the screenshot below as an example:
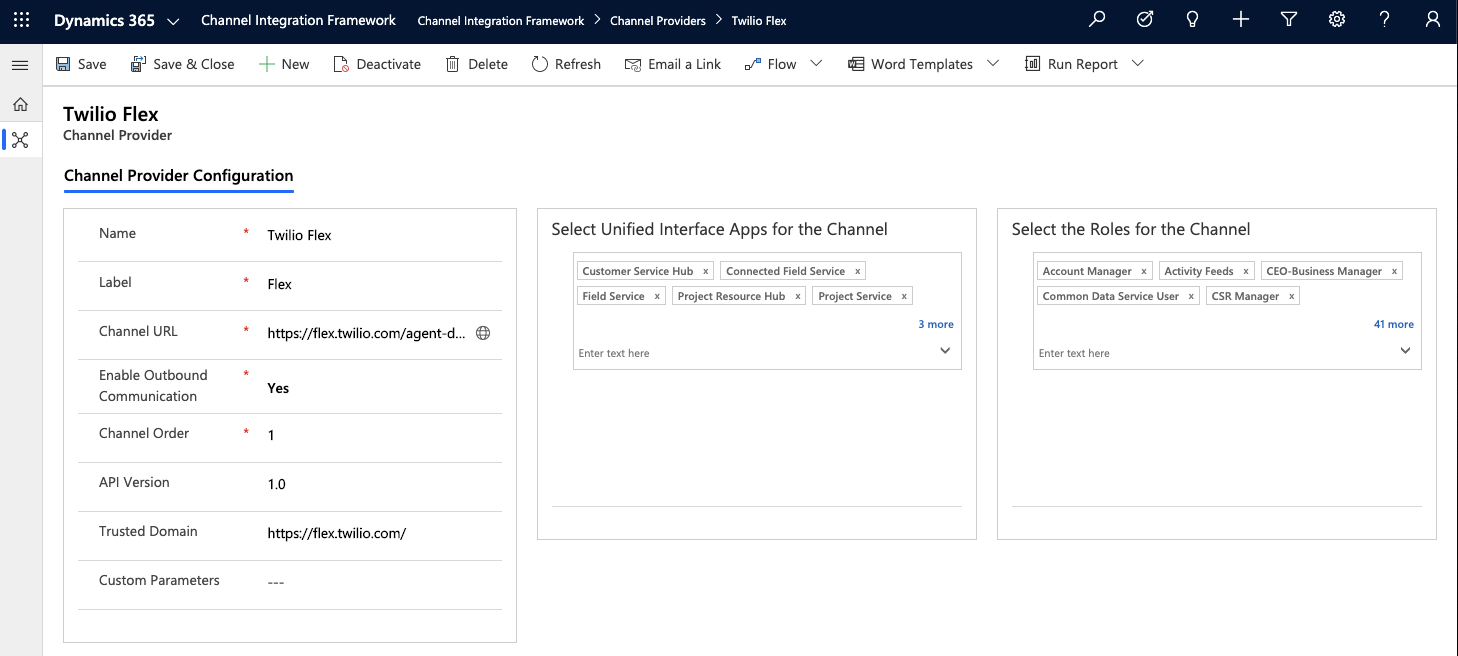
Important fields to note are the following:
- Channel URL:
https://flex.twilio.com/agent-desktop - Trusted Domain:
https://flex.twilio.com/ - Select Unified Interface Apps for the Channel: Assign the required Dynamic Apps where you’d like to make the CIF available. We have used the Customer Service Hub in this example.
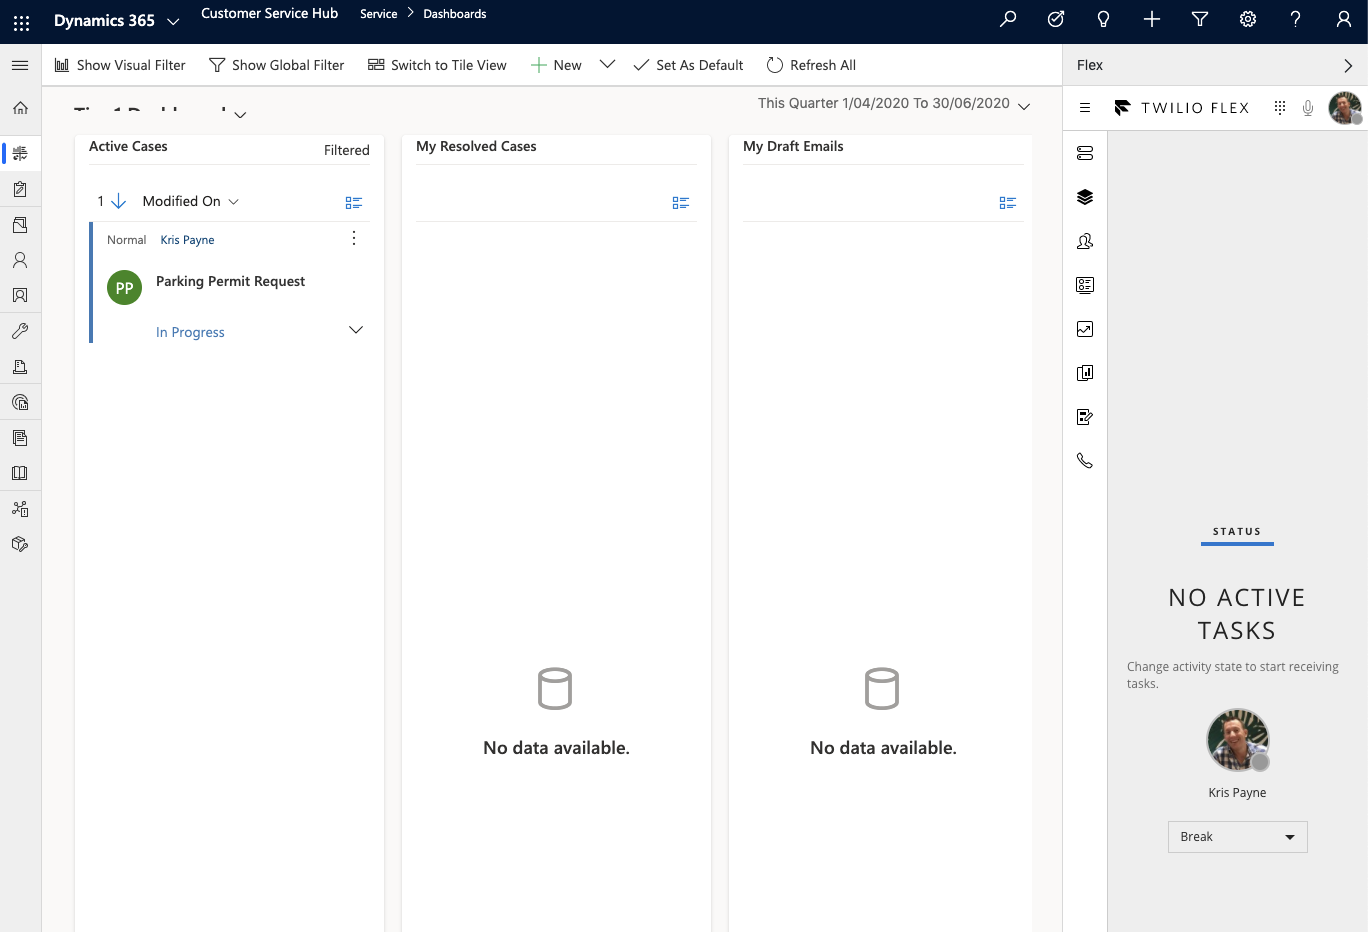
Once the CIF is installed and configured, go to your Dynamics App that you assigned in the step above and you should see something similar to the screenshot below. Note the Flex UI on the right hand side of the screen.
Don’t worry if it doesn’t look exactly like this just yet, we’ll walk you through the Flex Plugin to customise the view and other details in the Twilio Flex section below.
(Optional) Register an Application with Microsoft Identity Platform to enable retrieval of Contact and Case records
In the next section, we’ll go through integrating Twilio with Dynamics to retrieve a customer's Contact Record and Case Number if applicable.
Before we can do that, we need to first register our application with Microsoft’s identity platform. This step will enable us to leverage the Microsoft Dynamics Web API to retrieve this information. This Microsoft article titled Register an application with the Microsoft identity platform describes the process to register an application with Microsoft’s identity Platform.
Once the application is registered, you’ll need to expose an Application ID and Add permissions. Follow this Microsoft article titled Configure a Client Application to access Web API’s for full details.
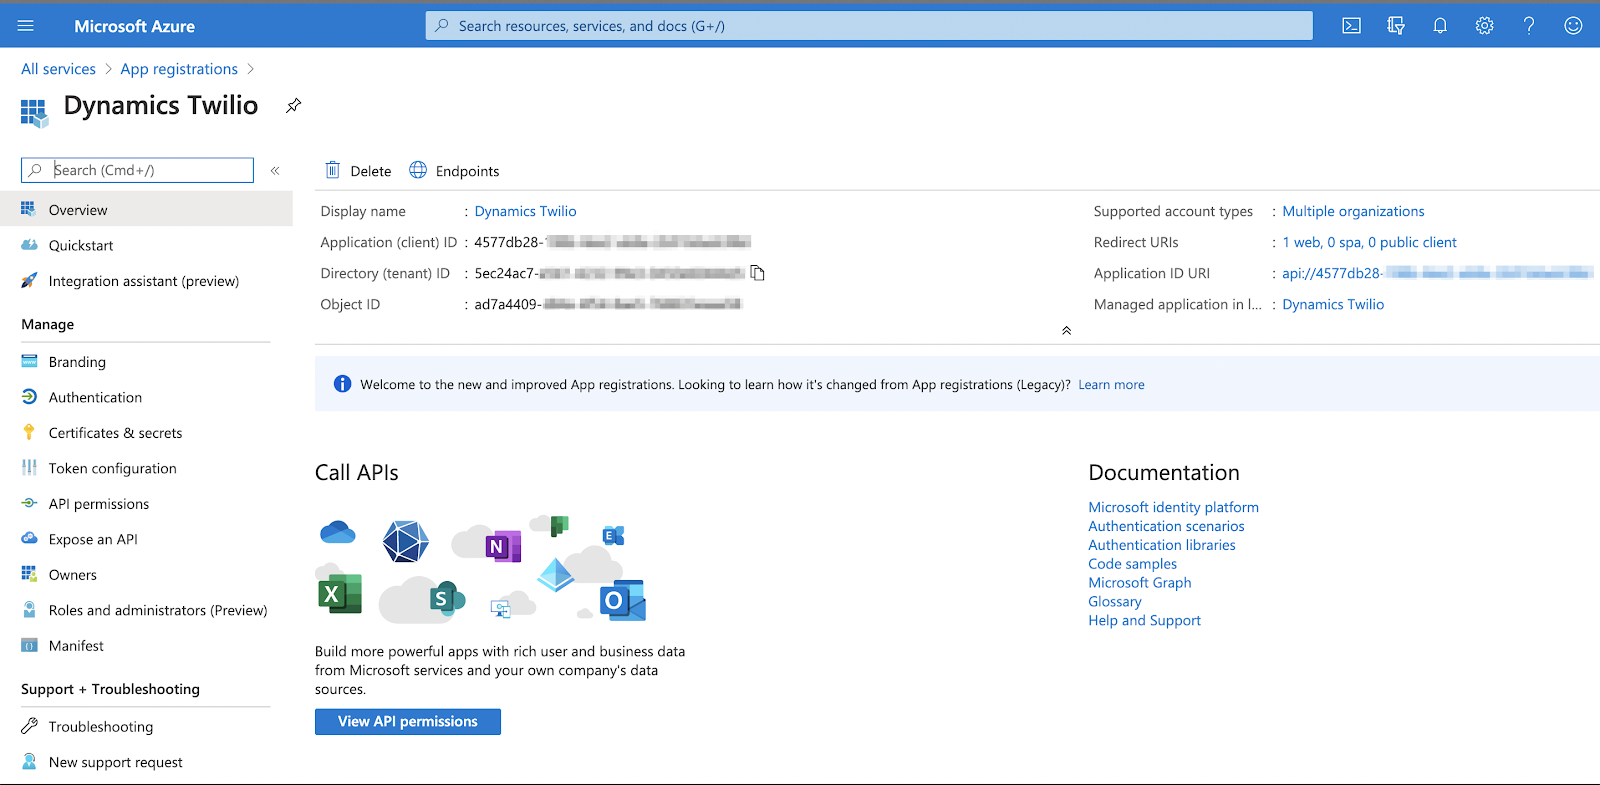
Take note of your Application (client) ID and, Directory (tenant) ID as we’ll be using these in the next section:
The Screenshot below shows an example of this:
Twilio Functions and Studio
Create Your Twilio Functions
We’re going to need to create a few Functions that we’ll use later in our Studio Flow.
We’re going to create new Functions from the Blank Template as shown below:
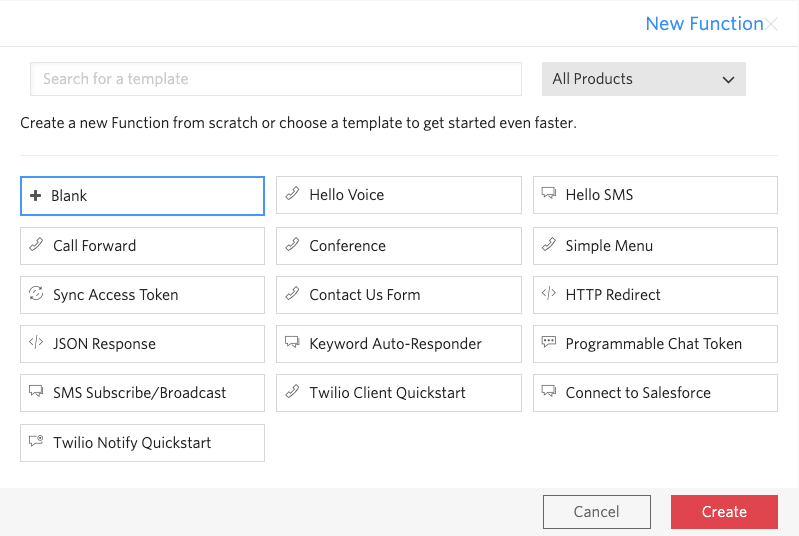
Also, note that all of this code is available in the repo here.
Get_Dynamics_Token
The first Function we’ll create leverages the Application and API permissions we created in the “Registering an Application” step above. This Function is used to get an Access Token that we can then use with our requests to the Microsoft Dynamics Web API to retrieve the required records.
We’ve called this Function Get_Dynamics_Token and defined the path as https://<YourRuntimeDomain>.twil.io/getDynamicsToken. (You’ll use this in your Studio Flow in the following sections.)
Copy the code below into your Function and replace the required fields with your specific Dynamics details. You’ll need to substitute your Application (client) ID in APPLICATION_(CLIENT)_ID, Directory (tenant) ID in <DIRECTORY_(TENANT)_ID>, and Dynamics Organization name in <YOUR_ORG>.
Upon successful execution, you’ll return the temporary Token in the callback which we’ll use in the following steps in our Studio Flow.
Get_Contact_Record
Now that we have a temporary Token we can retrieve a Contact Record. We’re going to use the Microsoft Client API retrieveMultipleRecords method to obtain this information.
We’ve called this Function Get_Contact_Record and defined the path as https://<YourRuntimeDomain>.twil.io/getContactRecord.
Below is example code you can use to retrieve a Contact record and any associated Case records:
Upon successful execution, you’ll return any Contact records and any associated Case records in the callback which we’ll use throughout our Studio Flow.
Add Function Dependencies
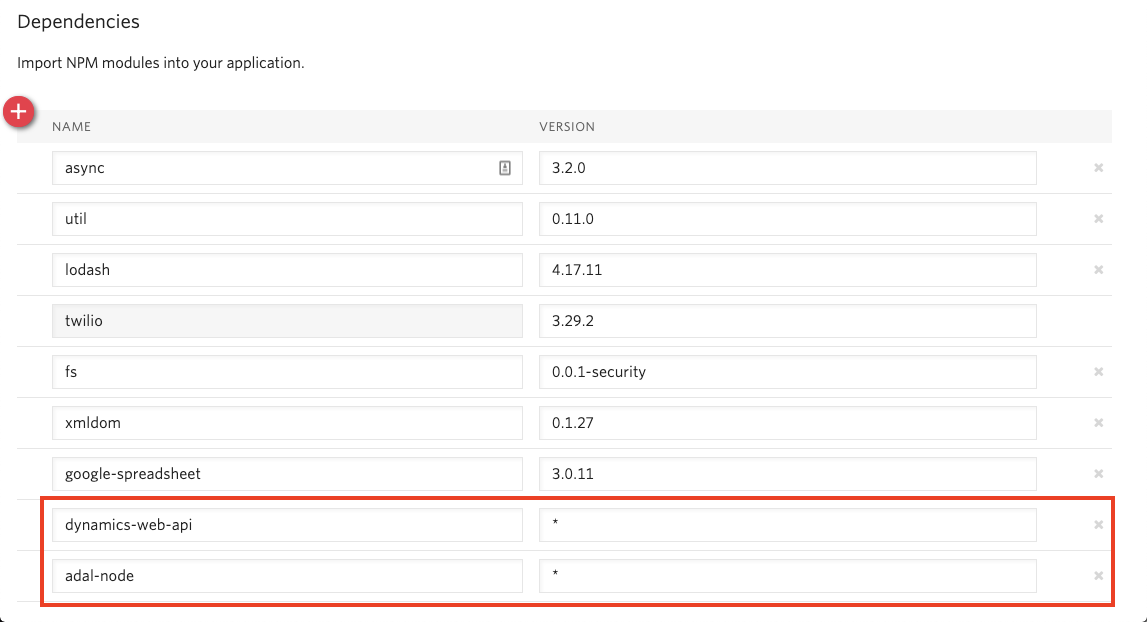
We used some Node dependencies in the Functions above. We now need to ensure we define these as such for our Functions to work.
Go to Functions > Configure and add dynamics-web-api and adal-node as shown below. Use a * wildcard in the version column to keep these current.
Configure Your Studio Flow
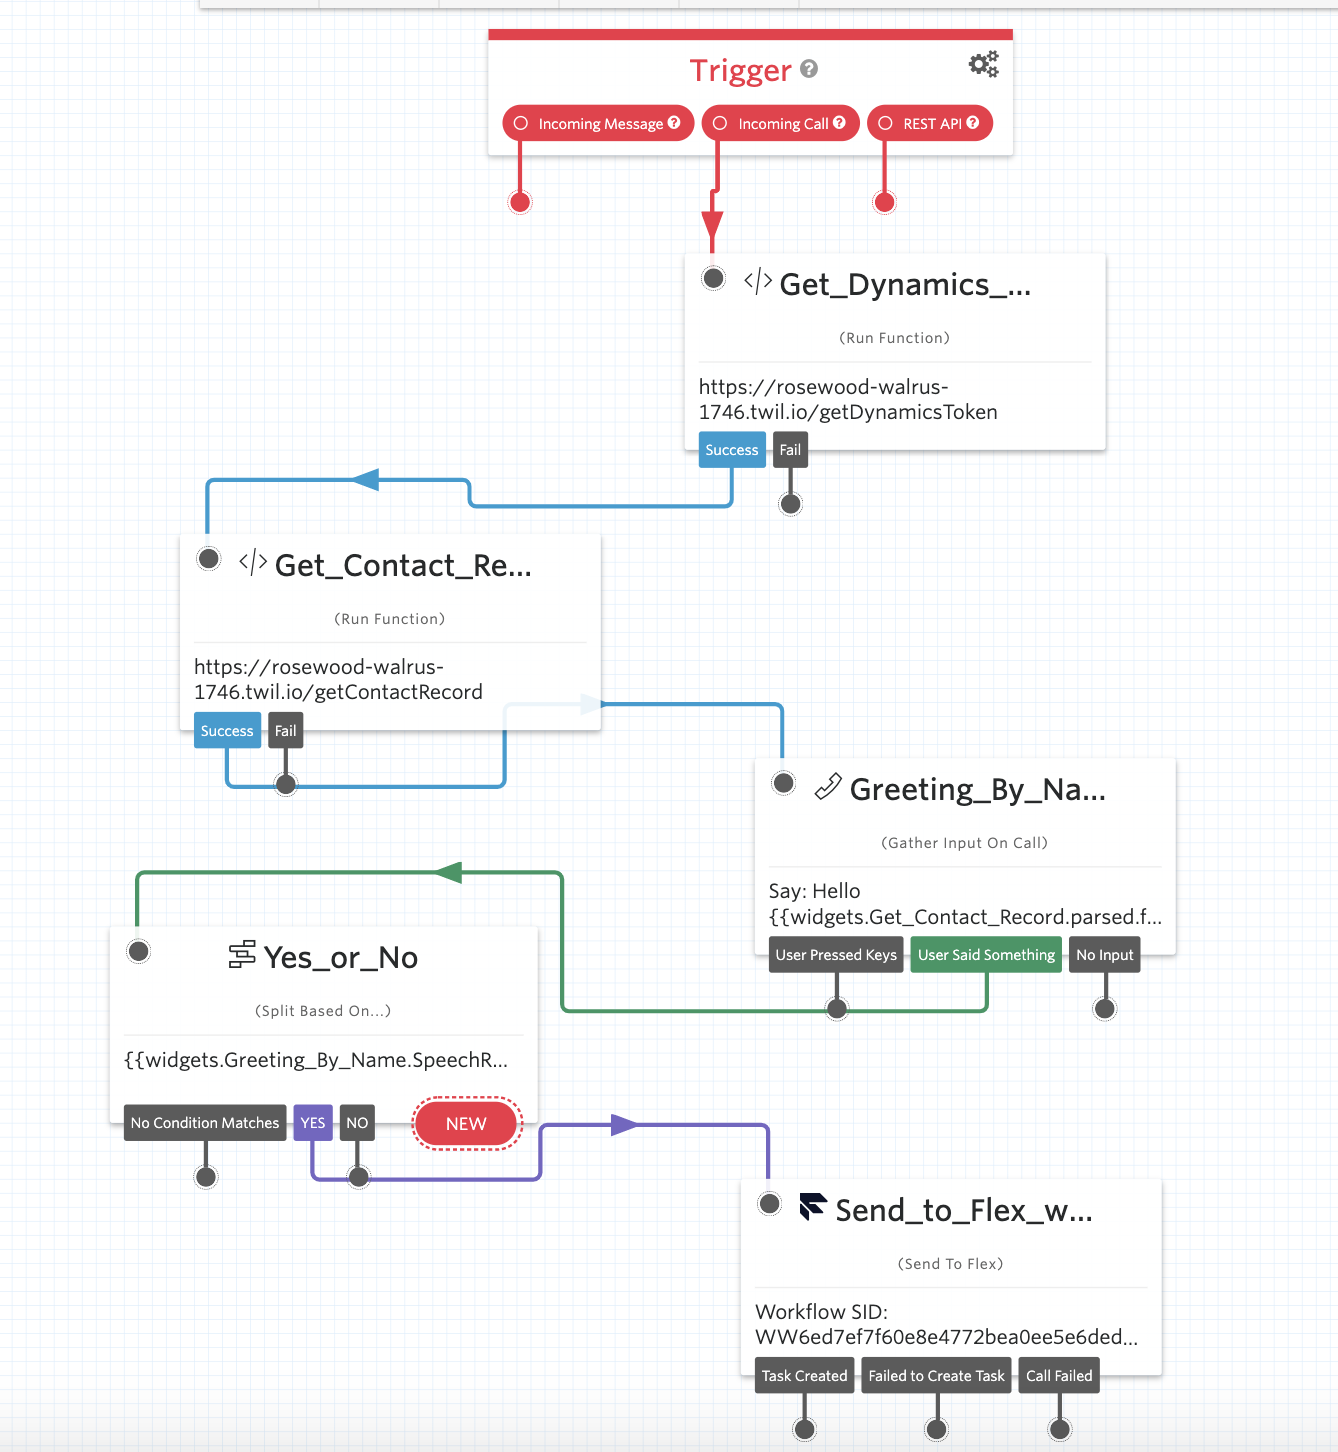
Now that we have our Dynamics Environment in place and access configured as well as our Twilio Functions defined we can create our Studio Flow.
Below is an example Studio Flow that upon execution from an Incoming Call will invoke our “Get Dynamics Token” Function, followed by “Get_Contact_Record”, and then greet the caller by name before handing the call off to a Flex agent with the Contact record details. We’ll walk through each step separately.
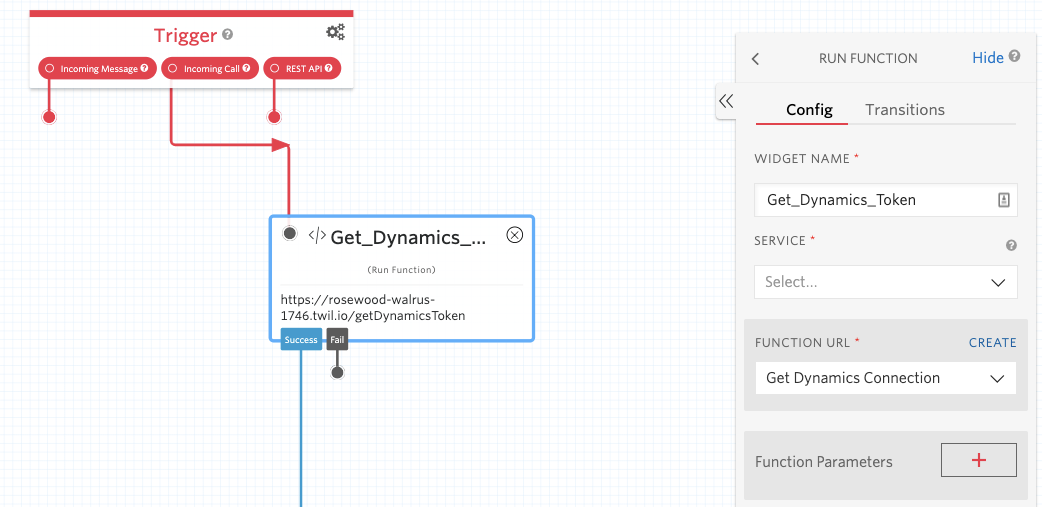
Step 1
In this step we just need to execute our Get_Dynamics_Token Function with no parameters.
Drag a “Run Function” Widget onto the canvas and drag the pull-down menu to Get Dynamics Connection. Connect it to the ‘Incoming Call’ action of the default Trigger.
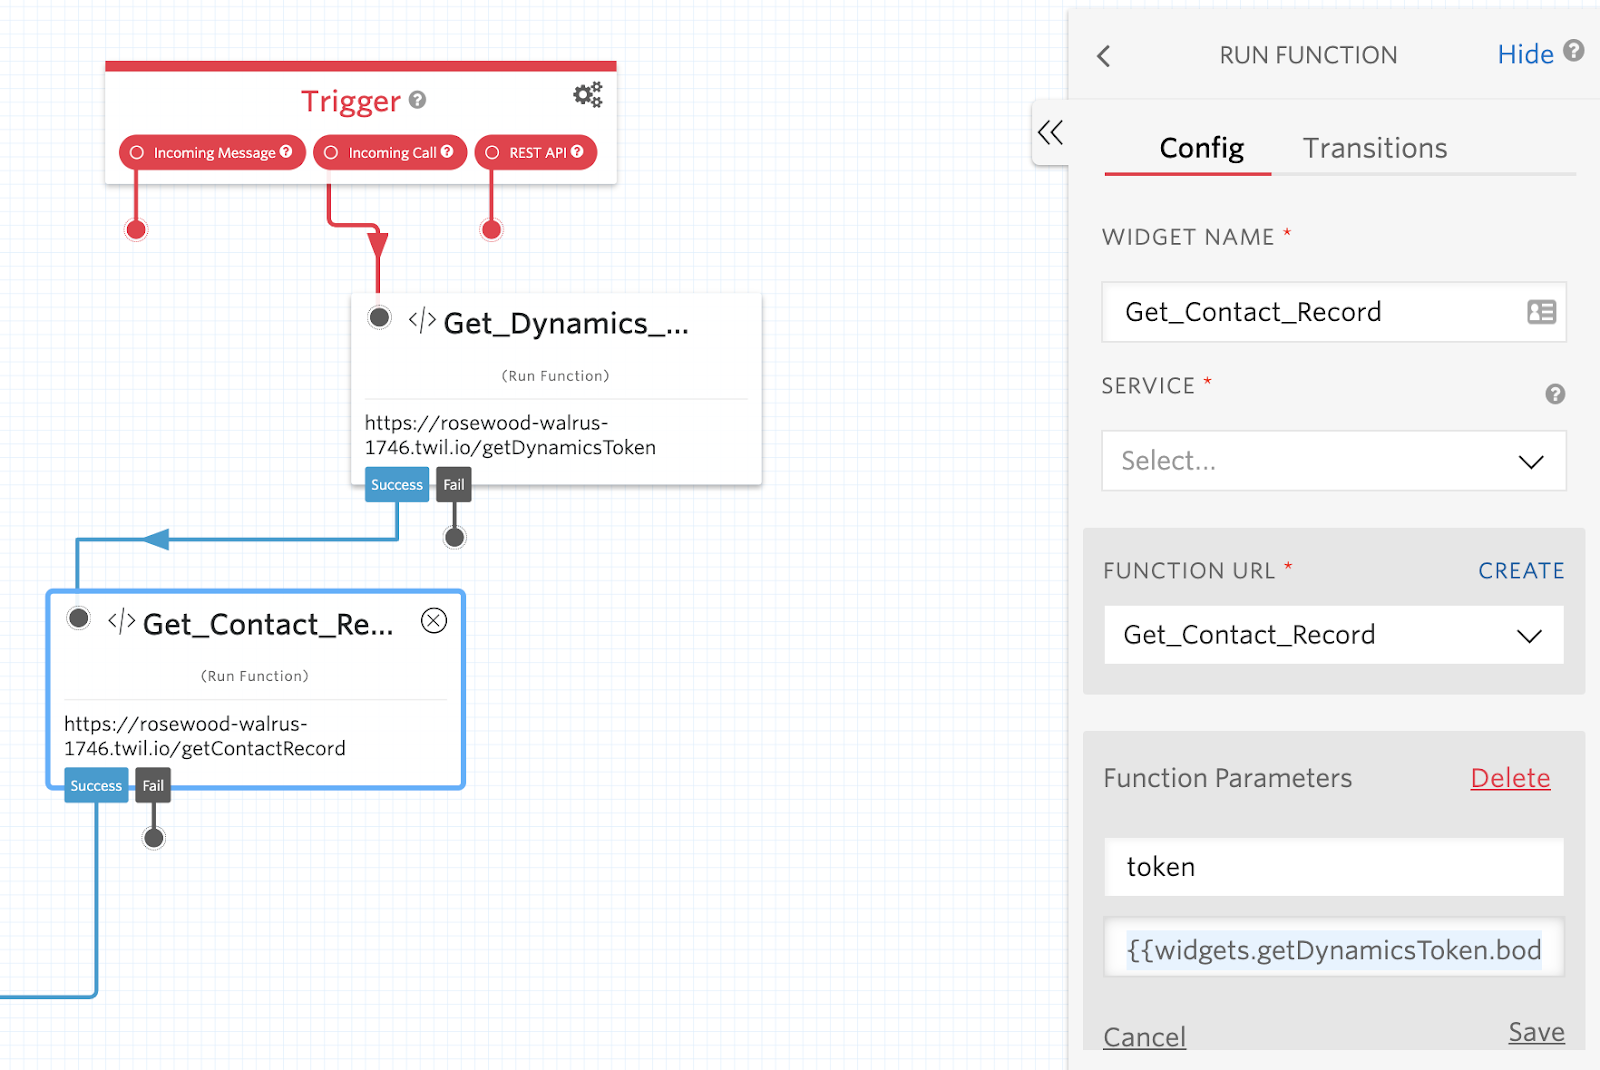
Step 2
In this step we’re going to execute the Get_Contact_Record Function and pass in the parameters, token and contact. Again drag a “Run Function” widget onto the canvas, this time selecting Get_Contact_Record in the pulldown menu for “Function URL”. Connect it to “Success” from the previous widget.
The token parameter is passed in from the widget used in the previous step – {{widgets.getDynamicsToken.body}} – and the contact parameter is the caller’s phone number, in this case {{contact.channel.address}}
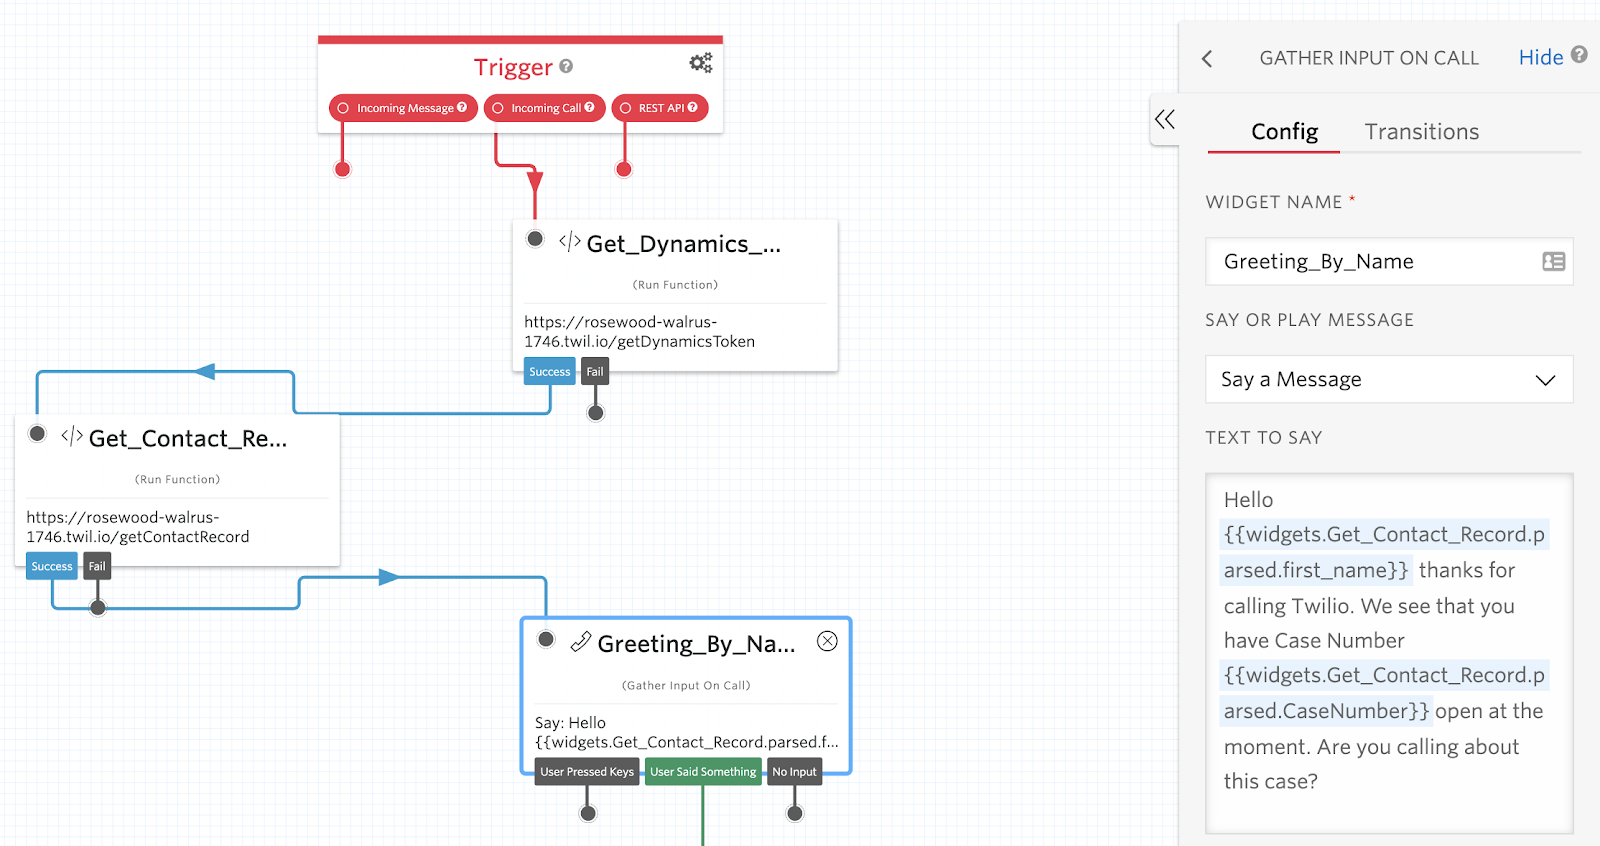
Step 3
We can now use this information retrieved in Step 2 in our Flow to greet the caller by name. Drag a “Gather Input on Call” widget onto the canvas and connect it to “Success” from the previous step. In the pulldown, ensure “Say a Message” is selected, then add a similar message to this:
Note the use of the variables in the Text To Say config section below. We’re using first_name and CaseNumber when constructing the ‘Say’ message to the caller.
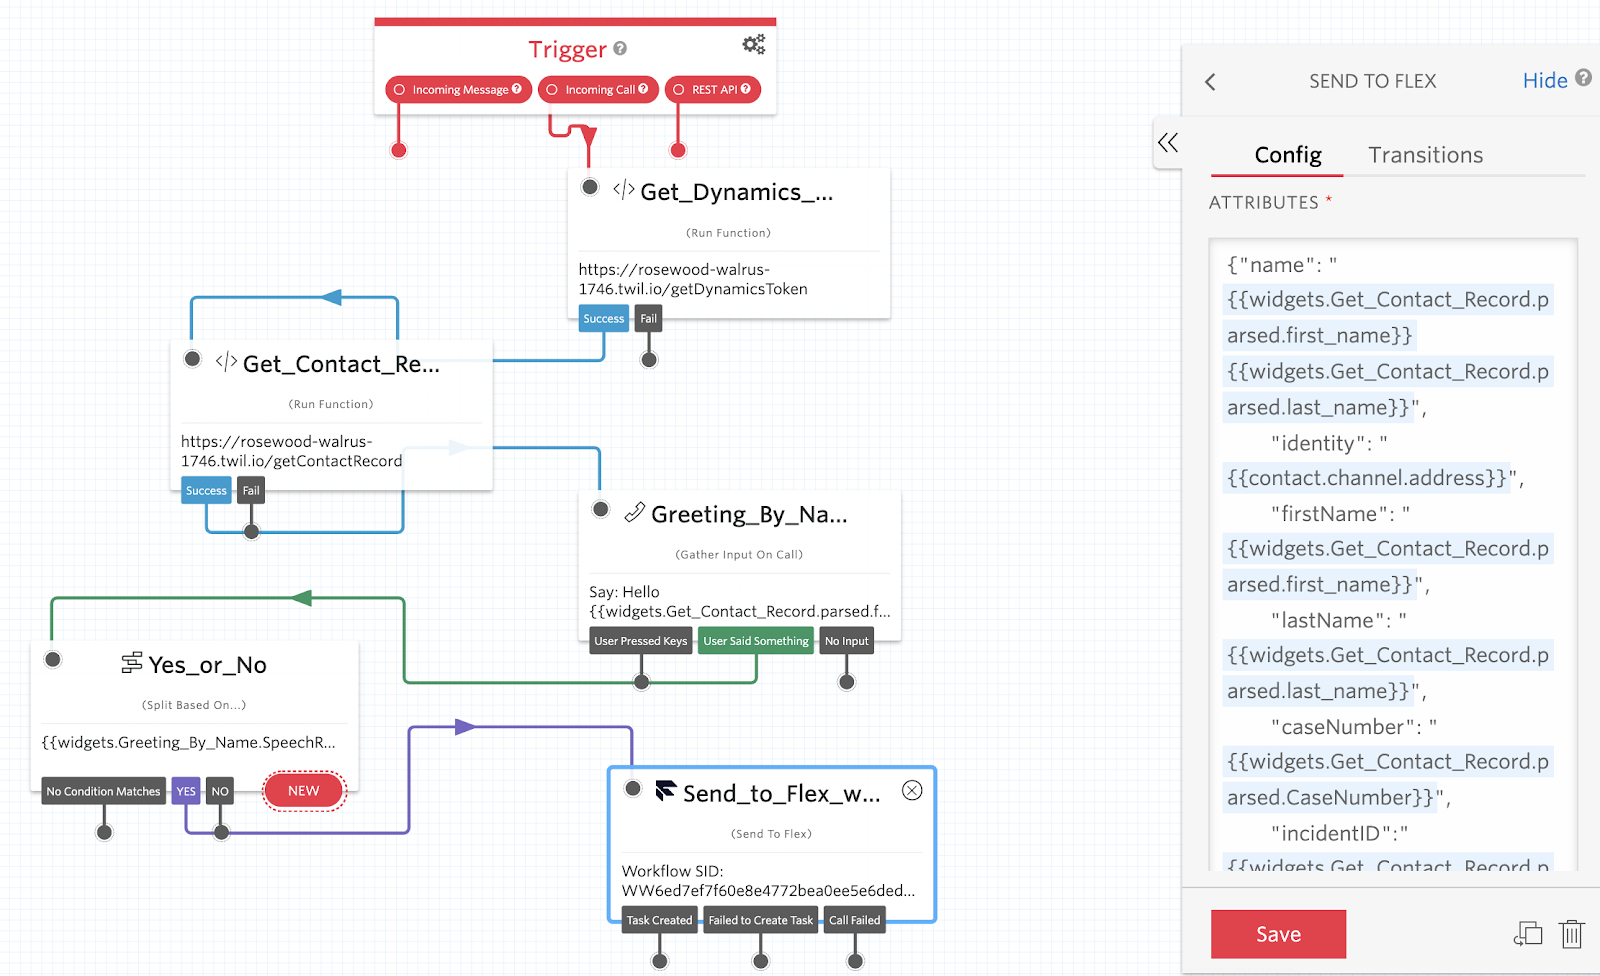
Step 4
Finally, when we transfer the caller to our Flex Agent we want to pass this information with the call so that our Screen Pop fires and opens the correct page (see the Twilio Flex section below for more on this).
To do this, we need to attach this information as “Task Attributes” to the task in the “Send to Flex” Widget. See the definition of these task attributes below.
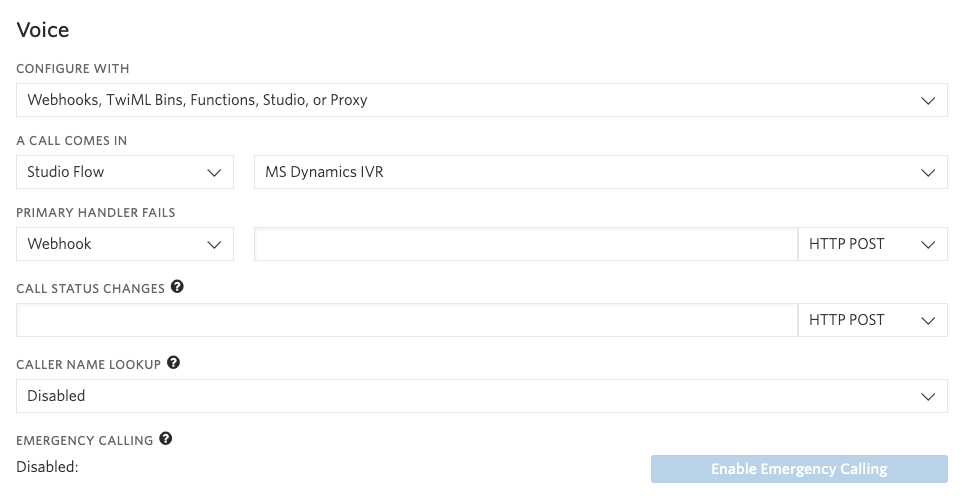
Configure a Twilio Phone Number
Finally we need to point a Twilio phone number to our newly created Studio Flow.
Select a number you own – or buy a new number – from the Twilio Phone Numbers console. After, open the phone number by clicking it, then scroll down to the “Voice” section on the page.
There, select:
- Configure With - “Webhooks, TwiML Bins, Functions, Studio, or Proxy”
- A Call Comes In - Select the Studio Flow you just created
Here’s how it’ll look:
Twilio Flex
Make the Flex UI take actions within Dynamics
In the steps above we configured Dynamics to load the Twilio Flex user interface inside its CIF panel. Twilio Flex is now able to make and receive interactions on any channel you have set up in your contact centre. However, we can take this to the next level by driving actions within Dynamics when a call arrives and vice versa.
Microsoft provides a JavaScript client library for the Channel Integration Framework. This gives us the ability to register event listeners in Twilio Flex for things that happen within Dynamics (such as click-to-call), and it also lets us pass events to the parent frame to make Dynamics search for an incident number when a call arrives in Twilio Flex.
Prepare an empty Flex plugin
Flex is a React project and customizations that you make to the UI are created as plugin components.
Load the Microsoft CIF Library
Now we need to add the Microsoft CIF Client library in our plugin. The client library should be loaded asynchronously when Flex launches, so we will do that during the Flex init function.
The events that occur inside Flex when a call arrives all happen after our initialization is complete. This way, we know that we will have access to the client library when it is required.
However, you may wish to set up event handlers for things that will occur inside dynamics – for example, Click-to-act events. These event handlers have to be set up during the initialization, so we must wait until the client library has finished loading to be able to register them.
Now that we have loaded the library, we can make some decisions about actions that we want to occur within Dynamics.
Create functions in Flex to drive actions in Dynamics
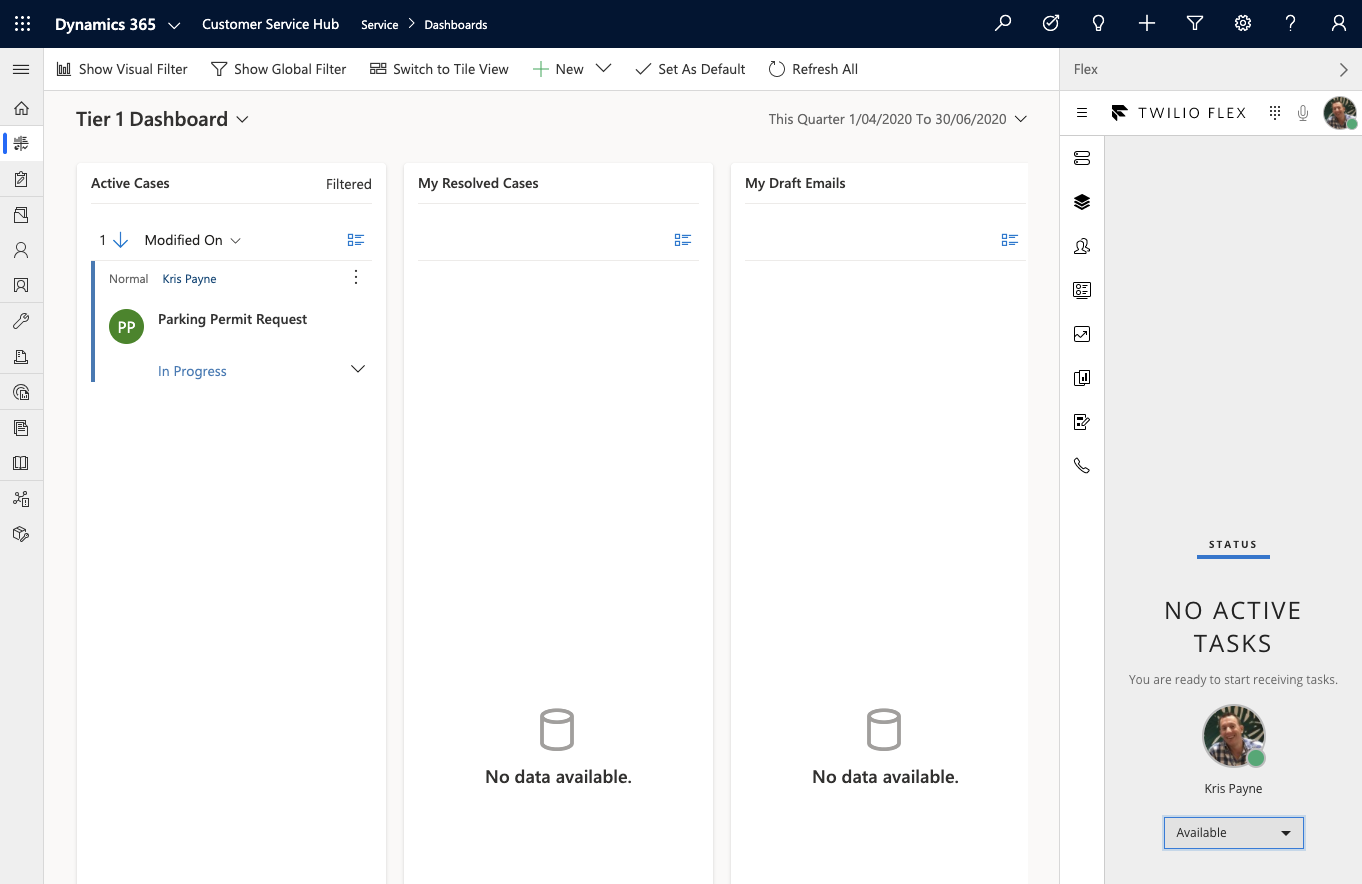
At this point in the tutorial, you will have Flex sitting inside of a panel in the right hand side of the Dynamics window as per the image below:
Flex is taking up a lot of screen real estate when the agent is not on a call – let’s do something about that.
The CIF client library can set that panel state to open or closed by passing it a boolean value. Let’s add a function to Flex inside of our init function that we can use repeatedly:
Now whenever we want the panel to open, we can call this function with an argument of 1 or we can close it with an argument of 0.
Lets create a function to get Flex to do something when a call arrives.
The most common requirement for a contact centre CRM integration is “screen pop” – that is, we will search for and open the record in Dynamics that corresponds to the incident number that was attached to the Task Attributes of the call in our Studio Flow.
Dynamics searches are complex and we may need to fall back to simply searching for the contact phone number of the person calling. So, let’s start our function by passing in contact phone number, case number, and incident id. Let’s also take this opportunity to open the panel using our function from before.
Now, we need to test whether or not there actually is a case number and incident ID associated with this call. If there is, we’ll execute a search in Dynamics.
Notice that this search string that we are passing to the CIF function uses both case number and Incident number as search terms. So, we will only have a successful result if both are present. (This is dependent on the data having been attached in the Studio Flow discussed earlier.)
We know that not every person who calls us will have a preexisting case, and that not every case will have been found by the IVR. We need to provide a basic screen pop for those scenarios as well.
We’ll add an “else” handler to search for only the contact telephone number:
That completes our screen pop function, and we can now call this anytime an interaction arrives in Flex.
Let’s go and register for new reservations so we can use our screen pop.
We now know that our screen pop function needs contactno, caseNumber, and incidentID as inputs – we can get those from the incoming task reservation as task attributes:
In our implementation, we decided that screen pop is redundant on outbound calls because the user is already at the correct page of the CRM. So, inbound calls need to execute screen pop and outbound calls simply need to open the Flex panel.
So let’s test the direction of the call and trigger the screen pop function or panel functions depending on the direction.
That completes our subscription to the on “reservationCreated” event.Flex will now execute the screen pop search whenever a new inbound interaction arrives.
Finally, we just need to tidy up some loose ends in the UI.
Align the Flex UI with Dynamics
By default, the Flex UI is designed to take up the full width of the screen and to contain its own CRM container for customer data. In this integration, the primary UI is centred on Dynamics as the repository for customer data. Here, Twilio Flex resides in a smaller “task focused” sidebar. Hence the panel that Flex uses to host an embedded CRM in its default state is redundant.
We can prevent this Flex component from rendering with the following addition to our initialization function:
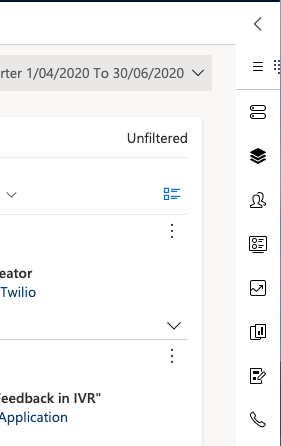
The far left hand side of the Flex UI contains important navigation icons that we want to remain visible at all times - even when the panel is closed. The default behaviour of Twilio Flex is to hide these icons when the screen real estate available to it is too small.
We will suppress this behaviour to keep the navigation icons visible when the panel is docked by adding the following change to our initialization function:
This will give us a Flex Nav bar at all times on the right side of our Dynamics window as per the image below.:
Let’s improve on that screen a little by making Flex pop out if a user selects one of the views from the sideNav.
Fortunately we made a function for this earlier called “panel”:
We have one more loose end to tie up. Let’s get Flex to tidy itself back up into a closed panel after we finish with a call.
To do this, we simply add a listener for the “afterCompleteTask” event and call our panel function one last time:
We now have a Flex plugin that is ready for us to test and publish!
Test the Dynamics and Flex integration
Once logged into Dynamics, you’ll see Flex embedded on the right hand side of the window. It will dock out of the way when not in use.
Make sure you’ve set your Worker to ‘Available’ and place a call to the Twilio Phone Number that we set up in the ‘Configure a Twilio Phone Number’ section above.
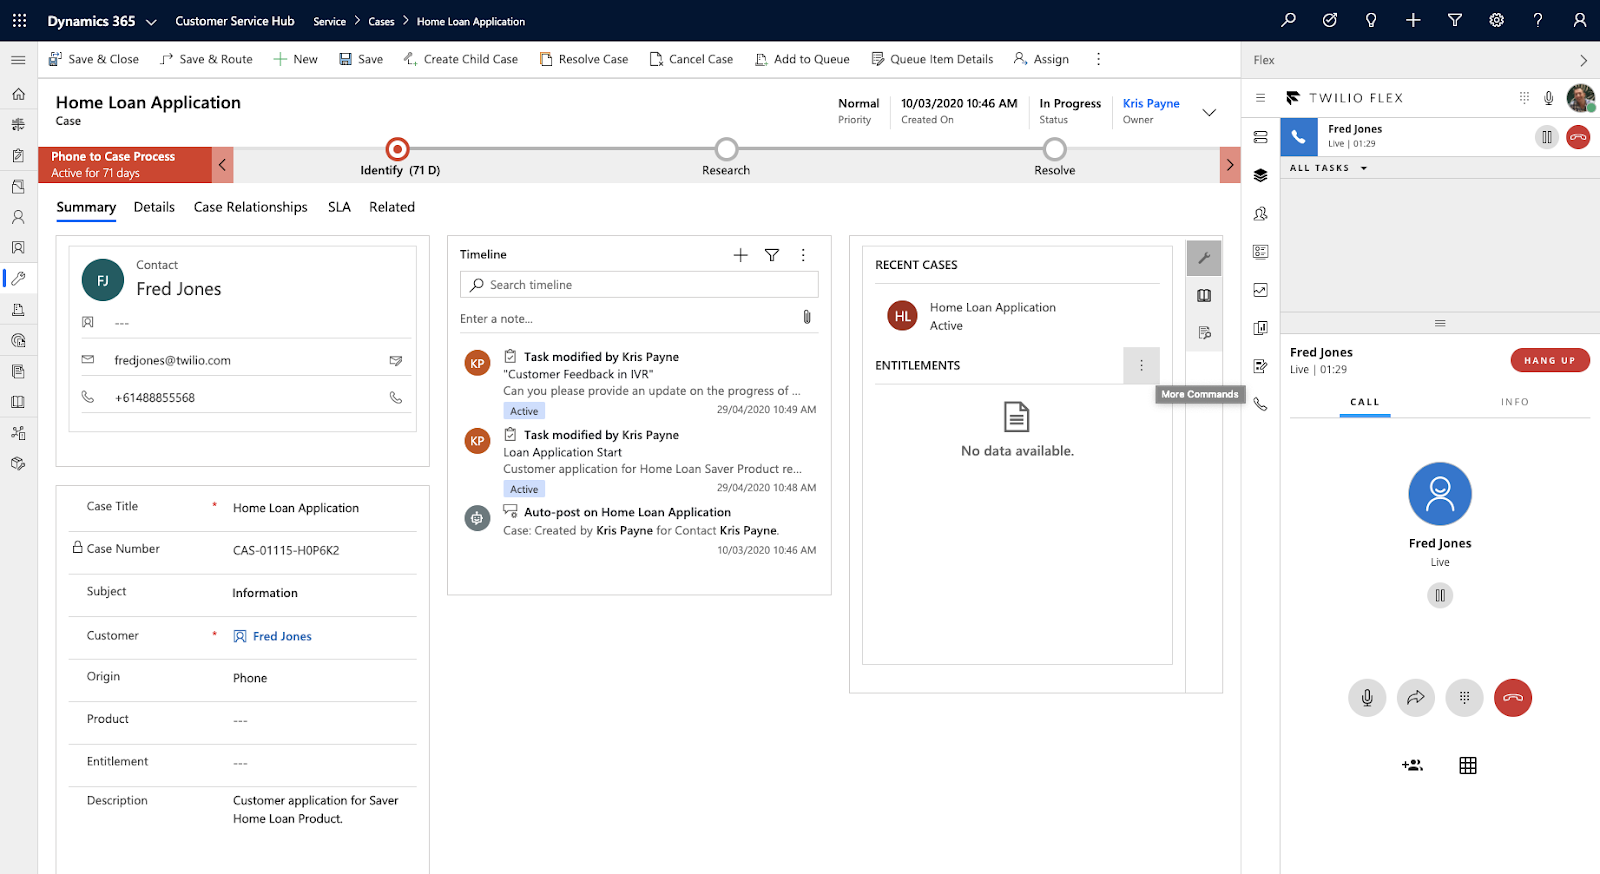
That's it, you should see your call presented in Flex and once selected/accepted the screen pop will open the Dynamics record.
Time to CELEBRATE! You have a working Twilio Flex and Microsoft Dynamics365 integration, all mediated by serverless Functions and Studio!
Conclusion: Integrating Dynamics365 with Twilio Flex
As you’ve seen, it’s straightforward to integrate Twilio Flex with Microsoft Dynamics 365 and provide an optimal agent and customer experience. You should now be in a position to test your MVP and showcase the benefits of this solution.
Whats Next
A few things you may want to consider to further enhance your solution are:
- Enable Web Chat and SMS - We showed you only a Voice flow, but you can easily expand this to other channels
- Expand your integration with Dynamics to be able to write data to a customer record. For example, you might create a case based on a call flow.
- Two Factor Authentication - Embed Twilio Verify or Authy to give agents the ability to authenticate customers with a push notification via Authy or via an SMS one time passcode with Verify.
- Leverage Twilio’s Autopilot capability to build a Natural Language IVR that uses customer data retrieved from Dynamics to provide self service and reduce agent workload.
References
You can find the code described in this blog on GitHub
About Us
Kris Payne is a Twilio Solutions Architect working on the Enterprise Sales Engineering team in Sydney Australia. Kris has an extensive background with contact centres and works with customers to help deliver digital transformative projects focused on Customer Experience. Any chance Kris gets to step away from his computer you’ll find him out and about the Sydney bush on his mountain bike, enjoying the peace. You can reach him at kpayne [at] twilio.com or LinkedIn
Eli Kennedy is a Contact Centre Specialist Solutions engineer at Twilio. Eli has worked in practically every role associated with the contact centre industry – from agent, to workforce planner, to implementation engineer, to consultant. Eli loves designing unique customer and agent experiences and is still happy to get his hands dirty getting things built. You can reach him at ekennedy [at] twilio.com
Mike Meisels is an Enterprise Account Executive on the Australia Team. Mike has a background in developing and implementing solution architecture. Mike joined the dark side 4 years ago but still likes to keep his hands dirty with developing solutions for Not For Profits and other organizations. Mike hides in his study away from his 5 daughters, 3 cats, and 2 dogs. Active on LinkedIn, he can be tracked down here.
Related Resources
Twilio Docs
From APIs to SDKs to sample apps
API reference documentation, SDKs, helper libraries, quickstarts, and tutorials for your language and platform.
Resource Center
The latest ebooks, industry reports, and webinars
Learn from customer engagement experts to improve your own communication.
Ahoy
Twilio's developer community hub
Best practices, code samples, and inspiration to build communications and digital engagement experiences.