How to Integrate Telegram into Twilio Flex Conversations
Time to read: 4 minutes
June 27, 2022
Written by
Reviewed by

In this post, I’ll show you how to add Telegram as a channel into Flex Conversations, and provide your customers with another way to reach your contact center. This particular approach requires only backend development and there will be no need to build an additional Flex UI plugin.
Prerequisites
Before we can start, you'll need to make sure you have a few things set up:
- If you haven't yet, sign up for a free Twilio account
- Set up your account with Flex Conversations
- Install Node.js on your machine
- Install Telegram Messenger on your iOS/Android device
Now that you’re ready, we can start integrating!
Getting Started
It’s important to provide your customers ways to reach you on their preferred channels, and while Flex Conversations only supports SMS/MMS, WhatsApp, and Chat out of the box, you have the tools to add your desired channel and keep your customers happy.
To create a conversation between a customer on Telegram and an agent on Flex, we will build an application that will receive messages from Telegram and send them to Twilio, and vice versa. The application will:
- Listen for events from Telegram when a new message is sent. If the customer is already engaged in a conversation with an agent, the message will be added to the existing conversation, otherwise a new conversation will be created.
- Listen for events in the conversation when a message is posted by an agent, and send it back to Telegram.
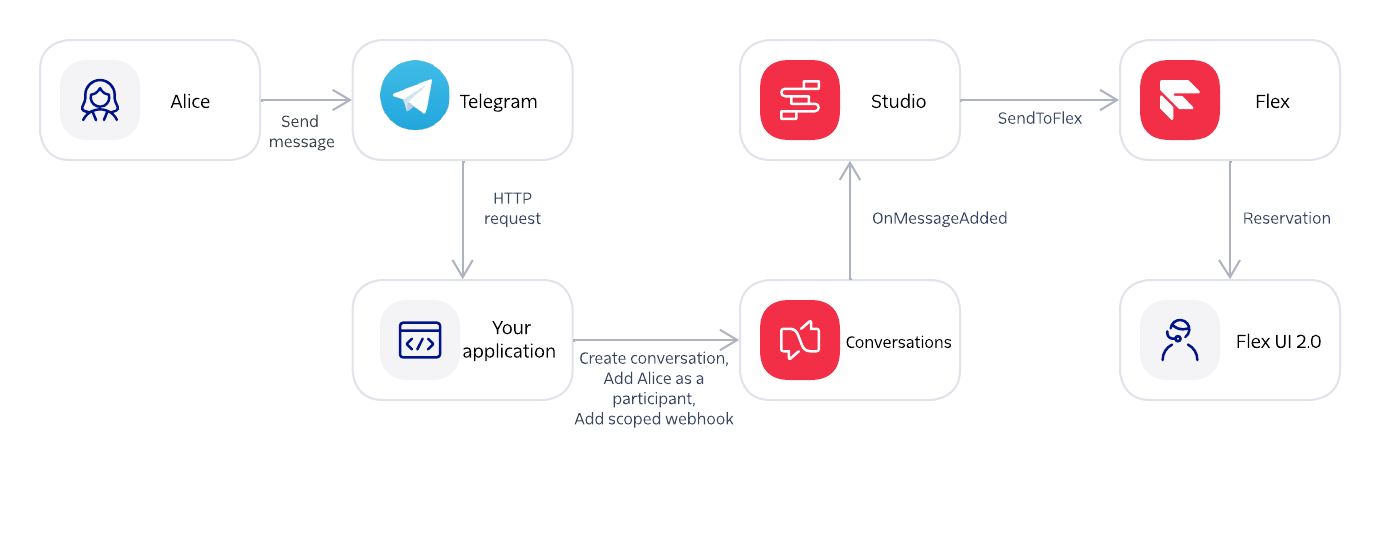
Here’s a high-level diagram of how this would work:
Create a Telegram bot
To give your customers the opportunity to reach out to your support team via Telegram, you need to create a Telegram bot.
After installing the Telegram Messenger app on your device, you need to find BotFather (a bot that helps you create new bot accounts and manage your existing bots), create a new bot and choose a username for it. For more information have a look at the Telegram bot documentation.
Create a new Studio Flow
In this step, we will create a new Studio Flow that routes new inbound Conversations to Flex:
- Create a new Studio Flow, e.g., “Telegram Flow”
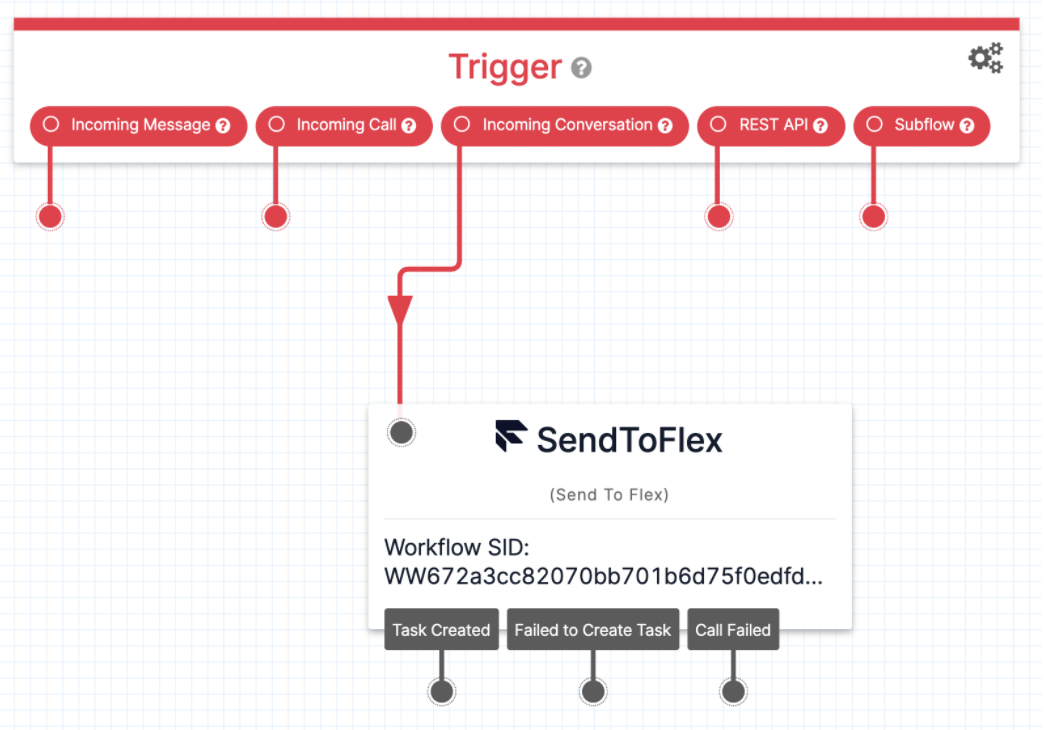
- Locate the Incoming Conversation trigger. If you don't see it, your account is missing a special account flag. Please contact support or your account manager for assistance.
- Connect the Incoming Conversation trigger to a Send to Flex widget. Configure the widget as follows:
- Select your desired TaskRouter Workflow
- Set the Task Channel to "Programmable Chat"
- Click Save and Publish your changes.
- Save your Studio Flow SID, because we’re going to need it later
Receive a message from Telegram
Now that we have our bot and the Studio flow, we can go ahead and start receiving messages from Telegram. For this, we’ll implement a /receive-message endpoint, which will process the request from Telegram and forward the message to Flex Conversations.
sendMessageToFlex is broken out into a few further functions: let’s see what each of them is responsible for.
We call findExistingConversation to understand if the customer is already engaged in a conversation with an agent. If the conversation exists, the new message will be added to it, otherwise a new conversation will be created.
createConversation and createParticipant, as the names suggest, are responsible for creating the conversation and adding the participant - in case the customer is just reaching out and there’s no active conversation already:
Finally, we’re adding a scoped webhook for the conversation. With studio as the target and the configuration filter set to onMessageAdded, any message that is added to the conversation will invoke the Incoming Conversation trigger on the specified flow (this is where we’ll use the SID of our Studio Flow).
Now that the conversation is ready, we can add the message from Telegram in it. We need our webhook to be invoked when this message is sent, and it’s important to note that only the SDK-driven clients (like mobile phones or a browser) will invoke the webhooks without further actions. When using the API or Server-side Helper Libraries, they won’t be invoked unless the header Webhook Enabled is set to true.
We created the logic to handle incoming messages from Telegram. Now, all we have to do is to make sure we receive these updates from Telegram. For this, we’re going to set a webhook in our Telegram bot. Whenever there is an update for the bot, we will receive an HTTPS POST request on our application. We can execute this part of the code as soon as our application is up and running:
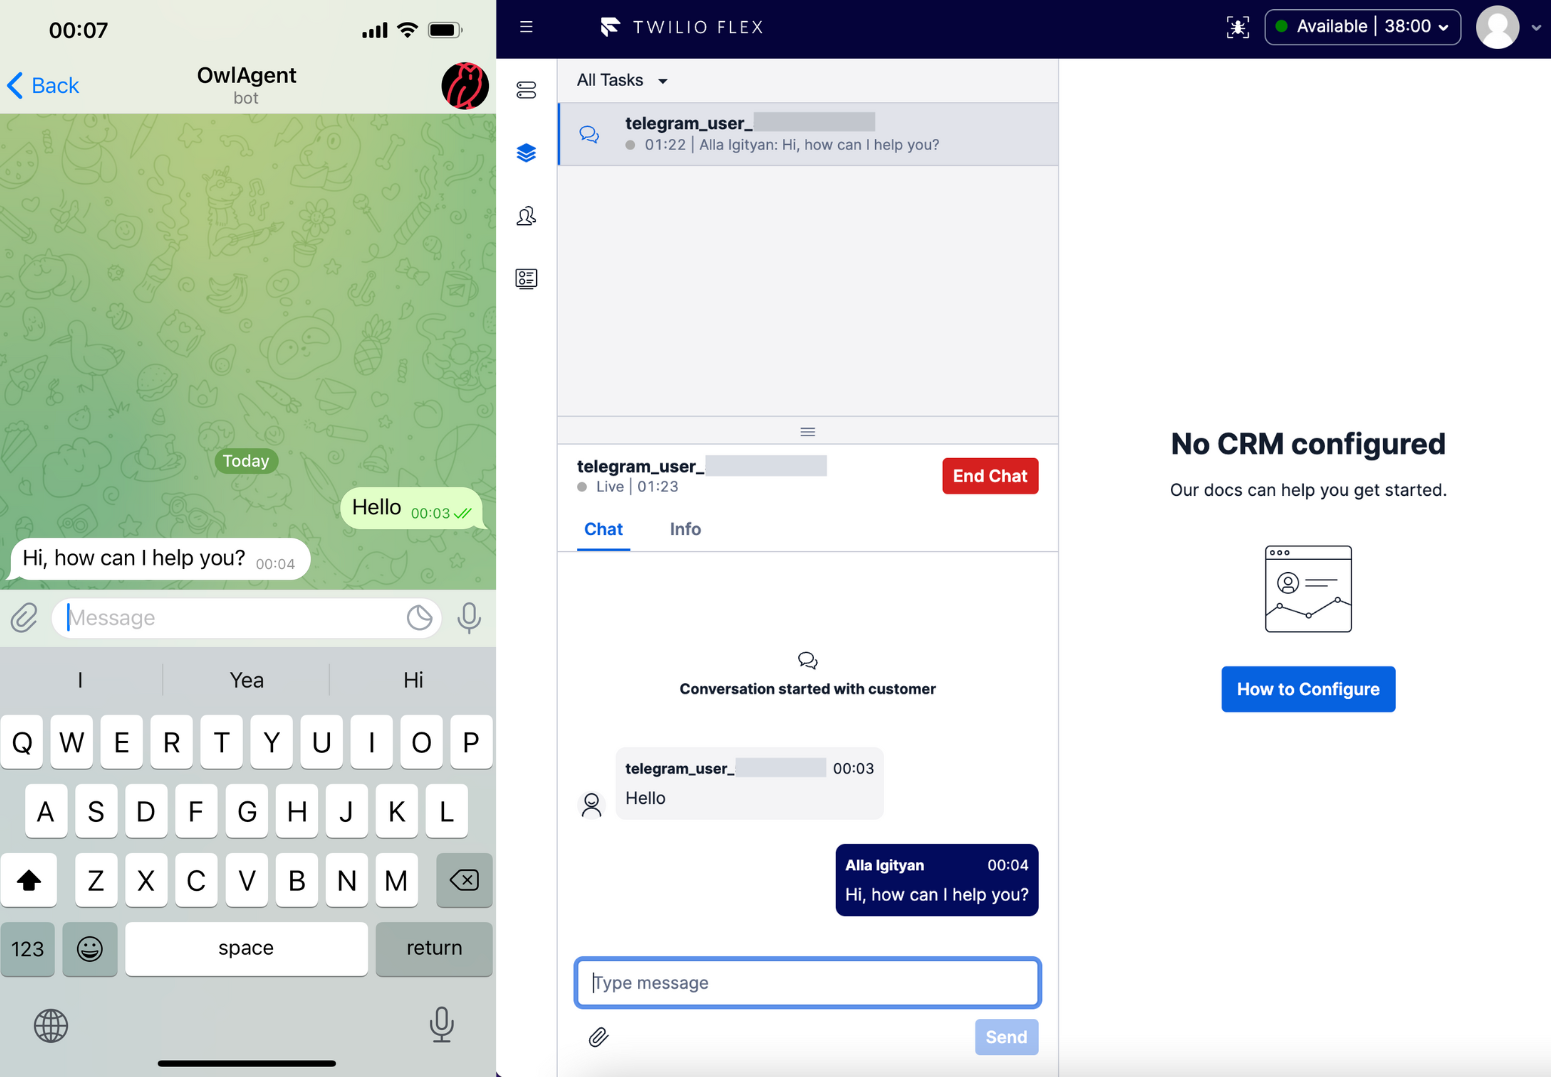
Now let’s test things out!
Go ahead and make yourself available as an agent, then send a message to your Telegram bot. The agent will shortly receive an incoming chat request from the Telegram user. There’s one problem though – the agent’s messages are not going to reach the Telegram user just yet. Let’s fix that!
Send a message back to Telegram
We received a message from Telegram and sent it to Flex, now we need to build the opposite direction. Let’s create another endpoint that will receive and process updates whenever a new message is added into the conversation by an agent from Flex.
In order for this endpoint to be executed, we need to add another scoped webhook for the conversation and specify the configuration url.
Now the agent will also be able to reply to the customer!
Next Steps for your Telegram Integration
The code for this proof of concept is available in this repo.
You might want to explore additional features for your integration, like fetching more information about the customer and providing some context to your agents, or receiving other types of updates from Telegram, such as the update about an edited message. This tutorial and the code in the repository should provide a starting point for you to build and integrate Telegram into Flex Conversations. Moreover, you can use it as an example to add any other custom channel to your contact center, because the process is going to be similar to this.
Now that you’ve learned to integrate Telegram with Twilio Flex Conversations, read the docs to see what other features are available.
Alla Igityan is an Associate Solutions Engineer at Twilio. She’s helping companies in Emerging Markets in EMEA build powerful customer engagement solutions powered by Twilio. She can be reached at aigityan [at] twilio.com.
Related Resources
Twilio Docs
From APIs to SDKs to sample apps
API reference documentation, SDKs, helper libraries, quickstarts, and tutorials for your language and platform.
Resource Center
The latest ebooks, industry reports, and webinars
Learn from customer engagement experts to improve your own communication.
Ahoy
Twilio's developer community hub
Best practices, code samples, and inspiration to build communications and digital engagement experiences.