Look at the Sky! Learn Data Visualization with WhatsApp, Google Maps, Python, Twilio, and Clarifai
Time to read:
July 15, 2020
Written by
Reviewed by

Do you remember Second Sky in 2019 when Porter Robinson and his team put up a huge board for attendees to draw and sign on? Due to COVID-19, his music festival transitioned to the virtual world. Inspired by his new song, “Look at the Sky” which debuted at the end of his Secret Sky set, I built this fun digital board to visualize where fans are in the world and how we’re all still connected under the same sky.
In completing this tutorial you will build a data visualization webpage after applying image recognition on WhatsApp photos.
In this article, we’ll walk through how you can view data visualizations from your Python app that easily share and identify media content in a private WhatsApp sandbox using Twilio API for WhatsApp, Clarifai API, and Flask.
Tutorial Requirements
In order to build this project, you will need to have the following items ready:
- Python 3.6 or newer. If your operating system does not provide a Python interpreter, you can go to python.org to download an installer.
- ngrok, a handy utility to connect the development version of our Python application running on your system to a public URL that Twilio can connect to. This is necessary for the development version of the application because your computer is likely behind a router or firewall, so it isn’t directly reachable on the Internet. You can also choose to automate ngrok in this article.
- A Clarifai account. Sign up for a free account to generate an API key.
- A free or paid Twilio account. If you are new to Twilio get your free account now! (If you sign up through this link, Twilio will give you $10 credit when you upgrade.)
- A Gmail account to generate a Google Maps Javascript API key. The documentation on Google will guide you to create a project for the API key then restrict and enable Maps JavaScript API.
Configuration
We’ll start by creating a directory to store our project files. Inside your favorite terminal, enter:
Since we will be installing some Python packages for this project, create a virtual environment.
If you are using a Unix or MacOS system, open a terminal and enter the following commands:
NOTE: Depending on your active version of Python, you might have to specify python3.
If you are on a Windows machine, enter the following commands in a prompt window:
If you are curious to learn more about the packages, you can check them out here:
- The Flask framework, to create the web application that will receive message notifications from Twilio
- The python-twilio package, to send messages through the Twilio service
- Clarifai’s Python library to interact with the Clarifai API for image recognition
- The reverse_geocoder library to retrieve location data from coordinates
- The pyngrok wrapper for ngrok
Configure the Twilio WhatsApp Sandbox
Log onto the Twilio Dashboard to view your Programmable SMS. Look at the sidebar to find “WhatsApp”. Click on it to learn how to set up your sandbox.
The sandbox is provided by Twilio, however, once you complete your app, you can request production access for your Twilio phone number.
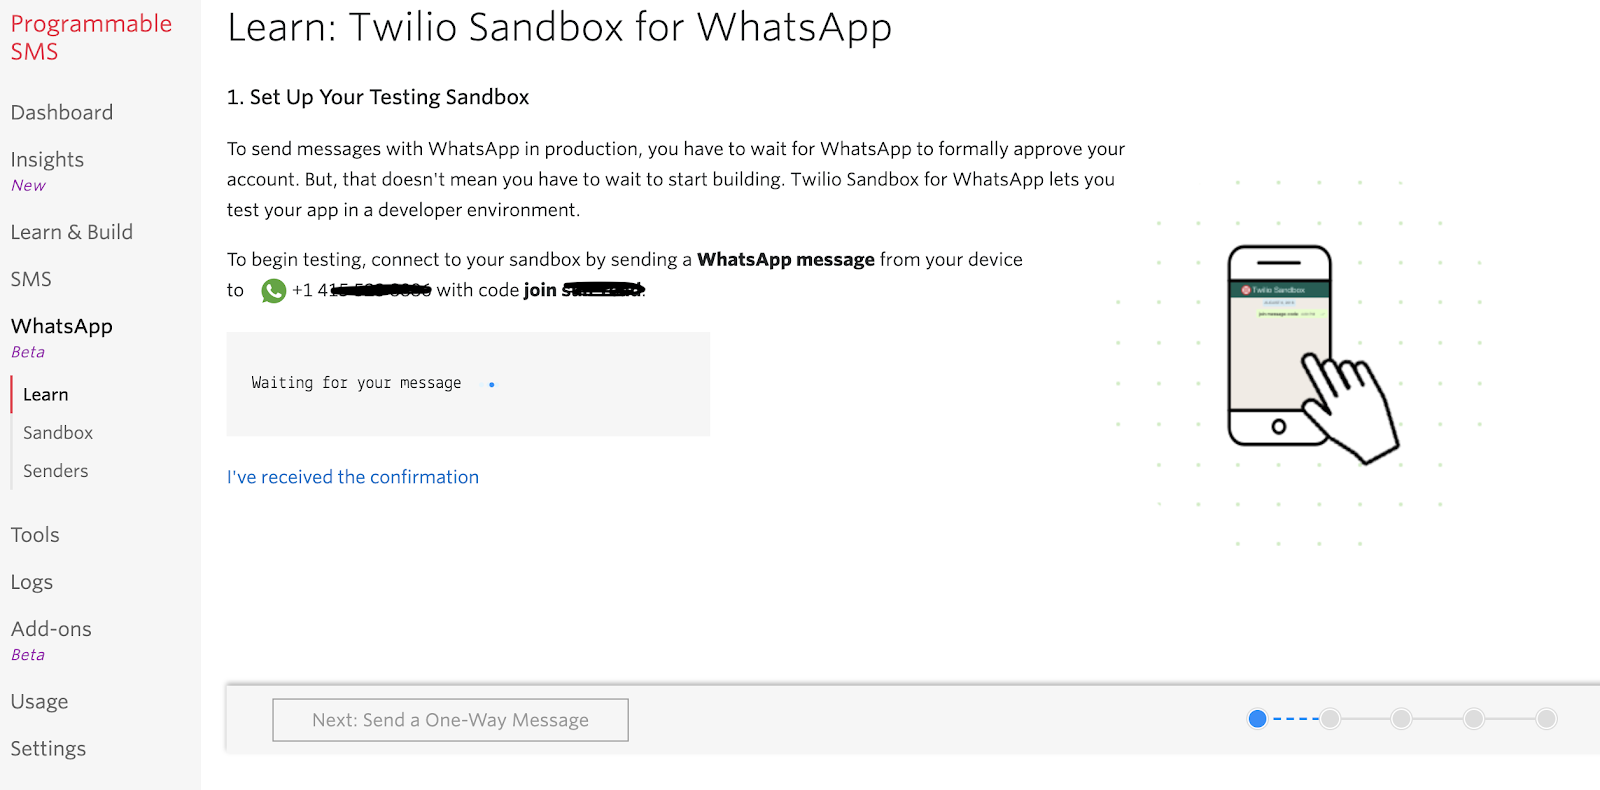
Use your smartphone to send a WhatsApp message of the phrase to your assigned WhatsApp number. If you are successful, you should receive a message as shown below.
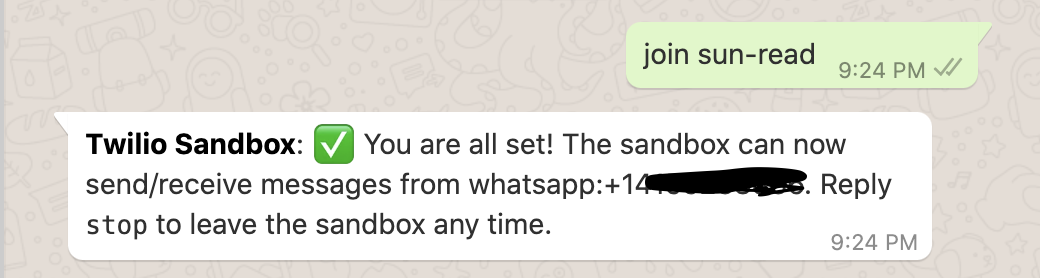
You should share these instructions with anyone else who wants to join your WhatsApp sandbox to share pictures.
Authenticate against Twilio and Clarifai Services
Next we need to safely store some important credentials that will be used to authenticate against the Twilio and Clarifai services.
For the TWILIO_ACCOUNT_SID and TWILIO_AUTH_TOKEN variables, you can obtain the values that apply to your Twilio account from the Twilio Console:
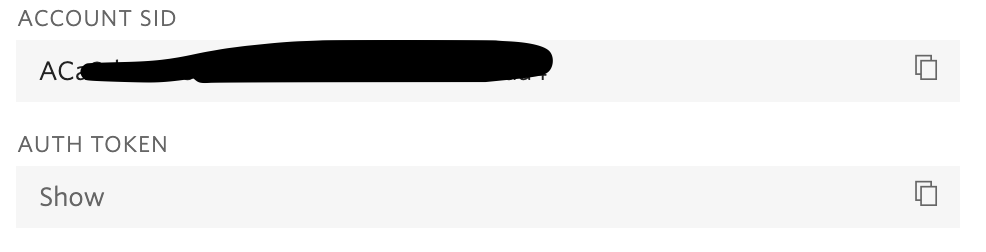
We will have to create a .env file to safely store some important credentials that will be used to authenticate against the Twilio service.
Here is what the .env file should look like:
While we’re at it, we’ll generate the Clarifai API key for the image recognition part of our project. To use the Clarifai API, you need to make an account and create an application.
If you are a Windows user, replace export with set for the Clarifai API key.
Receive and respond to messages with Twilio
The goal of this app is to allow friends and family to text your WhatsApp number with a picture of the sky and have it appear on our Google Maps visualization page.
After texting the generated phrase from the Twilio WhatsApp console, the users must enable their WhatsApp location services so that they can send in their current location before they can proceed to send in a picture. The developer is able to access their Google Maps visualization by going to localhost:5000 or their unique ngrok URL. The pinpoints on the map are generated from the data retrieved from every user that texts the WhatsApp number.
Build out the functions
The Twilio API for Programmable SMS uses a webhook (web callback) to allow real-time data to be delivered to other applications. This is especially important since we want to constantly be able to view our friends’ statuses.
Open up the app.py file you created and put the following code above the ngrok lines:
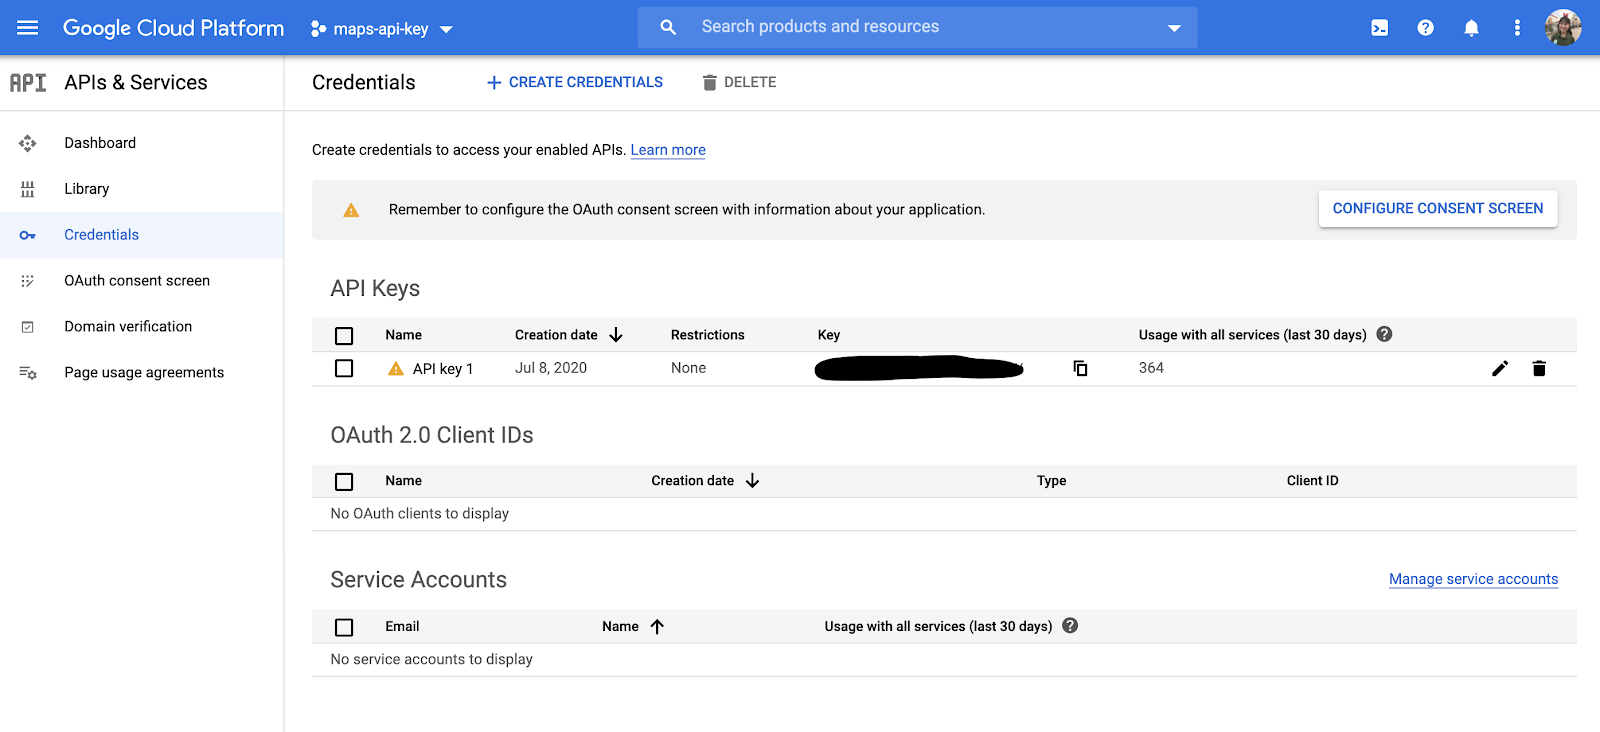
In the code above, a GoogleMaps instance is defined. In order to see the Google Maps visualization on the web browser, head over to the Google Cloud Platform console and make sure you created a project and generated an API key. Before we move on, make sure that you restrict your API key by clicking on your project Name, in this case, API key 1.
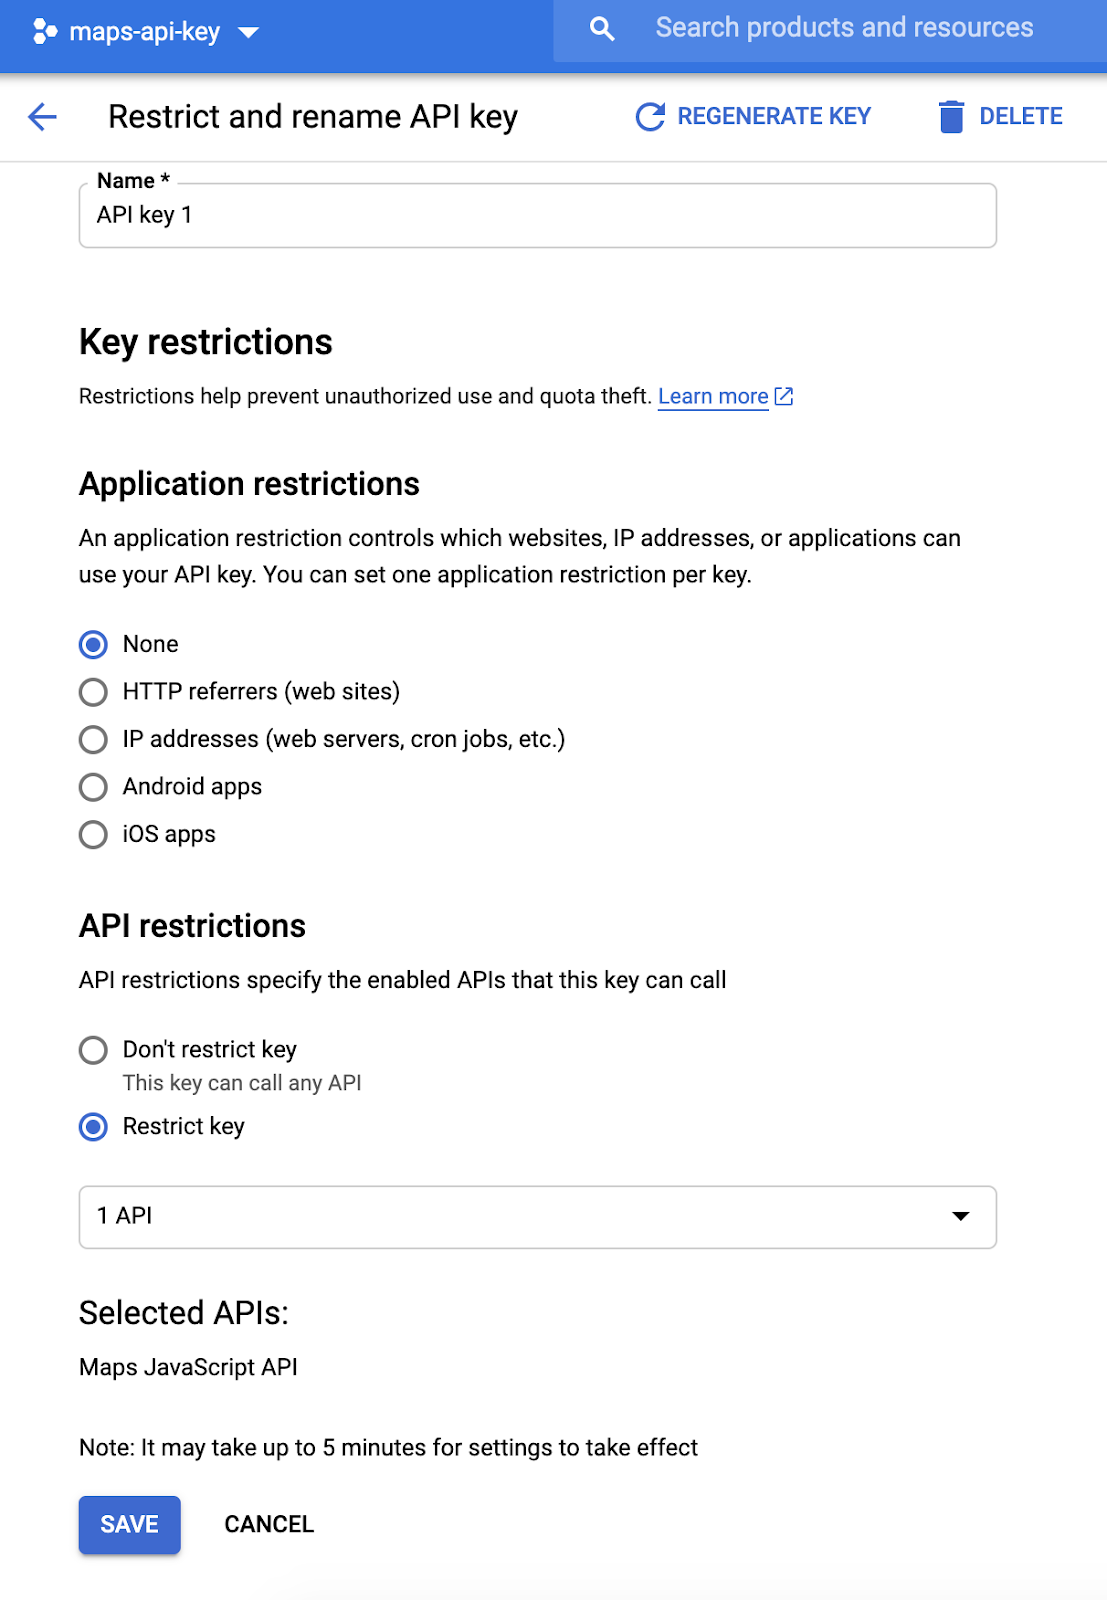
The screenshot above shows the options for you to restrict your API key to one of Google’s many services. Click on the option Restrict key to see a dropdown menu and find Maps Javascript API. If the Maps JavaScript API is not on the dropdown list, you must enable the API first.
Click save once you’re done.
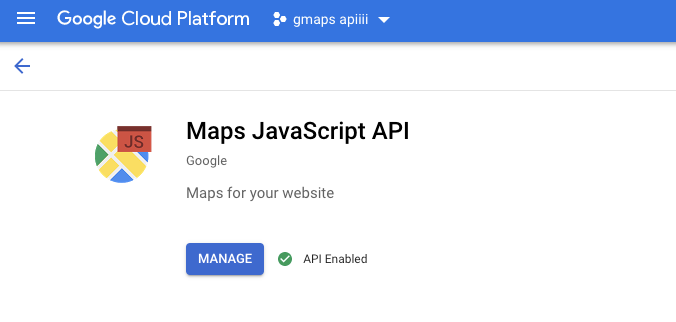
After completing the steps above, locate your project page to see a page similar to this:
Insert your Key into the line GoogleMaps(app, key="<YOUR GOOGLE MAPS API KEY>") so that you can use Google’s services to generate the map and test locally.
Go back to the code in app.py. Notice that there are functions called get_tags() and get_location() which haven't been defined yet. We will be going over these functions later in the article, as well as the sky_pics data structure that holds the info from the sender, such as the location coordinates and picture data.
Set up a development Flask server
Now that you have saved the code above into your file, we’ll have to test things out by starting a development Flask server. Type the following line in your terminal:
Remember that if you are a Windows user, replace export with set for the environment variables.
These lines are convenient because every time you save the source file, the server will reload and reflect the changes.
Then, type flask run in your terminal to start the Flask framework.
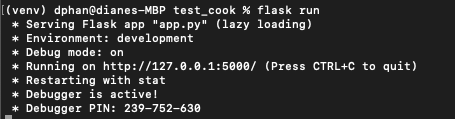
The screenshot above displays what your console will look like after running the command flask run. The service is running privately on your computer’s port 5000 and will wait for incoming connections. You will also notice that debugging mode is active, and that my flask server restarted to reflect my changes.
While flask is running in one terminal window, open up a second tab or terminal window. Start ngrok with the following command:
Great, you enabled your Flask service publicly over the Internet!
Ngrok is a great tool because it allows you to create a temporary public domain that redirects HTTP requests to our local port 5000.
Note that if you are unable to install ngrok system-wide, try to locate the executable ngrok file manually in order to call it in your terminal using its full path. For example, my ngrok file was on my desktop, so I would type
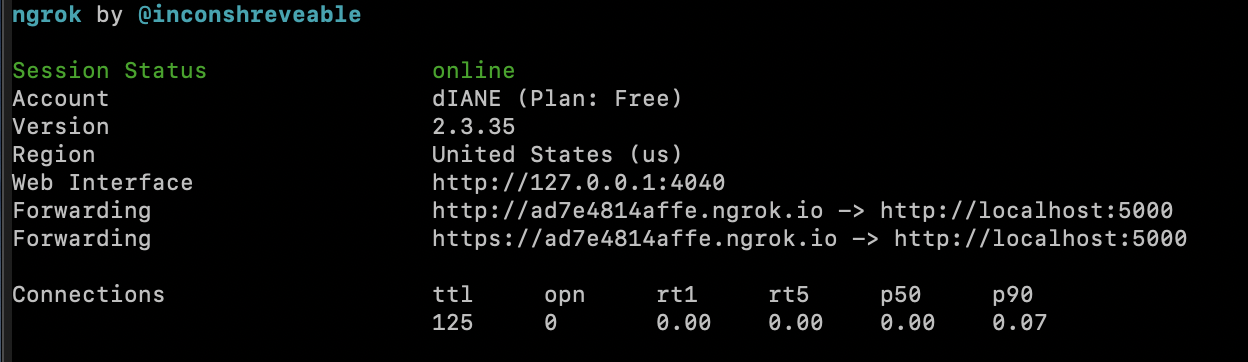
Your ngrok terminal will now look like the picture above. As you can see, there are URLs in the “Forwarding” section. These are public URLs that ngrok uses to redirect requests into our flask server.
Set up a webhook with Twilio
Take your ngrok URL from earlier (in this case, https://ad7e4814affe.ngrok.io/) and return to the Twilio Console where we tell Twilio to send incoming message notifications to this URL.
In the Twilio Console, click on the (...) on the left sidebar to find the Programmable SMS Dashboard. Look at the sidebar to find “WhatsApp”. Click on it to unlock the option “Sandbox” under “Learn”, which we looked at earlier in this article.
Paste the URL copied from the ngrok session into the “WHEN A MESSAGE COMES IN” field and append /webhook, since that is our endpoint. Here is my example for reference:
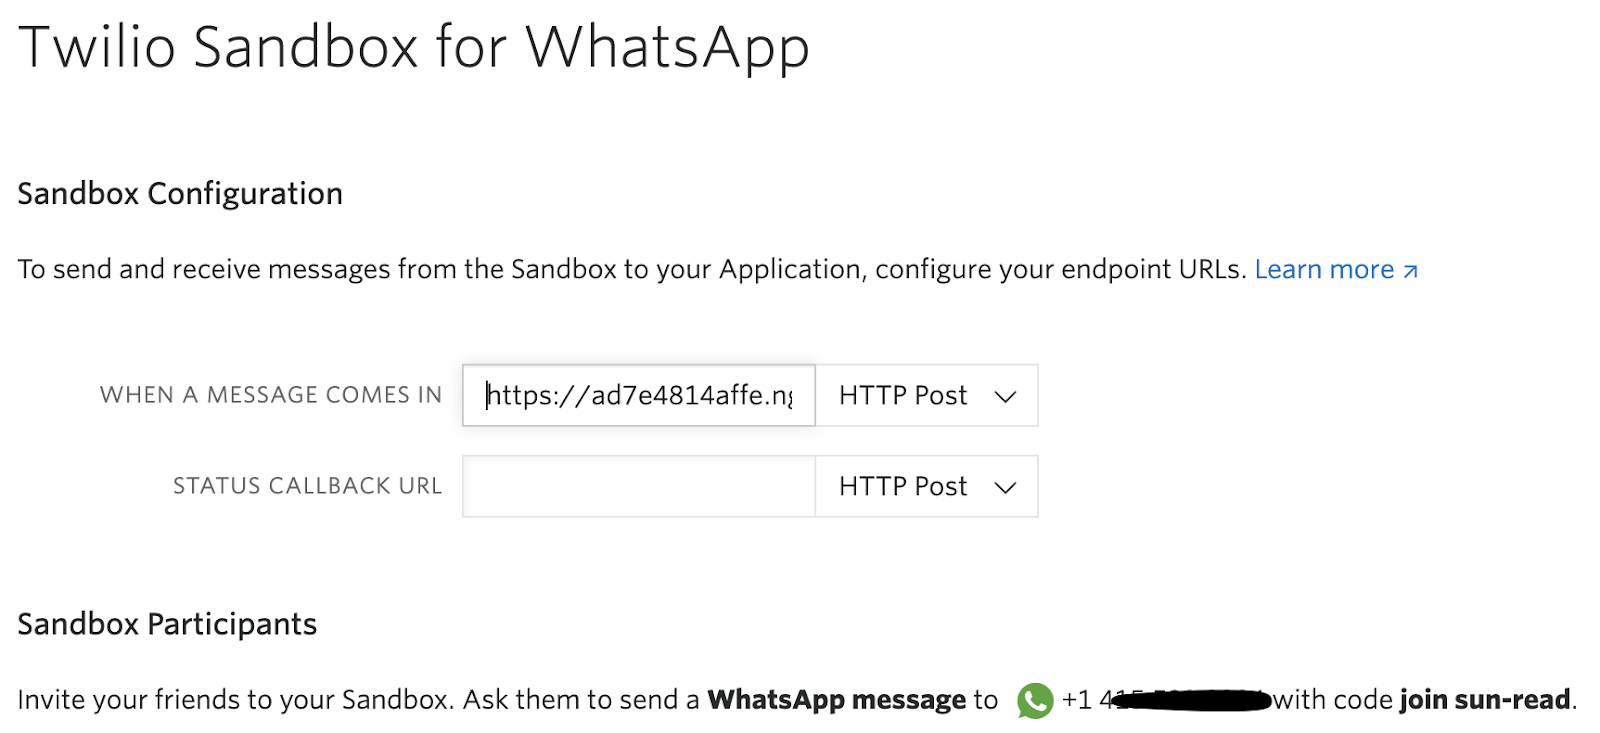
The URL from ngrok is “https://ad7e4814affe.ngrok.io/webhook”
Before you click on the “Save” button, make sure that the request method is set to HTTP POST.
Time to test things out! Log into WhatsApp and send a text message to your Twilio Sandbox.

Looks like it works! Now it’s time to send a picture of the sky.
Make the app more powerful
In the app.py file, sky_pics was declared as a Python dictionary for the project. This global variable is a data structure that allows us to have one unique key, representing the person’s phone number. Each key will have it’s own information that can be updated. The dictionary is also a returnable object that conveniently lists out all the keys (sender’s phone number) and their values (the coordinates, location, and a picture).
With the help of Geocoder, Clarifai, and Google Maps, we are able to build a more powerful app to see our data in a creative and fun way.
Create markers on the map with Geocoder API
When the user enables their location services and texts their current location, the Longitude and Latitude coordinates are available in the Twilio WhatsApp Messages payload. Working with ngrok allows you to view all of the incoming requests to your webhook locally, which makes it easier for you to view the texter’s data. Here’s a screenshot of the incoming requests generated by ngrok:
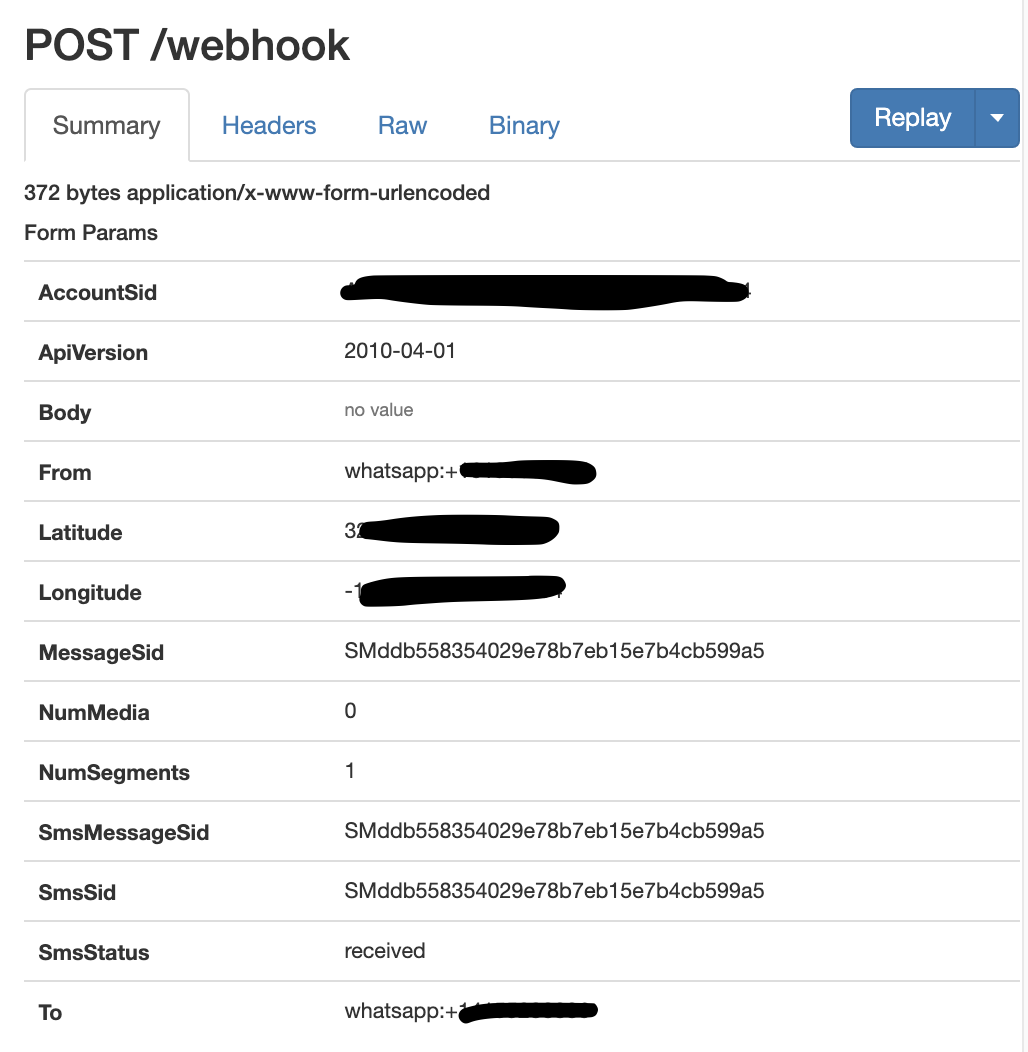
These coordinates are used to plot location markers in the Google Maps API, but you can use the Reverse Geocoder API to keep track of the locations where users are located and confirm their location.
Create a file in the root directory named geocoder.py and copy the following code:
After importing the code, save it, then go back to app.py. You’ll need to import the function from the new Python file to the main file that runs via Flask. Add this line at the top of the file, along with the other packages imported to this app.
Great! Now that we have location data, we need to collect the pictures.
Identify the sky with Clarifai
This project is a fun opportunity to test out the Clarifai API and see how it works against the user inputs. In this section you will understand why image recognition APIs are important especially when building a project that presents untrusted users the ability to upload any photo they want. Here, you’ll want to make sure that the users only send in pictures of the sky instead of something else such as a meme.
With that said, let’s create a new Python file. I created image_classifer.py to store the code that uses Clarifai’s API. Copy the following code into the file you just created:
After importing the code, save it, then go back to app.py. You’ll need to import the function from the new Python file to app.py. Add this line at the top of the file, along with the other packages imported to this app.
If you haven’t done so already, make sure to set the Clarifai API key with the following command:
If you are a Windows user, replace export with set for the Clarifai API key.
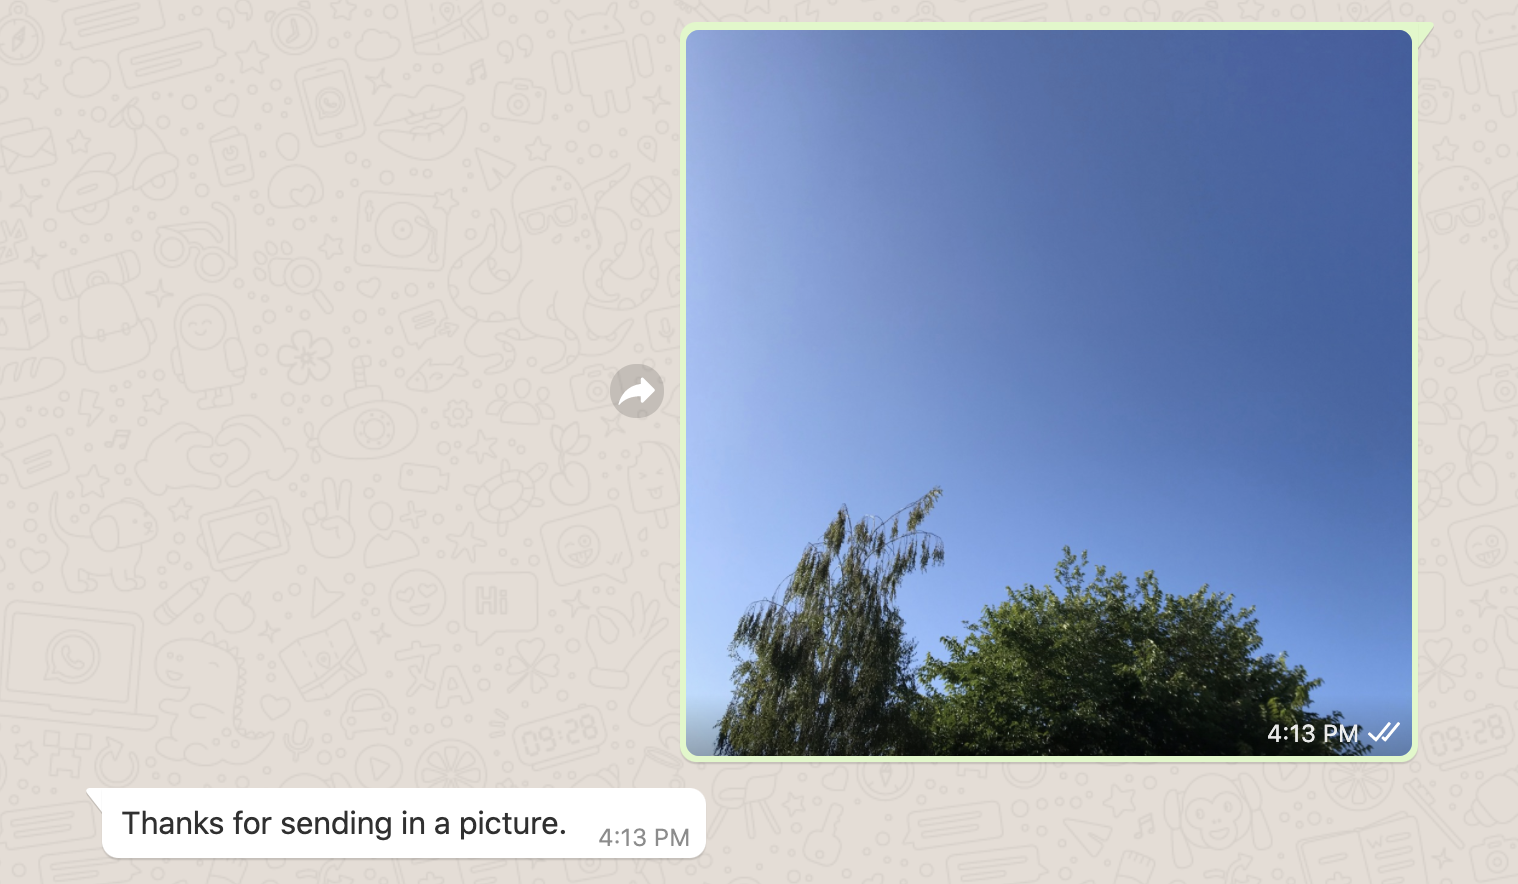
Here is an example of what will happen when we test out the entire app later. The user will text in a picture of the sky. If the app can confirm that the picture is indeed, a sky, then WhatsApp will respond with a “Thanks for sending in a picture.” message as seen below:
The line print("The tags for your picture are : ", relevant_tags) from app.py allows you to view the tags that Clarifai’s API generated from the picture that was sent in. Check out the tags for the picture from above:
Looks like the Clarifai API is doing its work and the app is able to tell you to send in a picture of an actual sky.
Visualize data on Google Maps
It’s time to build out our beautiful map of data! If you haven’t created a Google Maps API Key by now, be sure to take some time to generate a key and enable Google Maps for Javascript.
There are different methods of implementing HTML in a Flask application, but I found the following solution to be sufficient for the visualization.
Paste the following code in between the webhook definition and ngrok lines in the app.py file:
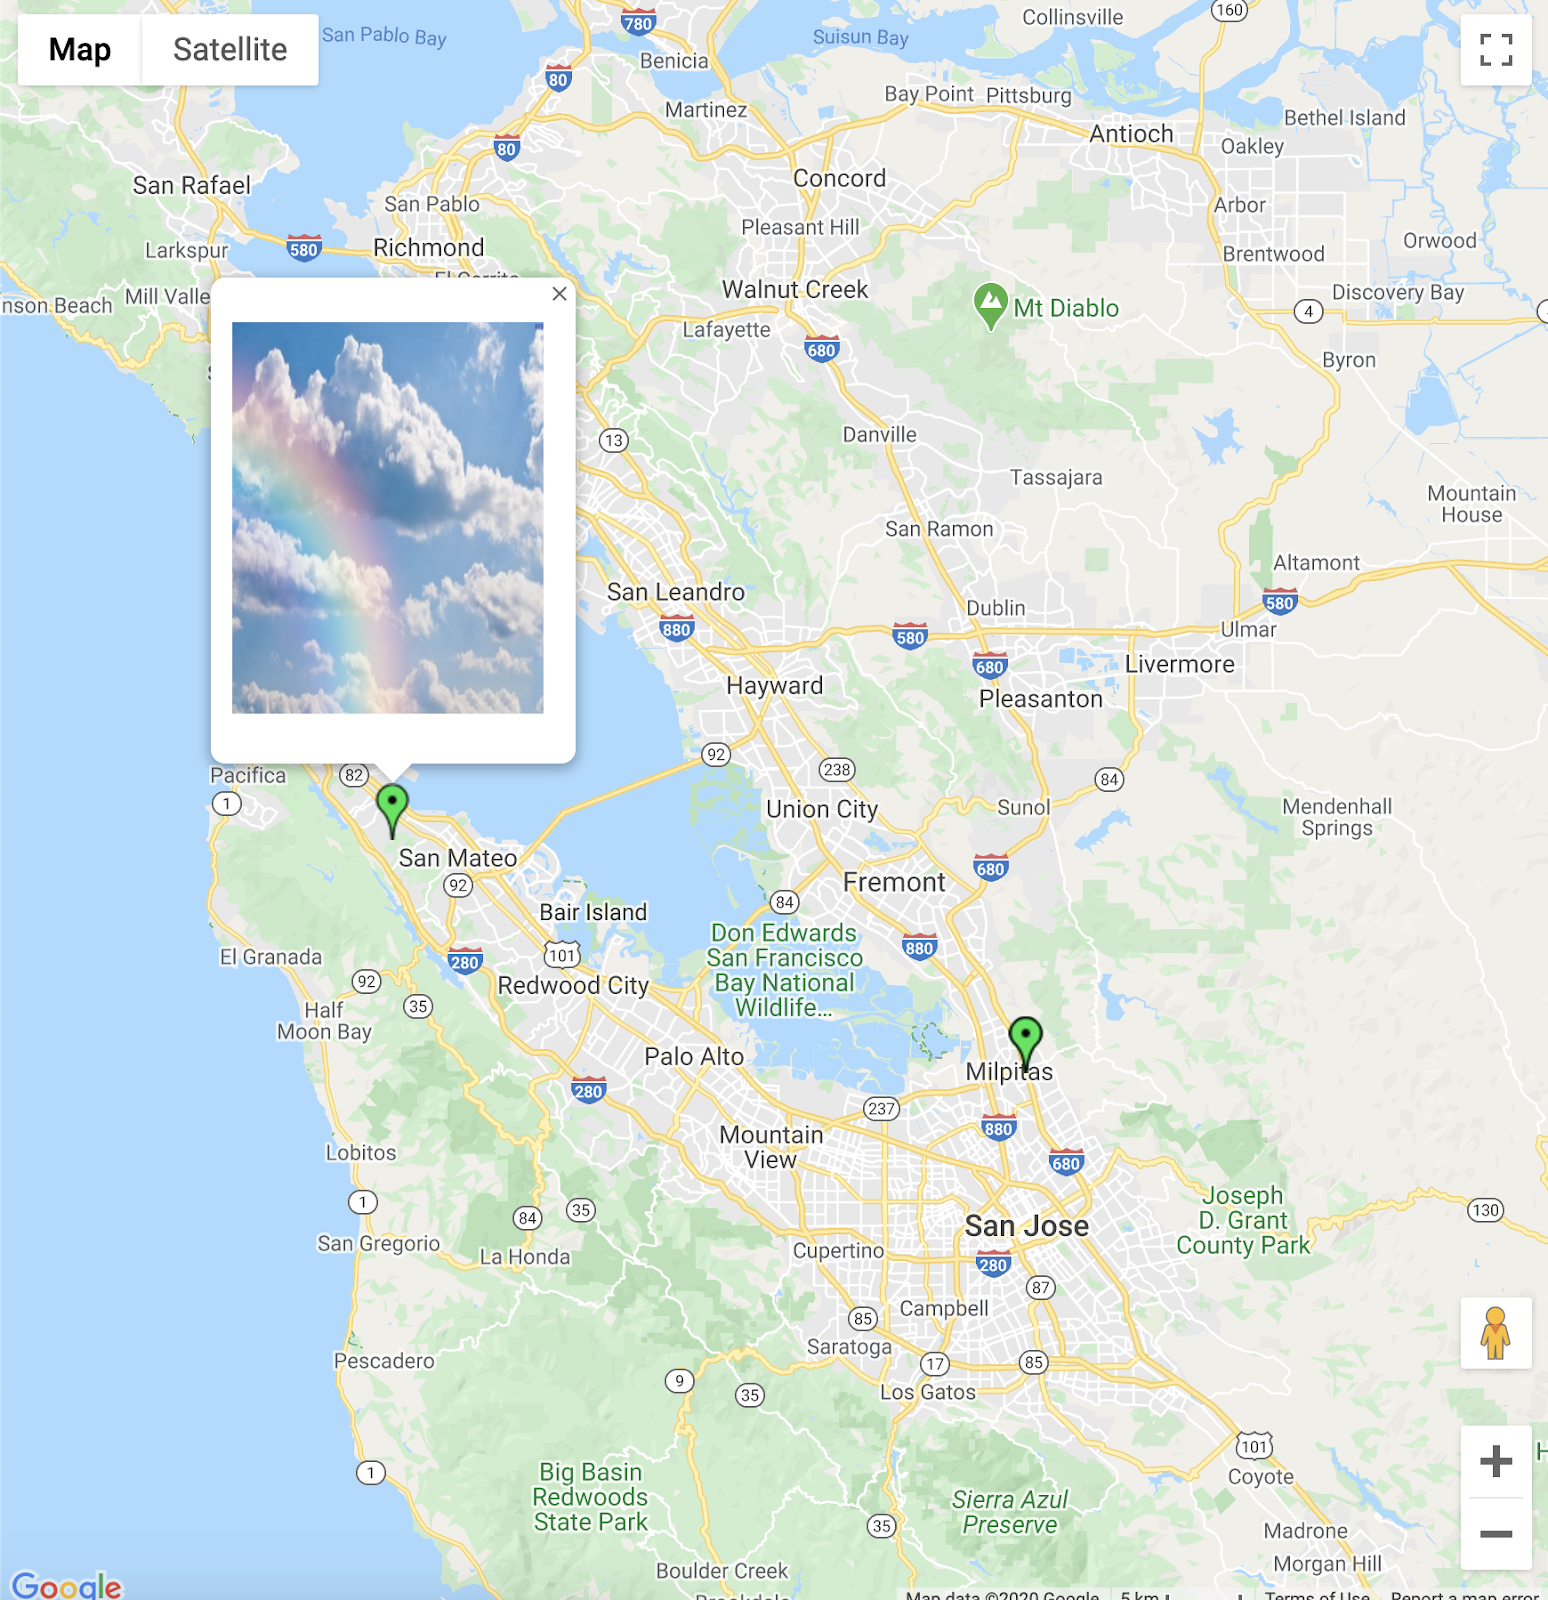
As you can see, you have a mix of HTML and Python to generate the pinpoints on the map. The markers array was created in order to hold the HTML elements such as the pinpoint represented by icon and the infobox which are generated on the Google Maps site. This infobox is a pop up window that will display the picture of the sky sent from the person with the coordinates provided so you can play around with the HTML there to figure out what you want to see on your visualization.
While creating the markers array, sky_pics dictionary is iterated through and identifies all of the users that failed to send in a picture. You can choose your own way to deal with the incomplete data, but I thought I could use a random filler image of a sky so that the map can still be populated with data points instead of creating an out of bounds error for missing data.
A Javascript Map object named mymap was also created in the code above. This will be called in another file. In your root directory, create a folder called templates and inside of that file, create index.html.
This HTML file is rendered in app.py when you access your ngrok URL. With the help of the flask-googlemaps that we imported back in the app.py file, we are able to use global functions and templates in the Jinja environment in order to see the Map view on our web browser. Check out Miguel Grinberg’s blog if you’re interested in learning more about the templates and Jinja environment for Python apps.
Play around with the map() parameters in app.py and customize the HTML headers so that your web visualization looks most appealing to you!
Run the WhatsApp Data Visualization App
It’s time to wrap things up and make sure your program is working the way you want it to so that you can share the project with friends and family. If you want an example, view my code on GitHub.
Make sure you have one tab running flask and one tab running ngrok. If you closed it for any reason, start it again now with the following commands in their respective tabs.
And in the second tab:
Furthermore, make sure that your ngrok webhook URL is updated inside the Twilio Sandbox for WhatsApp. Each time you restart ngrok, the URL changes, so you will have to replace the URL. Remember to add the /webhook at the end of the ngrok forward URL.
It’s time to share pictures of the sky from your own home. Be sure to tell your friends your WhatsApp Number so that they can text in, register their location in the sandbox, and send in pictures of the lovely sky. After you have at least one person text in a location and picture, visit your ngrok URL to see the data!
Conclusion: Building a WhatsApp Data Visualization App
Congratulations on building your first WhatsApp Data Visualization App! You must be in awe with the pictures of the sky that have been shared with your app. This simple Google Maps and WhatsApp tutorial shows you how to create a data visualization of images and locations from friends and family around the world. They can even update their location with a picture of a sunset at the end of the day through the help of Twilio, Python, Clarifai, and Flask.
I hope this article was fun and taught you about these APIs, but also reminded you to enjoy the world around you. It’s fun to escape worlds, but don’t forget to appreciate the beauty around you. We’ll start by admiring the colors of the sky and realizing that we share the same sky regardless of how far we are from each other. As Porter Robinson mentioned, Everything we need is already here.
What’s next for Data Visualization apps?
APIs are super fun to use, don’t you think? If you’re seeking ways to expand on this project, try these:
- Create your own graphic for the pinpoints on Google Maps
- Collect and visualize data using Node.js and Twilio Sync
- Build a map locating boba in the area and adding pictures to it
- Explore data visualization projects using Python modules
Let me know if you’re working on any projects or if you see something lovely in the sky!
Diane Phan is a Developer Network Intern on the Developer Voices team. She is Porter Robinson’s #1 fan and loves to help beginner programmers get started on creative projects that involve fun pop culture references. She can be reached at dphan [at] twilio.com.

Related Resources
Twilio Docs
From APIs to SDKs to sample apps
API reference documentation, SDKs, helper libraries, quickstarts, and tutorials for your language and platform.
Resource Center
The latest ebooks, industry reports, and webinars
Learn from customer engagement experts to improve your own communication.
Ahoy
Twilio's developer community hub
Best practices, code samples, and inspiration to build communications and digital engagement experiences.