How to Organize a Lunch Order with Java and Twilio SMS
Time to read:
April 12, 2022
Written by
Reviewed by

Offices are opening up again! As employees are slowly going back to work in the office, local businesses are blooming with an influx of customers and new food orders. Allow Twilio to assist you in making your next lunch run with a quick and accessible way to view those elaborate orders on your phone when you're in line.
In this article, you will learn how to make a list to add and view from your phone using Twilio SMS and Java.
Prerequisites
- Java Development Kit (JDK) version 8 or newer.
- Maven 3.3 or newer.
- IntelliJ IDEA Community Edition for convenient and fast Java project development work. The Community Edition is sufficient for this tutorial.
- A free or paid Twilio account. If you are new to Twilio, get your free account now! (If you sign up through this link, Twilio will give you $10 credit when you upgrade.)
- ngrok, also known as a handy utility to connect the development version of the Java application running on your system to a public URL that Twilio can connect to.
Create and import Spring Boot project
This project utilizes a resource called Spring Intializr. This tool provides the basic structure of a Spring Boot project for developers to get started quickly.
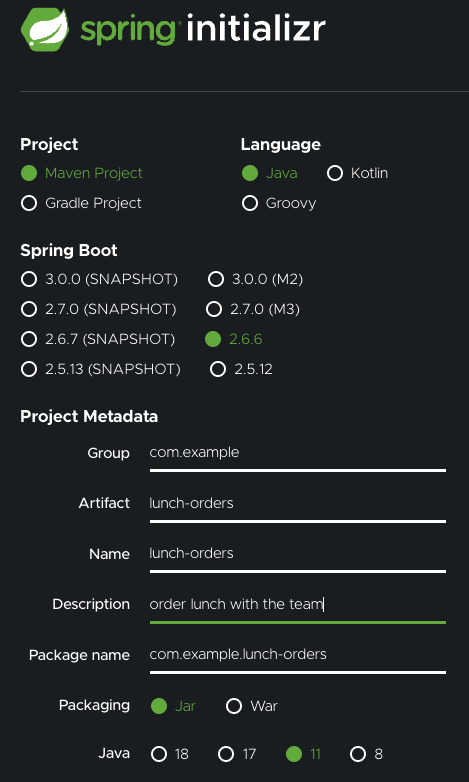
Go to the Spring Initializr site. Under Project, choose “Maven” and then “Java” as the language. Note that this tutorial is built with Spring Boot version 2.6.6, so select the same version in Spring Initializr.
For the Project Metadata, change the name of the project listed in the Artifact section. Name this application artifact "lunch-orders". Give the Name section the same name, as this is the display title that creates the entry point for the project.
Feel free to add in a description for the project to help you organize better.
Choose “Jar” as the Packaging type as the application will run in the embedded Tomcat server provided by Spring Boot, as well as Java version 11.
Refer to the image below to ensure your Spring project matches up.
On the right-hand side, click on the Add Dependencies button and search for "Spring Web" under the Dependencies section.
Click on the Generate button at the bottom of the page and the browser will download a .zip file containing the boilerplate code for the project. Extract the .zip file.
Open IntelliJ IDEA and open the root folder of the extracted contents from the lunch-orders.zip folder. Click on Finish to import your project into your IDE.
Explore the file structure
Examine the project directory and expand the src/main/java folder to see the com.example.lunchorders subfolder. The file structure should look similar to the screenshot below:
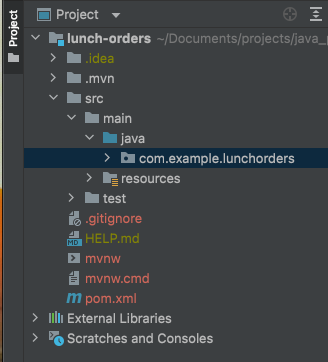
Expand the com.example.lunchorders package to reveal a class file named LunchOrdersApplication. This class exists to compile and execute the code later on in the article.
Configure Twilio into the project
Find and open the pom.xml file and make sure the following dependency is in the list of dependencies in order to allow the application to use REST services:
In the same pom.xml file, add the following dependency to the list of dependencies:
This dependency allows the Twilio Java Helper Library to be used and executed in this Maven project. This is essential for the controller class that will be created later on to handle the TwiML messages of this SMS project.
Save the file.
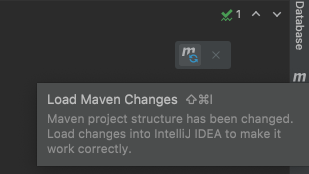
Look at the top-right corner of the IntelliJ IDEA and find the little icon with an "M" shape. Click it to load Maven changes.
Define the lunch list class
Navigate back to the src/main/java subfolder and package to create a new class named LunchList.java to define the functions of the lunch list application.
The list will be implemented as an ArrayList to ensure that the list can grow dynamically and hold String type entries.
Copy and paste the following code to create the LunchList class and a few methods to get the task list started:
Here, a new ArrayList object is initialized and named lunchOrderList. This lunchOrderList object will be used and referenced throughout the program, as whenever a function is called on the ArrayList, the object's contents will be altered.
A getLunchOrderList function is defined to conveniently return the contents of the lunchOrderList object. The addItem and removeItem functions exist to call the built-in functions for the ArrayList Java class.
As defined above, this application will hold String values and be numbered in this ArrayList. Thus, users can add a new String value to the list by passing in the task parameter, or they can choose to remove it with the corresponding integer value.
To start off the list, add a lunch order for yourself by typing in your name first, then the order, in String format, such as "Diane - Salad and panini". The LunchList constructor will create the first entry in the list during compilation.
Build the TwiML Controller
A controller is required in Java projects to control and handle the HTTP requests made from the user to the application. In this case, the user inputs either a String or int value to determine how the lunchOrderList should alter the data.
Right-click on the com.example.lunchorders package to create a new class named TwiMLController.java to create the controller that handles the requests made to the LunchList class.
Copy and paste the following code to the newly created class:
The @RestController annotation marks the request handler required to build and provide the RESTful web service during runtime.
The @Autowired indicates a constructor used in the Springboot application to enable dependency injection. The TwiMLController takes in a LunchOrders class object, which in this case, is empty from the initialization on line 16.
Build the application logic
In this application, the list of orders will be displayed when the user texts in "list" or "List" to the phone number. If the user texts in anything else, the entire message string will be appended to the array list.
Copy and paste the following code to the TwiMLController class:
The @PostMapping annotation means that the application can accept HTTP POST requests, also known as the SMS sent to the /sms POST route.
Since the user is able to interact with the application by texting in new orders to be inserted into the list, the Java application must be able to read the body message requests sent to Twilio with the @RequestParam. This provides the form parameters from the request that will be parsed and directly added to the lunch order list with the defined addItem(item) method, or return the current list, if prompted otherwise.
Add the SMS functionality to the webhook
Before closing out the sendTwiML() method, add the following code beneath the else condition statement:
The Twilio SMS API takes the stringList string to construct a TwiML response that will be sent via SMS to the cellular device.
Once the new food order is added, a message confirming the order is returned to the texter.
Open the ngrok tunnel
After defining the functionality of the sendTwiML method, the ngrok client and tunnel need to be initialized.
To do that, navigate to the LunchOrdersApplication.java file. Import the following lines to the top of the file:
Copy and paste the following highlighted code inside the void main() function:
The final keyword is added to restrict the variable from being modified. You can view the documentation for declaring and using the ngrok in the java-ngrok GitHub README.
At this point, you should have a POST route that creates an SMS with Twilio's API and a connection to a tunnel from the ngrok client. Save the program.
Navigate back to the pom.xml file to add the following dependency to the list of dependencies:
Look at the top-right corner of the IntelliJ IDEA and find the little icon with an "M" shape. Click it to load Maven changes.
In order for the ngrok tunnel to be opened successfully, the port must be changed to port 80. Navigate to the src/main/resources/ subfolder and open the applications.properties file. Add the following line and save:
Run the lunch order application
We've nearly reached the end of the tutorial. If you need to check your code, here's my GitHub repo.
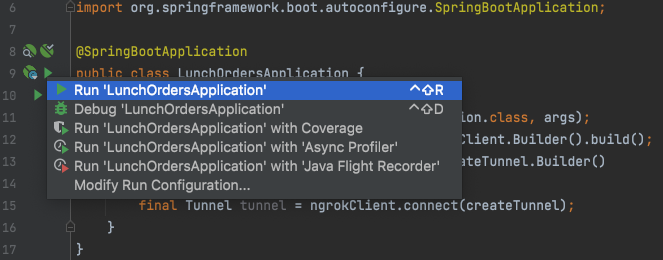
In the LunchOrdersApplication.java file, and click on one of the green play buttons next to the public class definition as seen below:
Wait a few seconds for the project to build, download the project's dependencies, and compile.
Soon, the terminal should display a link to the default port 80 as well as a randomly generated link. You may have to scroll down the output text for a bit until you find a URL similar to “https://ad7e4814affe.ngrok.io/”. Here's an example of the output you might have to scroll through:
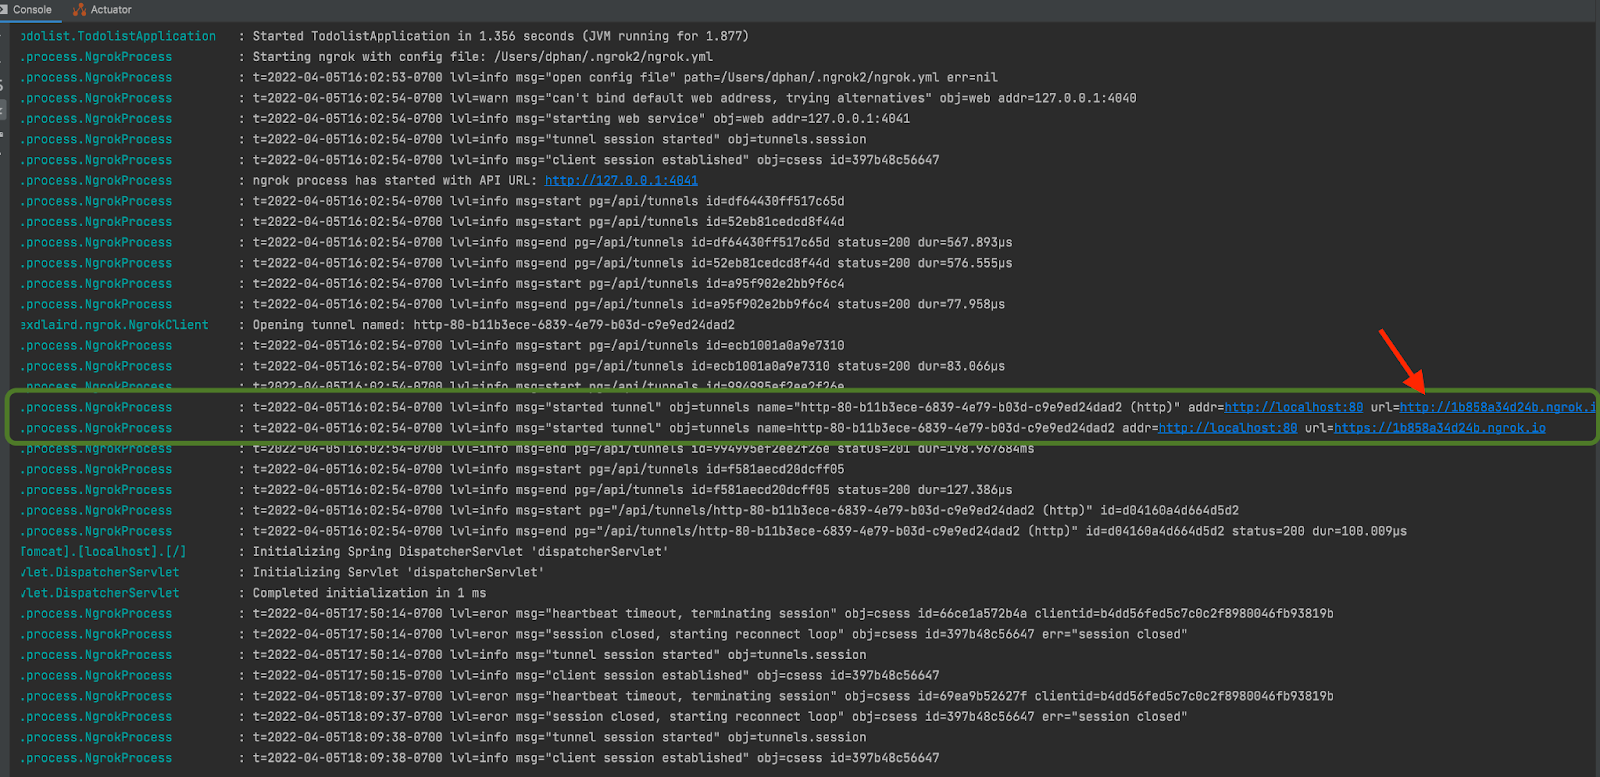
NOTE: Keep in mind that this URL is no longer active and only presented here for demonstration purposes.
Set up the webhook with Twilio
Copy the Forwarding URL starting with “https://“ and open the Twilio Console, where we will tell Twilio to send incoming message notifications with this URL.
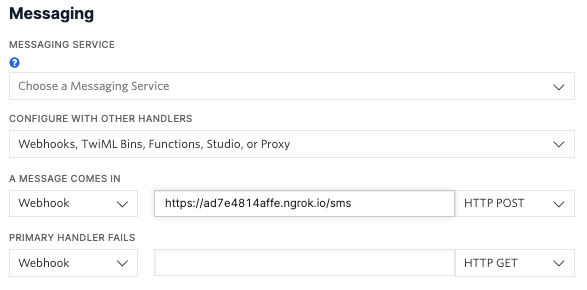
In the Twilio Console, click on the left sidebar to explore products and find Phone Numbers. Click on the active phone number that you want to use for this project and scroll down to “Messaging”.
There, paste the URL copied from the ngrok session into the A MESSAGE COMES IN field and append /sms, since that is the endpoint. Before you click on the Save button, make sure that the request method is set to HTTP POST.
Here is my example for reference:
Send a text message to the Twilio number
Let's make this fun and send an emoji text to the Twilio Phone Number on the mobile device. Wait a few seconds and you should see the TwiML message response on your device.
Grab your SMS enabled mobile device and text your Twilio number. You can message "list" to view the current list, or add a new entry to the list.
![SMS conversation between the Twilio Phone Number and the user. User sends "Hugo - strawberry pastry and coffee" and Twilio replies with "Order received!", then the user sends "list" and Twilio replies with "[Diane - Salad and panini, Hugo - strawberry pastry and coffee]"](/content/dam/twilio-com/global/en/blog/legacy/2022/lunch-array-list-java-maven-twilio-sms/arqDlbExHXeEoUR02ebCBlRXOqNnPIBHrj3qRKsH7siYAgP9MQzslKt23sqUXx93yF2FtwKHsVCW_wR2Arfe.png)
The next time you're at the office, let your teammates know that they can text your Twilio number to make a convenient and organized pick up for lunch!
What's next for building Java projects?
Congratulations on making an active lunch order list to use with Twilio SMS. Feel free to add more to the list, view it, and share it with your teammates. Remember that once the ngrok tunnel is closed, the list will be cleared and reinitialized with the constructor.
Hungry to build more? Check out these projects with Twilio:
- Start a Ghost Writing Career with OpenAI's GPT-3 Engine and Java
- Customize a WhatsApp Chatbot with Twilio WhatsApp API and OpenAI's GPT-3 Engine
- Make a Mysterious Phone Call with Twilio Voice and Java
Diane Phan is a software developer on the Developer Voices team. She loves to help programmers tackle difficult challenges that might prevent them from bringing their projects to life. She can be reached at dphan [at] twilio.com or LinkedIn.


Related Resources
Twilio Docs
From APIs to SDKs to sample apps
API reference documentation, SDKs, helper libraries, quickstarts, and tutorials for your language and platform.
Resource Center
The latest ebooks, industry reports, and webinars
Learn from customer engagement experts to improve your own communication.
Ahoy
Twilio's developer community hub
Best practices, code samples, and inspiration to build communications and digital engagement experiences.