Make Spooky Automated Calls at Halloween With Twilio Voice and Go

November 07, 2022
Written by
Joseph Udonsak
Contributor
Opinions expressed by Twilio contributors are their own
Reviewed by

Make Spooky Automated Calls at Halloween With Twilio Voice and Go

Automation is essential to improving the efficiency of any process. By harnessing technology solutions for monotonous tasks, human resources are freed up for use in more intricate aspects of the process. An excellent example of this is automating notifications and reminders using phone calls.

In this article, I will show how to build a Go web application which, when provided with a phone number, will make an automated phone call to the provided phone number and play one of three pre-recorded audio files. But keeping with the spirit of the season the caller will be greeted with a spooky Halloween message.

Prerequisites

To follow this tutorial, you need the following:

Set up the project

The first thing you need to do is to create a project directory and change into it. To do that, run the following commands.

mkdir voice_demo
cd voice_demo

Next, create a new Go module by running the following command

go mod init voice_demo

Then, add the project dependencies:

  1. GoDotEnv: This will help with managing environment variables
  2. Twilio Go Helper Library: This simplifies interacting with the Twilio API

To install them, run the two commands below.

go get github.com/joho/godotenv github.com/twilio/twilio-go 

Next, create a new file named .env to store the environment variables which the application requires. Then, in the new file paste the following code.

TWILIO_PHONE_NUMBER="<<TWILIO_PHONE_NUMBER>>"
TWILIO_ACCOUNT_SID="<<TWILIO_ACCOUNT_SID>>"
TWILIO_AUTH_TOKEN="<<TWILIO_AUTH_TOKEN>>"

After that, create a local version of the .env file using the following command.

cp .env .env.local

*.env.**.local files are ignored by Git as an accepted best practice for storing credentials outside of code to keep them safe.

Make your Twilio credentials available to the application

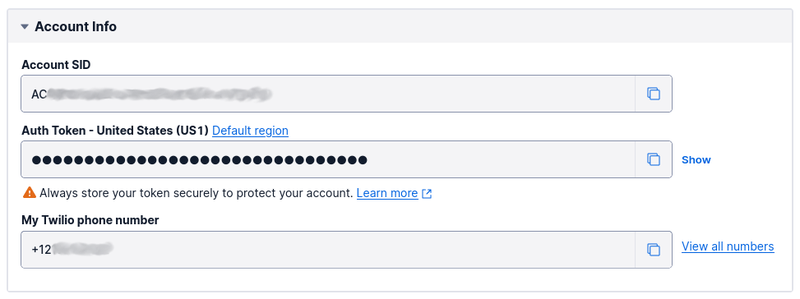
The next thing you need to do is to retrieve your Twilio Auth Token, Account SID, and phone number. To do that:

  • Login to the Twilio Console
  • Copy the details from the "Account Info" panel
  • In .env.local, replace <<TWILIO_AUTH_TOKEN>> , <<TWILIO_AUTH_TOKEN>>, and <<TWILIO_PHONE_NUMBER>> respectively, with the copied details

Retrieve you account SID, auth token, and twilio phone number in the Twilio Console

You also need to ensure that the phone number has appropriate geo permissions to enable calls to the destinations you need to call.

Add the ability to make a phone call

Create a new directory named helper in the application's top-level directory. Then, in that directory create a file named caller.go. In that new file, add the following code.

package helper
import (
        "encoding/json"
        "fmt"
        "github.com/twilio/twilio-go"
        twilioApi "github.com/twilio/twilio-go/rest/api/v2010"
        "github.com/twilio/twilio-go/twiml"
        "math/rand"
        "os"
        "time"
)

func Call(phoneNumber string) (string, error) {
        accountSid := os.Getenv("TWILIO_ACCOUNT_SID")
        authToken := os.Getenv("TWILIO_AUTH_TOKEN")

        client := twilio.NewRestClientWithParams(twilio.ClientParams{
                Username: accountSid,
                Password: authToken,
        })

        params := &twilioApi.CreateCallParams{}
        params.SetTo(phoneNumber)
        params.SetFrom(os.Getenv("TWILIO_PHONE_NUMBER"))
        params.SetTwiml(playTwiml())

        resp, err := client.Api.CreateCall(params)
        if err != nil {
                return "", err
        }

        response, _ := json.Marshal(*resp)
        return string(response), nil
}

func playTwiml() string {
        play := &twiml.VoicePlay{
                Url: randomAudioClip(),
        }

        verbList := []twiml.Element{play}
        playTwiml, err := twiml.Voice(verbList)
        if err != nil {
                fmt.Println(err)
        }
        return playTwiml
}

func randomAudioClip() string {
        rand.Seed(time.Now().Unix())
        audioUrls := []string{
                "https://bit.ly/3dmicn8",
                "https://bit.ly/3xxpyLI",
                "https://bit.ly/3QSGnHE",
        }
        n := rand.Int() % len(audioUrls)
        return audioUrls[n]
}

Audio files courtesy of Clipchamp

After specifying the package name and imports, the Call() function is declared. This function is used throughout the application whenever a phone call is to be initiated. Using the phone number provided as an argument, a request is made to the Twilio API passing the following parameters:

  1. The recipient’s phone number
  2. The Twilio phone number to call from, which is retrieved from the environment variable specified earlier
  3. The TwiML instruction (generated in the playTwiml() function) for Twilio. The TwiML instruction uses the <Play> verb to play an audio file back to the caller. Twilio retrieves the file from one of the three bit.ly URLs provided in the randomAudioClip() function

If the call was successful, a response will be returned. Otherwise, an error will be returned with the corresponding error message.

Model the phone number

Next, create a struct to model a phone number. This struct will simplify parsing of the JSON request. Additionally, it will hold the logic for validating the provided phone number before a request to the Twilio API can be made.

Create a new directory named model in the top-level directory of the project, and in that new directory create a file named PhoneNumber.go. Then, paste the  following code into the new file.

package model

import (
        "errors"
        "log"
        "regexp"
)

type PhoneNumber struct {
        Value string `json:"phoneNumber"`
}

func (phoneNumber *PhoneNumber) Validate() error {
        match, err := regexp.Match(`^\+[1-9]\d{1,14}$`, []byte(phoneNumber.Value))

        if err != nil {
                log.Fatal(err.Error())
        }
        if !match {
                return errors.New("phone number must be in E.164 format")
        }
        return nil
}

This struct has a single field named Value which corresponds to the phone number.

The Validate() function takes a PhoneNumber struct and matches the value against the regular expression for a valid E.164 phone number. In the event that the provided phone number is invalid, an error is returned with an appropriate error message.

Regex validation is used in this article for the sake of simplicity. You could use the Twilio Lookup API for a more robust validation.

Create the template for the application's default route

The application's default route will render an HTML page with a form which contains two elements:

  • An input field for the recipient's phone number
  • A submit button

To build it, first create a new directory named static in the application's top-level directory. Then, in the new directory create a new file named index.html and paste the following code into the new file.


<!DOCTYPE html>
<html lang='en'>
  <head>
    <meta charset='utf-8' />
    <meta name='viewport' content='width=device-width, initial-scale=1' />
    <link
      rel='icon'
      href='https://www.twilio.com/assets/icons/twilio-icon.svg'
      type='image/svg+xml'
    />
    <link
      href='https://cdn.jsdelivr.net/npm/bootstrap@5.0.2/dist/css/bootstrap.min.css'
      rel='stylesheet'
      integrity='sha384-EVSTQN3/azprG1Anm3QDgpJLIm9Nao0Yz1ztcQTwFspd3yD65VohhpuuCOmLASjC'
      crossorigin='anonymous'
    />
    <title>Twilio Voice Demo - Go</title>
  </head>

  <body>
    <div style='margin: 10%'>
    <h1>Twilio Voice Demo with Go</h1>
      <div
        class='alert'
        id='responseAlert'
        role='alert alert-success'
        style='display: none; word-wrap: break-word'
      ></div>
      <form class='row g-3 needs-validation' id='callForm' novalidate>
        <div class='col-12'>
          <label for='phoneNumber' class='form-label'>Phone Number</label>
          <input
            type='text'
            class='form-control'
            id='phoneNumber'
            placeholder='234 123 456 7890'
            aria-describedby='phoneNumberHelp'
            required
          />
          <div id='phoneNumberHelp' class='form-text'>
            Phone number should be in a valid
            <a
              href='https://www.twilio.com/docs/glossary/what-e164'
              target='_blank'
              >E.164</a
            >
            format.
          </div>
          <div class='invalid-feedback'>Please enter phone number.</div>
        </div>
        <div class='col-12' style='display: flex; justify-content: center'>
          <button id='submitButton' type='submit' class='btn btn-primary'>
            Call
          </button>
          <button
            id='loadingButton'
            class='btn btn-primary'
            type='button'
            disabled
            style='display: none'
          >
            <span
              class='spinner-border spinner-border-sm'
              role='status'
              aria-hidden='true'
            ></span>
            Calling...
          </button>
        </div>
      </form>
    </div>

    <script
      src='https://cdn.jsdelivr.net/npm/bootstrap@5.0.2/dist/js/bootstrap.bundle.min.js'
      integrity='sha384-MrcW6ZMFYlzcLA8Nl+NtUVF0sA7MsXsP1UyJoMp4YLEuNSfAP+JcXn/tWtIaxVXM'
      crossorigin='anonymous'
    ></script>

    <script>
      (function () {
        'use strict';

        var forms = document.querySelectorAll('.needs-validation');

        Array.prototype.slice.call(forms).forEach(function (form) {
          form.addEventListener(
            'submit',
            function (event) {
              if (!form.checkValidity()) {
                event.preventDefault();
                event.stopPropagation();
              }

              form.classList.add('was-validated');
            },
            false
          );
        });
      })();

      const showButton = (buttonId) => {
        const button = document.getElementById(buttonId);
        button.style.display = 'block';
      };

      const hideButton = (buttonId) => {
        const button = document.getElementById(buttonId);
        button.style.display = 'none';
      };

      const showAlert = (message, type) => {
        const alert = document.getElementById('responseAlert');
        alert.innerText = message;
        alert.classList.add(`alert-${type}`);
        alert.style.display = 'block';
      };

      (function () {
        'use strict';

        const form = document.querySelector('#callForm');
        form.addEventListener('submit', async (event) => {
          event.preventDefault();
          const phoneNumber = document.getElementById('phoneNumber').value;
          if (phoneNumber === '') {
            return;
          }
          hideButton('submitButton');
          showButton('loadingButton');

          const response = await fetch('/call', {
            method: 'POST',
            headers: {
              'Content-Type': 'application/json',
            },
            body: JSON.stringify({ phoneNumber }),
          });
          const { message } = await response.json();
          showAlert(message, response.ok ? 'success' : 'danger');

          hideButton('loadingButton');
          showButton('submitButton');
        });
      })();
    </script>
  </body>
</html>

Bootstrap is used to style the template, and several Javascript functions validate the submitted form and handle the submission process for valid input.

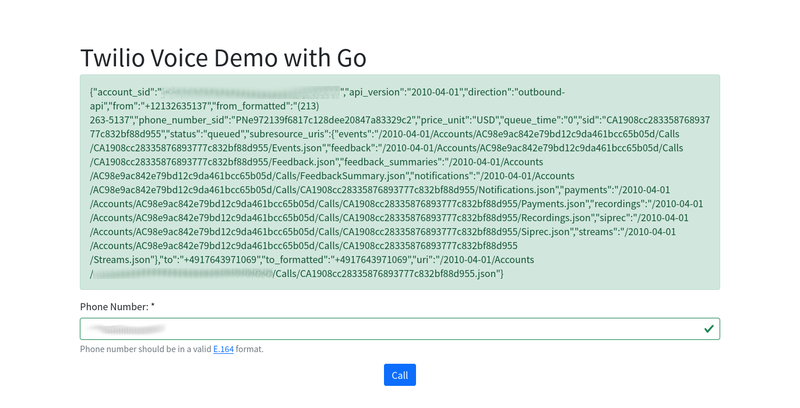
When the submit button is clicked, the provided phone number is sent to the backend encoded as a JSON string. Following that, the response received from the request is rendered in an alert above the form.

Create the main function

All that is left is a main() function to serve as the entry point for the application to serve the index file and handle incoming requests.

In the application's top-level directory, create a new file named main.go and paste the following code into it.

package main

import (
        "encoding/json"
        "fmt"
            "github.com/joho/godotenv"
        "log"
        "net/http"
        "voice_demo/helper"
        "voice_demo/model"
)

func main() {
        loadEnv()
        fileServer := http.FileServer(http.Dir("./static"))
        http.Handle("/", fileServer)
        http.HandleFunc("/call", callHandler)

        fmt.Printf("Starting server at port 8000\n")

        if err := http.ListenAndServe(":8000", nil); err != nil {
                log.Fatal(err)
        }
}

func loadEnv() {
  err := godotenv.Load(".env.local")
  if err != nil {
    log.Fatal("Error loading .env file")
  }
}

func callHandler(writer http.ResponseWriter, request *http.Request) {
        writer.Header().Set("Content-Type", "application/json")
        response := make(map[string]string)

        var phoneNumber model.PhoneNumber
        json.NewDecoder(request.Body).Decode(&phoneNumber)

        err := phoneNumber.Validate()

        if err != nil {
                writer.WriteHeader(http.StatusBadRequest)
                response["message"] = err.Error()
        } else {
                res, err := helper.Call(phoneNumber.Value)
                if err != nil {
                        writer.WriteHeader(http.StatusBadRequest)
                        response["message"] = err.Error()
                } else {
                        writer.WriteHeader(http.StatusOK)
                        response["message"] = res
                }
        }

        jsonResponse, err := json.Marshal(response)
        if err != nil {
                log.Fatalf("Error happened in JSON marshal. Err: %s", err)
        }

        writer.Write(jsonResponse)
}

In the main() function, four key things take place:

  1. The environment variables are loaded.
  2. The files in the static directory are served to handle requests to the index route.
  3. The callHandler() function is declared to handle POST requests to the /call route.
  4. The application is served on port 8000.

Test that the application works

First, start the application using the following command.

go run main.go

Then, view the application in your browser by navigating to http://localhost:8000/.

The Twilio Voice Demo with Go form before being filled in.

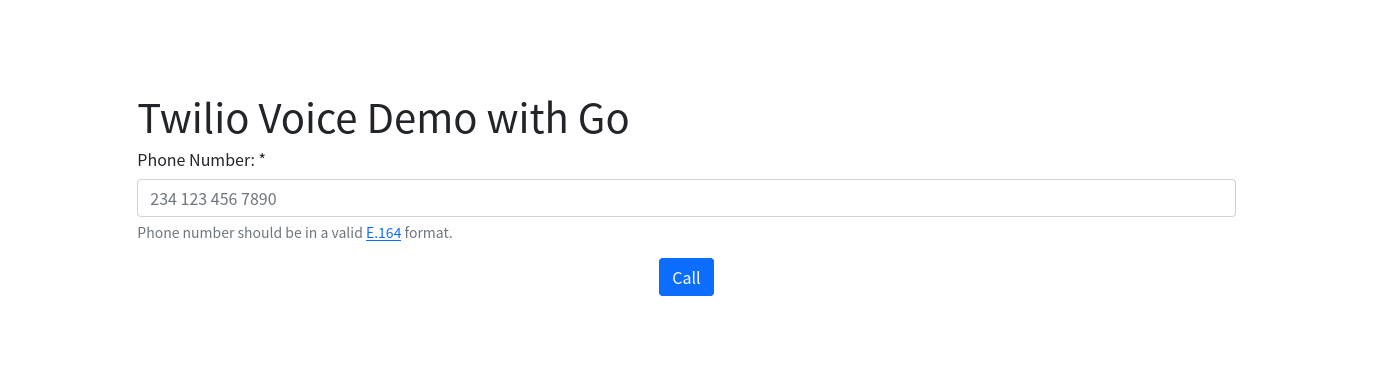
Fill in your best friend's number, click Call, and wait for Twilio to deliver some shivers down their spine.

The Twilio Voice Demo with Go form after being successfully submitted


That's how to make automated calls with Twilio Voice and Go

You've now learned how to build a Go web application that can make an automated phone call to a friend's phone and play a pre-recorded audio file.

Want to have even more fun? Refactor the app to use the Twilio Voice API to record their reaction to the surprise call. That way, the moment will last forever.

If at any point you get stuck you can review the final codebase on Github. Until next time, make peace not war ✌🏾

Joseph Udonsak is a software engineer with a passion for solving challenges – be it building applications, or conquering new frontiers on Candy Crush. When he’s not staring at his screens, he enjoys a cold beer and laughs with his family and friends.

Image credits