Playing Pokemon via SMS in Swift Using Vapor and Twilio
Time to read:
May 03, 2018
Written by
This post is part of Twilio’s archive and may contain outdated information. We’re always building something new, so be sure to check out our latest posts for the most up-to-date insights.

Pokemon filled many childhoods with joy. For some of us as adults, server side Swift does the same. What better way to spend a fun afternoon than combining the two?
Let’s walk through how to build your own version of Twitch Plays Pokemon powered by text messages using the Twilio API, Vapor and Lua scripting for the Visual Boy Advance emulator.
Getting Equipped
Before moving on you’ll need to do the following to set up your environment:
Install wine to be able to run the emulator we need, as only the Windows version has Lua scripting functionality.
If you’re on a Mac, you can install Wine using Homebrew with the following command:
You might have issues getting the emulator to run by default, so make sure you have a 32-bit prefix set by running the following commands in your terminal:
Wine depends on XQuartz, so if that installation didn’t work you might also have to install XQuartz. You can do this with brew as well:
You also have to install Vapor, the server side Swift framework we are going to be using:
Check that Vapor is installed:
You can download the Windows Visual Boy Advance emulator here. Any of those should have the Lua scripting functionality. If you end up having any trouble getting them to run on your machine, you can directly download the version I have been using.
Writing emulator Lua scripts
Now that you have everything installed, run the VBA emulator with Wine. If you installed Wine with brew you can do this by running the terminal command wine followed by the filename of the VBA executable.
What’s cool about this version of VBA is that it has Lua scripting capabilities. You can write Lua code that will run in the environment of the emulator for a variety of things such as manipulating the game’s memory, creating save states, or programmatically controlling button input. We’ll be doing the latter.
To begin, create a file called pokemon.lua in the directory where you want your code to live, and add the following Lua code:
What we’re doing here is reading from a file called button.txt on every frame of the game. The while true do infinite loop will execute before each frame, allowing our Swift code to pipe button presses directly into the game’s input by writing to button.txt whenever a text message is received.
To run the Lua Script, do the following as shown in the GIF below:
- Open VBA with Wine, and the ROM of the game you are using. I will be using Pokemon Red version. If you don’t have one, you can try grabbing a free ROM for a homebrew game like Tobu Tobu Girl.
- Navigate to Tools -> Lua Scripting -> New Lua Script Window
- Click “Browse” and navigate to where your script is
- Click “Run”
You should see a “Hello World!” on the screen to let you know things are working.
Getting started with Vapor
We’re now ready to move on to writing some Swift. With Vapor installed, run the following command from the same directory as your pokemon.lua file to generate a new project:
Once that is finished, navigate into the project directory and have Vapor generate an Xcode project for you. When the prompt comes up, type y to automatically open the Xcode project:
Change the scheme to “Run” as seen in this image:
Go to App -> Routes -> Routes.swift which is where the code we will be editing lives.
Add a new route to receive text messages to your Twilio number for button presses:
We’re taking a GET request and grabbing the “Body” parameter which will contain the text of the message that was sent to your Twilio number, and writing that to a text file in the directory where your Lua script is running. Don’t forget to update the path to that directory in the code.
Now you can run the Xcode project. You will get a prompt asking you to confirm that you want to allow outside connections to your app. Now you can visit your web app in your browser. You can even have it press buttons in the gameboy emulator by appending a “Body” parameter to the URL like so: http://localhost:8080/sms?Body=A
You should see text that says “Thanks for playing Pokemon with me :)” The next step is to start accepting text messages!
Setting up a Twilio Phone Number
Before being able to respond to messages, you’ll need a Twilio account and phone number. Once you create an account, you can buy a phone number here (it’s free if you’re using the number to test your code during development).
Your Vapor app will need to be visible from the Internet in order for Twilio to send requests to it. We will use ngrok for this, which you’ll need to install if you don’t have it. In your terminal run the following command:
If you’ve just installed ngrok and that previous command didn’t work, you might have to run it like ./ngrok http 8080 from the directory that the ngrok executable is in.
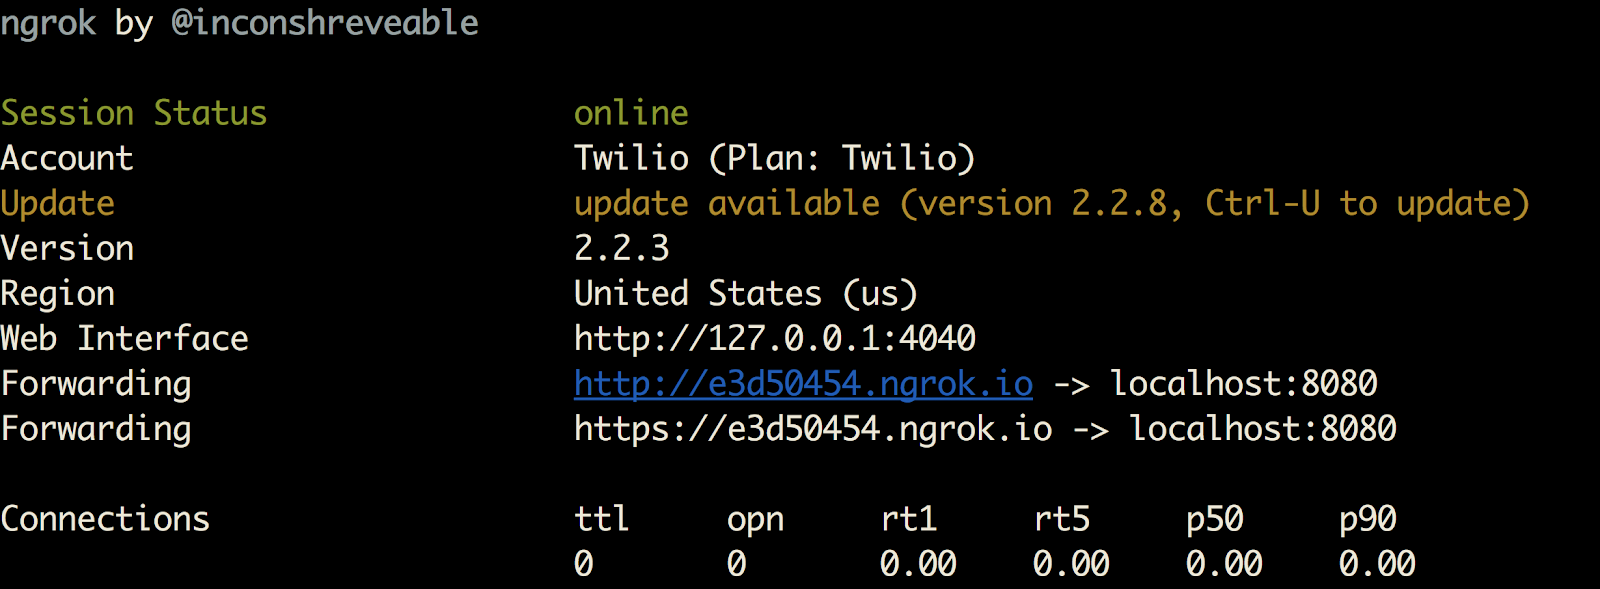
This provides us with a publicly accessible URL to the Flask app. Configure your phone number as seen in this image by adding your ngrok URL with /sms appended to it to the “Messaging” section and changing the method from “HTTP POST” to “HTTP GET”:
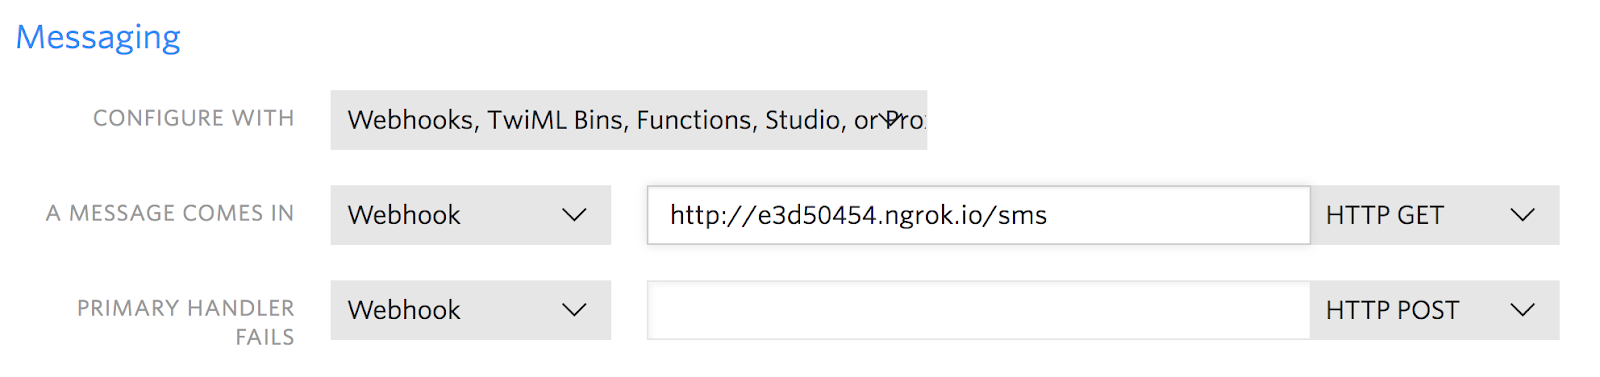
You are now ready to receive text messages to your new Twilio number to play some Pokemon!
Playing Pokemon with text messages
Now all of your friends can send text messages to your Twilio number to play Pokemon with you! This code should work with any other game as well. Try building off of this and messing around further with the Lua scripting functionality and more Vapor features.
If you have any other cool ideas, feel free to reach out and let me know or ask any questions:
- Email: Sagnew@twilio.com
- Twitter: @Sagnewshreds
- Github: Sagnew
- Twitch (streaming live code): Sagnewshreds

Related Resources
Twilio Docs
From APIs to SDKs to sample apps
API reference documentation, SDKs, helper libraries, quickstarts, and tutorials for your language and platform.
Resource Center
The latest ebooks, industry reports, and webinars
Learn from customer engagement experts to improve your own communication.
Ahoy
Twilio's developer community hub
Best practices, code samples, and inspiration to build communications and digital engagement experiences.