Record Twilio Studio Voice Calls with Functions
Time to read:
August 13, 2019
Written by

Twilio Studio is a great tool to build Interactive Voice Response systems (IVRs) to help businesses communicate with their customers.
In Studio, a Flow is executed from an incoming call or SMS to your Twilio number, or you could trigger an outbound flow via a REST API request. Once in a Flow, Studio offers various ways to control calls and message flows, including but not limited to:
- Saying or playing messages to a callee
- Gathering input from the callee such as digits or voice messages
- Making an HTTP request to a third party system
Studio is even able to record audio, which makes it super easy to build a voicemail app for a Twilio number. If, however, you find yourself in a situation where you want to record an entire call (for example, to audit your IVR for UX Research purposes) there's no specific Studio widget that can get the job done. Fortunately, you can still record an inbound call to a Studio flow using Twilio Functions and the Twilio API. Let's see how it's done!
Twilio Studio and Functions: Serverless products
We will walk through setting up the Studio Flow, then write a Twilio Function and, finally, configure our Twilio number. Studio and Functions are both serverless Twilio products, so instead of running an app in your own environment (like on localhost, AWS, or Heroku), both Studio and Functions run on Twilio’s platform. You don't need to worry about setting up or maintaining the server in which your logic lives.
Twilio Studio is managed from a UI. You use widgets to describe how you want to control your communication flows, and little to no code is required. A Twilio Function, on the other hand, uses JavaScript, which Twilio executes in a standard Node.js runtime environment.
Setting Up to Record in Studio
For the sake of recording an inbound call, we'll build a Voice-based IVR. A customer can call our Twilio number, hear a few options to decide upon, and finally take some action based on the prompts.
Let's consider this IVR, which doesn't come with recording functionality. The Flow looks like this:
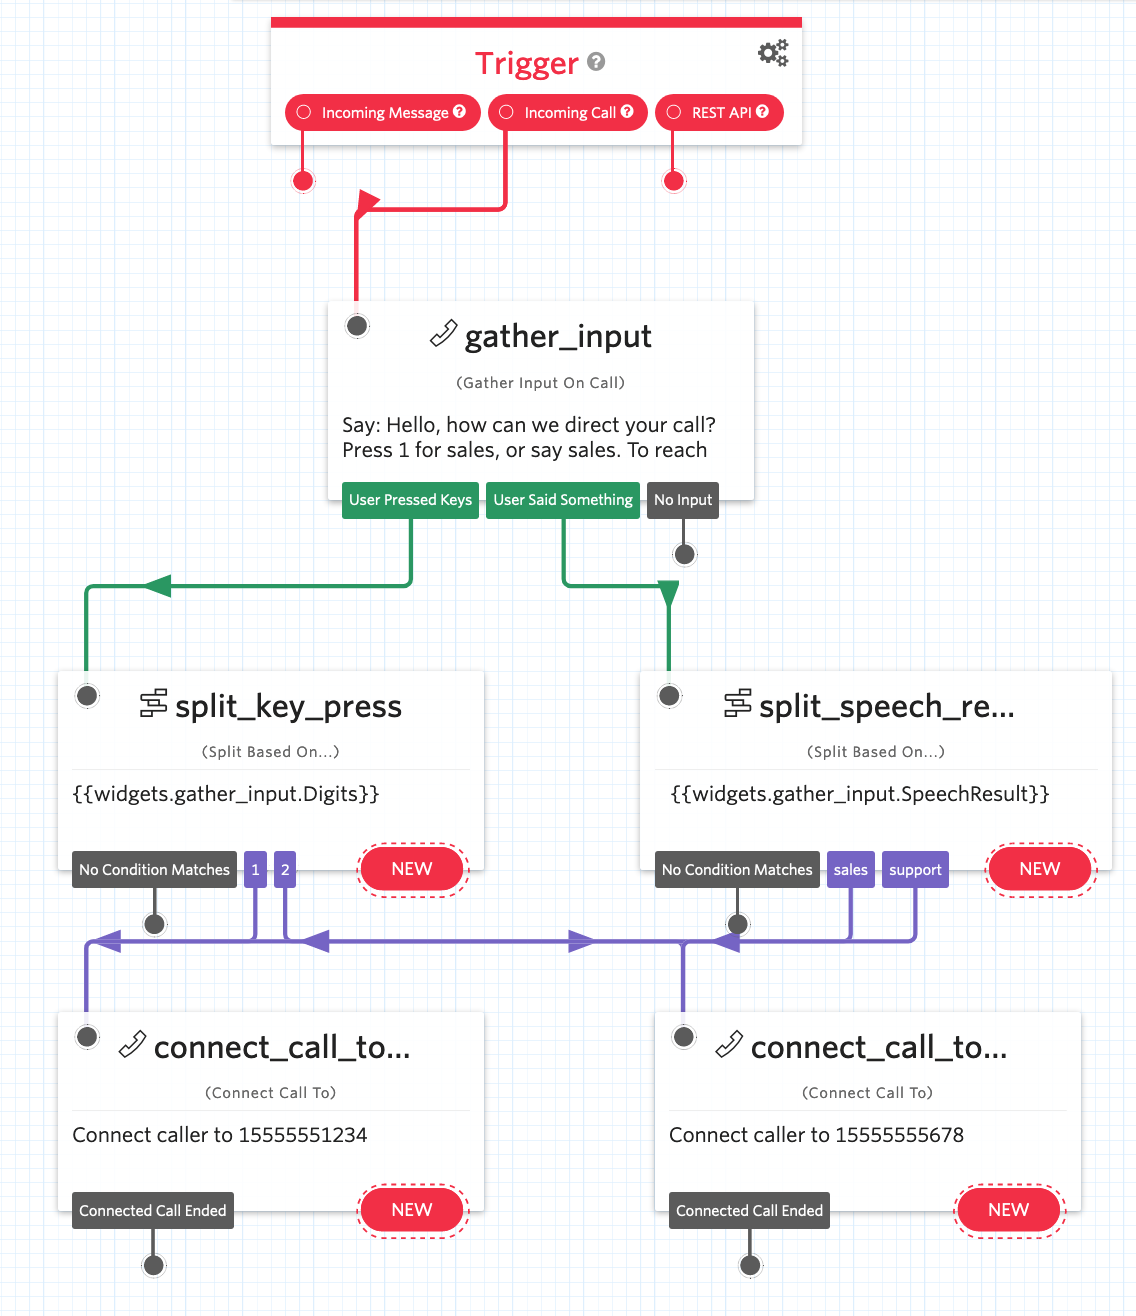
In this Flow, when a customer calls our number, they hear a message that offers to connect to sales or support. The callee can press 1 or 2, or say "sales" or "support". The flow diverts the call to the right team based on the customer's input!
Now, we want to add functionality to record the call when the Studio Flow is executed.
How do recordings work in Twilio?
Twilio can be instructed to record an in-progress call by making a POST request to the recording resource for a given call, like so:
https://api.twilio.com/2010-04-01/Accounts/ACXXXXXXXXXXXXXXXX/Calls/CAXXXXXXXXXXXXXXX/Recordings.json
Given a Call SID (CAXXXXXX in the API endpoint, which uniquely identifies a call), a POST to this URL will start recording the call. (For a bit more information please visit this help page.)
How do we implement recordings within Studio?
To implement recordings in Studio, we need to extract the Call SID for the Flow’s execution, then create the POST request.
We will need to modify the Flow shown above so we make a POST to the URL where the Call SID matches the one from the current Studio Flow execution. Fortunately in Studio, the Call SID is available to us from the trigger widget as {{trigger.call.CallSID}}.
There are two ways to create the POST request:
- Using a HTTP request widget
- Running a Function
The HTTP request widget is not advisable here, because it would expose our authentication credentials. We need an environment where we can store our credentials in secure environment variables, and make requests to Twilio without exposing those credentials on a front end. Twilio Functions is the perfect tool for this job, so Studio’s Run Function widget is perfect for the recording use case.
The Run Function widget will execute a Function call, and can send the Function the Studio Execution's Call SID as a parameter. The function will take in the Call SID and make the POST to the recording resource URL.
Before we start recording the call, we need an actual active/in-progress call. So we need to add something between the trigger and the Run Function widgets in order to make the call active and ensure that media is flowing.
We can add a Say/Play widget that reads an introductory message to the customer. When a call comes in to our Twilio number, the Flow is executed and the call becomes active after the message is read. In addition to activating the call, the Say/Play widget also lets the customer know that the call will be recorded, helping ensure that we're staying transparent and compliant with our customers.
Summarizing our Function and Studio Flow
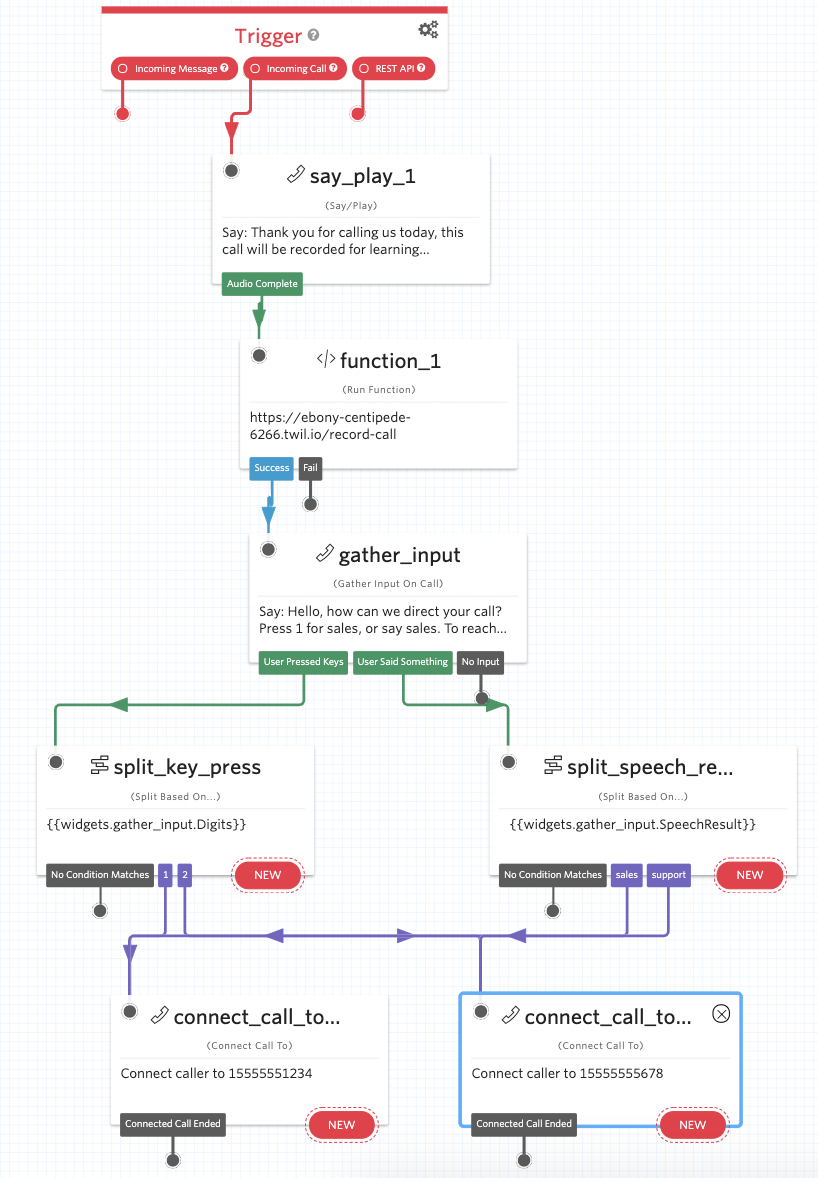
Knowing that we'll need an intro message and a Function, our flow should now begin like so:
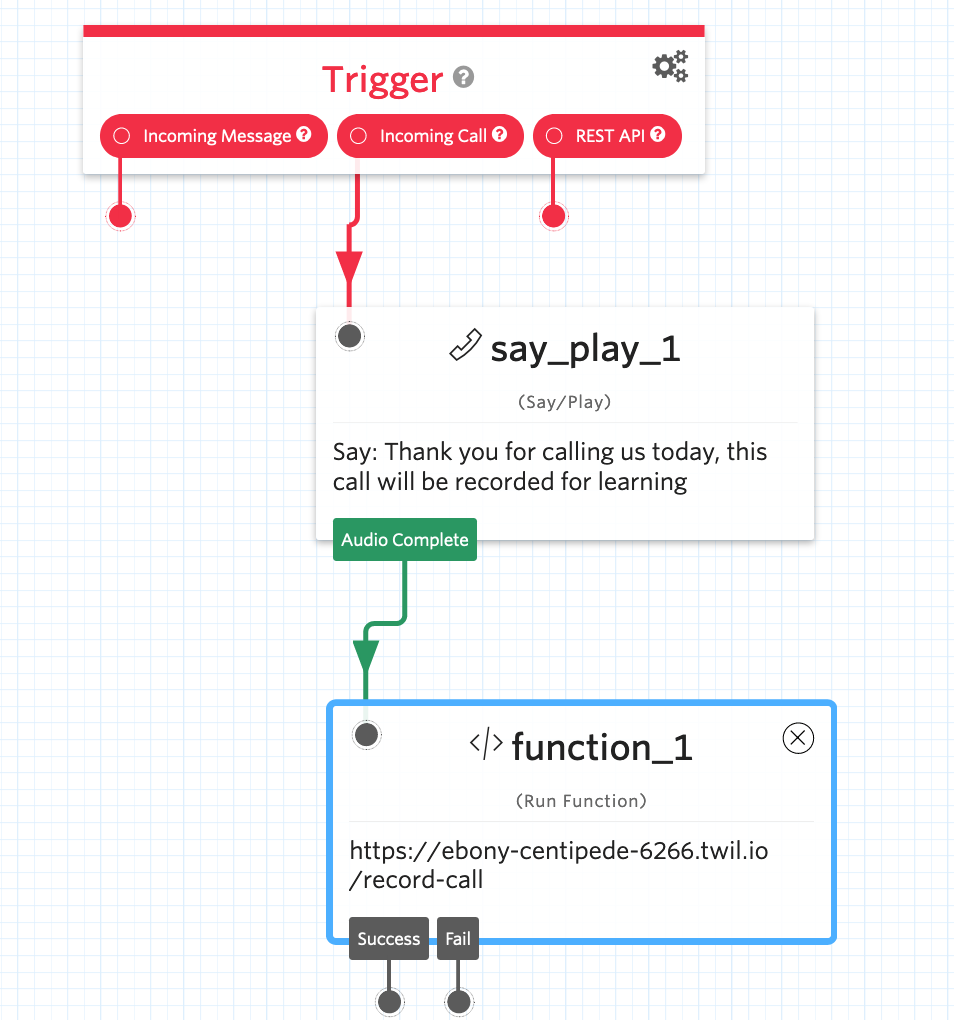
Let’s recap our strategy:
When a customer calls our Twilio number, a message is read out by the Say/Play widget saying “Thank you for calling us today, this call will be recorded for learning purposes”. Then, the Run Function widget runs the function described below.
Remember: the two things we need to compose the recording URL are the Account SID and the Call SID.
The Account SID is available to the function when you toggle “Enable ACCOUNT_SID and AUTH_TOKEN” to checked in the Function’s configuration. The Call SID will be passed as a parameter in the Run Function widget:
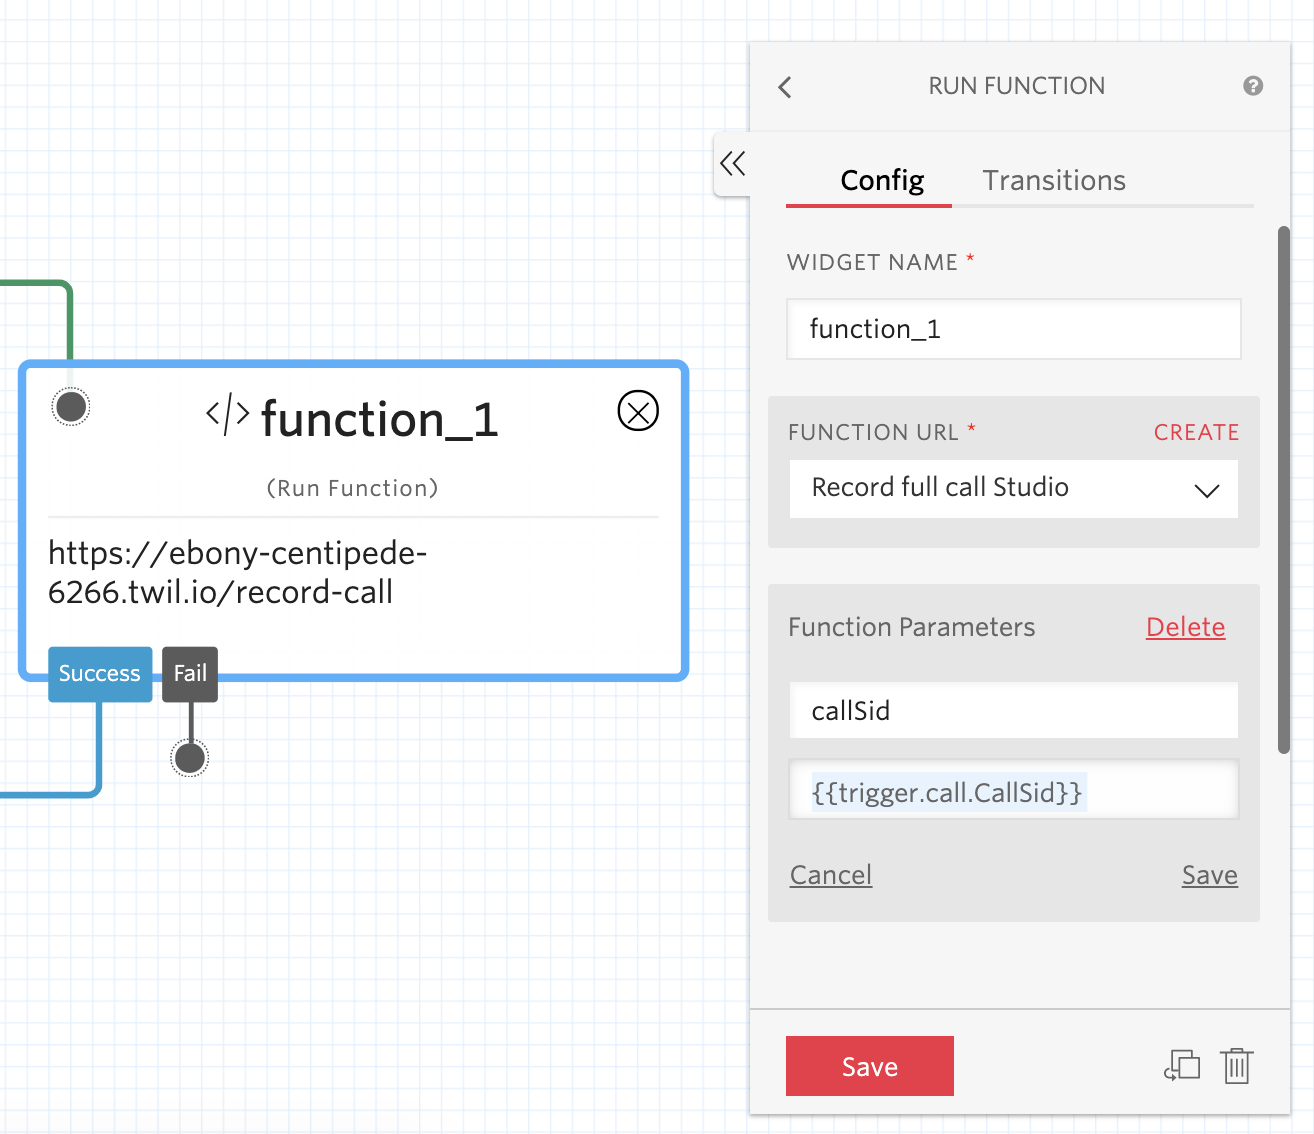
This Function parameter will be key to make the Call SID available when the function runs!
Record call function
The Studio flow is looking pretty good, but now you need to create the Function that actually powers the recording.
Navigate to the Function’s console and create a new function with this code:
// import a library into our function
const got = require('got');
//Boilerplate for function code
exports.handler = function(context, event, callback) {
// Make an HTTP Request using a template literal for the Twilio API call
got(`https://api.twilio.com/2010-04-01/Accounts/${context.ACCOUNT_SID}/Calls/${event.callSid}/Recordings.json`, {
method:'post',
auth: `${context.ACCOUNT_SID}:${context.AUTH_TOKEN}`
})
.then(res => {
console.log(res)
callback(null, res.body)
})
.catch(err => callback(err));
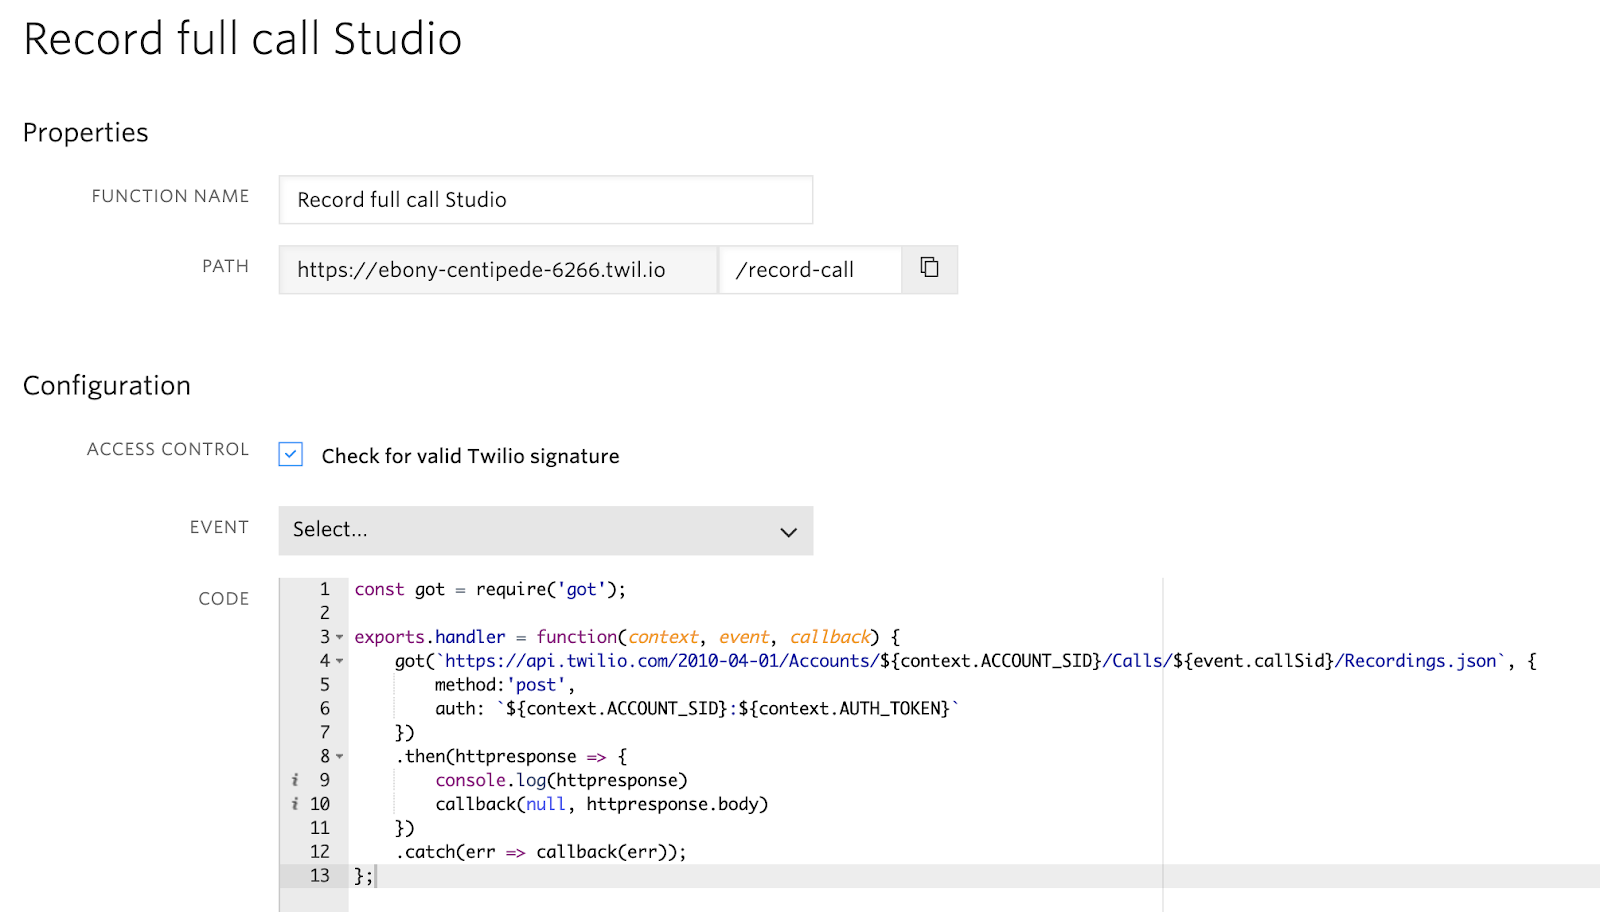
};Create a path for the Function URL, such as /record-call. The Function’s friendly name doesn’t really matter, but the path is where you'll tell Studio to make a request during the call.
Finally, enable "Check for valid Twilio signature". All HTTP requests made by Twilio will include an X-TWILIO-SIGNATURE header that you can use to verify Twilio Requests. Since this Function is being invoked by another Twilio product (in this case, Studio) this is an easy way for us to secure our function.
Click Save. Your Function page will look like this:
Now you'll need to configure your runtime environment. Since you are making a POST from the Function with the got dependency, we need to make the library available to the function. To do so, add got in the Functions Configuration console. You can check for the current version of the package on the NPM registry or just use an asterisk (*) to use the latest version.
Finally, make sure that Account SID and Auth Token are available Environmental Variables.
That’s all you need from Functions. Now let’s see how our flow looks:
Looking good. Next, let's try it out.
Run the Studio call recording Flow
Now you're ready to try this for real.
- Go to your incoming numbers configuration and select a Twilio number that will receive the calls from your customers (or, select more than one number!)
- Navigate to the phone number you like and configure it so that when a call comes in, it directs the call to your new Studio Flow. (For step-by step-instructions you can consult this tutorial).
- Now, once a call comes in to your Twilio number, a recording resource will be created after the introductory message is said
How can you listen to the recordings? You’ll have them available in your recordings console and in your calls dashboard.
Recording incoming phone calls to an IVR created in Studio
Now you can record incoming phone calls to the IVR you created with the visual builder Studio. Pretty neat!
That’s all for now, but please get in touch with any questions or comments. For more information about creating an IVR with Studio, check out this Twilio Studio guide.
We can’t wait to see what you build!
Nahuel Sznajderhaus is a Technical Support Engineer for Developers at Twilio based in Dublin, Ireland: nsznajderhaus@twilio.com. Ricky Holtz is a Developer Educator at Twilio, based in San Francisco: @ayyrickay, eholtz@twilio.com.


Related Resources
Twilio Docs
From APIs to SDKs to sample apps
API reference documentation, SDKs, helper libraries, quickstarts, and tutorials for your language and platform.
Resource Center
The latest ebooks, industry reports, and webinars
Learn from customer engagement experts to improve your own communication.
Ahoy
Twilio's developer community hub
Best practices, code samples, and inspiration to build communications and digital engagement experiences.