How to Build a REST API for a Real Estate Agency with Twilio TaskRouter, Java, and Spring Boot
Time to read: 10 minutes
July 08, 2022
Written by
Reviewed by

Many businesses use a routing system to delegate a task to the correct agent that will execute it. An example is a real estate agency. In this kind of business, each client has an economic profile, and so each one can be served by a different type of salesperson.
The customer of a real estate agency is commonly called a lead. A lead is a potential buyer or renter of real estate. A lead with a high monthly income, and thus a high purchasing power, is better for the agency, and will be served by a more experienced salesperson. On the other hand, a lead with low purchasing power could be served by beginner or less experienced salespeople.
In this post, I will show you how to create a REST API for a real estate agency. This API will receive and delegate leads to the respective salespeople. Creating this API from scratch can become too complex, especially if it needs to scale for many users. The Twilio TaskRouter API will be utilized for convenient implementation.
Prerequisites
To follow this tutorial, you need to have the following installed and configured:
- Java JDK 11.
- A Twilio account and a Twilio phone number. You can use my referral link to create an account and get $10 in Twilio credits when you upgrade to a paid account.
- An IDE of your choice (I’m using IntelliJ CE 2022.1).
- ngrok CLI
Set up the Task Router workspace
The Twilio Task Router workspace contains elements such as Workers, Workflows, and TaskQueues. We will look at each of these in detail in this section.
To set up a Task Router workspace:
- Go to the console and click "Create New Workspace".
- Name it Real State Agency, and leave the template as "Standard Workspace".
- Leave the "Callback URL" field blank and click "Save".
Add Workers to the Workspace
The Workers are the agents that execute Tasks. In the real estate agency, each Task is a real estate potential sale obtained from a lead. And each Worker is a salesperson that will take care of that potential sale.
In this agency, we will have three types of salespeople: level 1, level 2, and level 3. Each one will be associated with a different buyer profile using the following rules:
- Level 1 Salespeople handle leads with monthly income between $3,000 and $6,000.
- Level 2 Salespeople handle leads with monthly income between $6,000 and $10,000.
- Level 3 Salespeople handle leads with monthly income greater than $10,000.
Each Salesperson is a Worker in the Workspace. The "Attributes" field identifies if the Worker is suitable for the Task received by Task Router. I have used the "leadTypes" field to identify the correct Worker. That means Level 1 Salespeople can pick any Task that maps to BUY_L1. The same applies to Level 2 and 3 Salespeople and BUY_L2 and BUY_L3 Tasks, respectively. To configure that, create three Workers as follows and leave its status offline for now:
- Name: Level 1 Salespeople
Attributes {"leadTypes":["BUY_L1"]}
- Name: Level 2 Salespeople
Attributes {"leadTypes":["BUY_L2"]}
- Name: Level 3 Salespeople
Attributes {"leadTypes":["BUY_L3"]}
Add Task Queues for each Worker
Before creating the Task Queues, go to the Workflows tab and delete the default workflow that is already created there. Then, go back to the Task Queue screen and delete the already created Queue named Sample Queue. These two don’t have any use in this tutorial.
The purpose of a Task Queue is to receive and filter Tasks to the correct Worker. Create three TaskQueues (one for each Worker) named Level 1 Salesperson Queue, Level 2 Salesperson Queue, and Level 3 Salesperson Queue. The three Queues should share the same initial configuration as below:
- Task Order: First-In-First-Out.
- Reservation Activity: Offline.
- Assignment Activity: Offline.
- Max reserved workers: 1.
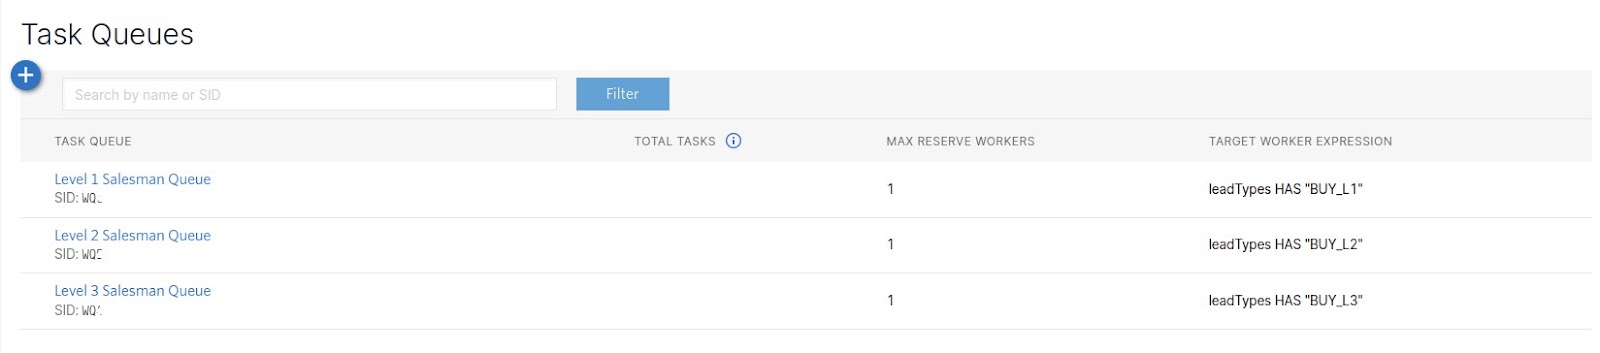
Each TaskQueue filters a Task to the specific Worker through a query language. The query language is configured in the "Queue Expression" field. This field is matched with the "Attributes" field of each Worker. You can check the complete guide to Queue Expressions here. For this example, assign the following expressions to the queues created earlier:
- Name: Level 1 Salesperson Queue, Queue Expression
leadTypes HAS "BUY_L1" - Name: Level 2 Salesperson Queue, Queue Expression
leadTypes HAS "BUY_L2" - Name: Level 3 Salesperson Queue, Queue Expression
leadTypes HAS "BUY_L3"
At this point your TaskQueues located inside the create Workflow should look like this:
You can also see which Workers are associated with each Queue. To check that, navigate to the bottom of the Task Queue page. Under the "Matching Workers" tab, make sure that the correct Workers are listed here. For example, Level 3 Salespeople should appear in the Level 3 Salesperson Queue. To illustrate, check the images below how the matching workers in your Level 1 Salesperson Queue, Level 2 Salesperson Queue, and Level 3 Salesperson Queue should look like, respectively:

Level 1 Salesperson Queue

Level 2 Salesperson Queue

Level 3 Salesperson Queue
Create a Workflow for each task type
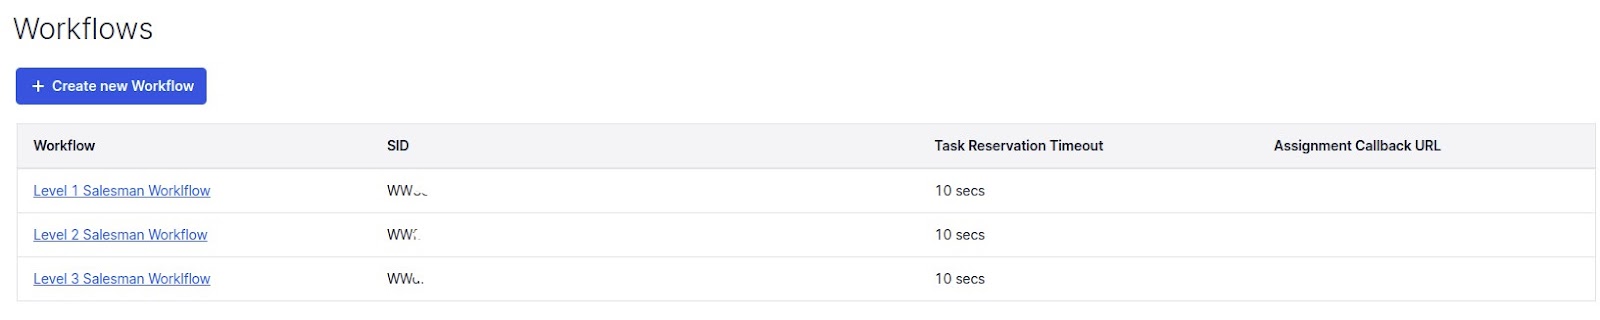
Workflows receive Tasks and delegate them to the correct Task Queue. The Workflow will capture the leads mapped by the Spring application created in the next section and send them to the correct Task Queue. To create Workflows, go to the homepage of your Workspace and click on Workflows. Create three Workflows configured as shown below. The other configuration options can be set as default for now.
- Name: Level 1 Salesperson Workflow.
- Name: Level 2 Salesperson Workflow.
- Name: Level 3 Salesperson Workflow.
Now, for each Workflow, we need to associate a filter to associate the correct TaskQueue and Tasks with it. To do that, create three new filters by clicking on “Add a Filter”, one for each Workflow, configured as follows:
- For the Level 1 Salesperson Workflow:
TaskQueue: Level 1 Salesperson Queue
Matching Tasks: leadType == "BUY_L1"
- For the Level 2 Salesperson Workflow:
TaskQueue: Level 2 Salesperson Queue
Matching Tasks: leadType == "BUY_L2"
- For the Level 3 Salesperson Workflow:
TaskQueue: Level 3 Salesperson Queue
Matching Tasks: leadType == "BUY_L3"
You can leave the other configuration options as is. Each of these Workflows matches the Tasks sent by our application. Then, each Workflow maps that Task to the correct TaskQueue. Finally, the TaskQueue will associate the Task with the correct Worker via Reservation. We’ll look at Reservation in detail in the next section. Make sure the created Workflows look as follows:
Create the application for the real estate agency
With Twilio's TaskRouter environment configured, it's time to write some code. Create a Spring application via the Spring initializer with the following parameters:
- Build system: Maven
- Spring Boot version: 2.6.x
- Java version: 11
- Dependencies: Spring Web and Lombok
- Artifact: real-estate-agency
Click on Generate and save it on your computer. Go to the folder where you just saved the project, right-click on it, and extract it using your favorite tool.
Open your Intellij IDEA and open the project by clicking on File->Open, located at the top left corner of the screen. Choose the extracted folder. Then, you should be able to see the generated Spring application at your IDE.
We will use the Twilio Java Helper Library to facilitate the use of the TaskRouter API. To pull that library open the generated project in your IDE and add the following dependency to your pom.xml file:
Click on the Maven icon at the top right corner of the screen, and choose the Reload All Maven Projects to load the newly added dependency.
Set the environment variables
To use Twilio's TaskRouter API you need to set some values for authentication, such as SIDs and authentication tokens. The best practice is to always use environment variables. To set environment variables, add the following entries into your application.properties file located under the resources folder and replace them with the correct values from your account:
A SID is a unique String identifier. Every Twilio resource has a 34-character SID. You can use the first two characters of the SID to identify its type. For instance, Workspace SIDs start with the characters WS. Workflow SIDs start with the characters WW. Account SIDs start with the characters AC. You can find each of those values on the Twilio console.
The Twilio Account SID and Auth Token are a unique identification of your account and can be found on the homepage of your Twilio account console. By default, you will be given the option to acquire one phone number that can be used for free and can also be found on the homepage of the Twilio console. You can also buy more Twilio phone numbers as needed. In the application.properties file, you should give the phone number in E.164 format.
Create the REST API
The REST API receives a request that contains customer data and turns it into a lead. Then, it sends that lead (as a Task) to the TaskRouter. To create the endpoint that accepts lead requests, right-click on the root package, and click New->Package. Name that package as controller. In that same package, create a class called LeadController with the content below:
The endpoint exposed at the path /leads/send returns a 204 (No Content) if the Task is successfully created.
To wrap our request body, create a model package inside the root package and add the LeadRequest class inside of it. Add the following content to that class:
Create a package called service in the root package, and add the WorkflowConfiguration and LeadService classes inside of that package:
This class generates a lead and communicates with the TaskRouter API to assign the lead to the correct salesperson. That service class has the following structure:
- The environment variables located in the
application.propertiesfile were injected using the@Valueannotation and constructor dependency injection. - The public method
generateTaskauthenticates the Twilio client using theTwilio.initmethod. Then, it creates theTaskand sends it to the correct Workflow using theTask.creatormethod. - The helper method
getWorkflowConfigurationgenerates the correct Workflow SID and attributes for alead. - The last three auxiliary methods
sendToL1Salespeople,sendToL2Salespeople, andsendToL3Salespeopledefine the type ofleadbased on the customer's monthly income.
Create the endpoint to receive the Reservation callback
A Reservation is created when a Worker becomes available and a Task eligible for that Worker is pending. After creating the Reservation, TaskRouter will automatically send a request to an address that you define as a callback. That callback is called assignment_callback. You will see more about how to set up the Worker availability and callback address in the testing section.
To be able to receive and accept a reservation create a TaskRouterController class in the controller package with the following content:
Here’s what’s going on in that class:
- The
@RequestMapping(“/taskrouter”)and@PostMapping(“/assignment_callback”)annotations define the callback endpoint at the path/taskrouter/assignment_callback. - The
handlePostmethod receives a request and passes it to theReservationService.
The ReservationService receives the Reservation and automatically accepts it. When the Reservation is accepted, a Worker is finally able to work on that Task. To be able to accept the Reservation, create a class ReservationService inside the service package with the following content:
The handle method contains three pieces of logic:
Twilio.initinstantiates and authenticates the Twilio client.- The callback request contains useful data about the Reservation. To accept the reservation we need the
taskSidandreservationSidfrom that request, those that uniquely identify the Task and the Reservation created, respectively. - The
Reservation.updaterupdates the status of the Reservation to “accepted” using a synchronous request to TaskRouter. The request contains thetaskSid,reservationSidandworkspaceSid.
Test your API
To test the application we need a public URL to receive the callbacks. With ngrok you can create a public URL of the application running on localhost. Do the following to create a public URL using ngrok:
- Install ngrok on your computer
- Run the command
ngrok http 8080in a terminal - The command outputs some information. Your public URL is the one pointing to https://localhost:8080. That URL looks similar to
http://<random_sequence>.ngrok.io.
Keep in mind that every time you run the ngrok http 8080 command another URL will be generated at port 8080. Keep ngrok running in your terminal while you finish the next steps.
After setting up ngrok, go to the main class named RealEstateAgencyApplication and click the play button located at the left of the class name. Now, we have a server up and running. At this point, you should be able to see similar entries at the end of the logs in your IntelliJ IDEA:
That means your application is running properly.
Now, grab the http:// URL created by ngrok and add the following path at the end of that URL: /taskrouter/assignment_callback. Your callback URL should look similar to:
To complete the test setup, go to the Workflows page in the Twilio Console. For each Workflow set that same Assignment Callback URL.
With the test setup done, it’s time to create some leads to be consumed by our API. With your server running, open up a new terminal window and run the following cURL command:
That cURL command creates a Task that contains the lead information. In this case, that lead is going to be served by a Level 2 Salesperson since the net monthly income of that customer is between $6000 and $10000. A new Task should appear in the Tasks tab in your Twilio Workspace. No reservations are created for this Task since all Workers were initially set to "Offline".
To create a Reservation, go to the Workers tab in your Twilio Console and click on the Level 2 Salesperson Worker button. Change the activity field of that Worker from Offline to Available. TaskRouter will automatically create the Reservation between the Task and that Worker. Then, TaskRouter sends the callback request to our API to be handled by us. The status of that Reservation changes to ACCEPTED as soon as the callback request hits our API since we configured it that way.
We finally made it to the end of the Task lifecycle. At this point, the Worker is effectively working on that Task. Or, in other words, our customer (a lead) is being attended by one of our Salespeople.
If you want to check the API requests made go to the URL http://localhost:4040. At this address, you can check all requests made to the public ngrok address, including the TaskRouter callback requests.
Next steps
In this tutorial, we defined a REST API to generate a lead and send it to the Twilio TaskRouter via HTTP call. We have also handled the callback requests from TaskRouter to accept the reservations made. Some improvements can be made to this model:
- Not always you’ll want to accept Reservations as soon as they arrive in your API, as we did. In a real-world scenario, you may want the accept reservations process decoupled from the handle assignment callback URL process. For example, you could process the Reservation received, validate the data, or send an SMS to the parties involved before accepting the Reservation.
- For this tutorial, we used an HTTP call. But, there are other ways to create a Task. One example is by receiving a phone call from a customer. With TwiML you define instructions on how to handle phone calls from customers. So, you could configure TwiML to send those phone calls to the TaskRouter. And once there, the TaskRouter automatically assigns the correct Salesperson to that customer.
I’d love to see what you build with the Twilio Task Router!
Pedro Lopes is a backend engineer. He's enthusiastic about distributed systems, big data, and high-performance computing. He can be reached at LinkedIn.

Related Resources
Twilio Docs
From APIs to SDKs to sample apps
API reference documentation, SDKs, helper libraries, quickstarts, and tutorials for your language and platform.
Resource Center
The latest ebooks, industry reports, and webinars
Learn from customer engagement experts to improve your own communication.
Ahoy
Twilio's developer community hub
Best practices, code samples, and inspiration to build communications and digital engagement experiences.