Scaling Node.js JavaScript Microservices on Shared MongoDB Atlas Cloud Persistence Layers
Time to read:
May 02, 2019
Written by
This post is part of Twilio’s archive and may contain outdated information. We’re always building something new, so be sure to check out our latest posts for the most up-to-date insights.

Building a JavaScript application on Node.js with a microservices architecture gives you the ability to scale your app to respond to increasing load levels by adding more instances of a service. But when multiple instances of a service work with the same data your application will have an additional design requirement: you'll need a persistence layer the service instances can use to store and share data.
This post will show you how to use a database as a persistence layer for a JavaScript microservices application. You'll see how the application uses Netflix Eureka and Netflix Zuul for service discovery and load balancing. You'll be able to apply the techniques you learn here to build applications you can scale up and scale out while avoiding the complexity of building service discovery and load balancing on your own.
You'll also get a hands-on introduction to working with MongoDB Atlas as a database-as-a-service (DBaaS). A cloud-based database is a natural complement to a cloud-based microservices application and MongoDB Atlas can run on Azure, AWS, or Google Cloud.
Prerequisites
To accomplish the tasks in this post you will need the following:
- Node.js and npm (The Node.js installation will also install npm.)
- Java Runtime Environment SE
- MongoDB Atlas account (chose a free tier cluster)
To learn most effectively from this post you should have the following:
- Working knowledge of JavaScript, Node.js, and databases
- Some exposure to HTTP protocol
To give you a head start, this post is built on the code and concepts from the previous two posts in this series:
Building JavaScript Microservices with Node.js – introduces the concept of microservices and shows you how to build microservices applications with JavaScript on Node.js.
Implementing Eureka and Zuul for Service Discovery and Dynamic Routing in JavaScript Microservices Running on Node.js – demonstrates how to integrate the Netflix Eureka service registry and Netflix Zuul's dynamic routing and load balancing into a microservices application.
If you are new to these concepts you may want to read those posts and build the project from them step-by-step. If you're familiar with microservices and want to focus on learning to implement a persistence layer, the companion repository has the code you need to begin this post. The instructions below will show you how to get the code written in the first two posts in this series.
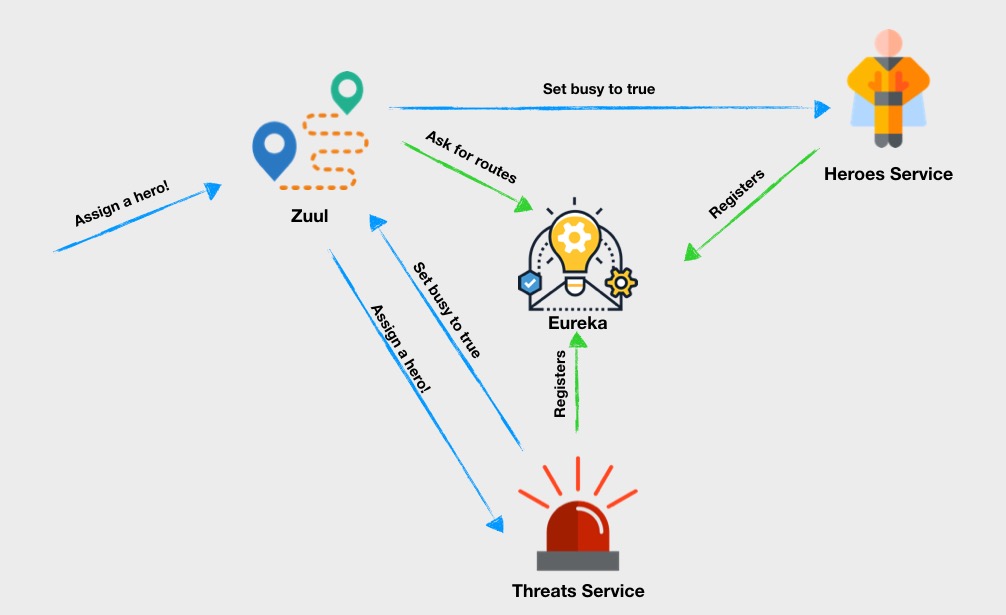
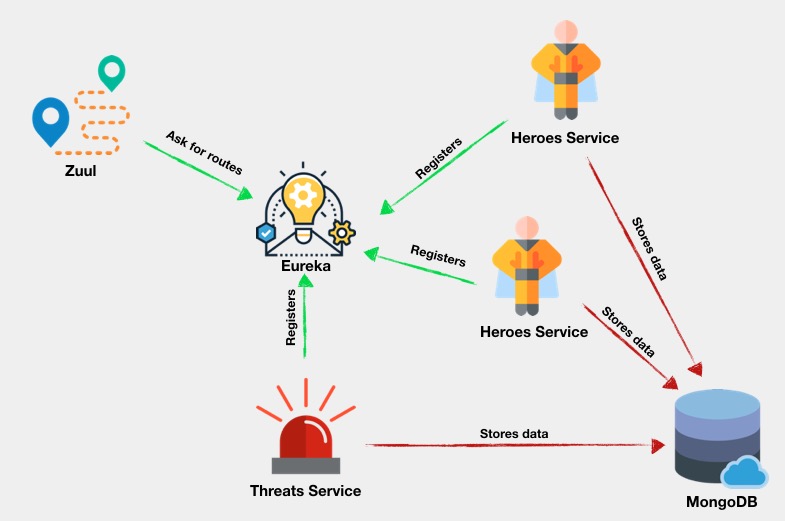
The case study project consists of four services. There are two JavaScript services running on Node.js:
heroes-service – maintains a list of super heroes, their attributes, and their busy/free status.
threats-service – maintains a list of dangerous situations and the hero assigned to responding to each threat.
These services use a helper function, registerWithEureka, that enables them to conveniently connect to the service discovery system. Together, these components comprise the functional aspects of the application.
There are also two Java services that provide infrastructure support for the Node.js services:
Netflix Eureka – is a service registry and discovery tool that enables services to find other services without needing to know where they're running.
Netflix Zuul – is a load balancer and dynamic routing service that gets a list of available instances of each service from Eureka, routes requests between services, and balances the load among server instances.
These Java services are provided in Java Archive (.jar) files: all you need to do is run them once you installed the Java SE Runtime Environment. They're packaged so you can use them in your own projects without modification.
The architecture of the project looks like this:
If you haven’t been following along with the previous posts and built the project while doing so, or you want to start fresh copy of the code, you can clone the project from the GitHub repository for this post.
Clone it by executing the following commands in the directory where you would like to create the project directory:
Note that these steps include installing the required npm packages in the appropriate directories.
Launch Eureka by executing the following command-line instruction in the root directory of your application. This will be the introduction-to-microservices directory, unless you changed the target directory when you cloned the repository.
Windows users should execute the following instruction, and all subsequent instructions, except where noted, in a Windows Command Prompt (cmd.exe) window, not a PowerShell window.
Open another console window in the root directory of your application and start the Zuul service by executing the following command-line instruction. This will be the second console window you'll have open:
Notice the parameter used while launching Zuul. It decreases the interval at which Zuul retrieves information about services from Eureka. This is useful in the development environment, but in production you should stick to the default settings. The Spring documentation provide background on why the process is relatively slow to register a service.
Open a third console window in the project root directory and executing the following command-line instruction:
Open a fourth console window in the project root directory and execute the following command-line instruction:
Check to see if everything works as expected by executing the following curl command from the project root directory in a new console window. This will be the fifth console window you’ll have open:
If the services are working correctly you should see results similar to the following console output from curl:
Scale baby scale!
A UFO invasion is coming to the Earth! Your heroes will get quite busy soon, so you need to prepare for increased traffic to heroes-service. With Eureka and Zuul it’s easy. What you need to do is add another instance of hero-service and register it with Eureka. Zuul will retrieve information about the new service instance automatically.
Open a new console window (number 6) in the root directory of the project and execute the following command-line instruction:
Note that the new instance of heroes-service is assigned a different port number, 3002, than the original instance of the service, which is assigned to port 3001. While this is necessary for two instances of the same service using the same Eureka handle on the same Node.js server (or any other server), multiple instances of a service running on different machines could use the same port number.
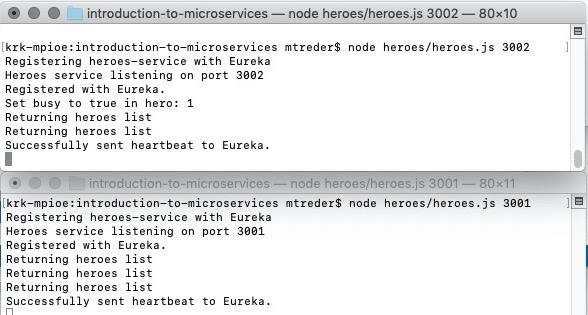
The new instance of heroes-service should report the following:
You should also see the new instance being registered with Eureka in its console window, which will display status messages similar to the following:
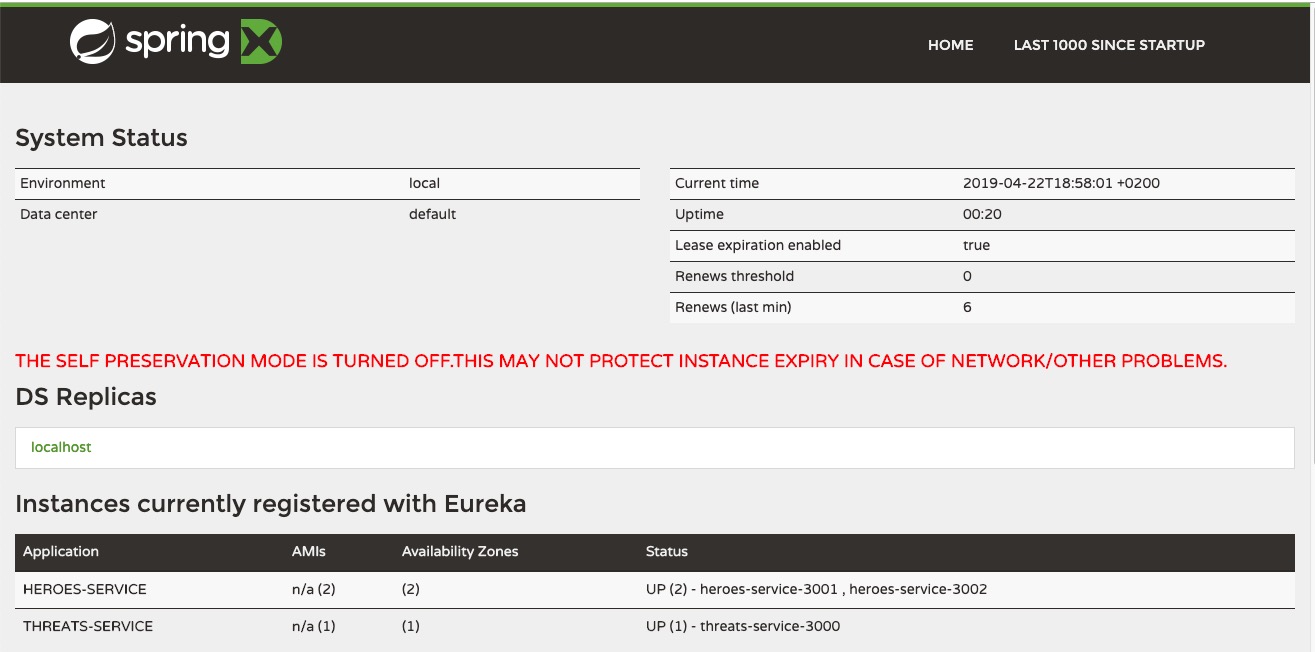
Open a browser tab and navigate to http://localhost:8761, the URL for the instance of Eureka you created when you launched the first Java .jar, above.
You should see the Spring Boot status page for Eureka, like the one shown below. Under Instances currently registered with Eureka you should see HEROES-SERVICE with a value of 2 for Availability Zones and the two instances at ports 3001 and 3002 listed as "UP" under Status. You should also see THREATS-SERVICE shown as "UP" on port 3000.
Now you need to give Zuul a chance to retrieve information about the new instance of heroes-service from Eureka. It won’t take more than 30 seconds (specified by the parameter --eureka.instance.leaseRenewalIntervalInSeconds=30 used when launching Zuul) and will be indicated by a log entry similar to the following:
Whenever a request is made to heroes-service Zuul uses a round robin algorithm to choose one of the two instances to handle the request.
Arrange your desktop so you can see the console windows for the two instances of heroes-service along with the with the window in which you previously executed a curl command. Each of the heroes-service instances should be displaying the following message every few seconds:
In the console window in which you executed the previous curl command, execute the following curl command multiple times while watching the output in the heroes-service windows:
As you execute the curl command repeatedly, you should see the following status message being displayed alternately in each window:
This demonstrates Zuul's load-balancing feature. Using a round-robin algorithm, Zuul sends the request to the most available instance of the requested service. In the case of this simple example, it (usually) sends the request to the instance it didn't send the previous request.
Take a closer look at console logs of the heroes-service instances. As you can see, requests are routed to both of them:
Look at the output in the console window as you execute successive curl commands. You will see that each instance responds differently as Zuul alternates between the two instances, as shown below:
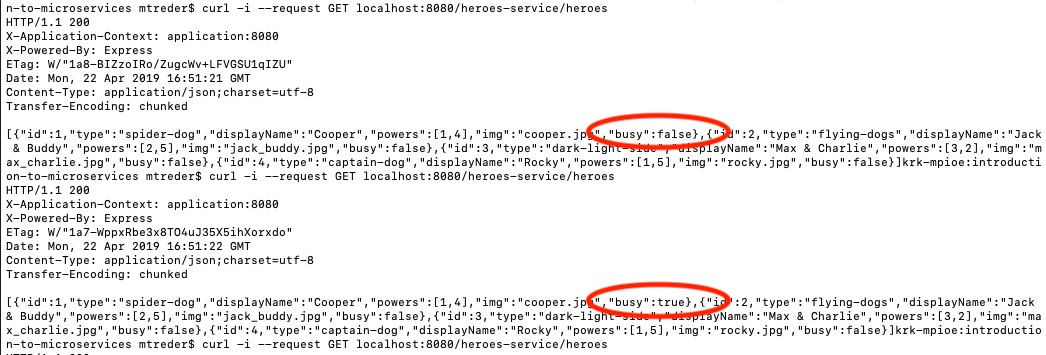
One of the instances of heroes-service is responding that the hero "Cooper" is busy, while the other instance is saying he's not. You assigned him to a threat, but only one of the instances seems to have gotten the message.
Why? Because both instances keep information about heroes objects in memory and don't share information about state changes between each other. Each instance reports only what it knows about the assignments it has performed.
Adding a persistence layer with MongoDB
To resolve the problem of the service instances keeping isolated data sets in memory, you can add a persistence layer to retain the values of data elements shared by multiple instances of a service. Each service will write to, and read from, the persistence layer when responding to requests that alter data.
Using a database is a common way of adding a persistence layer to a system. It has the added advantage of being nonvolatile memory, which means the state of the system can be read from the data store even when the other system components are not running. It can also be used to maintain a record of the changes in the system state over time. For example, in this project it may be helpful to know what threats a hero has confronted over time.
In this project the persistence layer will store information about which heroes have been assigned to specific threats. When one instance of hero-service assigns a hero to a threat the other instances will know this and they'll know when a hero is busy, so they won't attempt to assign two threats to a hero at the same time.
The persistence layer also enables you to add or subtract instances of a specific service to respond to varying demand for those services. A new instance will use the data from the database to seamlessly begin processing requests as it is called on by the load balancer. Conversely, an instance can be withdrawn from the Eureka registry to reduce processing costs when demand is light: the results of its most recently processed request will be stored in the database.
The new system architecture is depicted in the following diagram:
Navigate to https://cloud.mongodb.com/user and sign in to your account. To register new cluster, click on Build a New Cluster, then choose the most appropriate region and cloud infrastructure provider. (You can choose a "free tier available" region to avoid operating fees.)
When your cluster is ready, click the Connect button and follow the prompts on the Connect to Cluster() panel to: 1) allow a connection to your IP address and 2) create a MongoDB user.
Tips: When creating your password, avoid using characters that will have to be URL-encoded when entered on your system's command line. Be sure to save your MongoDB username and password in a safe place.
In the Choose a connection method step, select Connect with the Mongo Shell. Follow appropriate directions for downloading, installing, and configuring the MongoDB Shell to run on your system.
When you've configured the MongoDB Shell to run on your system, copy the supplied command-line instruction to a safe place. Leave this tab open with the Connect to Cluster() dialog box open; you'll be returning to it shortly.
Execute the command-line instruction in a console window to start the shell. You'll need to enter the user password you just created.
Tip for Windows users: Execute the MongoDB command-line instructions below in a PowerShell window; this will enable you to paste and execute the entire block of instructions in a single step.
When you have successfully connected to your MongoDB instance, add data to it by executing the following MongoDB command-line instructions:
Return to the browser tab with the Connect to Cluster() dialog box open.
Click the Go Back button to return to the Choose a connection method step.
Click Connect Your Application.
Under Choose your driver version the selected values should be:
DRIVER: Node.js
VERSION: 3.0 or higher
Select Connection String Only and click the Copy button. Save the connection string; you'll be using it later to connect the Node.js services to the MongoDB Atlas database.
The connection string should look something like this, depending on the cloud service you selected:
Implementing new versions of the services that use the persistence layer
You've created the persistence layer and seeded the database with the same data that is hard-coded into the source code for the current version of heroes-service and threats-service, but the code for each service will have to be updated to enable it to use the database. In a conventional application this would require updating the code and deploying it, stopping the original version of the application, and restarting the new version. It's hard to do that without causing a service interruption for users.
With microservices you can deploy the new version alongside the current version, then take the old version off-line when you're satisfied that the new version is working correctly. Users experience 100% uptime and new functionality seamlessly integrated into their application experience. You can scale up the new version of the service by starting additional instances. You'll see this process in action as you implement the persistence layer functionality in the code.
Create a new directory, /heroes-v2, under the application root directory.
Initialize the npm project and install the required npm dependencies by executing the following command-line instructions in the /heroes-v2 directory:
Create a new file, heroes.js, in the /heroes-v2 directory and insert the following JavaScript code:
Replace the placeholder text for the dbUrl assignment with the URL portion of the connection string you copied from the MongoDB Atlas Connect to Cluster dialog box. The connection string will look something like:
The process is the same for threats-service.
Create a new directory, /threats-v2, under the application root directory.
Initialize the npm project and install the required npm dependencies by executing the following command-line instructions in the /threats-v2 directory:
Create a new file, threats.js in the /threats-v2 directory and insert the following JavaScript code:
Replace the dbUrl placeholder with your MongoDB connection string in /threats-vs/threats.js as well.
If you want to catch up to this step using the code from the GitHub repository, execute the following commands in the directory where you’d like to create the project directory:
Verifying the current configuration
You've modified a number of files and run a number of programs by this point. Before continuing, it's a good idea to verify all the pieces of the application are in place and running correctly.
You should have 5 processes running in separate console windows.
Two Java applications:
java -jar eureka-service-0.0.1-SNAPSHOT.jar
java -jar zuul-0.0.1-SNAPSHOT.jar
These programs will be displaying status messages at regular intervals.
Three Node.js services:
node threats/threats.js 3000
node heroes/heroes.js 3001
node heroes/heroes.js 3002
These services will be displaying heartbeat status messages at regular intervals.
Verify all the services are registered with Eureka by navigating to http://localhost:8761 in your browser. You should see these three services listed under Instances currently registered with Eureka.
Check that the services can communicate with each other by executing the following curl command in a console window. (Windows users should use a Windows Command Prompt window, rather than a PowerShell window.)
This command assigns hero 1 to threat 1 and produces the following JSON output after the HTTP headers:
Launch the MongoDB command-line interface by executing the command-line instruction you obtained in the Connect with the Mongo Shell in a console window. You'll need to type in the password you used to create the connection.
Execute the following CLI instruction to verify all three data collections are present:
You should see three collections listed: heroes, powers and threats.
Verify each collection with the following CLI instructions:
The output from each command should correspond to the data you added above for the threats, heroes, and powers collections.
Leave the MongoDB CLI running in this console window. You'll use it later to verify that information is being written properly to the database.
Introducing updated services
With a persistence layer in place you can benefit from one of the advantages of the microservices architecture: it's easy to update a service while maintaining 100% system up-time. Instead of relaunching currently running instances of the services, you can start new instances with updated code, wait briefly until they have registered with Eureka, and remove the old instances of the service.
This approach also enables you to test new code in a production environment without committing your entire application to using it. You can register one instance of an updated service and monitor its performance before updating the remaining instances. If the new version has bugs or performance problems only a fraction of the requests to the service will be affected.
Start by launching a new instance of the updated threats-service in a new console window (number 6):
After about 30 seconds, Zuul will retrieve the information about this new instance from Eureka, which will be indicated by a log entry similar to the following:
Start two new instances of the new heroes-service by executing the following command-line instructions in two new console windows (numbers 7 and 8):
In your browser, navigate to the Eureka status panel at http://localhost:8761. You should see four instances of heroes-service and two instances of threats-service. The new versions are running on the 5XXX ports and the old instances are running on the 3XXX series ports.
You can now stop the original instances of heroes-service running on ports 3001 and 3002 and the instance of the original version of threats-service running on port 3000. You can also close the associated console windows, reducing the number of open console windows to a more manageable five.
Check the Eureka status page again to verify the old instances of the services have been unregistered. It make take 5 minutes or longer to deregister all the services. You can continue with the project while the services are being removed from Eureka.
With these simple actions you've converted your application to version 2 of heroes-service and threats-service. Your application is now ready to use the MongoDB persistence layer.
This is how the process of updating the services looks from an architectural point of view:
Verify the version 2 services are updating the persistence layer
The version 1 services assigned heroes to threats in memory, resulting in potential conflicts between what the instances of heroes-service knew about the assignment status of a hero. The version 2 services will get their lists of heroes, threats, and powers from the database. They'll also store their assignment data there.
To assign a hero to a threat, execute the following curl command in a new (or unoccupied) console window:
The curl command should return the following response from Zuul on port 8080:
Verify that the hero assignment has been stored in the database by running the following MongoDB CLI commands in the console window in which you have the Mongo CLI running:
The database queries should return the following results:
If you were keeping an eye on the console windows for Eureka, Zuul, and the services, you might have caught one of the heroes-service instances processing the curl request.
Verify that both heroes-services instances are returning consistent results for threat assignments by getting the hero's status from the persistence layer. The procedure for doing so is the same as the one you previously used to demonstrate the instances of the old version of the services were returning inconsistent results.
Take a moment, if necessary, to arrange your desktop so you can see the console windows for the three services, Eureka, Zuul, and the window in which you're running curl commands.
Repeatedly execute the following curl command-line instruction and note the request being passed through Zuul, Eureka, and one or the other of the instances of heroes-service. The two instance should alternate in processing the request as they are called in round robin fashion by Zuul.
Note carefully the responses returning to the curl requests. You'll see that each instance of heroes-service is returning consistent information about which heroes are currently busy and the information matches the results of the database query you performed earlier. If all these results are correct in your development environment you've implemented the persistence layer correctly.
The following diagram shows the flow of requests in the application. For simplicity, the Eureka service is not included; since it only provides a service registry it doesn't affect the flow of information in the system.
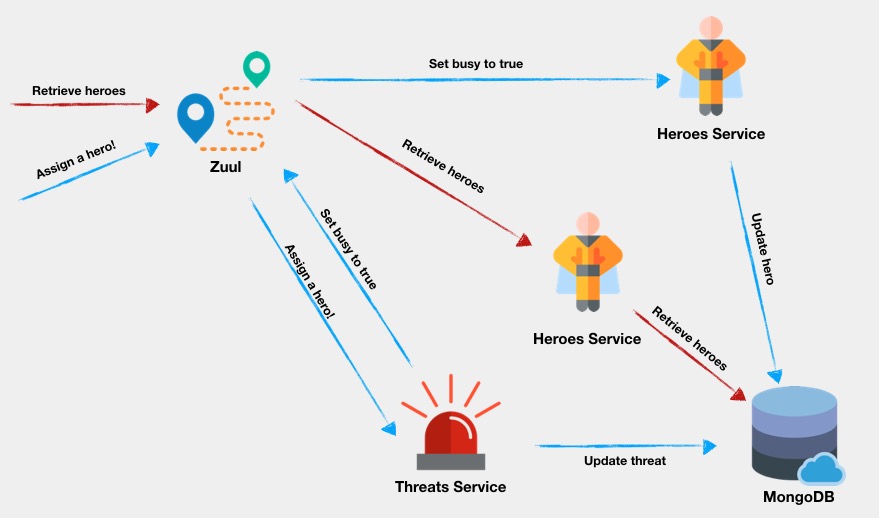
There are two scenarios depicted.
The blue arrows show a user asking the application to assign a hero to a threat:
- An HTTP POST request comes to Zuul at http://localhost:8080 with the route for the
threats-serviceassignment endpoint: /assignment. The POST request includes a JSON payload specifying the threat and the requested hero. - Zuul forwards the POST request it to the
threats-serviceinstance (on port 5000). - The threat-service
instance asks Zuul to perform a request toheroes-serviceand set the requested hero's status to busy. - Zuul chooses one of the available heroes-service
instances and sends the request fromthreats-service. - The selected heroes-service
instance updates the status of the hero in database.
The red arrows show a user asking for the heroes list:
- An HTTP GET request comes to Zuul at http://localhost:8080 with the route of the heroes-service
heroes list endpoint: /heroes. - Zull forwards the GET request to one of the available heroes-service
instances (in this case, to the second one) based on its round robin load-leveling algorithm . - The heroes-service` instance retrieves the requested data from shared MongoDB database. Because all the service instances share the persistence layer, each service can retrieve the most current information written by any of the other instances.
Summary
In this post you learned how a persistence layer contributes to the architecture of a microservices application and how to implement a cloud-based persistence layer with MongoDB Atlas. You saw how to scale your services by adding new instances to the system. You saw how Netflix Eureka and Netflix Zuul can be used to provide an out-of-the-box solution for microservices discovery, dynamic routing, and load balancing. Putting the whole system together, you saw how multiple instances of a service can easily share information through the persistence layer without requiring complex routing or data manipulation functionality. You also saw how new versions of services can be added to a running application to provide a seamless upgrade path for new functionality.
Additional Resources
Architectural Styles and the Design of Network-based Software Architectures, Roy Thomas Fielding, 2000 – Fielding’s doctoral dissertation describes Representational State Transfer (chapter 5) and other architectural styles.
Microservices – Although flawed, the Wikipedia article is a good starting place for finding more information about microservices architecture and implementation.
Node.js – provides the reference documentation for the application server.
The MongoDB 4.0 Manual – covers implementation of MongoDB in JavaScript, as well as other programming languages.
Spring Cloud Netflix project " … provides Netflix OSS integrations for Spring Boot apps through autoconfiguration and binding to the Spring Environment and other Spring programming model idioms."
Maciej Treder is a Senior Software Development Engineer at Akamai Technologies. He is also an international conference speaker and the author of @ng-toolkit, an open source toolkit for building Angular progressive web apps (PWAs), serverless apps, and Angular Universal apps. Check out the repo to learn more about the toolkit, contribute, and support the project. You can learn more about the author at https://www.maciejtreder.com. You can also contact him at: contact@maciejtreder.com or @maciejtreder on GitHub, Twitter, StackOverflow, and LinkedIn.
Related Resources
Twilio Docs
From APIs to SDKs to sample apps
API reference documentation, SDKs, helper libraries, quickstarts, and tutorials for your language and platform.
Resource Center
The latest ebooks, industry reports, and webinars
Learn from customer engagement experts to improve your own communication.
Ahoy
Twilio's developer community hub
Best practices, code samples, and inspiration to build communications and digital engagement experiences.