How to Send Emails Through SMS using JavaScript and Node.js
Time to read:
June 30, 2017
Written by
This post is part of Twilio’s archive and may contain outdated information. We’re always building something new, so be sure to check out our latest posts for the most up-to-date insights.

You can easily forward emails as SMS with a simple app. We can also extend the app to also send emails from SMS. Let’s get started!
Our Development Tools
Here’s our checklist of all the things we will need to build the app:
- A Twilio Account to get a Twilio Phone Number – Sign up for free!
- Node.js and npm
-
Yarn – You can use npm as well but you will have to modify the
package.jsonstartscripts to npm from yarn - Ngrok – the perfect solution to demo without deploying
- A working email account with IMAP access
Getting started
Begin by cloning the starter project from GitHub and running Yarn to install the project dependencies. Make sure that you are checking out the twilio-template-email2sms branch. Run:
This repository contains the completed app from the end of the previous article, so if you don’t want to read through the other post, that’s fine. I will briefly explain the code that we will be reusing from the demo application.
Copy the config.env.example file to a new file called config.env and add the credentials of your Twilio account which you can grab from the Twilio Console. In that configuration let’s note the host, port, username and password environment variables. The values in this are the ones your application will send/receive emails from, they depend on the email service you use, and you will have to look for the correct values. Here we will going set up the variables in our config.env file to work with a standard gmail account.
Note – If you use 2-factor-authorization on your account, you will need an app-specific password here.
There are three options to run the application.
yarn dev:clientonly fires the IMAP Client we used to listen for emails to be forwarded-
yarn dev:serverfires up the Express server (The file we will be working with, so if you don’t want to use the forward Email functionality just run this!) -
yarn devwhich does both.
Receive SMS on your Express server
Open server.js and add the following lines of code at the end to listen for a new incoming SMS message:
Next head over to the Twilio Console to configure your Twilio phone number with a messaging webhook.
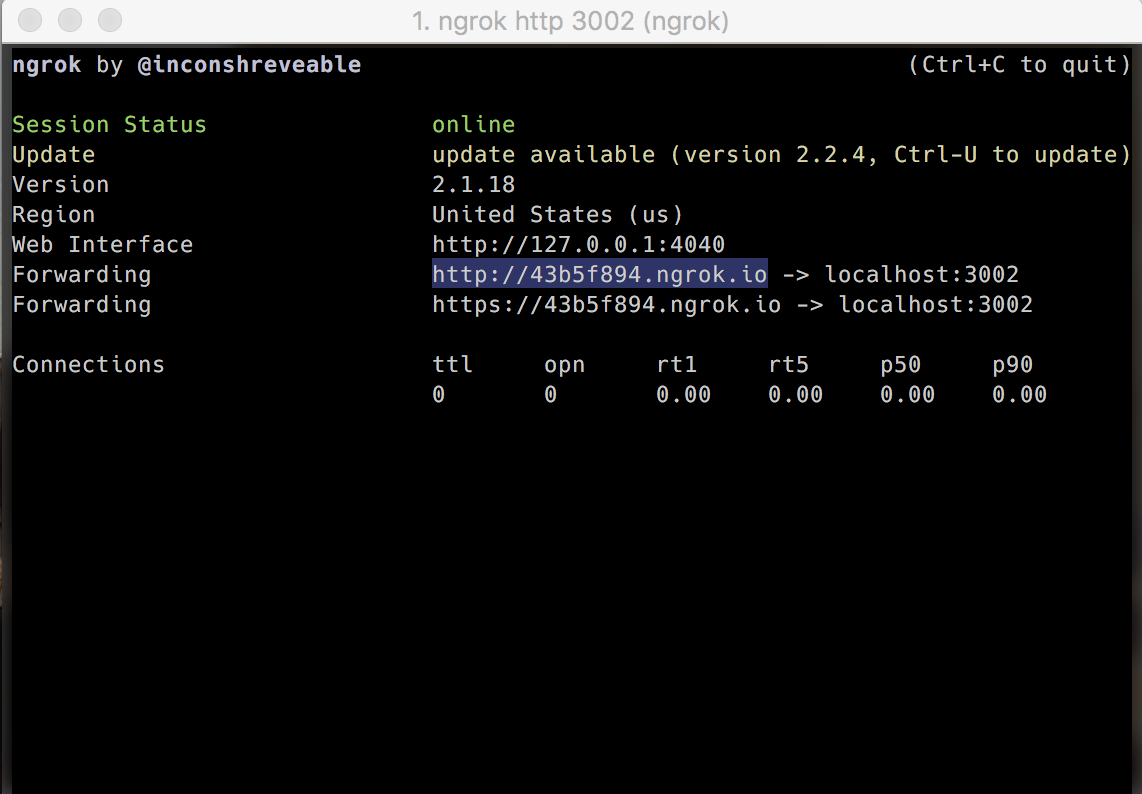
If you have a server that you can deploy the application to and get a public url – brilliant, otherwise ngrok is an amazing tool. It generates a unique public url for whatever port you expose your application on. Run ngrok http 3002 in a separate terminal and keep it running. You will get an ngrok URL you can use as your our Twilio phone numbers Messaging webhook URL.
Once you have a publicly accessible URL, whether from a publicly deployed app or through ngrok, head over to the Console to configure your phone number.
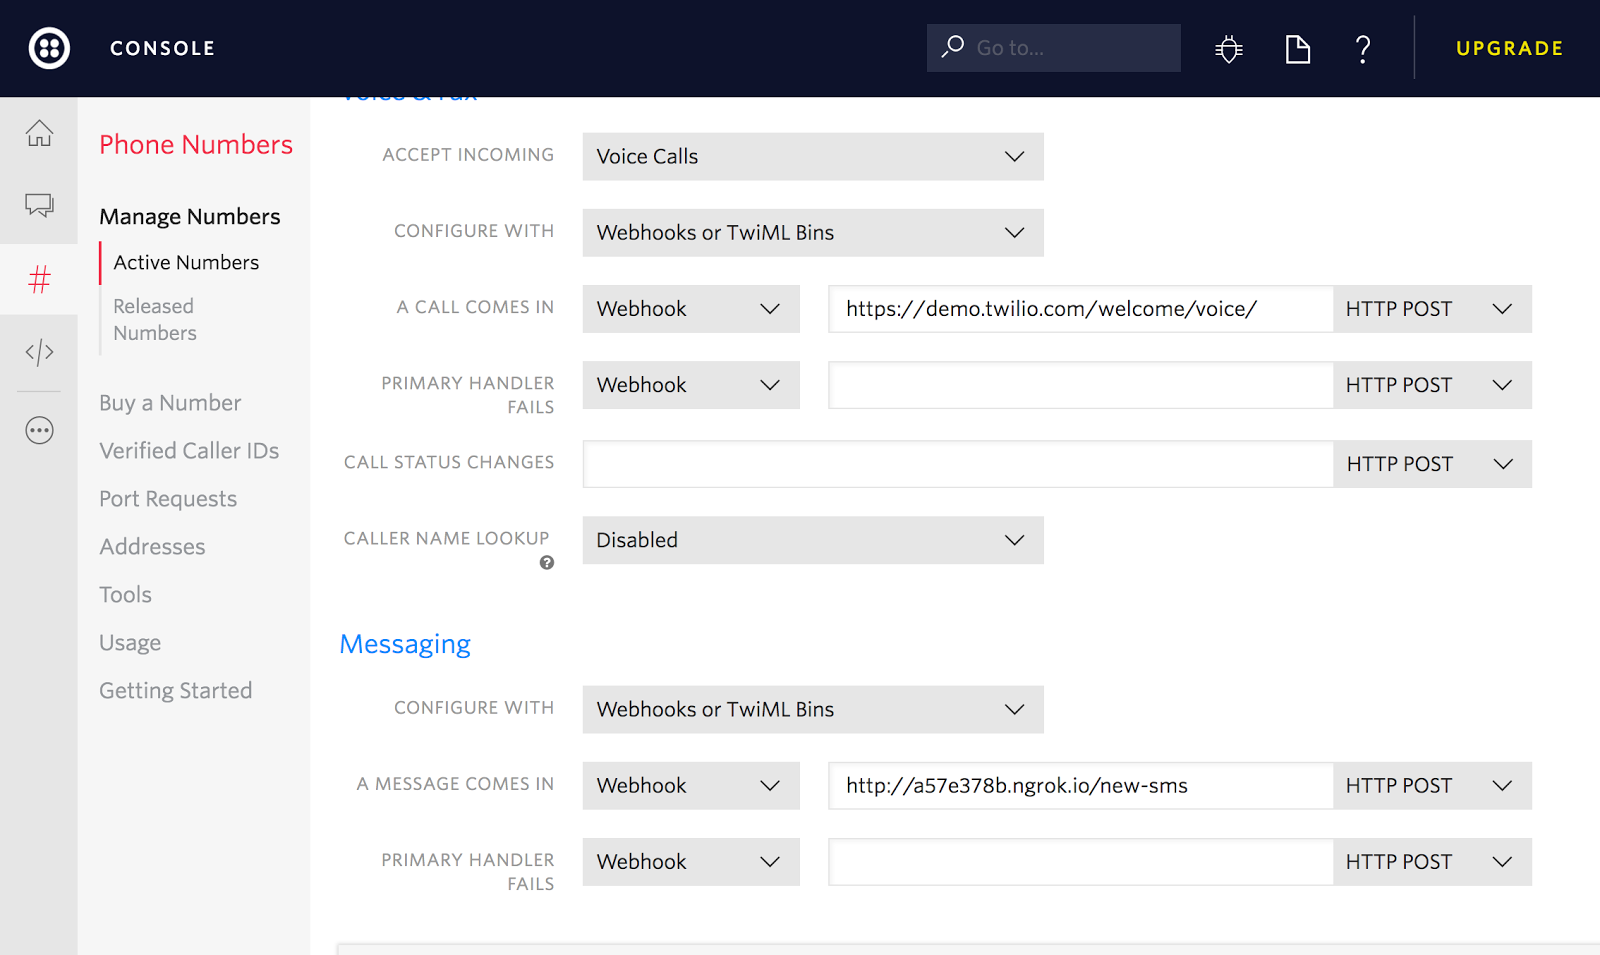
Scroll down to the Messaging section and in the field ‘A Message comes in’ , add the ngrok url from the last step.
Now run the server with the command yarn dev:server and then try sending a new SMS to your Twilio Number. Voila! The message gets printed to your terminal
New Email Flow
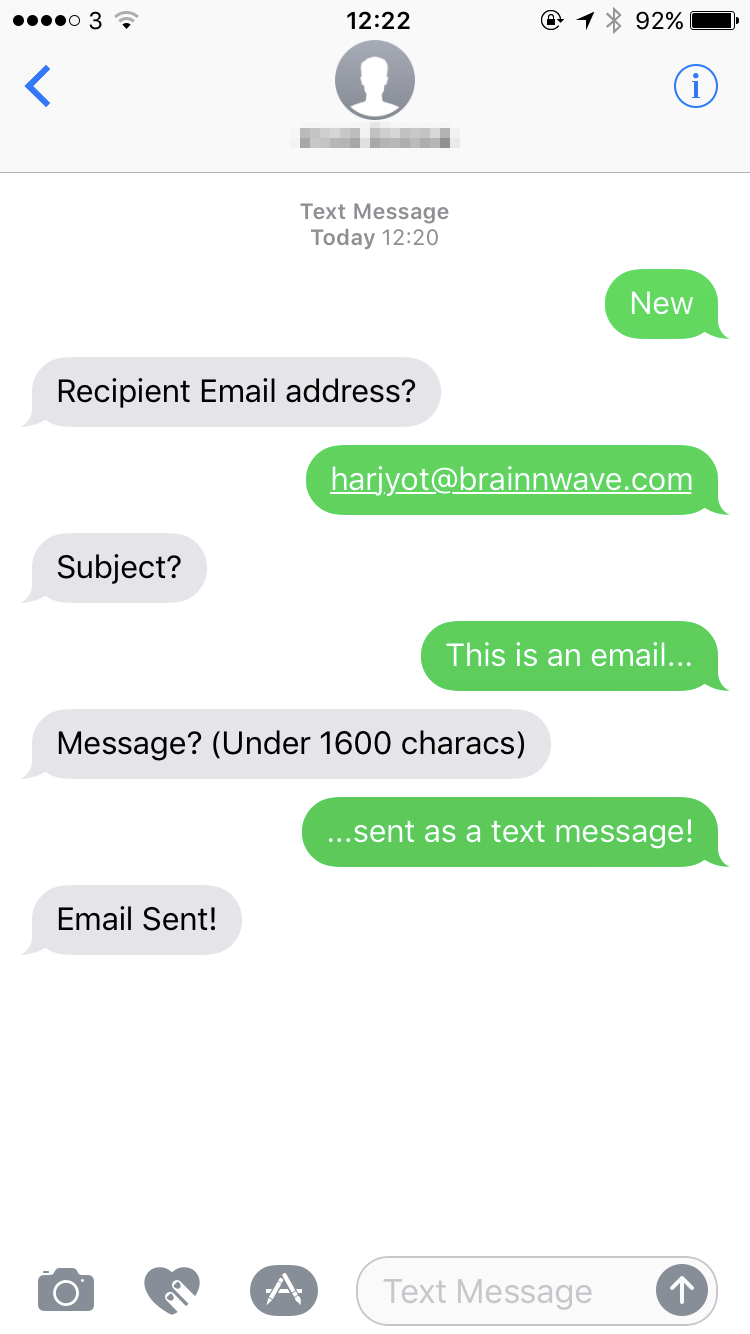
There can be multiple ways to setup a new email workflow, but here’s this short flow:

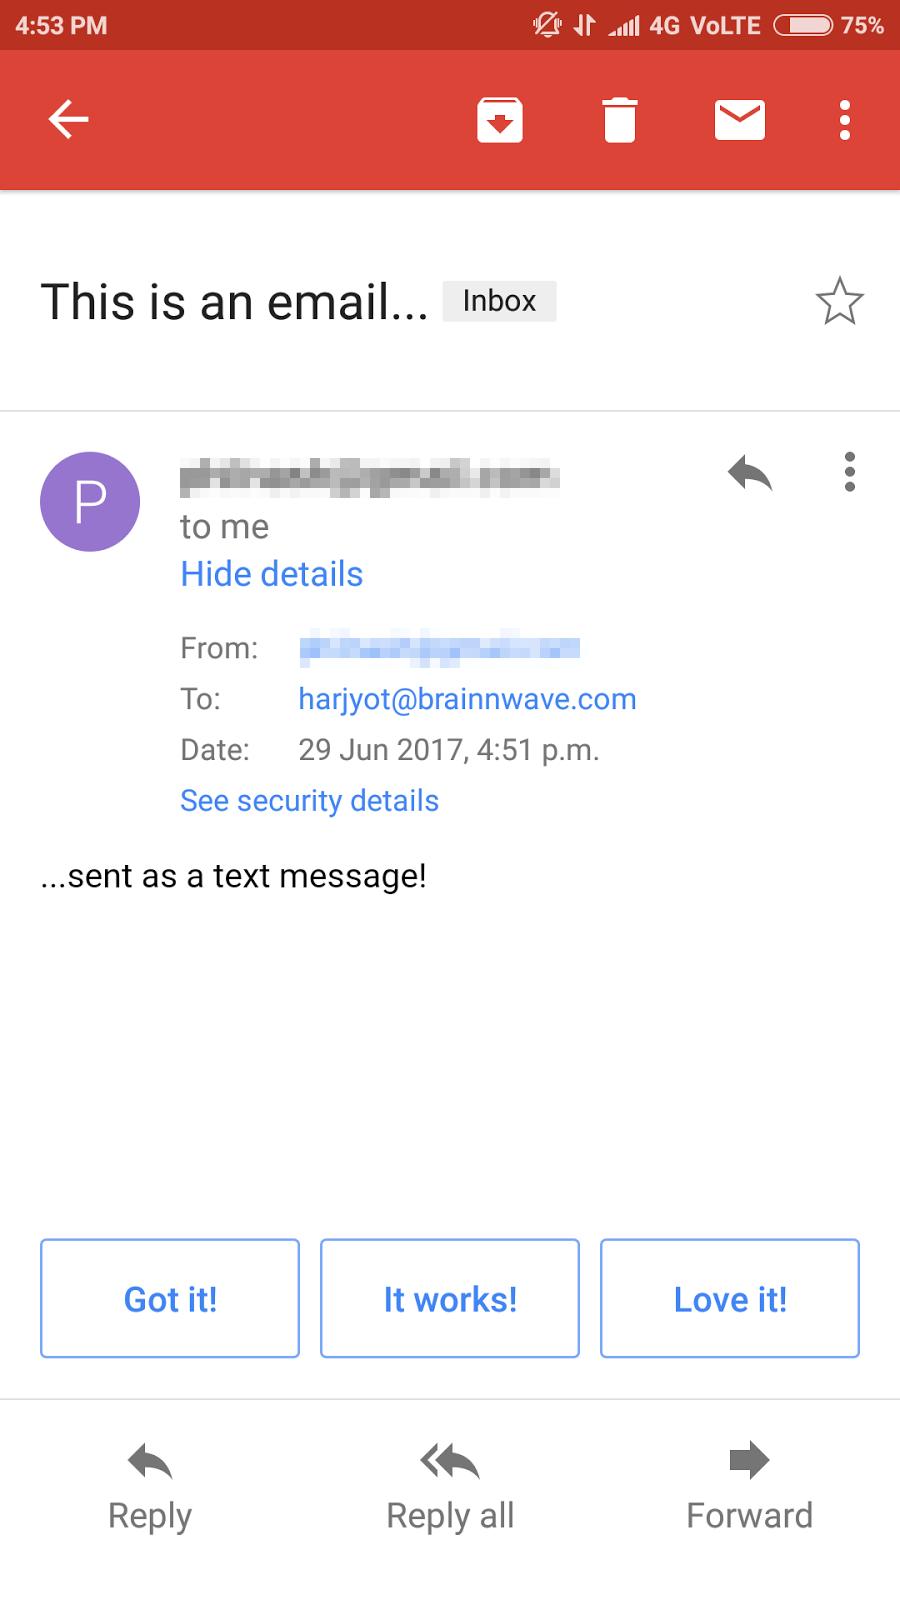
The user starts with sending the Twilio number a message ‘NEW’, the Express server prompts for the next step after each user step with the syntax of the next step. The first step is email address, which the user sends as ‘a@xy.com’. When the user sends the subject as ‘Message Subject’, and finally with the message body which the user sends as ‘Message body!’, the server then goes ahead and sends the compiled email.
Let’s setup our basic objects and the helper functions that we will need for the above flow in server.js.
What we do above is declare a global email object that is used in the latter functions.
Add this code to parse the email and manage the flow in server.js.
So what’s happening in the code above? The above function uses a global incomingEmail object to maintain which step of the new email creation the user is in, handling everything from notifying the user of the next step of the process by sending them an SMS reply with the necessary syntax and an example, handling errors, validating the recipient email using validator which is a nifty library for string validation and then finally sending the email.
Sending Email using Nodemailer
You will notice at the end of the switch-case in the parseToEmail function we make a call to sendEmail function which doesn’t exist yet.
Now let’s write that function in server.js:
A couple of things to note about this piece of code – we create a transporter object using the nodemailer library that allows us to send emails from a NodeJS Application – easy peasy! Here I am using Gmail with the same address to send emails as the one I used to watch for emails in the previous article. I am also using the Gmail preset the library provides, however if you want to use any other service, check the documentation to see how you can set it up.
The sendEmail function handles setting up the email and populating it with the required properties from our incomingEmail object and uses the transporter object to send it. The function returns a success string that the server sends us as an SMS to notify the email has been sent.
Putting it all together
We need to make just a slight change to our /new-sms handler in server.js:
Shall we try it? Send ‘New’ to your Twilio Number via SMS and follow the reply prompts!
Final Thoughts
In this short tutorial we extended our existing application by adding webhooks, using ngrok to test an app without deploying it and nodemailer to send emails from a NodeJS Application. We created out a simple state transitioning algorithm to solve a practical problem.
If you are further interested in trying out different things with the project, check out the master branch of the project at the repository. The project has the same code as above and includes an added MongoDB connection that stores all incoming emails.
If you have any questions or just wanna have a quick chat, drop me a message on Facebook or send a tweet my way @iharjyot.


Related Resources
Twilio Docs
From APIs to SDKs to sample apps
API reference documentation, SDKs, helper libraries, quickstarts, and tutorials for your language and platform.
Resource Center
The latest ebooks, industry reports, and webinars
Learn from customer engagement experts to improve your own communication.
Ahoy
Twilio's developer community hub
Best practices, code samples, and inspiration to build communications and digital engagement experiences.