Sending Automated Congratulations with Google Sheets, Twilio, and n8n
Time to read: 16 minutes
November 17, 2020
Written by
Reviewed by
.png")
It was your colleague’s, relative’s, or friend’s birthday, but in between all your busy day-to-day operations you missed an opportunity to send them a heartwarming message? You want to automatically send birthday messages to all your regular customers, but you don’t know how to?
Why not hand over this task to an n8n (pronounced “n-eight-n”) workflow? n8n provides extendable workflow automation that integrates with over 90 different apps, including Twilio Messaging.
In this post you’ll learn how to automate sending personalized congratulations and never forget a birthday and anniversary again. You won’t need to do any programming to build the solution: n8n provides a visual workflow designer and Twilio Messaging can be set up from the Twilio user interface.
You’ll enter your contact list for congratulation messages in Google Sheets to keep the maximum flexibility. As your list of contacts grows and the variety of messages you send increases you can add them to your spreadsheet without modifying your workflow.
Do you want to use a multitude of different languages for the messages? No problem, just include the language in your Sheets. Your programmable wishes will be sent in an SMS message at a preset time by Twilio.
Let’s get started!
Prerequisites
To follow along you’ll need these ingredients:
- n8n – You can find details on how to install n8n in theQuickstart page.
- Google account – You create an account, if you don’t use Gmail yet.
- Twilio account – Sign up with this link to receive an additional $10 credit.
You’ll be able to complete this project even if you’re coming from a non-developer background. Since this is a low-code tutorial, the small amount of code required is provided.
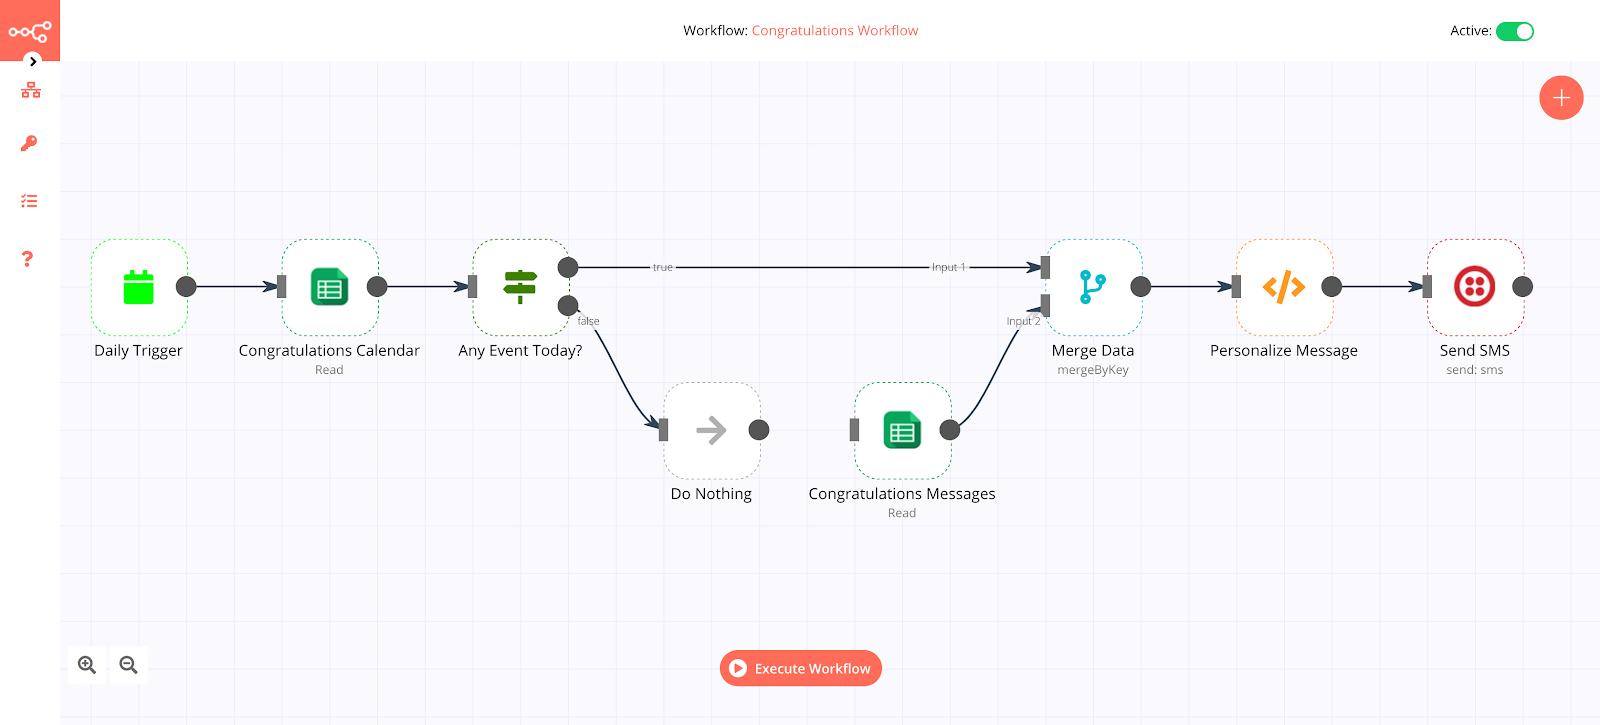
Completed workflow for automating SMS congratulations
Obtaining your Twilio credentials
Before you start to build the workflow, it makes sense to create a Twilio account. Use the link above if you don’t already have an account and you’ll receive an additional $10 credit when you upgrade. During the registration process be sure to register a phone number that can receive SMS messages.
Go to the Twilio console dashboard and get the Account SID and Auth Token for the ExplorationOne project (or your default project, or the project of your choice, if you’ve created additional projects). You can find these credentials on the upper right-hand side of the dashboard. These are user secrets, so copy them someplace safe and handle them securely.
Obtaining an SMS-enabled Twilio phone number
Go to the Phone Numbers page in your Twilio console and add a number with SMS capabilities. You won’t be charged for the number you register in your trial account. Copy the phone number someplace handy.
For the purposes of this post, all you’ll need are your Account SID, Auth Token, and phone number. But for more information on getting started with your Twilio trial account, see the Twilio Docs article:
How to Work With Your Free Twilio Trial Account
Creating your Google Sheets event calendar
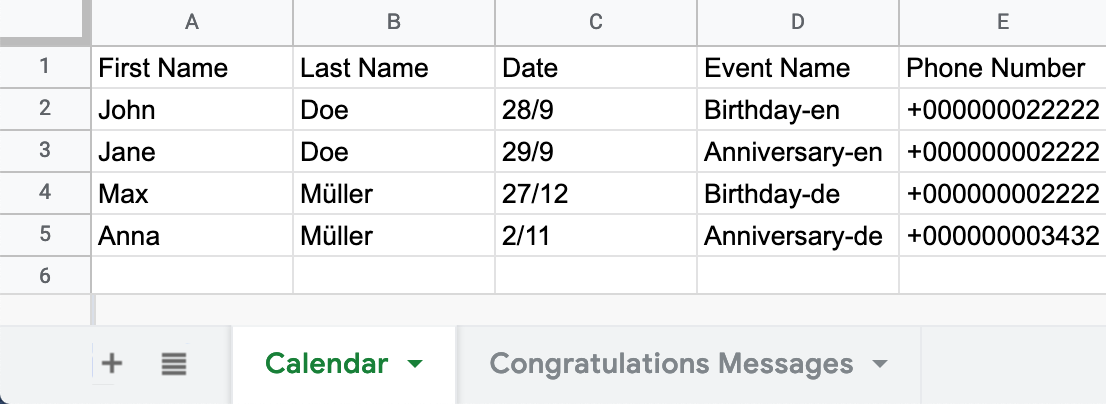
You’ll need to create your own event calendar in Google Sheets. Create a new blank spreadsheet and add “First Name”, “Last Name”, “Date”, “Event Name”, and “Phone Number” as the column headings, in that order.
Make sure that you add the phone numbers beginning with a single quotation mark (‘). This is to make sure that Google Sheets does not automatically format or calculate the values that you enter in the Phone Number column.
Also make sure to enter the phone numbers in E.164 format. This format enables Twilio to route SMS messages to recipients in different countries.
Keep in mind that the trial Twilio account will let you send messages to only registered phone numbers, for this case upgrading to a regular account is recommended.
In the Date column, enter birthday and anniversary dates in the format dd/mm (where dd is the day number and mm is the month number) preceded by a single-quotation mark (‘). This approach saves the date as a text value rather than a date. There are a couple reasons for doing this: Many people are reluctant to share their birthday year—particularly in a business context. It also prevents you from having to deal with localization issues in the Google Sheet or your n8n workflow.
Be sure the dates for at least a couple records are the date you’re building and testing the workflow, otherwise the node that checks for today’s events won’t find any and your workflow won’t send any messages for testing purposes.
The Event Name column consists of event names (Birthday, Anniversary, etc.) along with an abbreviation for the desired language, according to the person's preferences, separated by a hyphen (-). For example, if you want to congratulate your French colleague on her birthdays in French you’d add “Birthday-fr” under the Event Name. You can also invent new values for the Event Name column.
Fill in the information for your contacts according to these headings. Make sure to name this tab “Calendar”. This is important for later purposes. It could look like this:
Google Sheets tab for creating a congratulations calendar
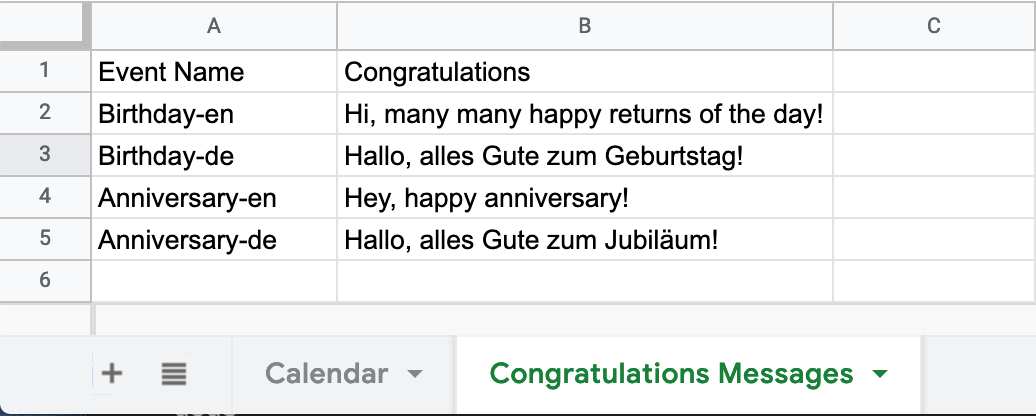
Then, create a second tab called “Congratulations Messages”. Enter the headings “Event Name” and “Congratulations” in columns A and B, respectively.
For the Event Name column, make sure to include a message for all the categories you have used in the Calendar tab so every language and event combination will have a preset message.
Be as creative as you can with the birthday and anniversary wishes. The name of the person will be added later by the workflow.
Note: Make sure that you add a comma (,) after the greeting (Hello or Hey) in the congratulations message. The workflow will use the comma character to detect where to add the first name of the recipient to personalize the messages.
Here’s how the event calendar should look:
Google Sheets tab for creating congratulations messages
Building the n8n workflow
This n8n workflow automates sending out SMS notifications according to your Google Sheets event calendar. Nodes are the action agents in the workflow, they execute, obtain, and send data. The following eight nodes will be used:
- Cron Trigger – Starts workflow daily at 8 AM
- Google Sheets – Obtains details like name, date, event name, and phone number from your event calendar in Google Sheets
- IF – Checks if the event dates match today’s date
- NoOp – Does nothing if dates don’t match
- Google Sheets – Obtains congratulations messages for different event names from Google Sheets
- Merge – Combines personal details with the congratulations message based on the event name
- Function – Personalizes the messages
- Twilio – Sends out a congratulations SMS
As you add these node types you’ll be renaming them so their names reflect their functional role.
Getting started with n8n
To start n8n, open a console window and type the following command:
Then type “o” or go to the URL visible in your console output; n8n should open with a single node called Start. As you will be using a Trigger node to begin the workflow instead of Start, simply move it to the side; it can’t be deleted and won’t be necessary for this workflow.
If you prefer to download the finished workflow, you’ll have to configure the workflow by filling out the missing information, as indicated by an exclamation mark on the nodes requiring modification.
Saving a workflow
Don’t forget to save your workflow in the beginning and from time to time. For saving, open the left side panel of n8n by clicking the > (expand) icon. Click Save As and name your workflow, e.g. “Congratulations”, and click Save. After the first Save As, simply click Save in the Workflows section of this panel to update your saved copy
1. Creating the daily Cron Trigger
The Cron node is useful to schedule workflows to run periodically at fixed dates, times, or intervals. This works in a similar way to the cron software utility in Unix-like systems, the macOS Automator, or the Windows Task Scheduler.
In the Editor UI, add a new node to your workflow by clicking the + button in the top right of the Editor UI. Then select the Cron node under the Triggers node list.
Click on the Add Cron Time button and select Every Day as the Mode. Enter “8” for Hour. After that you can rename the Cron node to “Daily Trigger”.
Rename the node’s headline from “Cron” to “Daily Trigger” by clicking the name, editing it, and clicking the ✔ (checkmark) to the right of the name. This will finish the configuration of the node and close the parameters window.
Here’s what the Cron Trigger parameters window should look like:
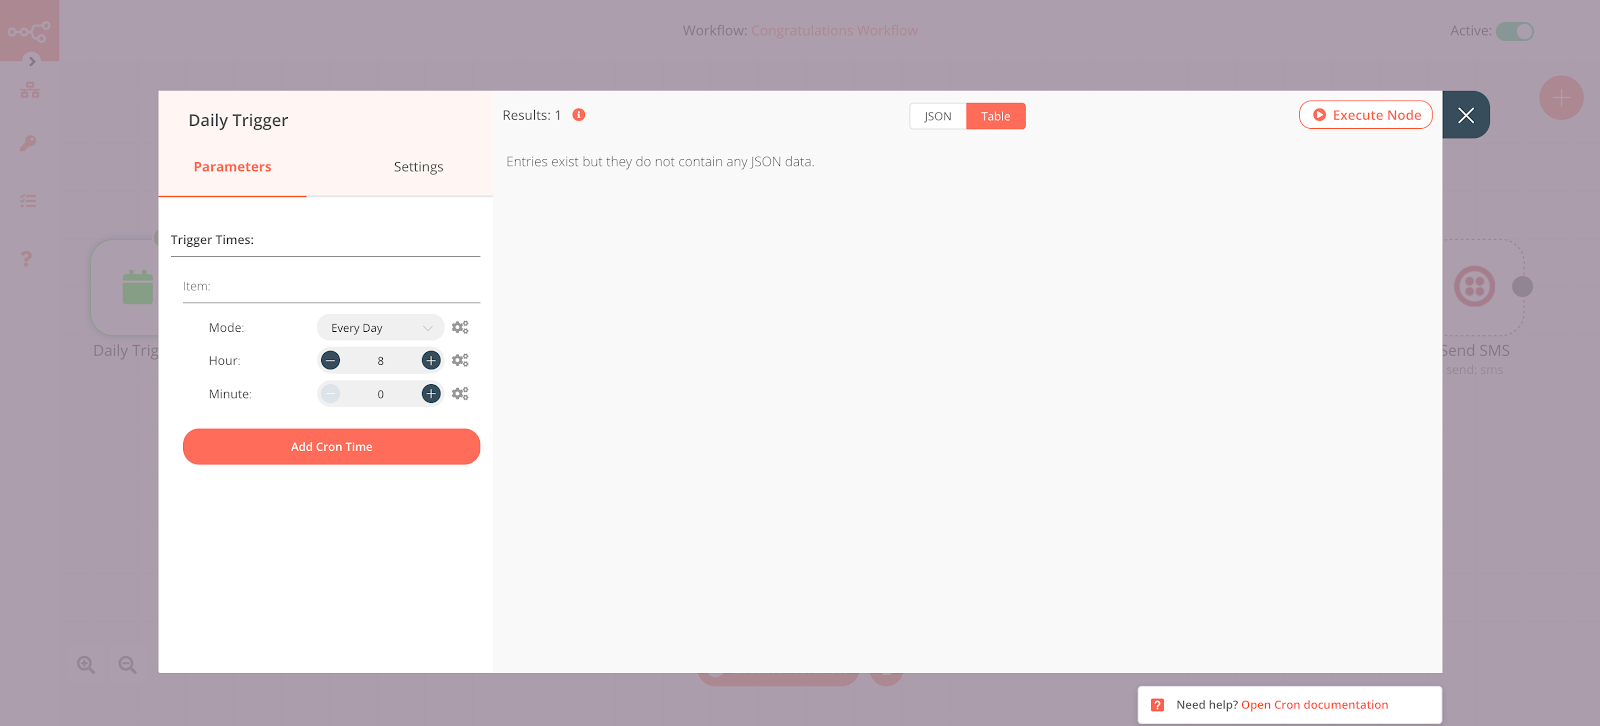
Cron Trigger node to start workflow
2. Creating the Google Sheets node for obtaining event details
Add a Google Sheets node to your workflow from the Regular nodes list.
In the Parameters panel of the Google Sheets properties window, locate the Authentication field and change the value of the dropdown list to “OAuth2”. The name of the first field in the Credentials section will change to GoogleSheets OAut… Change the selection in the dropdown list for this field to “-Create New-”.
The Create New Credentials: “Google Sheets OAuth2 API” window should open. Locate the OAuth section and find the OAuth Callback URL field and click it. A URL ending in “/callback” should be displayed. Copy this URL to someplace handy.
You’ll need to add your Google Client ID and Client Secret to the Credential Data section to enable it to get data from your Google Sheets. At the same time, you’ll need to add the node’s OAuth Callback URL to the Google Cloud Console. Don’t share these credentials.
Leave this window open.
Creating Google API OAuth client credentials and permissions
In another browser tab or window, go to: https://console.cloud.google.com/.
If you’re not already signed in you’ll need to do so using your Google Account sign in credentials (Gmail address and password). You may also need to create a Google Cloud Platform account if this is the first time you’re using it.
Click the ☰ (hamburger menu) on the top left to open the navigation panel, if it isn’t already open.
Click API & Services.
Click Credentials.
Click + Create Credentials and select OAuth client ID from the dropdown list.
You may be asked to configure an OAuth Consent Screen. If so, complete the following steps. If not, you can continue with the instructions after this section.
- If so, under User Type select External and click the Create button.
- On the OAuth consent screen page, find the Application name field and enter “n8n demo”. Supply the remainder of the required information indicated with an asterisk. (The Gmail address for your Google account works for required email addresses.) Click the Save and Continue button.
- On the Scopes and Optional info pages, click the Save and Continue button. On the Summary page, click the Back to Dashboard button.
- Again click Credentials in the left-hand navigation panel, then click + Create Credentials and select OAuth client ID from the dropdown list.
You’ll see the Create OAuth client ID page.
In the Application type dropdown list, select Web application.
In the Name field enter “n8n congratulations” so you’ll recognize this client ID later.
In the Authorized redirect URIs section, click the Add URI button and insert the OAuth Callback URL that you copied from the Create New Credentials: "Google Sheets OAuth2 API" window of the Google Sheets node in n8n.
Click the Create button. The OAuth client created popup window will appear.
Copy the values for Your Client ID and Your Client Secret and insert them into the Client ID and Client Secret fields in the Create New Credentials: Google Sheets OAuth2 API panel in n8n.
While still in n8n, click the (Connect OAuth Credentials) button in the OAuth section.
If you are logged into more than one Google account you may be prompted to select a Google account with which to connect. Select the account for which you created the OAuth client in the Google Cloud Platform console. This should be the same account you used to create the Google Sheet for this project.
You may see a Google Accounts security popup warning you that “This app isn’t verified”. Click Advanced, then click the Go to n8n.cloud (unsafe) link.
You may see a Grant n8n demo permission popup requesting permission to:
“See, edit, create, and delete all of your Google Drive files”. Click Allow.
This will be followed by another warning that requests permission to “View and manage Google Drive files and folders that you have opened or created with this app”. Click Allow.
The third warning will be “See, edit, create, and delete your spreadsheeting in Google Drive”. Click Allow.
When you see the Confirm your choices popup click the Allow button.
Once the connection is complete, click the Create (or Save) button in n8n.
Go back to the Google Cloud Platform console and click on Library in the menu on the left.
Search for “Google Sheets”, and click Google Sheets API. You’ll see the Google Sheets API page.
Click the Enable button. (If the Google Sheets API is already enabled you’ll see a Manage button instead.)
Return to the n8n Google Sheets node properties window.
In the Operations field, select “Read” from the dropdown list.
In another browser window or tab, open the Google Sheet you created for receiving expense information and copy the string of characters between, but not including, /d/ and /edit in your sheet’s URL. Paste this value into the field for Sheet ID in the n8n Google Sheets node parameters window. The value should look something like this:
1ysY7_xGX024j_bgN0thTKXK4AAaigw6XAALKnOaA80I
In the Range field, type your starting and ending column letters, depending on your specific spreadsheet, in the form “A:E”, where “A” is the starting column and “E” is the ending column.
Click on the Add Option button under the Options section and select Value Render Mode. Select the “Formatted Value” option from the dropdown list for the Value Render Mode field. This will ensure that the values the workflow obtains from Google Sheets, like date, are not calculated when they are retrieved by this node in n8n.
Now rename the node from “Google Sheets” to “Congratulations Calendar” and click the ✔(checkmark) to close the node editor and return to the Editor UI.
Return to the Congratulations Calendar node and click on Execute Node. You’ll see the matching information according to the details that you entered in the Calendar tab of your Google Sheets.
The node should appear similar to the following example:
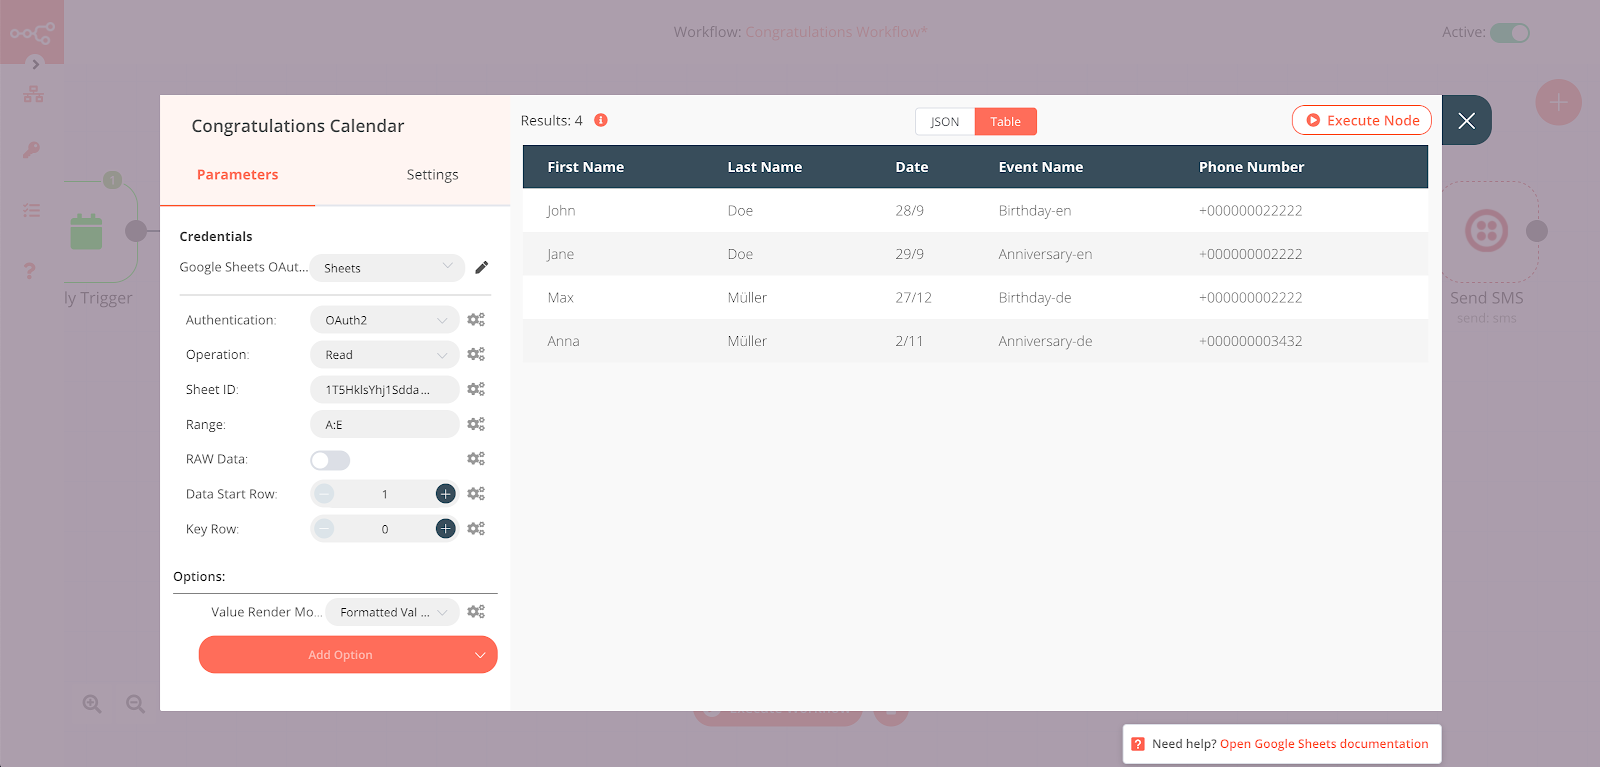
Google Sheets node for obtaining details from Calendar tab
3. Creating the IF node for checking if there are any events today
You’ll need to create the IF node to check if the birthdays and anniversaries match with today’s date. This will ensure that the workflow sends out wishes on the correct date.
Start by adding the IF node to your workflow from the Regular node list in the Create Node panel.
Click Add Condition and select “String”. The Value 1 field will include dynamic data that will change with each event. Therefore, add an expression for the Value 1 field by clicking on the gears symbol next to the Value 1 field, and select “Add Expression”. The Edit Expression window will open. In the Variable Selector section, select the following:
Nodes > Congratulations Calendar > Output Data > JSON > Date
Your expression in the Expression field should look like this:
{{$node["Congratulations Calendar"].json["Date"]}}
Keep in mind that the Google Sheets node should be executed before performing these actions so that data from the “Calendar” tab can be shown in the Result field. Close the Edit Expression window with X.
Add an expression for the Value 2 field by clicking on the gears symbol and selecting “Add Expression”. In the Edit Expression window paste the following code in the Expression field:
{{(new Date).getDate()}}/{{(new Date).getMonth()+1}}
Here, you are using JavaScript to get the date when the workflow is being run, since the workflow is set to be triggered daily. You might have noticed that the expression adds 1 to the value of the month. This is because the month is 0-indexed in JavaScript. For example, January has index 0, February has index 1, and so on.
The Result field will show you today's date in day/month (dd/mm) format.
Now rename the node from “IF” to “Any Event Today?” and click the ✔(checkmark) to close the node editor and return to the Editor UI.
Return to Any Event Today? node and click on Execute Node. You’ll see the matching birthdays or anniversaries, if they match today's date.
The node should look like this:
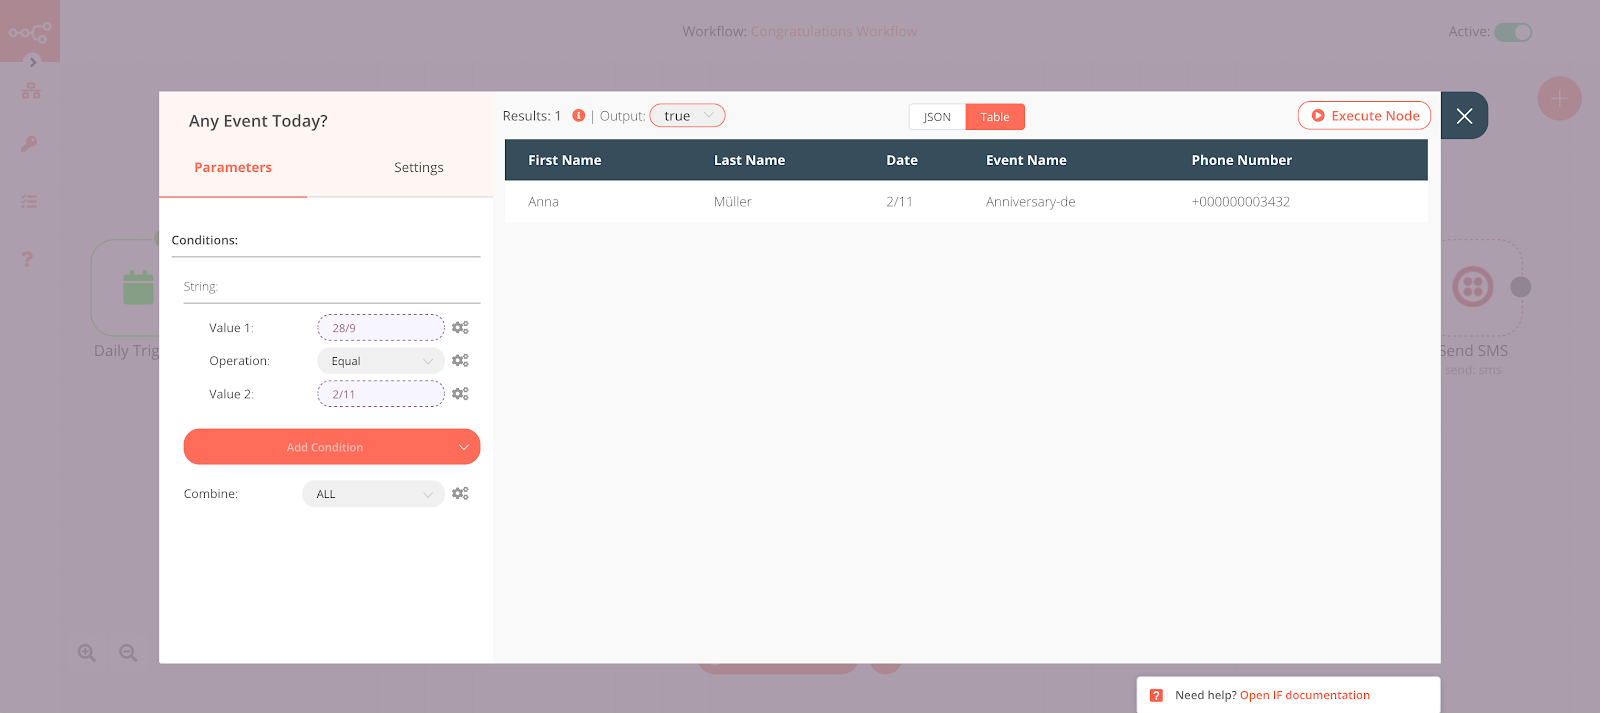
IF node for matching event dates with the current date
4. Creating the NoOp node for doing nothing
Unfortunately, not everyday is a special occasion. The workflow will need a node for not sending out congratulations. Adding this node is optional, as the absence of this node won't make a difference to the functioning of the workflow.
Add a new node by clicking the + (Add Node) button and typing “no” in the search field. The result should show a single node, No Operation, do nothing. Click this node to open its properties window.
Connect the NoOp node with the “false” branch of the Any Event Today? node.
Rename the node from “NoOp” to “Do Nothing” and click the ✔(checkmark) to close the node editor and return to the Editor UI.
Return to the Do Nothing node and click on Execute Node.
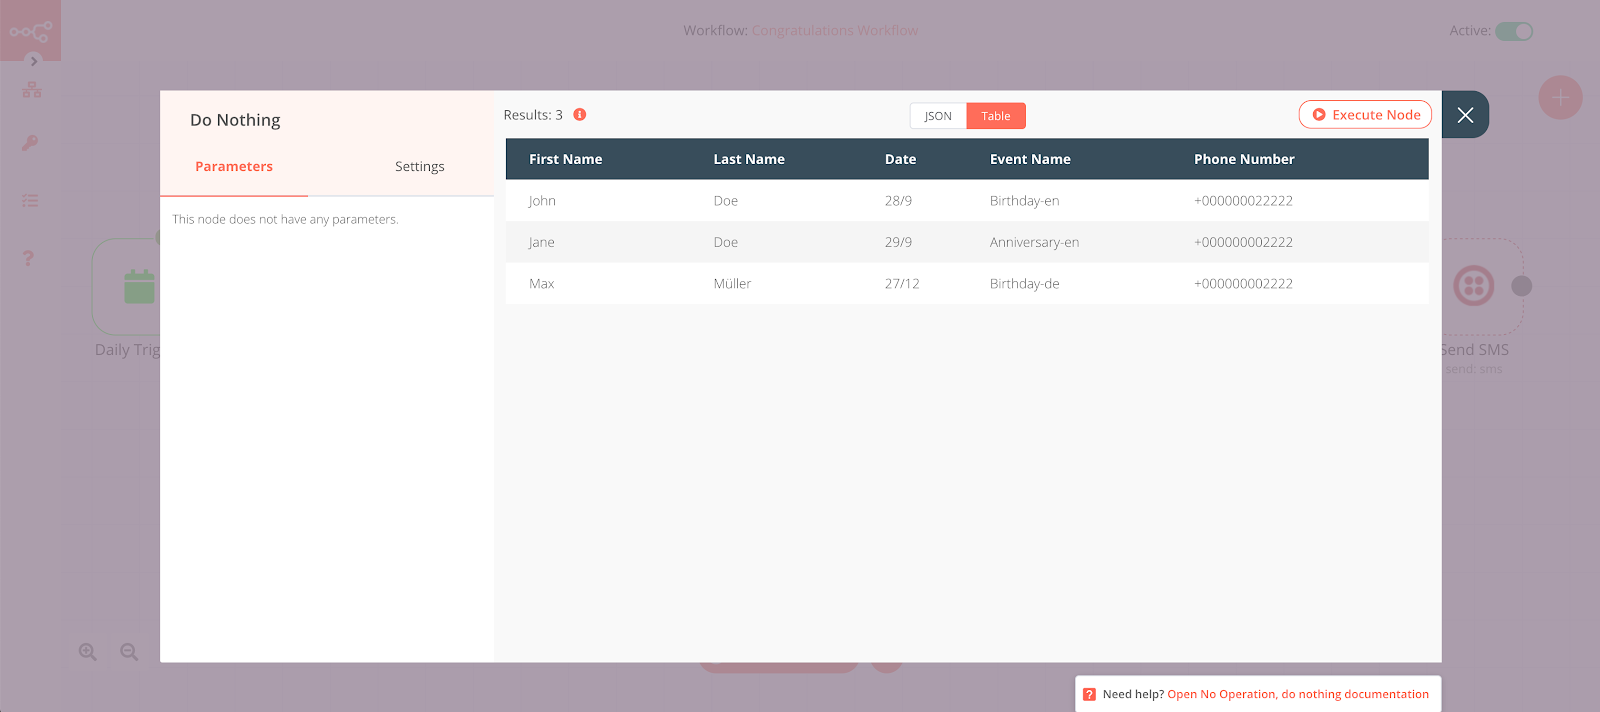
NoOp node for doing nothing
5. Creating the Google Sheets node for obtaining congratulations for different events in different languages
Add the Merge node to the workflow before adding the second Google Sheets node. Connect the Merge node with the “true” branch of the Any Event Today? node by dragging from the circle on the right side of the Any Event Today? node to the rectangle on the left side of the Merge node.
Add a Google Sheets node to your workflow from the Regular nodes list. Then connect the Google Sheets node with the “Input 2” branch of the Merge node.
Open the Google Sheets node. Change the Authentication field to OAuth2 and select the Google Sheets OAuth2 API and Sheet ID from step 2.
Enter “Congratulations Messages!A:B” in the Range field. Here, “Congratulations Messages” is the name of the tab.
Rename the node from “Google Sheets” to “Congratulations Messages” and click the ✔(checkmark) to close the node editor and return to the Editor UI.
Return to the Congratulations Messages node and click Execute Node. You’ll find all the data from your Google Sheets tab “Congratulations Messages”.
The node should look like this:
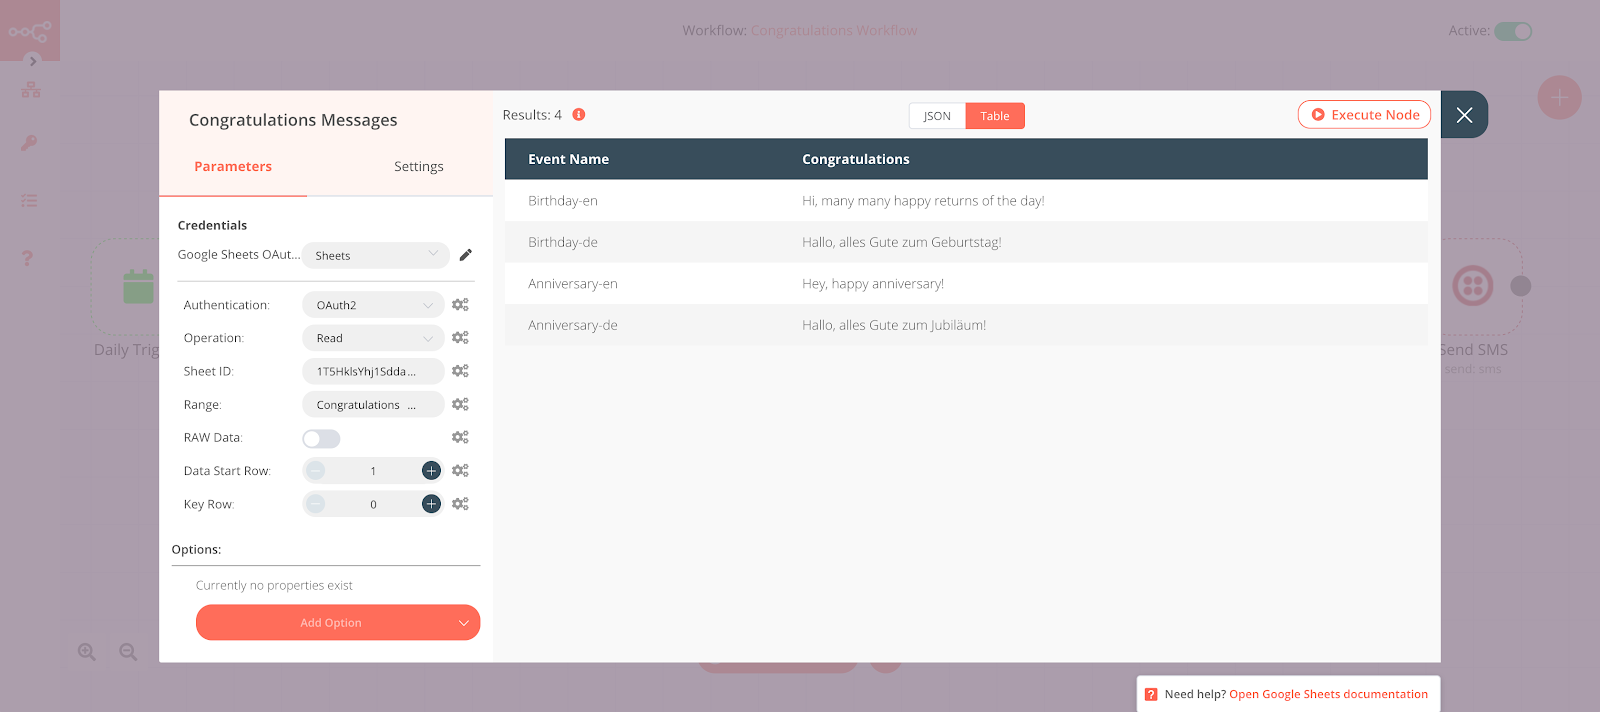
Google Sheets node for obtaining congratulations for different events in different languages
6. Creating the Merge node for merging information
You’ll use the Merge node to merge the data from the “Calendar” tab in Google Sheets with the data from “Congratulations Message” tab, using the Event Name column as a key. This will ensure that the correct congratulations messages show up in the row for people depending on the Event Name that was added for them.
Select “Merge By Key” for the Mode field. Enter “Event Name” in the Property Input 1 and the Property Input 2 fields.
Rename the node from “Merge” to “Merge Data” and click the ✔(checkmark) to close the node editor and return to the Editor UI.
Return to the Merge Data node and click Execute Node. You’ll see that the correct congratulation message has been added to the row for a person based on the Event Name that was entered for them in the Google Sheets.
The node should look like this:
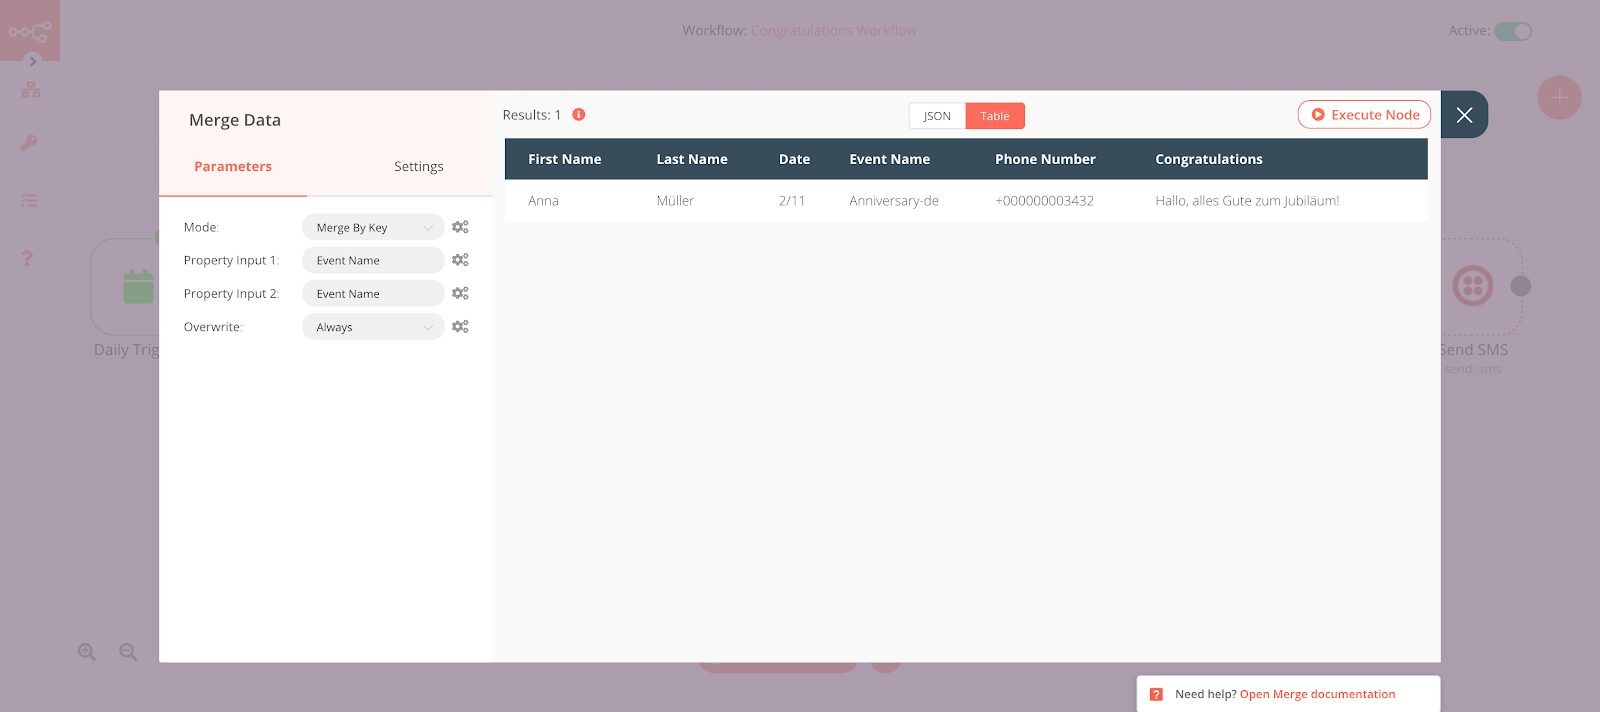
Google Sheets node for merging information from congratulations calendar
7. Creating the Function node for personalizing the messages
Function nodes are used to add custom snippets of JavaScript code to transform data from other nodes, or to implement custom functionality that n8n doesn’t support yet.
Note that the Function nodes are different from Function Item nodes. The code in the Function node is executed only once, while a Function Item is executed once for each item in a data set. A Function Item node accepts a collection of items and returns all the items. With this node it is possible to add, remove, change, and replace items. When writing code for this node you use arrays.
Click the + in the Editor UI again and click Function in the list of nodes in the Regular tab.
This Function node will split the congratulations message that is passed by the Merge Data node at every comma and convert it into an array. It will then add the first name of the person after the greeting and before the first comma. Finally, It will recombine the whole message so that you end up with a personalized message. Note that the node will return only the personalized message and the phone number to the next nodes because the rest of the data in the workflow is not needed anymore.
In the Node Editor view, click on the JavaScript Code field to expand it. Replace the existing contents with the following JavaScript code:
Click the X (close) button to return to the node editor.
Rename the node from “Function” to “Personalize Message” and click the ✔(checkmark) to close the node editor and return to the Editor UI.
Return to the Personalize Message node and click on Execute Node. You’ll find the personalized message along with the phone number of the person. Note that you can see return values in tabular or JSON object format.
The node should look like this:
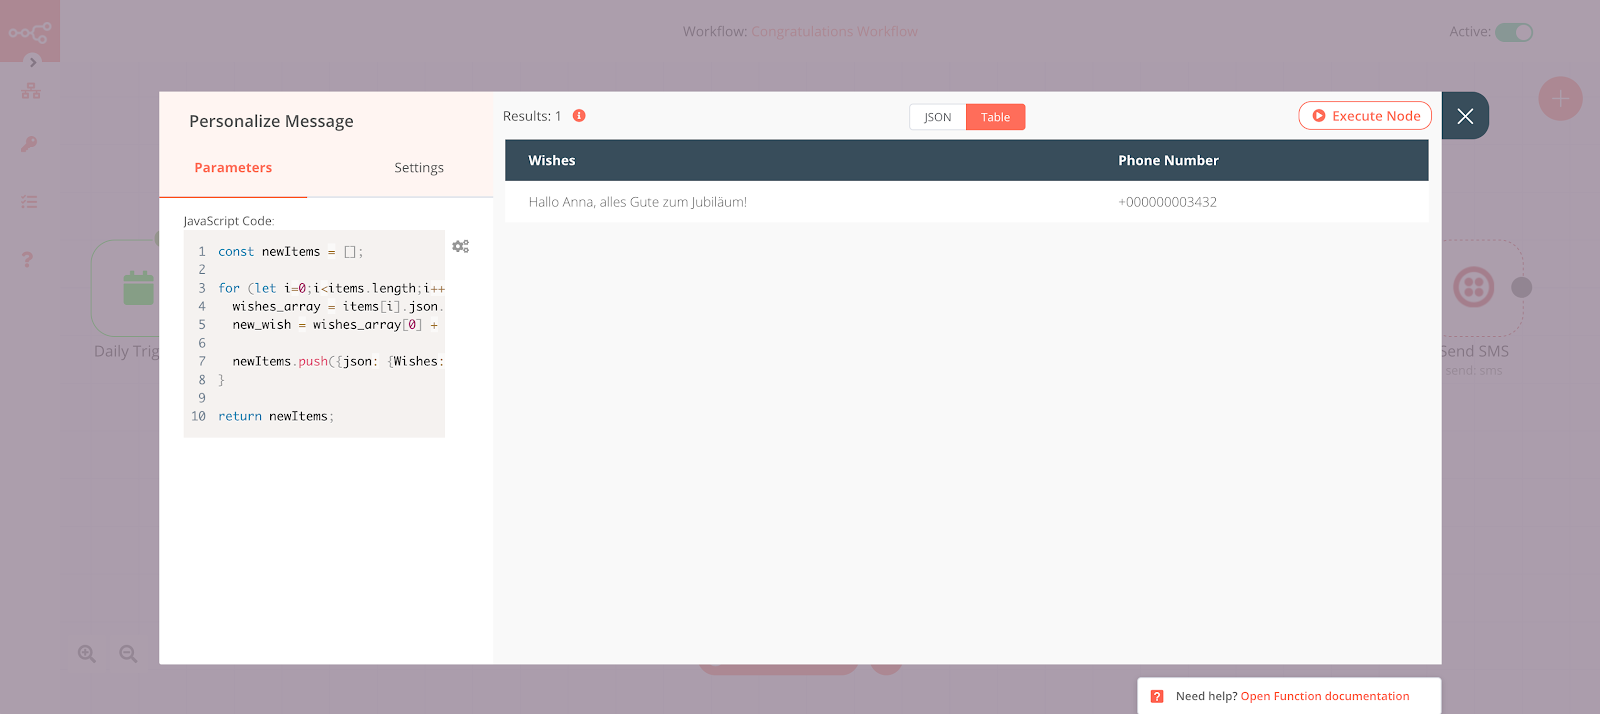
Function node for personalizing the messages
8. Creating the Twilio node for sending congratulations
You’ll use the Twilio node to send congratulations for today's birthdays and anniversaries directly to the phone numbers you entered in the Google Sheets “Calendar” tab.
Add a Twilio node. In the Twilio API field in the Credentials section, click in the field and click Create New in the dropdown list.
In the Credentials Name field, enter “Twilio Messaging”.
In the Credential Data section, enter the values you obtained from your Twilio console dashboard for Account SID and Auth Token.
Click Create.
In the From field, enter the Twilio phone number you obtained earlier usingE.164 format.
Since the To field will contain dynamic data which will change with each execution, using an expression will enable the node to get the correct data.
Add an expression by clicking on the gears symbol next to the To field, and select “Add Expression”. The Edit Expression window will open. In the Variable Selector section. The Edit Expression window will open. In the Variable Selector section, select the following:
Nodes > Personalize Message > Output Data > JSON > Phone Number
Your expression in the Expression field should look like this:
{{$node["Personalize Message"].json["Phone Number"]}}
Make sure that the Personalize Message node has been executed. Close the Edit Expression window with X.
Note: Twilio trial accounts can only send messages to registered phone numbers. To send messages to other numbers, upgrade to a regular account.
For the Message field, add an expression by clicking on the gears symbol next to the Message field, and select “Add Expression”. The Edit Expression window will open. In the Variable Selector section. The Edit Expression window will open. In the Variable Selector section, select the following:
Nodes > Personalize Message > Output Data > JSON > Wishes
Your expression in the Expression field should look like this:
{{$node["Personalize Message"].json["Wishes"]}}
Close the Edit Expression window with X.
Rename the node from “Twilio” to “Sends SMS” and click the ✔(checkmark) to close the node editor and return to the Editor UI.
Return to the Send SMS node and click on Execute Node. You’ll find the final results with your personalized message.
Save your workflow and toggle Active to on (green) in the top right of the workflow editor.
Well done, your workflow is finished, let’s celebrate! 🎉 🥳
The node should look like this:
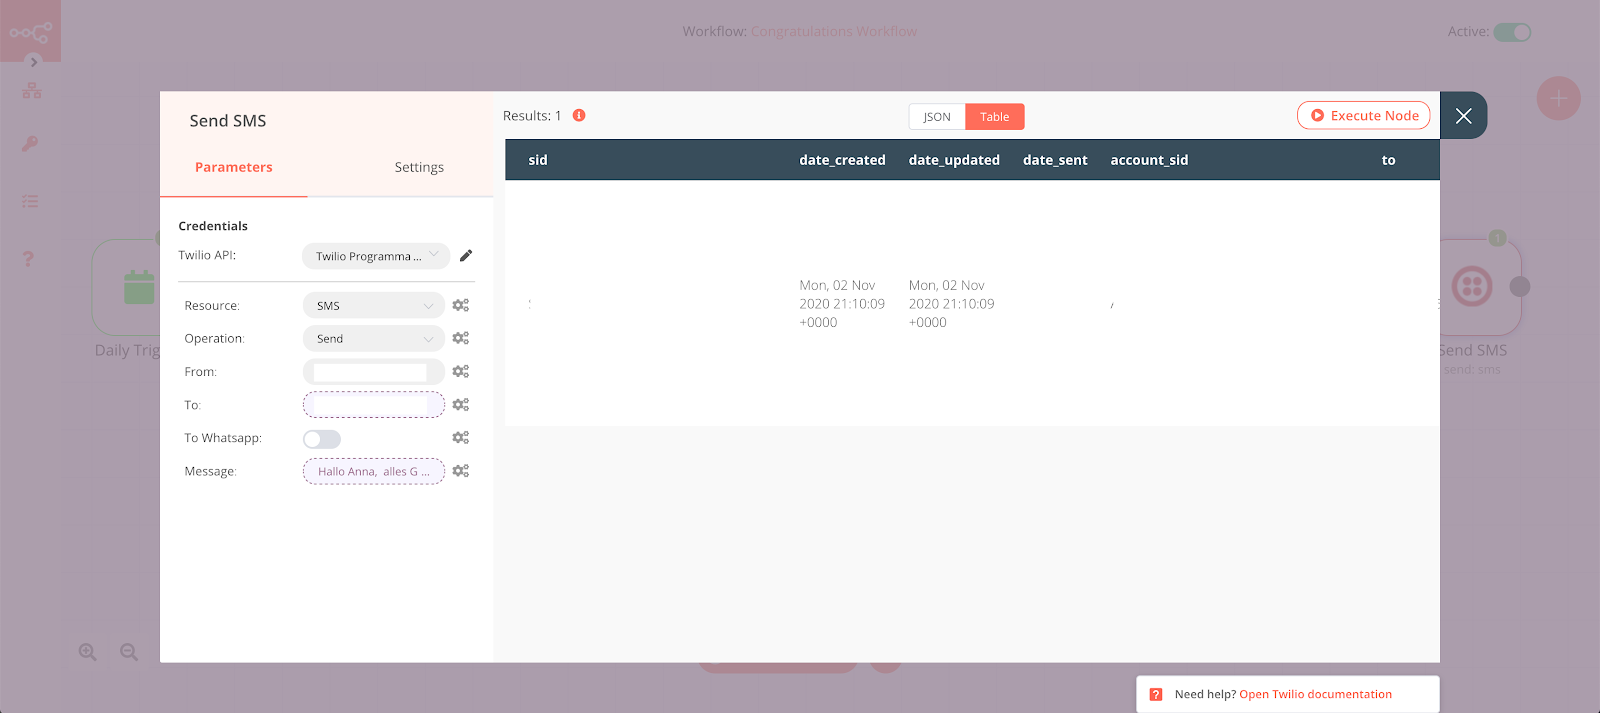
Twilio node for sending out SMS congratulations

End result: Heartwarming congratulations message sent with Twilio Messaging
Testing the completed workflow
Test the workflow by adding a record with today’s day as the birthday date. Click on the Execute Workflow button to send the message immediately to the mobile number that you specified in the new record.
If you need help debugging, the Messages Log and Events Log tabs for your Twilio phone number provide information about the activity associated with the number, including the status of SMS messages. You can find these logs in the Active Numbers section of the console.
What’s next?
You’ve completed the workflow and wonder how to improve it even further?
Try adding additional event categories like New Year’s, Christmas, Hanukkah, and other holidays to the Google Sheets template, according to your friends and family's traditions.
Don’t be shy to add other (well-researched) wishes in other languages to your Sheets.
You can also add an IMAP Email or Gmail node to send out congratulations via Email in case you don’t have the phone number of the recipient.
For all your internet friends, you can congratulate them online using a Twitter node to send out felicitations.
Note: Make sure to include an additional column in your “Calendar” tab in Google Sheets for these purposes, e.g. “Twitter” and “Email”, with the recipient's information.
Summary
In this partner-up between Twilio, Google, and n8n you’ve learned how to build an n8n workflow using eight different nodes to reliably send personalized and timely congratulations. You’ll never miss a single birthday or anniversary again!
Consider sharing this workflow with others and get in touch with the n8n community through their forum.
Additional resources
For more information on the topics discussed in this tutorial, refer to these references:
n8n Reference Overview – This section of the n8n documentation includes the change log, and information about configuration, server setup, troubleshooting, and other technical topics.
Node Overview – There are lots, and lots, of nodes for n8n covering all sorts of functionality and 3rd-party systems. This is the place to go for more information.
Google Cloud Docs – The Google Cloud is vast. You can find a link to more information about the Cloud Console under Management Tools.
Twilio Programmable SMS – Twilio makes sending and receiving SMS easy. This documentation will get you started in a variety of programming languages and technology stacks.
Isabel Hildebrand is currently studying law at HWR, Berlin. She is very passionate about automation and likes to work at the intersection of law, productivity, and technology. Feel free to reach out to her on LinkedIn.

Related Resources
Twilio Docs
From APIs to SDKs to sample apps
API reference documentation, SDKs, helper libraries, quickstarts, and tutorials for your language and platform.
Resource Center
The latest ebooks, industry reports, and webinars
Learn from customer engagement experts to improve your own communication.
Ahoy
Twilio's developer community hub
Best practices, code samples, and inspiration to build communications and digital engagement experiences.