Supercharge Your Amazon Connect Flows Using AWS Lambda, Node.js and Twilio
Time to read: 8 minutes
March 28, 2017
Written by

In this post we’re going to show you how to supercharge your Amazon Connect contact flows using AWS Lambda, Node.js and Twilio. We’ll build a contact flow to detect if a customer is calling from a mobile phone and, when they are, send their order details to them via SMS at the completion of the call. Let’s get started.
Assembling Your Tools
There are a few things you’ll need to set up before you start writing code:
- Node.js and npm: We build our Lambda functions with Node.js and install our dependencies using npm
- An AWS account: For all the AWS goodies we’ll use throughout this post
- A Twilio account: This account will let us make API requests to lookup phone number details and send SMS messages
Lookup Phone Number Type Using Amazon Lambda and Twilio Lookup
We can determine whether our customer is calling from a mobile, landline or voip number using a Lambda function and Twilio Lookup. Start the Lambda function by creating a new folder on your local system to store the code:
Install the Twilio Node.js helper library via npm:
Create a new file called index.js and open it in your favorite text editor. To start, there’s some scaffolding required for a Lambda function:
In order to authenticate with Twilio and lookup a customer’s phone number we need a few variables:
- Our Account SID and Auth Token. These will come in as environment variables that we will obtain later from the Twilio Console
- Our customer’s phone number which Amazon Connect will send in as an argument to our Lambda event.
Next, instantiate the Twiilio LookupsClient using our Twilio credentials:
Now, check the type of phone number that’s calling us and return it from Lambda to our Amazon Connect contact flow:
We have to compress the lambda-lookup folder and files to properly upload our function. Within your lambda-lookup folder run the following command:
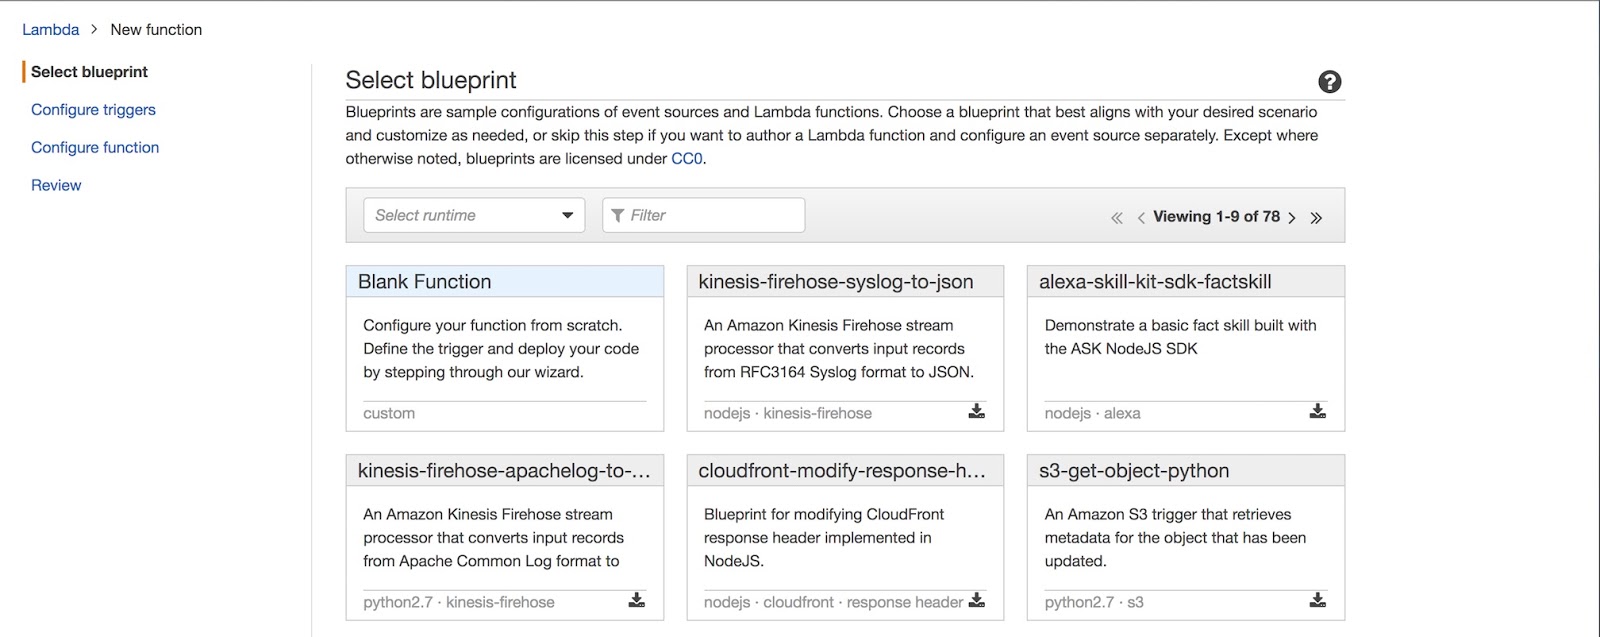
With our code ready to go, head over to the Lambda console. Create a new “Blank Function” function called LambdaLookup, we’ll be using the Node.js 6.10 runtimeand upload the zip we just created.
We won’t be setting trigger so we can go to the next step. From here we’ll add two environment variables:
- ACCOUNT_SID: You can find this in the Twilio console
- AUTH_TOKEN: You can also find this in the Twilio console
If this is your first time working with Lambda you’ll need to create a new role for your Lambda function. You can create a default role and name it what you’d like.
Before we can test our function, we need to update our timeout for our function. You’ll find this setting, under Configuration -> Advanced Settings. Bump it up from 3 seconds to 8 seconds.
Once your event is created and configured you can test it with the following test JSON. This is an example of what your function will received from Amazon Connect. Make sure to update the %your_phone_number% values:
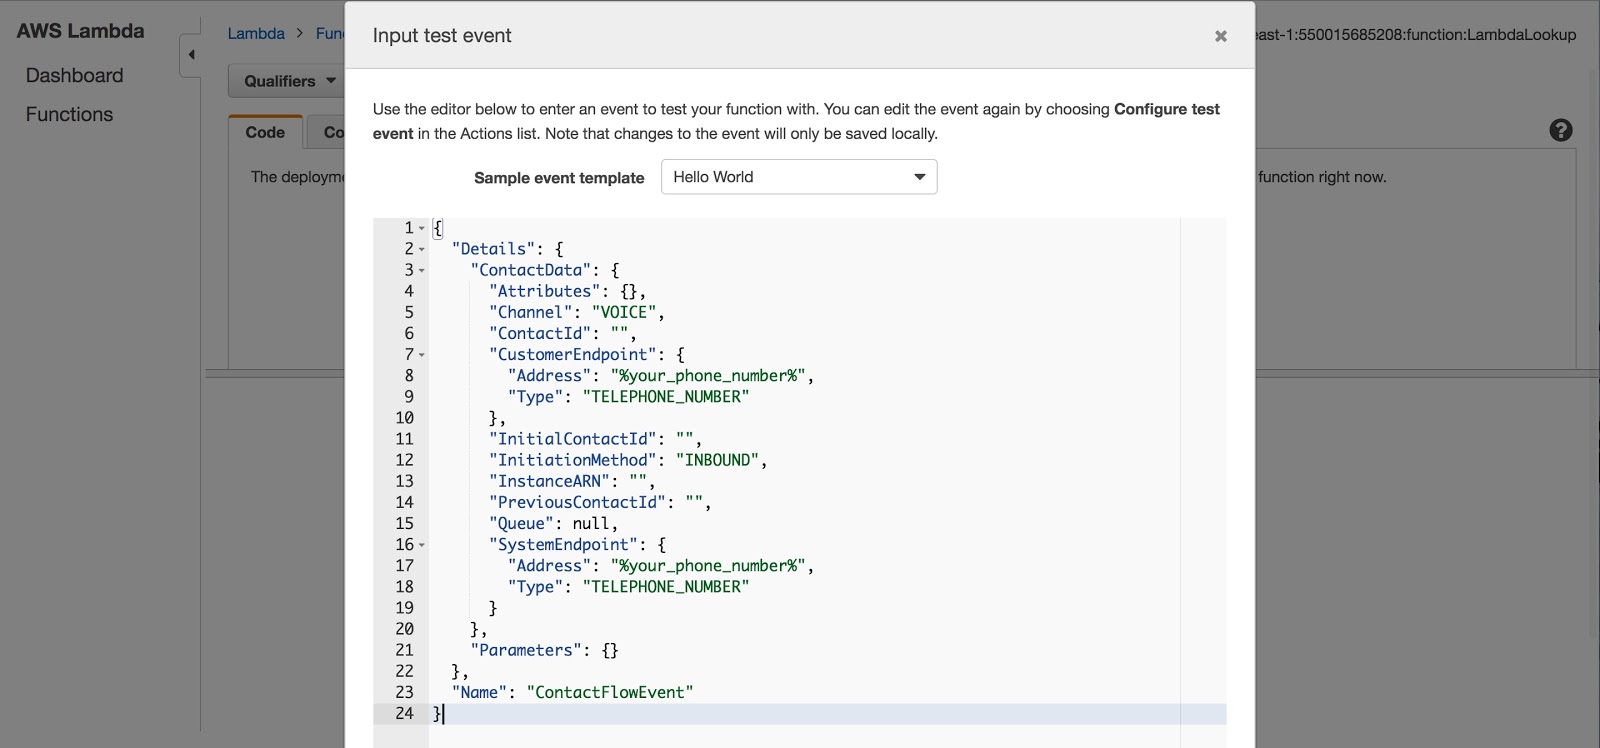
You’ll see a response when you run your test telling you if the phone number is a mobile or landline number. Your response will look like this:
There are some permissions we have to set on our Lambda function that will allow Amazon Connect to invoke it. To set these permissions we’ll need to use the AWS CLI. You can follow these instructions to get started with the AWS CLI.
After you have the CLI, running the following command will set a policy that lets Amazon Connect invoke our Lambda function:
You will need to specify your aws account id in the above command to ensure only contact flows in your account can invoke the lambda function.
You’ll receive a response that looks like this upon success:
Create a Lambda Function To Send an SMS Message
One Lambda function down, one to go. This Lambda function will send an SMS message to our customer with their order details.
Outside of your other lambda folder, create a new folder named lambda-sms and again install the Twilio helper library via npm.We’ll recreate the same scaffolding as before in our second LambdaLookup function. Give it a go, you should end up with an index.js that looks like this:
For this function, we’re going to introduce two other variables:
- PHONE_NUMBER: A Twilio number that your SMS will be sent from. This will be stored in an environment variable.
- orderDetails: The order details we want to send to that user.
Next instantiate the Twilio library using our account credentials:
Now we can send our message using Twilio Programmable SMS like this:
Like before, we can zip our code but this time into a file called lambda-sms.zip.
With our code ready to go, head back to the Lambda console. Create a new function called LambdaSMS and upload the zip we just created.
This time we’ll add three environment variables:
- ACCOUNT_SID: You can find this in the Twilio console
- AUTH_TOKEN: You can also find this in the Twilio console
- PHONE_NUMBER: A twilio phone number. You can buy a phone number here
Once your event is created bump the exection time to 8 seconds under you advanced config settings. After that, you can test it with the following test JSON:
You’ll see an SMS SID in you response and receive an SMS on the number you tested. Like LambdaLookup, we need to update the permissions for this function as well:.
Like above, You will need to specify your aws account id in the above command to ensure only contact flows in your account can invoke the lambda function.
Wire Up In Your Contact Flow
You now have two Lambda functions, one that looks up whether the customer number is a mobile or a landline and another one that sends the order confirmation via SMS. Integrating these functions into your Amazon Connect flows is really easy.
We’ll break the integration into 6 steps:
- Create a new contact flow
- Play prompt and set contact attributes
- Perform the number lookup and add it to the contact attributes
- Conditionally route the call based on the type of number
- Send the message
- Wire it all up
1. Create a new contact flow
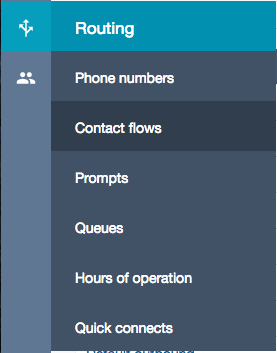
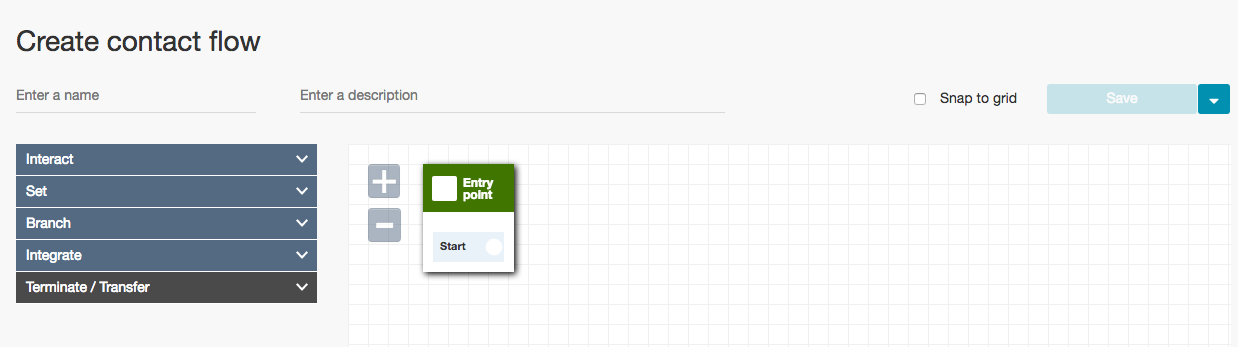
Starting from your Amazon Connect dashboard, create a Contact Flow by going to the routing menu on the left hand side and clicking Contact Flows. There you’ll see a “Create contact flow” button in the top right side of the page.
You will see an empty flow with an entry point. Give your Flow a name, “Call Order Details Demo”, and a description then you’re good to go.
2. Play prompt and set contact attributes
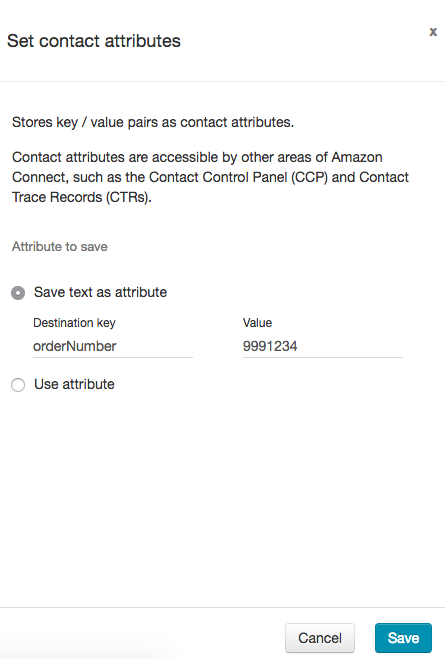
When a customer calls, the first thing we want to do is play a welcome message and set some contact attributes such as the orderNumber and the orderDetails. In real system, these could be fetched from existing customer/order databases by utilizing Amazon Lambda.
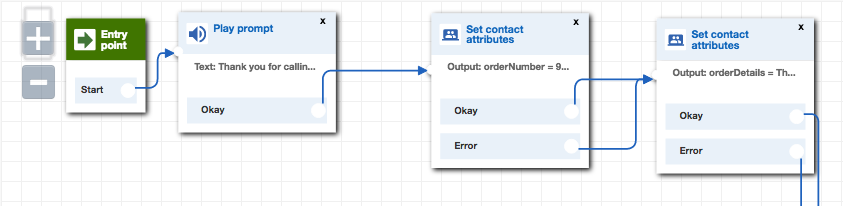
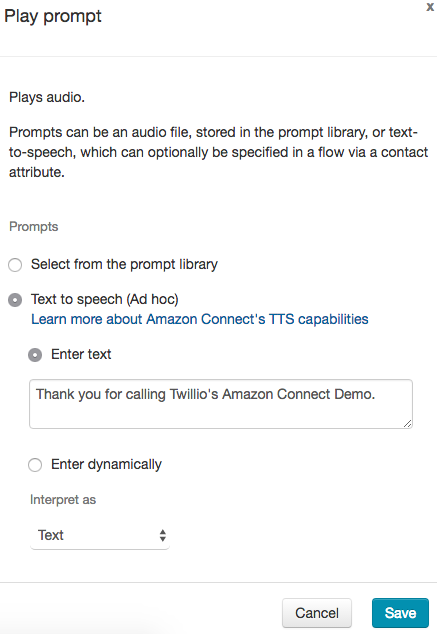
To easily create the prompt (the welcome message) click on the Play prompt note, select Text to speech (ad hoc) and choose enter text. Similarly you can click the Set contact attributes node to set the orderNumber value.
3. Perform the number lookup and add it to the contact attributes
Once we’ve welcomed the customer and set the orderNumber and orderDetails attributes, we want to invoke a Lambda function with the Twilio Lookup API code and set the result as a contact attribute
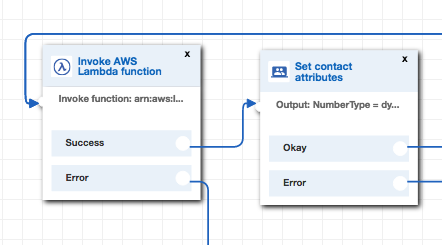
By clicking the Lambda function node you can set the ARN of your function that has the Twilio Lookup. By default, all contact attributes will be provided by Amazon Connect to your lambda function, including the customer phone number.
Finally we want to set the result of the number lookup as a contact attribute with the attribute name numberType. We do that with the Set contact attributes node that takes the response of the Twilio Lookup and sets the attribute value.
4. Conditionally route the call based on the type of number
Now your contact attributes should have the orderNumber, orderDetails, customerNumber and the numberType. We want different behaviors whether the phone number is a landline, mobile or voip. That is what the numberType tells us.
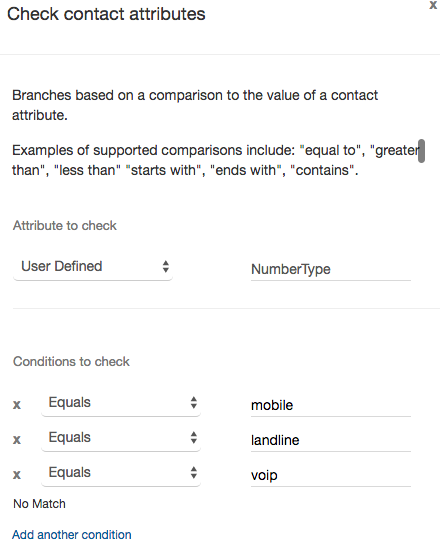
With the Check contact attributes node we can conditionally route based on the value of an attribute, in our case, numberType:
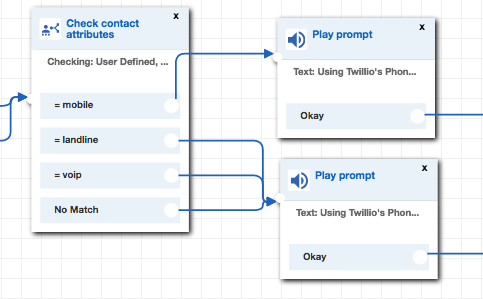
By clicking the Check contact attributes node, you can specify what values to check for. These will give you branches that you can point to different nodes in the flow.
We want customers calling from a mobile phone to hear one prompt let them now we are sending them their order details via SMS, and customers calling from a landline or voip number to please call with their mobile phone.
5. Send the message
In the previous step we branched customers that called from their mobile phones. We now want to send a text message with the order details to customers that called from a mobile phone. We have the orderNumber, orderDetails and customerNumber in our contact.
Using the Twilio Programmable SMS API in a Lambda function that we built, we can now integrate that into our flow using the Invoke AWS Lambda function node.
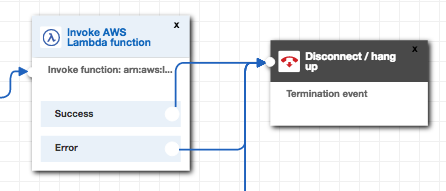
Once again, by clicking the Invoke AWS Lamda function node we set the ARN of our function that sends an SMS using the Twilio API.
After sending the message we are all done, the customer has the contact details and we are good to go and disconnect the call.
6. Wiring it all up
Before we’re done, we want make sure that we have all the error cases covered. You need to wire up the error node of the Lambda function nodes to a prompt to handle the error as well as the other phone number types.
With that your flow should look something like this:
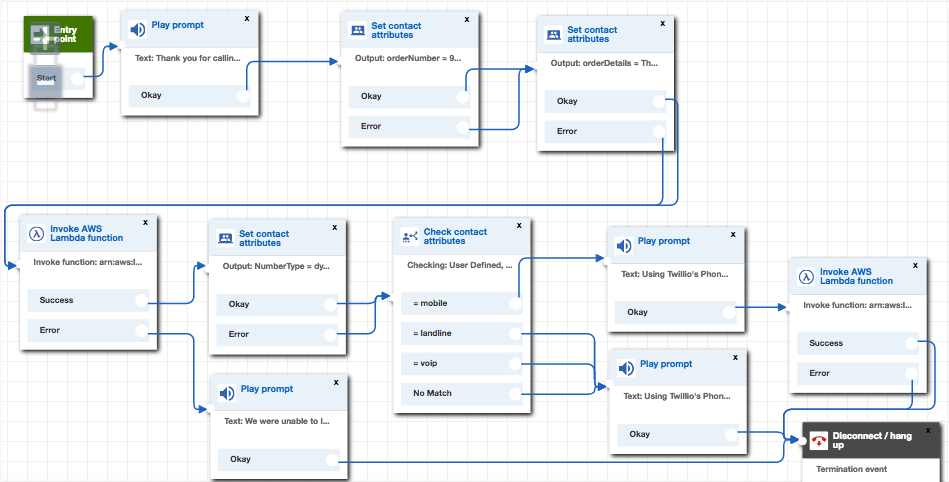
Now you can hit, save and publish then go to the phone numbers section of Amazon Connect and point a phone number to your new flow.
Give your phone number a call and you’ll experience the call flow in action. Try it from both a mobile phone and a landline phone so you can experience each path.
Onward!
Whenever someone calls into your Amazon Connect number from a mobile phone they’ll get their order details sent to them via SMS. Even better, we built this entire call flow with just two Amazon Lambda functions, Node.js and Twilio. We know there are many other ways that you may find to combine Amazon Connect and Twilio. If you build something you’re especially proud of drop us a message in the comments or say hi to us on Twitter (@twilio). We can’t wait to see what you build next.


Related Resources
Twilio Docs
From APIs to SDKs to sample apps
API reference documentation, SDKs, helper libraries, quickstarts, and tutorials for your language and platform.
Resource Center
The latest ebooks, industry reports, and webinars
Learn from customer engagement experts to improve your own communication.
Ahoy
Twilio's developer community hub
Best practices, code samples, and inspiration to build communications and digital engagement experiences.