Tell stories with friends with Programmable Chat and JavaScript
Time to read: 4 minutes
July 14, 2017
Written by

One of my favourite icebreakers is to play a game called Once Upon a Time, which is popular enough to have its own card game. When playing, friends get to write one line of a story at a time and each player can only see the one immediately before theirs. The results are always hilarious as stories go off in all kinds of directions. I wanted the ability to play anytime with friends, where all they need is an internet-connected device. In this post I’ll show you how to create a basic online version of the game using Twilio Programmable Chat.
Our tools
- Your code editor of choice – I personally use Sublime Text
- Node.js with the Express.js package
- A Twilio account, which you can sign up for here.
Setting up our project
The first thing to do is download the Node.js starter app from the Twilio Docs. Follow the Node.js instructions to get it running – this will lead you through configuring your account information and installing your project dependencies. Once you’re all done, run npm install in your terminal and let’s get rolling!
Looking at the sample project
Here’s the important files in the sample project:
- src/token_generator.js – a module for provisioning access tokens to the client
- src/router.js – handles user routes, such as /token and /chat/messages (which we’ll create later)
- public/chat/index.js – handles all client-side code
Creating an endpoint for our messages
By default, our sample project will get any new messages sent to the server from the time we join the channel. However, any past messages won’t get loaded but fortunately they are stored and can be retrieved in just a few lines of code. Let’s create a new route in src/router.js just before the last line:
The first two lines are where we declare our constants for setting-up Programmable Chat. In the next two lines, we’re telling Express to respond to the users when they navigate to “/chat/messages?channel=CHANNEL_SID” and then grab a list of the messages in that channel. We then use a JavaScript map to respond with the data we want.
Let’s see how this works. Go to your terminal, cd into your directory and then type node app.js to start the application. Then navigate to http://localhost:3000 to see the project. Add a few messages to your chat and then grab your Channel’s SID from the your browser’s developer tools.
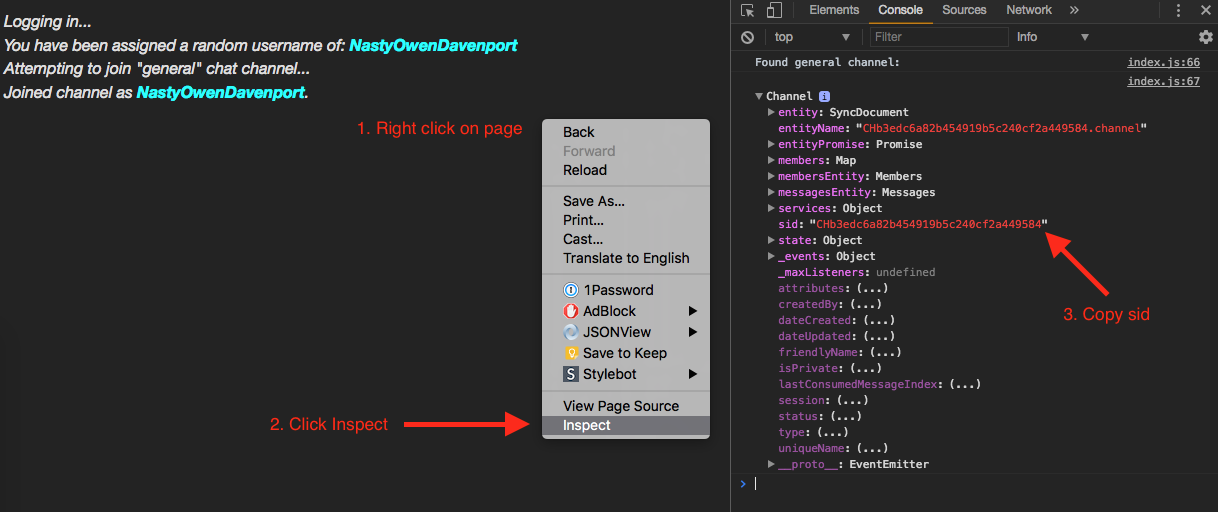
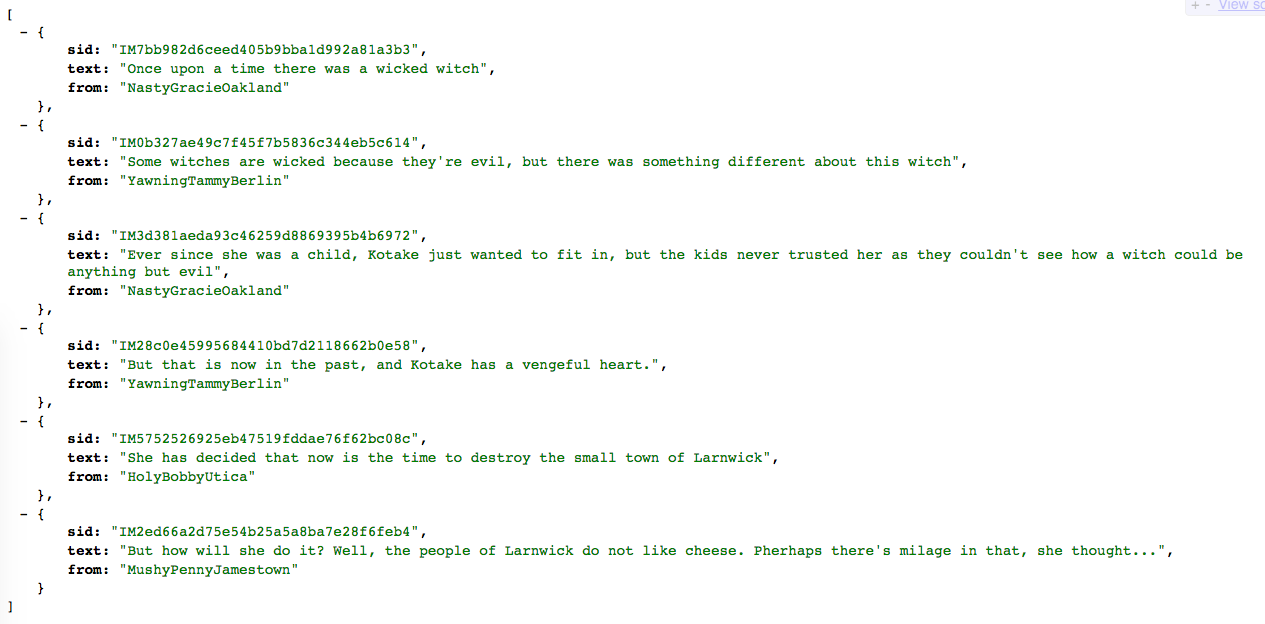
Navigate to http://localhost:3000/chat/messages?channel=CHANNEL_SID and if you’ve done everything correctly you should see your messages returned from the server.
The best thing about this is that you can now get all of your messages, even if they were published before a user joins the channel.
Even though we have all the messages accessible by the endpoint, we need some way to get this data back to the client. Let’s work on that next…
Getting all of our messages in the browser
Now that we’ve created our endpoint, let’s create two functions inside of “public/chat/index.js” to get that data in the browser. We’re going to add this code just below the setupChannel() function:
The grabMessages() function calls our new endpoint and returns that data – this function is small and reusable as it stops us from having to type out the full call every time we want to retrieve data.
The displayLatestMessage() function uses grabMessages(). If there’s no messages, it will encourage users to start their stories, but if there’s at least one message, it’ll grab the latest one and display it on the screen using theprintMessage() function.
Let’s rewrite the printMessage() function so it will only show the latest message, instead of all of them:
Finally, let’s get the game to automatically show the latest message the the user when they first join the channel. We’ll do this by adding one line to our setupChannel() function:
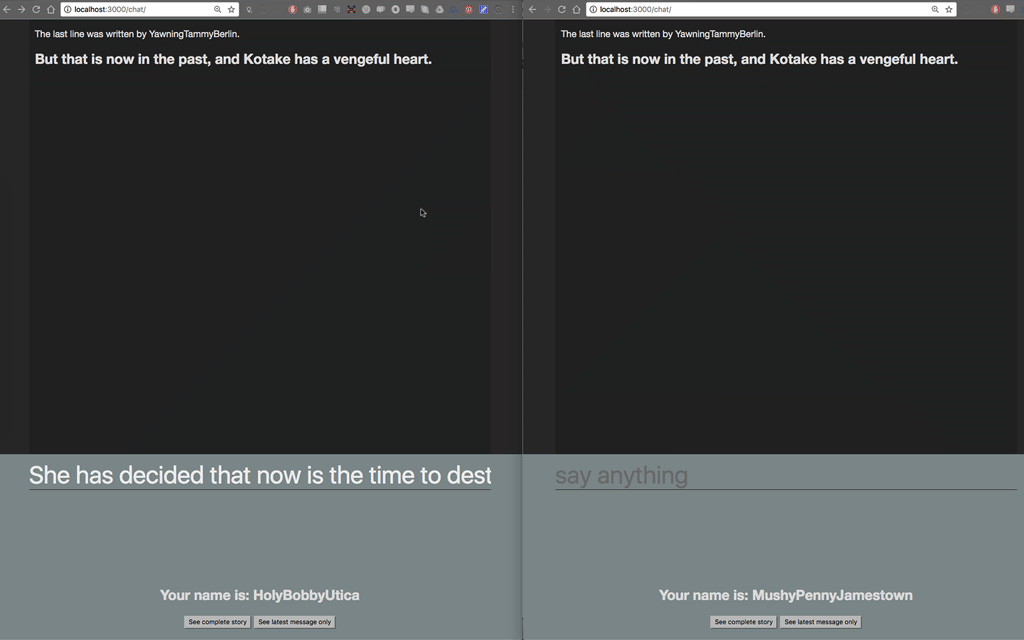
At this point, let’s try it out! Open http://localhost:3000 in your browser, and once you join the channel it should only display the latest message to you.
Creating our buttons to show the full picture
We’ve now got a way to get all of our messages but we’ve not got a way to display all of them on the browser yet. Let’s change that! First create the buttons in “public/chat/index.html” by replacing the contents of the
In the sample project each user gets assigned a random name when joining the channel. As we clear the screen when the project loads, users have no easy way to see what their name is – we can do better than this. Inside of “public/chat/index.js”, add the following line:
Just below the displayLatestMessage() function, let’s tell the browser what to do when the buttons are pressed:
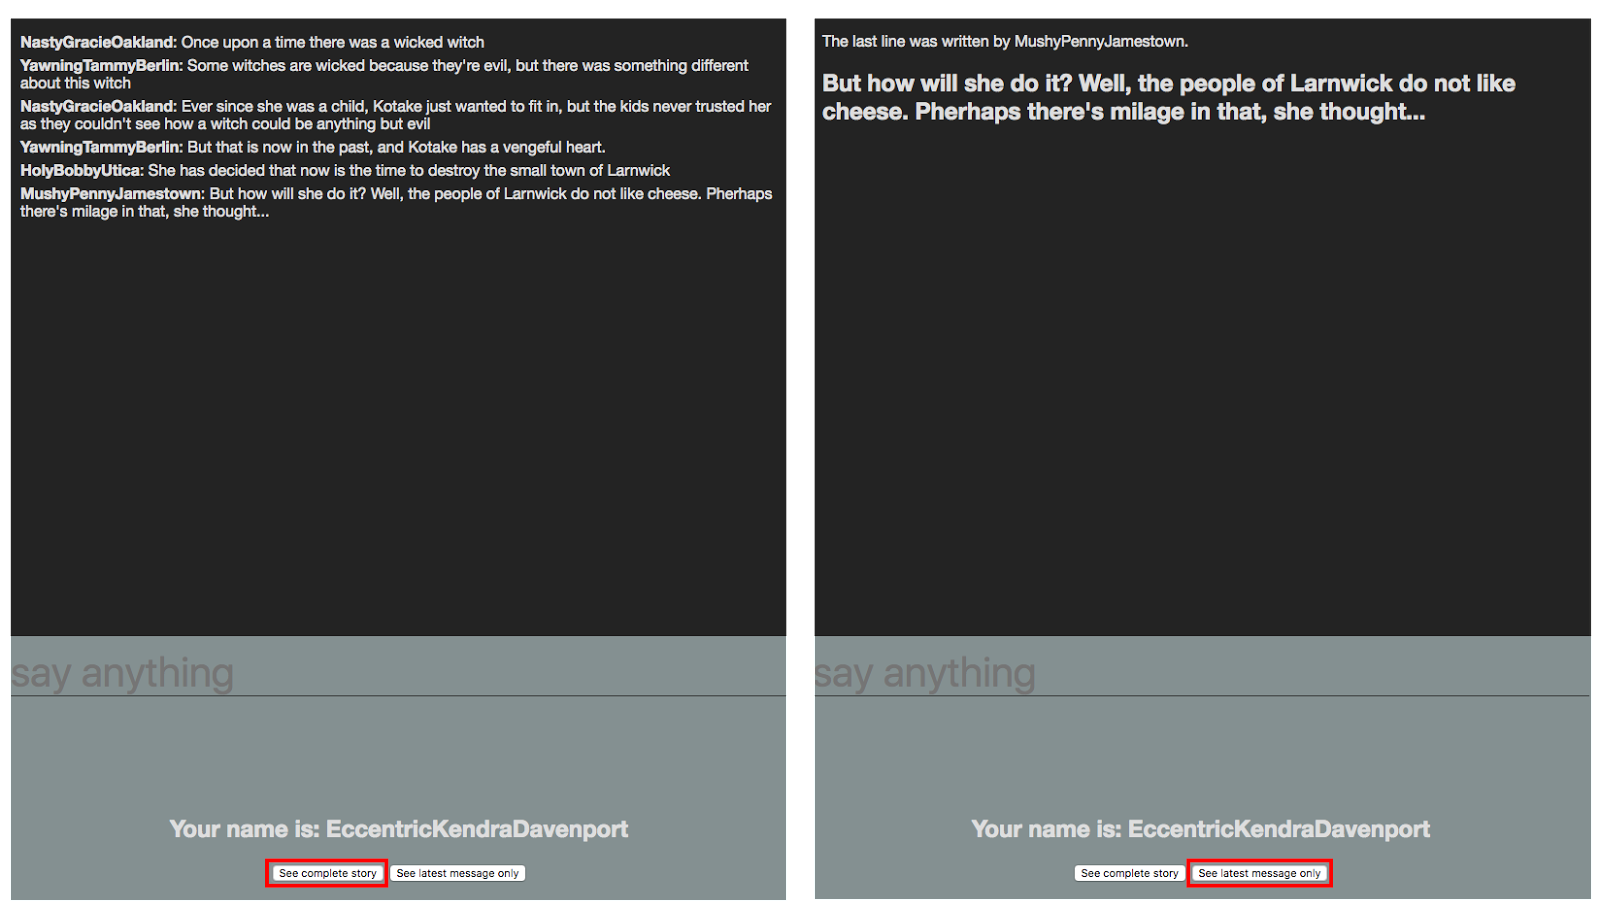
When the ‘full story’ button is pressed, we get all the messages and then display each one along with their author on the screen. When we click the ‘latest message only’ button, we run the displayLatestMessage() function. Refresh your browser and give it a go – trying out the buttons at the bottom of the page.
Using Programmable Chat is a doozy
We’ve managed to take the sample application which does a lot of the heavy lifting in getting started with Programmable Chat and created a simple version of Once Upon a Time. We can host the application, give friends a link and play.
We can create a custom endpoint to get all messages from a server and retrieve them from the client. Here’s some ideas on how you can extend this project further:
- Don’t let the same user post two times in a row
- Use the Messages resource to delete messages
- Allow for this one application to have multiple channels for simultaneous games
- Let users set their own name
Now you have everything you need to play Once Upon a Time with friends using Programmable Chat. If you have any questions, or hilarious stories which get created, let me know on Twitter (I’m @_phzn).

Related Resources
Twilio Docs
From APIs to SDKs to sample apps
API reference documentation, SDKs, helper libraries, quickstarts, and tutorials for your language and platform.
Resource Center
The latest ebooks, industry reports, and webinars
Learn from customer engagement experts to improve your own communication.
Ahoy
Twilio's developer community hub
Best practices, code samples, and inspiration to build communications and digital engagement experiences.