Creating a web chat app with Twilio Conversations and Vue.js (Part 1)
Time to read:
September 08, 2021
Written by
Reviewed by
Background
Twilio Conversations (classic) is an API that creates a virtual space for users to communicate across multiple channels. Twilio Conversations (classic) supports multiple chat platforms for cross and multi-channel communication. For example, a chat started via SMS can be continued via MMS, WhatsApp or web chat. Using the API, you can create conversations, add users, and monitor events during conversations via webhooks, making it possible to implement a communication method tailored to your needs.
In this tutorial, I will show you how to create a simple web chat app with Twilio Conversations (classic) and Vue.js.
Goal
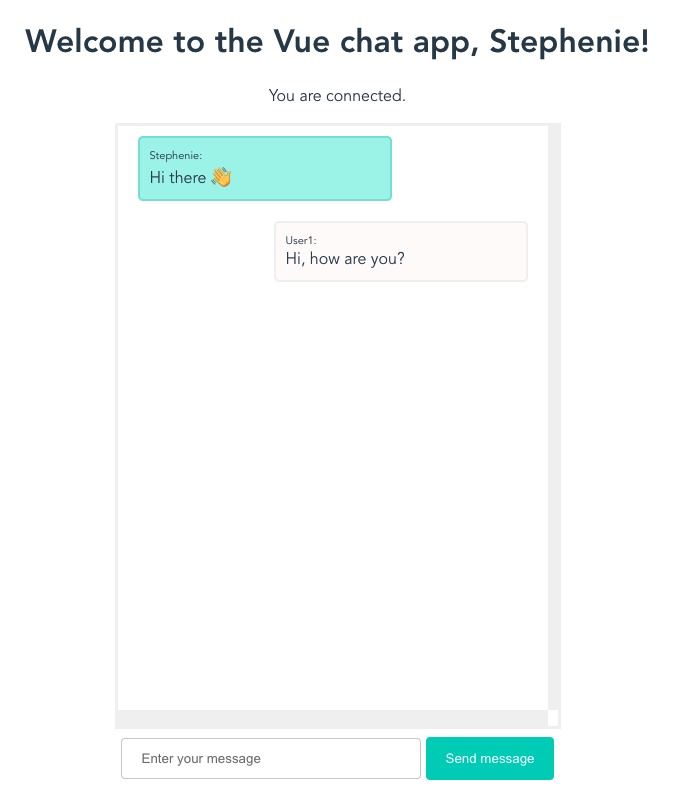
By the end of this tutorial, you will be able to learn how to use Twilio Conversations and the Twilio Conversations (classic) JavaScript client library in a practical way. You will create a simple web chat app using Vue.js that looks like this:
Assumed technical knowledge
This tutorial assumes that you have:
- Basic knowledge of JavaScript
- Basic knowledge of Node.js
Required tools
- Latest stable version of Node.js and npm
- Vue
- A free Twilio account
Application structure
In the chat app we are going to create, we will prepare a front end and a back end. The front end side uses Vue.js to display the chat app screen and message contents. Since Vue manipulates the DOM, the page is dynamically updated based on the information entered by the user. The back end side uses Node.js and Express to generate the access token. Access tokens verify a client’s identity and grant access to Twilio Conversations (classic) from an application running in a web browser.
The structure of the application is as follows:
Front end:
App: The root component, which is the execution entry point for the project. This is where you import global styles and packages that will be used throughout the project.Chat: A component that constitutes the chat screen. This component is used to initialize the Conversations client, create conversations and add users to the conversations.Conversation: A component that composes the messages in a conversation. Performs the process of sending and receiving messages.
Back end
server.js: Server file for generating access tokens.
Now that you have a rough understanding of the application structure, let’s proceed to create a project.
Basic setup
Installing Vue CLI
First, we will install the Vue CLI, which is a dedicated development tool for Vue. It creates a project template with a single command. It also supports ESLint, Babel, TypeScript, etc., so there is no need to install or configure individual packages.
Run this command in the terminal to install the latest Vue CLI:
Creating a Vue project
In a directory where you want to create your project, run this command to create a project template:
Options like these will be displayed in the terminal:
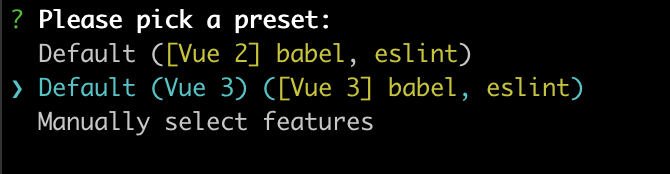
We will be using Vue 3 for this project, so select Vue 3 from the options. The Vue project will then be created.
Let’s now run the project. Run this command to navigate to the project directory and start the app:
Access http://localhost:8080/ through your browser. If the app was successfully set up, you’ll see something like this:
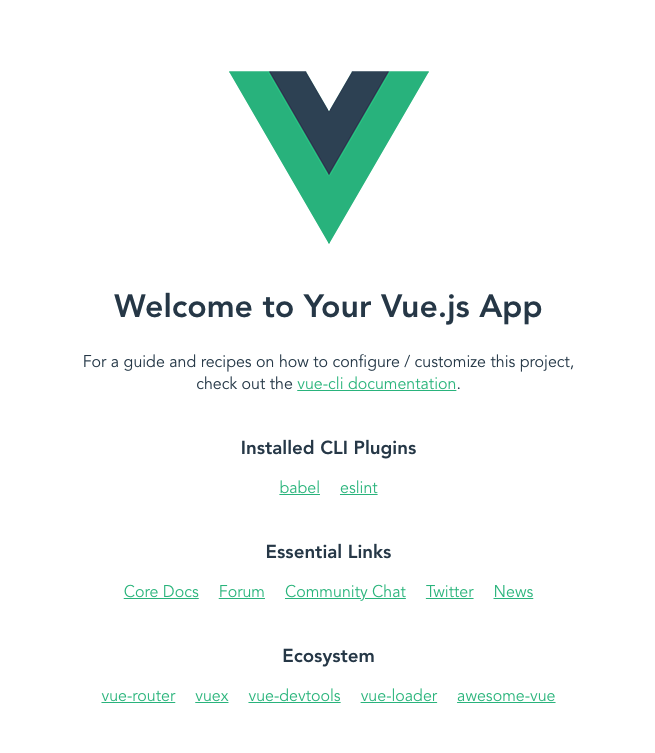
When you see this screen, stop the process once in the terminal.
Building the back end
Now that the Vue project template is complete, let’s prepare the back end. First, we’ll install the dependencies required to build the back end. Run this command:
The details of the installed dependencies are as follows:
twilio: A package used to write HTTP requests to the Twilio API using Node.js. In this tutorial, we will use it to generate access tokens for the front end.@twilio/conversations: A client library that enables Twilio Conversations (classic) to be used with JavaScript.express: A web application server framework for Node.js. In this tutorial, we will use it to create a route to pass an access token for each user to the front end.cors: A package to add CORS configuration to the Express server; for more information about CORS, see the blog post Add CORS Support to Your Express + TypeScript API.dotenv: Package that imports configuration options defined in .env files as environment variables.
Once the installation is complete, we'll create a server.js file, which will be used for generating access tokens, and a .env file to store environment variables. Create files named .env and server.js in your text editor.
Setting Twilio credentials as environment variables
Next, we will set up the environment variables. Open the .env file you created with a text editor, and copy and paste this code:
XXXXX represents a placeholder for Twilio’s authentication credentials. We will get these credentials from Twilio Console and add them to your .env file.
Account SID
Login to the Twilio Console and locate Account SID. Copy the value of the Account SID and paste it into the TWILIO_ACCOUNT_SID variable in the .env file.
API key and API secret
Next, go to API Keys in the Twilio Console. Click the plus (+) sign to create a new API key, enter a name for the key in the FRIENDLY NAME text field, and set the KEY TYPE to Standard. Click Create API Key.
The screen will show data including SID and SECRET, where SID is your API key.
Set SID to the value of TWILIO_API_KEY_SID in the .env file, and SECRET to the value of TWILIO_API_KEY_SECRET.
If you leave this screen, you will not be able to access your SECRET again. Copy and save the values before closing the screen.
Conversations Service SID
Access Conversations (classic) in Twilio Console. Click Manage in the left sidebar, and then click Services. Click Create a new service, and when the pop-up appears, enter a service name that is easy to identify, such as “vue-conversations”. After entering the service name, this screen will be displayed:
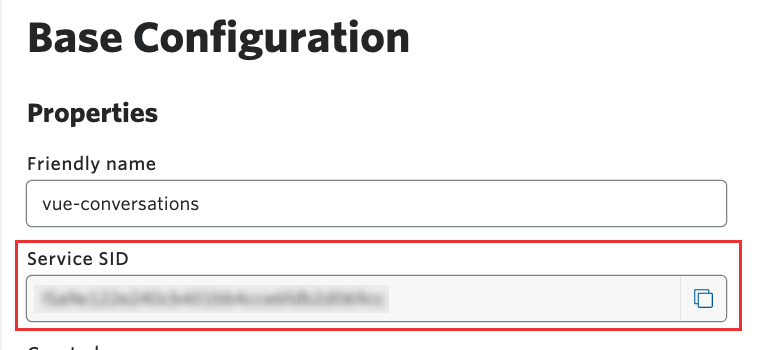
Copy the Service SID displayed on this screen and paste it into the TWILIO_CONVERSATIONS_SERVICE_SID in the .env file.
Save and close .env to complete setting the environment variables.
Generating an access token
Next, we will add the process of generating an access token to server.js. Open the server.js file and paste this code:
For more information about generating access tokens and this code, see Creating Access Tokens in Twilio Docs.
In the terminal, run this command in the root directory of conversations-project.
If the server runs without errors, you will see “Example app listening at http://localhost:5000”.
Your server is now ready!
Next steps
In part 1, we learned how to set up a project and build the back end. In part 2, we’ll build the front end and test the app.
Part 2: Creating a web chat app with Twilio Conversations and Vue.js (Part 2)


Related Resources
Twilio Docs
From APIs to SDKs to sample apps
API reference documentation, SDKs, helper libraries, quickstarts, and tutorials for your language and platform.
Resource Center
The latest ebooks, industry reports, and webinars
Learn from customer engagement experts to improve your own communication.
Ahoy
Twilio's developer community hub
Best practices, code samples, and inspiration to build communications and digital engagement experiences.