Build a WhatsApp E-Commerce Chatbot with NLP.js, Twilio Functions, Airtable, and PayPal

Time to read: 19 minutes
March 15, 2023
Written by
Reviewed by
Introduction
In this tutorial, you will learn how to build and run a serverless e-commerce Whatsapp chatbot application on your local machine that allows users to buy t-shirts in a fictitious virtual store.
To build this chatbot application, you will use the Twilio functions runtime to host and run the code on your local machine. You will use a library named NLP.js to process the Whatsapp messages sent by the users. You will use the Airtable API to store and retrieve this application's data on Airtable. You will also use the Paypal Javascript SDK to accept payments on this virtual store.
Twilio Functions are serverless, event-driven, and highly scalable functions hosted on Twilio's infrastructure. They enable developers to write and deploy backend code in Node.js without worrying about server setup or maintenance.
NLP.js is an open-source JavaScript library for natural language processing that provides various functionalities to build chatbots and other NLP applications.
Airtable API is a RESTful API that allows developers to interact with an Airtable database programmatically.
Paypal Javascript SDK is a library that provides a set of tools to integrate PayPal payment functionality into web applications.
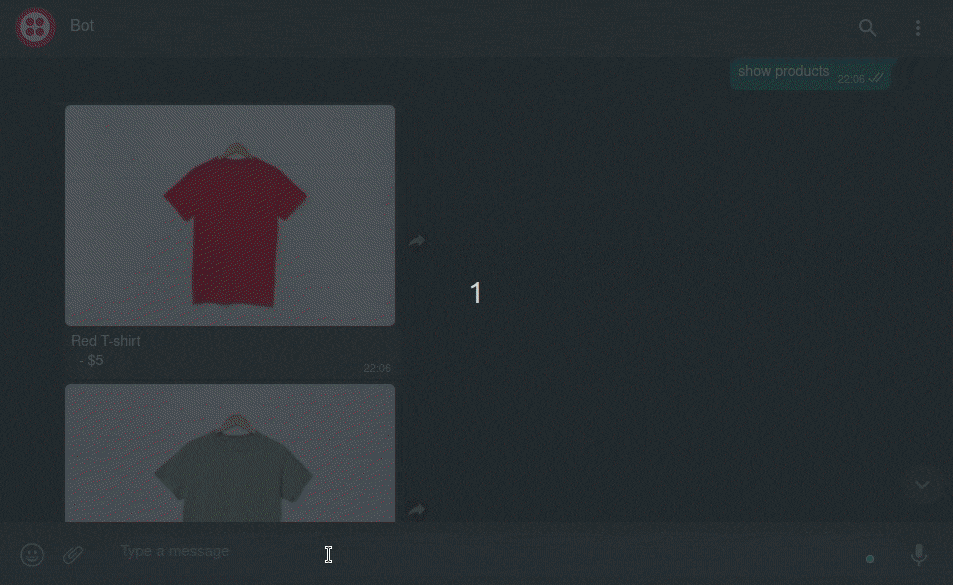
By the end of this tutorial, you will have a Whatsapp chatbot app that looks like the following:

Tutorial Requirements
To follow this tutorial you will need the following:
- A free Twilio account;
- An Airtable account;
- A Paypal account;
- A basic understanding of how to build applications using Twilio Functions;
- A basic understanding of how to use Airtable;
- Node.js v12+, NPM, and Git installed;
Get the boilerplate code
In this section, you will clone a repository containing the boilerplate code needed to build the serverless e-commerce chatbot.
Open a terminal window and navigate to a suitable location for your project. Run the following commands to create the project directory and navigate into it:
Use the following commands to clone the repository containing the boilerplate code and navigate to the boilerplate directory:
This code includes several Twilio functions that allow you to store and retrieve data using the Airtable API and an NLP model that was trained to recognize some entities and intents.
This Node.js application comes with the following packages:
@nlpjs/basic: is a part of the NLP.js library which provides basic natural language processing (NLP) functionalities.@nlpjs/builtin-microsoft: is a language understanding module for the NLP.js library, which provides pre-built models for recognizing entities, intents, and utterances.@twilio/runtime-handler: is a module in the Twilio Serverless Toolkit that provides an HTTP server for handling incoming requests to Twilio Functions.airtable: is a Node.js client for the Airtable API, which allows developers to interact with Airtable databases programmatically.install: is a minimal JavaScript module loader.npm: is a package manager for Node.js, used to manage and install packages (modules/libraries) for Node.js applications.twilio: is a package that allows you to interact with the Twilio API.
Use the following command to install these packages:
Understanding the functions directory
This directory contains the following serverless functions stored in javascript files with the same name: dbHelper, user, product, cart, and order.
The dbHelper function is responsible for using the airtable module to interact with the Airtable API and perform read and write operations on a given table.
The user function contains the following functions createUser, getUser, getUserByPhoneNumber, and updateUser. These functions rely on the dbHelper function to create and manage users on a table named Users.
The product function contains the following functions getProduct, getProductByColor, getProducts, updateProduct, and sendProducts. These functions rely on the dbHelper function to retrieve and manage products on a table named Products.
The cart function contains the following functions getCartItems, and addItemToCart. These functions rely on the user function to update the users’ cart items list which is stored in a field named cart located on the users table.
The order function contains a single function named createOrder. This function relies on the dbHelper function to create orders on a table named Orders.
Understand the Assets directory
This directory contains the following subdirectories: css, images, js, and other.
The css directory contains a file named style.css which will be used to stylize the checkout page that you are going to build for this application.
The images directory contains two images of t-shirts that will be used as the product images for this store.
The js directory contains a file named trainModel.js which contains the code that was used to train the model that is going to be used in this application. Make sure you open this file to see what utterances were used to train the model.
The other directory contains the following files: model.private.nlp, orders.private.csv, products.private.csv, and users.private.csv .
The model.private.nlp file is the model that will be used to recognize the intents and entities on the user’s messages.
The .csv files contain the CSV data that will be used to create the tables on Airtable.
Set up your Airtable base
In this section, you will create the tables in Airtable to store your application’s data.
Open a new tab in your preferred browser, navigate to the Airtable website, log in to your account, and go to the workspaces page.
On the Airtable workspaces page, create a new base and name it twilio-ecommerce.
Inside your newly created Airtable base, click the + Add or import button to import the users.private.csv, products.private.csv, and orders.private.csv files, located in the assets/other directory of the boilerplate code, into new tables. Make sure these tables are named Users, Products, and Orders respectively.
of the three create three tables named Users, Products, and Orders with the CSV data in the users.private.csv, products.private.csv, and orders.private.csv files respectively, located in the assets/other directory.
The Users table will be where you will store the users' information such as phone number, name, address, conversation state with the bot, and cart items.
The Products table will be where you will store information about the products that are being sold in this store such as title, color, price, and quantity.
The Orders table will be where you store information about the orders such as PayPal order ID, PayPal payer ID, PayPal payer email, shipping address, purchase date, amount, status, etc.
Collect and store your credentials
In this section, you are going to retrieve the Twilio, Airtable, and Paypal credentials that will allow you to interact with the Twilio and Airtable APIs and accept payments using Paypal.
The .env file included in the cloned repository is where you will store all credentials.
Twilio credentials
Open a new browser tab, and log in to your Twilio console. Once you are on your console copy the Account SID and Auth Token and store these credentials in the .env file found in the root directory of the boilerplate code:
Now navigate to the Whatsapp sandbox settings page, copy the Whatsapp number that was assigned to your account, and store it in the .env file:
Airtable credentials
Go back to your browser, click on the Airtable’s website tab, copy your Airtable base ID, which you can find in the URL for the page.
Once you’ve located your Base ID, paste it into your .env file as the value for AIRTABLE_BASE:
From your Airtable base page in your browser, click on the Account button located in the top right corner, then click on the menu item that says Developer Hub.
Click on the button that says Create new token to create a new personal access token that will allow you to interact with the Airtable API and perform CRUD operations.
Name your token twilio-ecommerce just like the base you created earlier. In the Scopes section, add a data.records.read and a data.records.write scope to allow you to read and write data in your tables. In the Access section, add the twilio-ecommerce base to grant this token access to it. Finally, click on the Create token button to create the token.
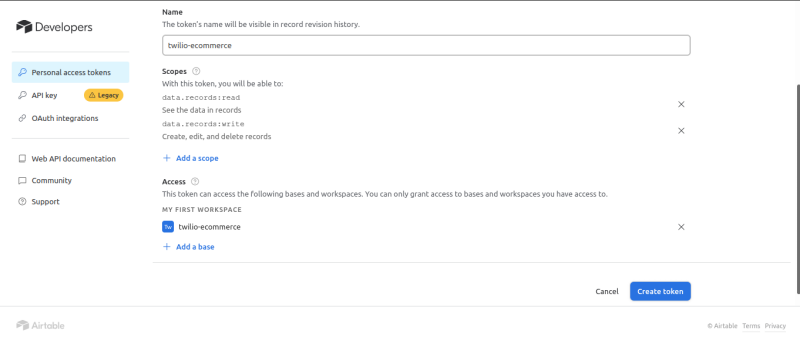
Copy and store the generated access token in your .env:
Collecting and storing your Paypal credentials
Navigate to the PayPal developer’s website, click on the Log in to Dashboard button located in the top right corner, and use your Paypal account email to log in.
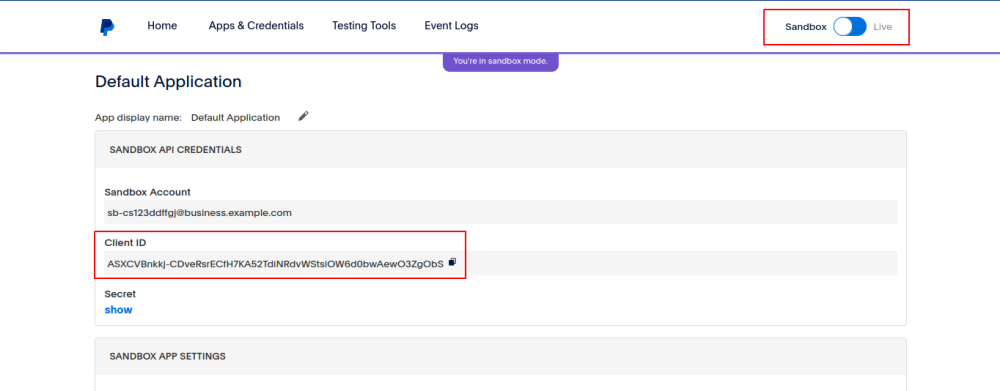
Once you are on the Dashboard page make sure that the Sandbox/Live toggle button located near the top right corner is set to Sandbox.
Then, Click on the Apps & Credentials button to navigate to the applications page.
Once you are on the applications page, click on the Default Application and you will be redirected to this application’s page.
This Default application will allow you quickly test your e-commerce checkout side of things without having to manually create and configure one from scratch.
Once you are on the Default application’s page, copy the Client ID located in the SANDBOX API CREDENTIALS section and store it somewhere safe.
Now use your cursor to hover over the Testing Tools Button in the top navigation menu and click on Sandbox Accounts.
On this page, you are going to retrieve the sandbox credentials that will allow you to make payments to the Paypal account linked to the default application whose client ID you stored.
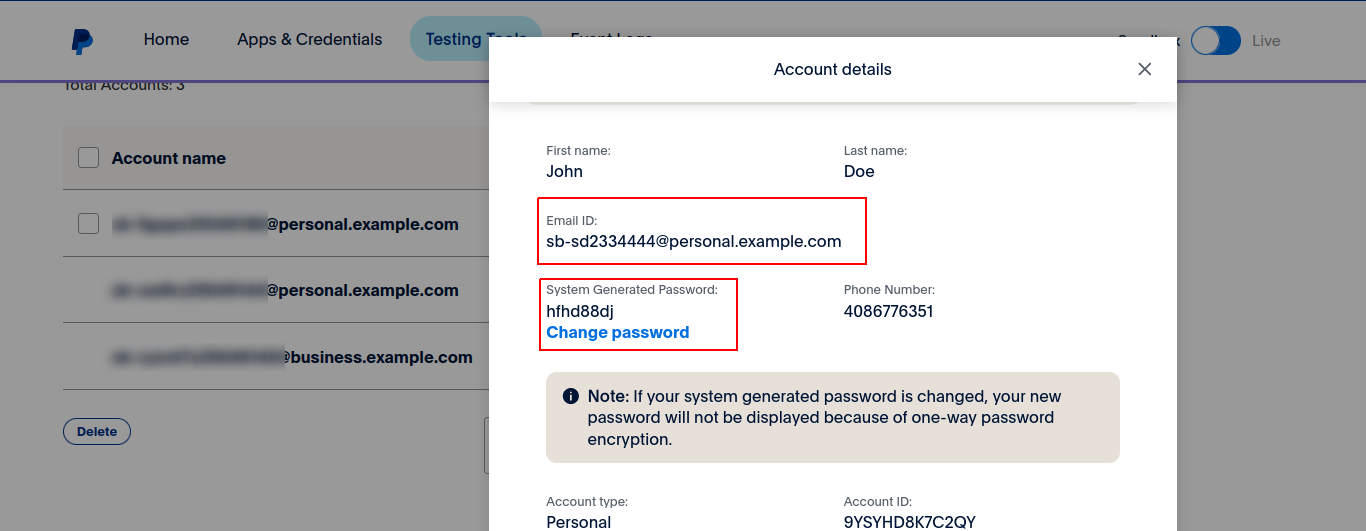
Once you are on the accounts page, scroll down until you see a table listing a Default Personal Account and a Default Business Account.
Click on the three dots icon on the default personal account row, and click on the View/Edit button to see this account’s information.
Copy the Email ID and the System Generated Password and store these credentials somewhere safe.
Congratulations, you’ve now acquired all of the necessary credentials.
Creating the Chat Twilio function
In this section, you will create a Twilio function named chat which will be responsible for handling the conversation between a user and the chatbot. This function will process all incoming WhatsApp messages using NLP and send the appropriate response.
Create a file named chat.js inside the functions directory of the boilerplate code and add the following code to it:
The code imports several packages, assets, and functions required for by the function.
First the code imports a method named dockStart and the fs module. dockStart is a method that creates an instance of the Dock class for natural language processing. It allows for dynamic loading and configuration of NLP components. The fs package is imported to read and write to the file system.
The code retrieves the model.nlp asset from the /other directory, and the user, product, and cart.js functions using the Runtime.getFunctions() method.
Finally, the code imports several functions from the user, product, and cart functions that later on will be used to execute specific functionality within the application.
Add the following code below the import statements block:
The exports.handler() function created above is the entry point for the Twilio Function.
When a new message is received, the Twilio API sends an HTTP request to this Function. The code inside this function, first, extracts the sender's phone number, the message body, and the host URL from the request.
Then the code calls a function named handleMessage() to process the incoming message and stores the value returned in a variable named answer,
Lastly, the code creates a new TwiML MessagingResponse object, adds the returned answer to the MessagingResponse object, and sends it back to Twilio using the callback() function.
Add the following code above the exports.handler() function:
This code defines the handleMessage() function, which processes an incoming message using NLP and returns a response.
Inside the function, modelAssetPath is set to the path of the NLP model asset. The dockStart() method is then called to create an instance of the Dock class for NLP processing.
The Dock class is used to create an instance of the NLP engine for processing text. It enables the loading of different plugins and packages for performing various NLP tasks like entity recognition, language detection, and sentiment analysis.
Here, the NLP engine (dock) was configured to use the English language, the Basic plugin, and the BuiltinMicrosoft and LangEn packages.
Add the highlighted code inside the handleMessage() function below the dock object:
Here the ner and builtin-microsoft objects were retrieved from the dock object to add NER functionality to this application.
NER stands for Named Entity Recognition, a technique used in NLP to identify named entities in text, such as person names, organizations, and locations. etc. In this application, NER will be used to identify the t-shirt color and quantity that a user wishes to purchase.
An instance of the NLP engine was retrieved from the dock object and stored in a variable named nlp. Then the nlp.load() method was used to load the NLP model.
The nlp.process() method was used to process the incoming message, and extract the intent and entity. The intent was stored in a variable named answer and then it was returned to the exports.handler() function.
Go back to your terminal and from the root directory of the boilerplate code (boilerplate/..) run the following command to start your application:
Open a new terminal tab, and run the following command to make your application available outside your local network:
Copy the HTTPS URL provided by ngrok. In your browser, navigate to the Whatsapp Sandbox page. Click Sandbox Settings. In the field that says When a message comes in, paste the URL and add /chat to the end of it. Then click Save. The URL should look similar to https://6538-165-90-82-245.in.ngrok.io/chat.
Click back on the main Sandbox tab. Under the heading Send a Whatsapp Message, you’ll see instructions for sending a code to the provided WhatsApp number. Open your preferred Whatsapp client and send a message, per those instructions.
This will register your number as a sandbox participant.
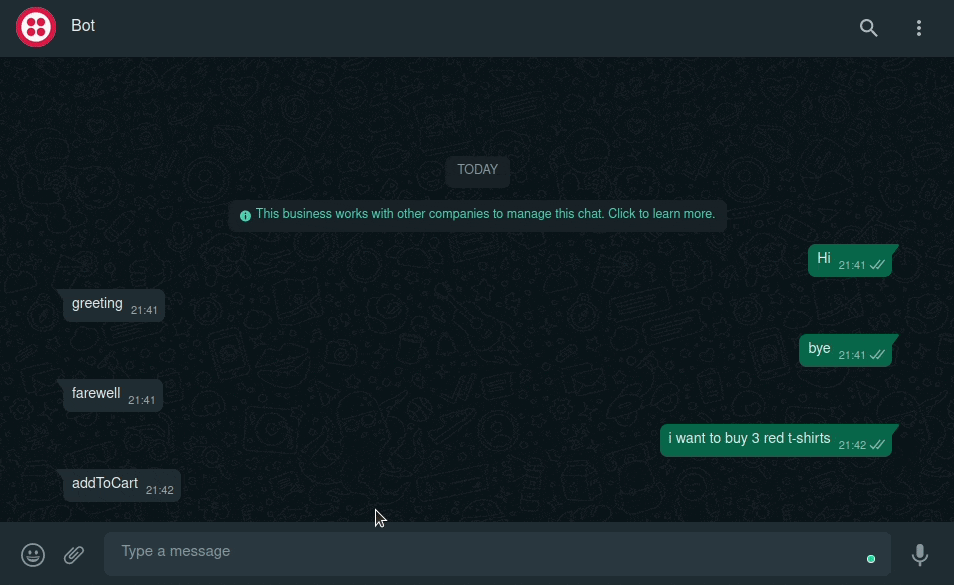
Once your number has been added to the list of sandbox participants, send a few messages to the chatbot and it will reply with the recognized intent:

Saving the conversation state
In this section, you will write the code that will allow you to store the conversation state in Airtable.
Go back to your code editor, and add the following code above the handleMessage() function inside the chat.js file:
Here a function named saveState() was defined. The purpose of this function is to keep track of the user's progress through the conversation and to store this information in the Users table so that it can be retrieved and used to control the flow of the conversation in subsequent interactions with the user.
The function first checks if the user exists by checking if the user parameter is not undefined.
If the user does not exist, it creates a new user with the createUser() function imported from the user function module.
If the user exists, the function checks if the current state of the user (user.fields.State) is different from the new intent. If it is, it updates the user's state using the updateUser() function from the user function module.
In this application, the intent extracted from the user’s messages is used as the conversation state. The NLP model trained for this application can recognize the following intents: greeting, farewell, agreeing, refusing, showProducts, addToCart, and checkout.
Handling the intents
In this section, you will write the code responsible for handling the intents extracted from the incoming Whatsapp messages sent by the user.
Handling the greeting and farewell intents
Add the following code below the saveState() function:
In the code above you created a function named handleIntent(). This function will be responsible for handling the recognized intents and generating an appropriate response.
The function first retrieves the intent from the input object and initializes the answer variable to an empty string. It then retrieves the user data from the Users table using the getUserByPhoneNumber() function and saves it to a variable named user.
The function then switches on the intent value and executes a different block of code for each intent. Here are the different cases implemented above:
greeting: If the user intent is a greeting, the function saves the state of the conversation by calling thesaveState()function and returns a greeting message that asks if the user would like to see the products available.farewell: If the user intent is a farewell message, the function saves the state of the conversation by calling thesaveState()function and returns a farewell message.default: If theintentvalue does not match any of the cases above, the function sends a message indicating that it did not understand the user's input.
Go to the bottom of the handleMessage() function and replace the line where you declared the variable named answer with the highlighted line:
Here you assigned the value returned by the handleIntent() method to the variable named answer.
Go back to your Whatsapp client, send a greeting or farewell message such as hi or bye, and watch how now the chatbot sends the message that you set on the handleIntent() function.
Handling the agreeing Intent
Go back to your code editor and add the following case, highlighted below, below the farewell statement in the handleIntent() function:
Here you added the code responsible for handling the agreeing intent.
When a user intent indicates agreement, the code first checks the state of the conversation to determine whether the user was in the process of greeting the chatbot or adding an item to the cart.
If the user was in the process of greeting the chatbot, the code sets the conversation state to showProducts, gets a list of available products by calling the getProducts() function in the product function, and sends this list of products to the user by calling the sendProducts() function also in the product function.
If the user was adding an item to the cart, it sets the state to checkout and sends a message with a link that points to the checkout page.
If the user wasn’t doing any of the things above the bot doesn’t do anything.
Go back to your Whatsapp Client, and send a message greeting the chatbot. When the bot asks you if you would like to see the products, send a message saying “yes” and the chatbot will send you the products available in the store.

Handling the refusing intent
Go back to your code editor, and inside handleIntent() function the add the following case to your switch statement, below the agreeing case:
In the code above you added the code responsible for handling the refusing intent.
When a user intent indicates refusal, the code first checks the state of the conversation to determine whether the user was in the process of greeting the chatbot or adding an item to the cart.
If the user was in the process of greeting the chatbot, the code returns a message containing the command that will allow the user to see the products at any point in the conversation.
If the user was adding an item to the cart, the code returns a message containing the command that will allow the user to proceed to the checkout.
If the user wasn’t doing any of the things above the bot doesn’t do anything.
Go back to your Whatsapp Client, and send a message greeting the chatbot. When the bot asks you if you would like to see the products, send a message saying “no” and the chatbot will send you the command that will allow you to ask to see the products at any point in the conversation.

Handling the showProducts intent
Go back to your code editor and add the highlighted code below the refusing intent:
Here you added the code responsible for handling the showProducts intent. When the user intent is a request to view products, the function sets the state of the conversation to showProducts and sends the list of available products to the user.
Go back to your Whatsapp Client, and send a message containing the command “show products” and the chatbot will send you the products available in the store.

Handling the addToCart intent
Go back to your code editor and add the highlighted code below the showProducts case in your switch statement:
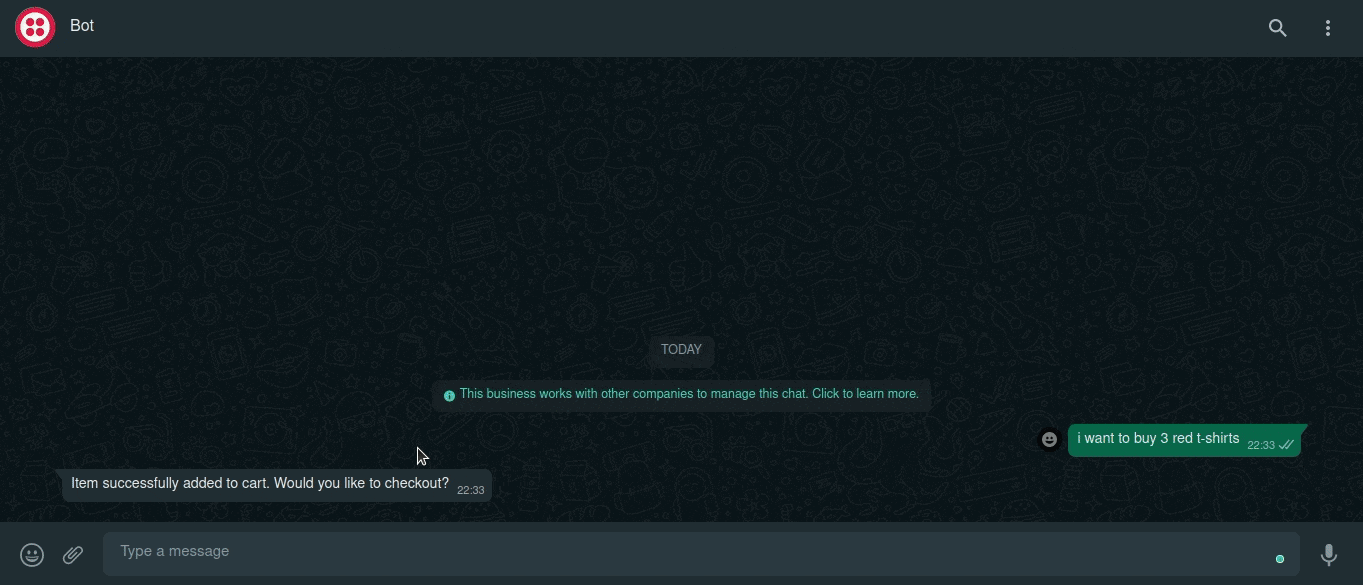
In the code above you added the code responsible for handling the addToCart intent. When the user intent is a request to add an item to the cart, the function sets the conversation state to addToCart and uses the addItemToCart() function to add the item to the user's cart. It then sends a message indicating whether the item was added successfully or not.
Go back to your Whatsapp Client, and send a message like the following “I want to buy 3 red t-shirts”, and the chatbot will add three red t-shirts to your cart.
Handling the checkout intent
Go back to your code editor and add the following code below the addToCart intent:
Here you added the code responsible for handling the checkout intent. When the user input is a checkout request, the function sets the conversation state to checkout and sends a message with a link that points to the checkout page.
Go back to your Whatsapp Client, and send a message containing the command “checkout”, and the chatbot will send you the link to a page where you will be able to checkout.

Creating the Checkout Twilio function
In this section, you will create the Twilio function responsible for the checkout.
Go back to your code editor and create a file name checkout.js inside the functions directory, and add the following code to it:
In the code above, you imported several functions from the user, cart, and order Twilio functions. These functions will allow you to complete the checkout process.
Add the following code at the bottom of your checkout.js file:
The exports.handler() function created above is the entry point for the Twilio Function. This function will be responsible for handling the checkout process by manipulating data in the Users and Orders table in Airtable.
Here, if the event.action is equal to checkout, the function retrieves the user data using getUser() function and creates an orderFields object to be used for creating a new order in the createOrder() function.
It also creates a userFields object to update the user's data and clear their cart. It then calls the updateUser() function to update the user's data and the createOrder() function to create a new order.
Finally, the function sends a successful response to the client using the callback function.
Add the highlighted code to the else statement:
Here if the event.action is not equal to checkout, the function retrieves the user data and their cart items using the getUser and getCartItems functions respectively.
It creates a response object with the user's name, address, and cart items, and sends it to the client using the callback function.
The first time this code is executed, the name and address fields will be empty because they are typically filled out on the checkout page. Subsequent checkouts will update the name and address fields with the values provided on the checkout page.
Creating the Checkout Page
In this section, you will create the checkout page where a user can review their selected items, enter shipping information, and use Paypal to make the payment.
Create a file named index.html in the assets directory and add the following code to it:
This code defines an HTML document with a Bootstrap stylesheet and script, as well as a custom stylesheet named style.css, and sets the document title to "Serverless Store Checkout".
Add the following code inside the body section of this HTML document, above the bootstrap script:
The body section contains the main content of your checkout page, which includes a form with input fields for name and address, and a PayPal button.
The form and input fields are contained within a Bootstrap card, and the input fields have labels and placeholders.
The body also contains a separate Bootstrap card for displaying a shopping cart with a list of items and their prices and the total amount.
The PayPal button and shopping cart list are created dynamically by adding the Paypal Javascript SDK and a javascript file named index.js at the end of the body, below the Bootstrap script.
In the code above, make sure you replace the text that says <your_client_id> with your Paypal Client ID that you stored earlier in this tutorial.
Next, create a file named index.js in the assets/js directory and add the following code to it:
The code above is for handling the PayPal checkout and starts by defining two constants that retrieve HTML elements by their IDs that show the list of items on the cart and the total amount of the purchase.
It then defines a constant variable that holds the origin of the current page and creates a new object from the query string of the page's URL. The script gets the value of the userId parameter from the object and assigns it to a constant variable. This userId is used to retrieve a specific user’s information needed for the checkout.
Finally, the script initializes a variable amount to 0, which will later be used to store the total amount of the purchase.
Add the following code below the amount variable:
This code defines a function called sendRequest() which is used to send a POST request to the Twilio checkout function with a JSON-encoded body.
This function uses the fetch API to send the request and returns the parsed JSON response from the server. If there is an error during the request, the function logs the error to the console and returns undefined.
Add the following code below the sendRequest function:
In the code above, you created a function named initPayPalButton, which initializes a PayPal button using the PayPal SDK. This button allows the user to make a payment using their PayPal account.
The function creates a new PayPal button with specific styles and options, such as the shape, color, and label of the button.
The createOrder() callback function is called when the user clicks the PayPal button. It returns an object that represents the order being created. The order contains information about the purchase, such as the currency code and the value of the purchase. The amount value used in the createOrder function is set to the amount variable declared at the top of the file.
Finally, the initPayPalButton function renders the PayPal button by calling the render() method with the ID of the HTML element where the button should be displayed. In this case, it is set to the paypal-button-container element.
Add the highlighted onApprove() callback function below the createOrder() function inside the initPayPalButton() function:
This code defines the onApprove() callback function. This callback function is called when the user approves the payment.
It captures and extracts information from the transaction details, such as the payer's name, address, and email address. It then creates a new object representing the order with this information and the amount value and sends a request to the Twilio checkout function using the sendRequest function with this information.
If the request is successful, it displays an alert indicating that the transaction was completed; otherwise, it displays an alert indicating that the order creation failed.
Add the following callback functions, highlighted below, below the onApprove() callback function inside the initPayPalButton() function:
Here you defined the onCancel and onError callback functions.
The onCancel callback function is called when the user cancels the payment. It logs a message to the console and displays an alert indicating that the transaction was canceled.
The onError callback function is called when an error occurs during the payment process. It logs the error to the console and displays an alert indicating that there was an error with the transaction.
Add the following code below the initPayPalButton() function:
This code defines a function named getCheckoutInformation(). This function is responsible for getting the checkout information for the current user.
First, it creates a body object that contains an action field with a value of getCheckoutInformation and a userId field that is set to the userId variable declared outside of the function.
Then, it calls the sendRequest() function with the body object as an argument to send a POST request to the Twilio checkout function with the getCheckoutInformation action and the current user's ID.
The function awaits the response and destructures the cartItems, name, and address fields from the response object.
It sets the form’s name and address input field values to the name and address fields taken from the response object.
Finally, it calls getCheckoutInformation() to retrieve the checkout information.
Add the highlighted code to the bottom of the getCheckoutInformation function:
Here the code checks If the response contains the cartItems property, and if it does the function iterates over each item in the cart and creates a list item element to display the item's details, such as its title, price, quantity, and total cost. It also adds up the total cost of all items in the cart and updates the text content of the amountTxtEl element with the total amount.
Finally, the function calls the initPayPalButton function to initialize the PayPal button with the amount value that was calculated.
Go back to your Whatsapp client and send a message containing the command “checkout”. Click on the link that the chatbot will send you to proceed to the checkout page.
When you reach the checkout page fill out the checkout form and then click on the PayPal button. A payment window asking you to use your Paypal account to log in will open.
Once you are on this payment window, use your Paypal sandbox account Email ID and password that you stored earlier to log in and complete the purchase.
Conclusion
In this tutorial, you learned how to build and run an e-commerce Whatsapp chatbot application on your local machine that allows users to buy t-shirts in a virtual store. First, you learned how to create Twilio functions that receive and process messages using the NLP.js library. Then, you learned how to store this application’s data in Airtable. Lastly, you learned how to use the Paypal Javascript SDK to accept payments on this virtual store.
Carlos Mucuho is a Mozambican geologist turned developer who enjoys using programming to bring ideas into reality. https://twitter.com/CarlosMucuho

Related Resources
Twilio Docs
From APIs to SDKs to sample apps
API reference documentation, SDKs, helper libraries, quickstarts, and tutorials for your language and platform.
Resource Center
The latest ebooks, industry reports, and webinars
Learn from customer engagement experts to improve your own communication.
Ahoy
Twilio's developer community hub
Best practices, code samples, and inspiration to build communications and digital engagement experiences.