SMS and MMS Marketing Notifications with PHP and Laravel

January 10, 2017
Written by
Mario Celi
Contributor
Opinions expressed by Twilio contributors are their own
Reviewed by
Paul Kamp
Twilion
Kat King
Twilion
Mica Swyers
Contributor
Opinions expressed by Twilio contributors are their own

sms-mms-notifications-php-laravel

Ready to implement SMS and MMS marketing notifications? Because of the high read-rate and the always-present nature of mobile devices, marketing through SMS is an excellent choice. Today we'll build notifications with PHP and Laravel.

Here's how it'll work at a high level:

  1. A potential customer sends an SMS to a Twilio phone number you've advertised somewhere
  2. Your application confirms that the user wants to receive SMS and MMS notifications from you
  3. An administrator crafts a message in a web form to send to all subscribers

Basic Twilio building blocks

For this tutorial we'll be working with the following tools:

  • TwiML and the <Message> Verb: We'll use TwiML, the Twilio Markup Lamguage to manage interactions initiated by the user via SMS.
  • Messages Resource: We will use the Twilio REST API to send marketing messages out to all subscribers.

Let's get started!

Making the Subscriber class

In order to track who wants our marketing messages, let's start at the beginning and provide the right model:

  • phone_number stores where to send the marketing messages.
  • subscribed is a boolean which tracks if a Subscriber is opted in.  Unsubscribed users will not receive messages.

We can use the command line to create the scaffolding for this model with a command similar to:

php artisan make:model Subscriber -m

Editor: this is a migrated tutorial. Find the code at https://github.com/TwilioDevEd/marketing-notifications-laravel

<?php

namespace App;

use Illuminate\Database\Eloquent\Model;

class Subscriber extends Model
{
    protected $fillable = ['phone_number', 'subscribed'];

    public function getPhoneNumberAttribute() {
        return $this->attributes['phone_number'];
    }

    public function setPhoneNumberAttribute($value) {
        $this->attributes['phone_number'] = $value;
    }

    public function scopeActive($query)
    {
        return $query->where('subscribed', 1);
    }
}

Now that we have a model, let's create the migration.

Create a migration for the Subscriber model

To create the table where we’ll store subscriber info, we’ll create a migration and then execute it. First, create a basic migration file by running the command:

php artisan make:migration subscribers

Next, open the new file and add info on the fields we need this table to have. It will be located in the database/migrations directory and named with the current timestamp and the table name we provide. For example, it might look something like 2018_02_01_012345_create_subscribers_table.php

Inside the file we’ll find the class CreateSubscribersTable which contains two methods: up() and down() for creating or destroying our table. We just need to edit the up() method to add the phone_number and subscribed fields we need for our model.

Here's how the migration should look:

<?php

use Illuminate\Database\Schema\Blueprint;
use Illuminate\Database\Migrations\Migration;

class CreateSubscribersTable extends Migration
{
    /**
     * Run the migrations.
     *
     * @return void
     */
    public function up()
    {
        Schema::create('subscribers', function (Blueprint $table) {
            $table->increments('id');
            $table->string('phone_number')->unique();
            $table->boolean('subscribed');
            $table->timestamps();
        });
    }

    /**
     * Reverse the migrations.
     *
     * @return void
     */
    public function down()
    {
        Schema::drop('subscribers');
    }
}

To create that table in our database, our database name, database user, and database password will need to be setup to match the local database installation in our Laravel project’s .env file.

Next, run the command:

php artisan migrate

... and the migration should be successful.

Simple, right? Next let's look at how to handle incoming messages from people opting into the service.

Handling incoming text messages in PHP and Laravel

Here we create the endpoint that Twilio calls every time our number receives an incoming message from a new subscriber.

It relies on a createMessage method that produces the message that will be returned, resulting in a warm and fuzzy welcome message.

Twilio can send your web application an HTTP request when certain events happen, such as an incoming text message to one of your Twilio phone numbers. These requests are called webhooks, or status callbacks. For more, check out our guide to Getting Started with Twilio Webhooks. Find other webhook pages, such as a security guide and an FAQ in the Webhooks section of the docs.

<?php

namespace App\Http\Controllers;

use Illuminate\Http\Request;

use App\Http\Requests;
use App\Http\Controllers\Controller;
use App\Subscriber;

use Twilio\Twiml;

class SubscribersController extends Controller
{
    /**
     * Manage the subscription for a subscriber.
     *
     * @param Request $request
     *
     * @return \Illuminate\Http\Response
     */
    public function register(Request $request)
    {
        $phoneNumber   = $request->input('From');
        $message       = $request->input('Body');
        $outputMessage = $this->createMessage($phoneNumber, $message);

        $response = new Twiml();
        $response->message($outputMessage);

        return response($response)
            ->header('Content-Type', 'text/xml');
    }

    private function createMessage($phone, $message)
    {
        $subscriber = Subscriber::where('phone_number', $phone)->first();
        if (!$subscriber) {
            $subscriber = new Subscriber;
            $subscriber->phoneNumber = $phone;
            $subscriber->subscribed  = false;

            $subscriber->save();
        }

        return $this->generateOutputMessage($subscriber, $message);
    }

    private function generateOutputMessage($subscriber, $message)
    {
        $subscribe = 'add';
        $message = trim(strtolower($message));

        if (!$this->isValidCommand($message)) {
            return $this->messageText();
        }

        $isSubscribed = starts_with($message, $subscribe);
        $subscriber->subscribed = $isSubscribed;
        $subscriber->save();

        return $isSubscribed
            ? $this->messageText('add')
            : $this->messageText('remove');
    }

    private function isValidCommand($command)
    {
        return starts_with($command, 'add') || starts_with($command, 'remove');
    }
    
    private function messageText($messageType = 'unknown') {
        switch($messageType) {
            case 'add':
                return "Thank you for subscribing to notifications!";
                break;
            case 'remove':
                return "The number you texted from will no longer receive notifications. 
            To start receiving notifications again, please text 'add'.";
                break;
            default:
                return "I'm sorry, that's not an option I recognize. 
            Please, let me know if I should 'add' or 'remove' this number from notifications.";
                break;
        }
    }
}

Next we'll show how the createMessage method works.

Create a subscriber from an incoming message

We begin by getting the user's phone number from the incoming Twilio request. Then we try to find a Subscriber with that phone number.

If there's no subscriber with this phone number, we create one, save it, and respond with a message asking them to text the word "add". By default, users won't be subscribed; users will need to confirm the subscription with an additional text.

<?php

namespace App\Http\Controllers;

use Illuminate\Http\Request;

use App\Http\Requests;
use App\Http\Controllers\Controller;
use App\Subscriber;

use Twilio\Twiml;

class SubscribersController extends Controller
{
    /**
     * Manage the subscription for a subscriber.
     *
     * @param Request $request
     *
     * @return \Illuminate\Http\Response
     */
    public function register(Request $request)
    {
        $phoneNumber   = $request->input('From');
        $message       = $request->input('Body');
        $outputMessage = $this->createMessage($phoneNumber, $message);

        $response = new Twiml();
        $response->message($outputMessage);

        return response($response)
            ->header('Content-Type', 'text/xml');
    }

    private function createMessage($phone, $message)
    {
        $subscriber = Subscriber::where('phone_number', $phone)->first();
        if (!$subscriber) {
            $subscriber = new Subscriber;
            $subscriber->phoneNumber = $phone;
            $subscriber->subscribed  = false;

            $subscriber->save();
        }

        return $this->generateOutputMessage($subscriber, $message);
    }

    private function generateOutputMessage($subscriber, $message)
    {
        $subscribe = 'add';
        $message = trim(strtolower($message));

        if (!$this->isValidCommand($message)) {
            return $this->messageText();
        }

        $isSubscribed = starts_with($message, $subscribe);
        $subscriber->subscribed = $isSubscribed;
        $subscriber->save();

        return $isSubscribed
            ? $this->messageText('add')
            : $this->messageText('remove');
    }

    private function isValidCommand($command)
    {
        return starts_with($command, 'add') || starts_with($command, 'remove');
    }
    
    private function messageText($messageType = 'unknown') {
        switch($messageType) {
            case 'add':
                return "Thank you for subscribing to notifications!";
                break;
            case 'remove':
                return "The number you texted from will no longer receive notifications. 
            To start receiving notifications again, please text 'add'.";
                break;
            default:
                return "I'm sorry, that's not an option I recognize. 
            Please, let me know if I should 'add' or 'remove' this number from notifications.";
                break;
        }
    }
}

To recap: we've created a Subscriber model to keep track of the people that want our messages, and need to implement subscribing and opting-out.

Let's look at the subscribe/unsubscribe logic on the next pane.

Manage user subscriptions

We want to provide the user with two SMS commands to manage their subscription status: add and remove.

These commands will toggle a boolean flag for a Subscriber record in the database and will control that customer's marketing message preference.

To make this happen, the controller logic handles incoming messages from known Subscribers like this:

  • If it is a add or remove command, create/update their subscription with the right status in the database.
  • If it is a command we don't recognize, send them a message explaining available commands.
<?php

namespace App\Http\Controllers;

use Illuminate\Http\Request;

use App\Http\Requests;
use App\Http\Controllers\Controller;
use App\Subscriber;

use Twilio\Twiml;

class SubscribersController extends Controller
{
    /**
     * Manage the subscription for a subscriber.
     *
     * @param Request $request
     *
     * @return \Illuminate\Http\Response
     */
    public function register(Request $request)
    {
        $phoneNumber   = $request->input('From');
        $message       = $request->input('Body');
        $outputMessage = $this->createMessage($phoneNumber, $message);

        $response = new Twiml();
        $response->message($outputMessage);

        return response($response)
            ->header('Content-Type', 'text/xml');
    }

    private function createMessage($phone, $message)
    {
        $subscriber = Subscriber::where('phone_number', $phone)->first();
        if (!$subscriber) {
            $subscriber = new Subscriber;
            $subscriber->phoneNumber = $phone;
            $subscriber->subscribed  = false;

            $subscriber->save();
        }

        return $this->generateOutputMessage($subscriber, $message);
    }

    private function generateOutputMessage($subscriber, $message)
    {
        $subscribe = 'add';
        $message = trim(strtolower($message));

        if (!$this->isValidCommand($message)) {
            return $this->messageText();
        }

        $isSubscribed = starts_with($message, $subscribe);
        $subscriber->subscribed = $isSubscribed;
        $subscriber->save();

        return $isSubscribed
            ? $this->messageText('add')
            : $this->messageText('remove');
    }

    private function isValidCommand($command)
    {
        return starts_with($command, 'add') || starts_with($command, 'remove');
    }
    
    private function messageText($messageType = 'unknown') {
        switch($messageType) {
            case 'add':
                return "Thank you for subscribing to notifications!";
                break;
            case 'remove':
                return "The number you texted from will no longer receive notifications. 
            To start receiving notifications again, please text 'add'.";
                break;
            default:
                return "I'm sorry, that's not an option I recognize. 
            Please, let me know if I should 'add' or 'remove' this number from notifications.";
                break;
        }
    }
}

We'll visit the message creation form next.

Set up the business logic for marketing messages

From the site's frontend, we retrieve the message text (and/or image URL) first.  Next we loop through all subscribers and call the sendMessage method to send the message out.

When the messages are on their way, we redirect the submitter back to the notifications.create route with a Flash Data message containing feedback about the messaging attempt.

<?php

namespace App\Http\Controllers;

use Illuminate\Http\Request;

use App\Http\Requests;
use App\Http\Controllers\Controller;
use App\Subscriber;

use Twilio\Rest\Client;

class NotificationsController extends Controller
{
    protected $client;

    public function __construct(Client $client)
    {
        $this->client = $client;
    }

    /**
     * Show the form for creating a notification.
     *
     * @return \Illuminate\Http\Response
     */
    public function create()
    {
        return view('notifications.create');
    }

    public function send(Request $request)
    {
        $this->validate($request, ['message' => 'required']);

        $message  = $request->input('message');
        $imageUrl = $request->input('imageUrl');

        $activeSubscribers = Subscriber::active()->get();
        foreach ($activeSubscribers as $subscriber) {
            $this->sendMessage($subscriber->phoneNumber, $message, $imageUrl);
        }

        $request
            ->session()
            ->flash('status', 'Messages on their way!');

        return redirect()->route('notifications.create');
    }

    private function sendMessage($phoneNumber, $message, $imageUrl = null)
    {
        $twilioPhoneNumber = config('services.twilio')['phoneNumber'];
        $messageParams = array(
            'from' => $twilioPhoneNumber,
            'body' => $message
        );
        if ($imageUrl) {
            $messageParams['mediaUrl'] = $imageUrl;
        }

        $this->client->messages->create(
            $phoneNumber,
            $messageParams
        );
    }
}

Ready to see how we send SMS and MMS themselves?

Send SMS or MMS marketing messages

In the method sendMessage we create a Twilio REST API client that can be used to send either SMS or MMS messages.

The client requires your Twilio account credentials (an Account SID and Auth Token), which can be found in the Twilio Console:

Account Credentials


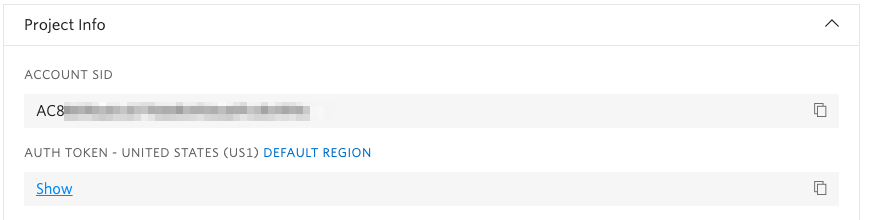
You'll want to set those in the .env file. (Additionally, you'll need to add a SMS-capable number there from the Phone Number console.) Once the app is running, then all we need to do is call create on the client->messages object in order to send our message.

The Twilio Message API call requires a to parameter and an array containing a from number, the message body and an optional mediaUrl.

<?php

namespace App\Http\Controllers;

use Illuminate\Http\Request;

use App\Http\Requests;
use App\Http\Controllers\Controller;
use App\Subscriber;

use Twilio\Rest\Client;

class NotificationsController extends Controller
{
    protected $client;

    public function __construct(Client $client)
    {
        $this->client = $client;
    }

    /**
     * Show the form for creating a notification.
     *
     * @return \Illuminate\Http\Response
     */
    public function create()
    {
        return view('notifications.create');
    }

    public function send(Request $request)
    {
        $this->validate($request, ['message' => 'required']);

        $message  = $request->input('message');
        $imageUrl = $request->input('imageUrl');

        $activeSubscribers = Subscriber::active()->get();
        foreach ($activeSubscribers as $subscriber) {
            $this->sendMessage($subscriber->phoneNumber, $message, $imageUrl);
        }

        $request
            ->session()
            ->flash('status', 'Messages on their way!');

        return redirect()->route('notifications.create');
    }

    private function sendMessage($phoneNumber, $message, $imageUrl = null)
    {
        $twilioPhoneNumber = config('services.twilio')['phoneNumber'];
        $messageParams = array(
            'from' => $twilioPhoneNumber,
            'body' => $message
        );
        if ($imageUrl) {
            $messageParams['mediaUrl'] = $imageUrl;
        }

        $this->client->messages->create(
            $phoneNumber,
            $messageParams
        );
    }
}

And with that, the application is completely wired.  Next up, we'll look at what other features we can easily add with Twilio and a little guidance from our tutorials.

Where to Next?

That's it! We've just implemented a an opt-in process and an administrative interface to run an SMS and MMS marketing campaign.

Now all you need is some killer content to share with your users via text or MMS (That's for you to find!).

PHP and Twilio are a great mix. Here are just a couple of other features we think you'll enjoy:

IVR: Phone Tree

Easily route callers to the right people and information with an IVR (interactive voice response) system.

Automated Survey

Instantly collect structured data from your users with a survey conducted over a voice call or SMS text messages.

Did this help?

If you have any feedback to share with us please tweet to us @twilio.  We love to hear what you've built and what you're building!