Alert System with Twillio SendGrid and Node.js

May 15, 2024
Written by
Sergiy Pylypets
Contributor
Opinions expressed by Twilio contributors are their own
Reviewed by

Alert system with Twilio SendGrid and Node.js

In the world of IoT, a common case is to monitor specific parameters of a system or device and send notifications and alerts in the case if the parameters are beyond predefined threshold limits.

Suppose you have to enhance an air quality monitoring system with a possibility to send email notifications in the case when the air temperature or concentration of 10 mm particles exceed the threshold values. This tutorial describes how it can be implemented with the usage of Twillio SendGrid platform and Node.js technology. The development process is described in context of using Linux OS. All these steps can be performed in other OS as well, with a minimal adjustment.

Requirements

  • Node.js version 6, 8 or >=10
  • A SendGrid account - if you’re new to Twilio/SendGrid create a free account
  • A text editor or IDE - Visual Studio Code is used in this tutorial, but you can use whatever tool you are accustomed with.

Project set-up

First of all, you need to get your SendGrid API key. Provided having a SendGrid account, you can generate a new API key for use in your email applications. If you have Node and npm packages installed and running in your computer, you can create a new directory, say, alert-system, and run the following command inside it:

npm init

Running the npm init command initiates a prompt to create a package.json file. As the prompt explains, you’ll walk through configuring the most basic settings of your Node.js application in this file.

For now, you can leave index.js as the entry point, along with a short description and your name as the author, and elect to use the default values offered by pressing the Enter key until you reach the end of the prompt. Then you’re asked to confirm your settings with a preview of your package.json file. Press Enter to confirm and return to the regular terminal prompt.

Then, you’ll need to install the SendGrid package:

npm install --save @sendgrid/mail

This command puts all necessary dependencies inside the node_modules directory. The --save flag saves the sendgrid/mail package as a dependency for this project.

To communicate with the SendGrid server, you need to inject the API key into your application. It is not recommended to hard-code the key into the application code due to possible security issues, so you need to pass it to the application in a secure way, e.g. via an environment variable. You can get details about setting environment variables here. In the development environment, you can, for example, create a set-up script, say sendgrid.env, containing the following command:

export SENDGRID_API_KEY='<your API KEY here>’

The script can be run with the source command:

source ./sendgrid.env

Then you use the key as follows:

. . .         
const sgMailClient = require('@sendgrid/mail');
sgMailClient.setApiKey(process.env.SENDGRID_API_KEY);
. . .

In general, there are two approaches to implement a monitoring system: the push-data approach and pull-data approach. In the push-data case, you provide a possibility to push data into your system from an external source. In the pull-data case, your system pulls data from an external source itself. For the beginning, you can implement the push approach first. Then you would be able to add the pull functionality as well.

Air quality alert system – the data-push approach

To enable pushing data into your system, you expose a REST endpoint, which can be called by external data producers. It is possible to use the express library for it:

npm install --save express

Suppose an external service sends the measurement data in the following format:

{
  "sensordatavalues": [
    {"value_type": "created", "value": "2024-02-01 20:29:59"},    
    {"value_type": "temperature", "value": "36"},
    {"value_type": "humidity", "value": "60"},
    {"value_type": "pressure", "value": "970000"},
    {"value_type": "P1", "value": "50"},
    {"value_type": "P25", "value": "70"},
    {"value_type": "P10", "value": "80"}
  ]
}

For these input data, you can implement the data processing endpoint as follows.

It is good to put all configuration settings into the configuration script, e.g. config.js, to be used by all the application components:

// It gathers all the configuration for our server in the same place.
"use strict";
module.exports = {
  server: {
    hostName: "localhost",
    portNo: 3030
  },

  // Threshold values that trigger alerts.
  alertLimits: {
    maxSafePM10: 80, // Air quality is deemed to be 'poor' when PM10 is greater than 80.
    maxTemperature: 30
  },
  sendGridParams: {
    to: '<recipient email address>',
    from: '<your verified sender email address>'
  }
};

where: <recipient email address> is the destination email address you want to send the alert to; <your verified sender email address> is the email address you registered as the verified sender address .

Next, you implement the main script, index.js, containing the basic application logic:

// Our data processor receives incoming data via HTTP POST.
"use strict";

const express = require('express');
const http = require('http');
const bodyParser = require('body-parser');
const config = require('./config.js');
const raiseEmailAlert = require('./email-alert-system.js');

const app = express();
app.use(bodyParser.json());
app.use(bodyParser.urlencoded({
  extended: false
}));
const httpServer = http.Server(app);
let port = config.server.portNo;
if (port == null || port == "") {
  port = 3000;
}
httpServer.listen(port, () => { // Start the server
  console.log("Data collection point listening on port " + port);
});
app.post("/data-collection-point", (req, res) => {
  try {
    const measurementData = processSensorData(req.body);
    checkTemperature(measurementData);
    checkPM10(measurementData);
    res.sendStatus(200); // Respond to the client with HTTP STATUS 200 (status ok).
  } catch (err) {
    console.error(err);
    res.sendStatus(400);
  }
});

function processSensorData(sensorData) {
  const measurementData = {};
  sensorData.sensordatavalues.forEach((item, i) => {
    switch (item.value_type) {
      case "created":
        measurementData["timestamp"] = item.value;
        break;
      case "temperature":
        measurementData["temperature"] = item.value;
        break;
      case "humidity":
        measurementData["humidity"] = item.value;
        break;
      case "P1":
        measurementData["pm1"] = item.value;
        break;
      case "P25":
        measurementData["pm25"] = item.value;
        break;
      case "P10":
        measurementData["pm10"] = item.value;
        break;
      default:
    }
  });
  return measurementData;
}

function checkTemperature(data) {
  const temperature = data.temperature;
  console.log("checkTemperature() - Temperature: " + temperature);
  const temperatureLimit = config.alertLimits.maxTemperature;
  if (temperature > temperatureLimit) {
    console.log("Temperature alert triggered");
    const alertMsg = data.timestamp + " - Received temperature value: " + temperature + "C, this has exceeded the limit of " + temperatureLimit + "C.";
    raiseEmailAlert(alertMsg);
  }
}

function checkPM10(data) {
  const pm10 = data.pm10;
  console.log("checkPM10() - PM10: " + pm10);
  const pm10Limit = config.alertLimits.maxSafePM10;
  if (pm10 > pm10Limit) {
    console.log("PM10 alert triggered");
    const alertMsg = data.timestamp + " - Received PM10 concentration value: " + pm10 + ", this has exceeded the limit of " + pm10Limit;
    raiseEmailAlert(alertMsg);
  }
}

where the email-alert-system.js script encapsulates all business logic for sending emails with the usage of SendGrid service:

"use strict";

const config = require('./config.js');
const sgMailClient = require('@sendgrid/mail');

sgMailClient.setApiKey(process.env.SENDGRID_API_KEY);

function raiseEmailAlert (msg) {
  console.log("raiseEmailAlert() - msg: " + msg);
  const email = {
        to: config.sendGridParams.to,
        from: config.sendGridParams.from,
        subject: 'SendGrid alert system', //We can set it configurable as well
        text: msg,
        html: '<strong>' + msg + '</strong>',  //We can set a template here
      }
  sgMailClient.send(email)
};

module.exports = raiseEmailAlert;

To start the application, you can use the following command:

node index.js

If you see the following statement in the console:

Data collection point listening on port 3000

then the application is ready to accept data requests. Now you can test it with the usage of a HTTP client such as Postman . You can send the following test data, for example:

{
"sensordatavalues": [
{"value_type": "created", "value": "2024-02-07 19:34:59"},    
{"value_type": "temperature", "value": "36"},
{"value_type": "humidity", "value": "60"},
{"value_type": "pressure", "value": "970000"},
{"value_type": "P1", "value": "80"},
{"value_type": "P25", "value": "80"},
{"value_type": "P10", "value": "85"}
]
}

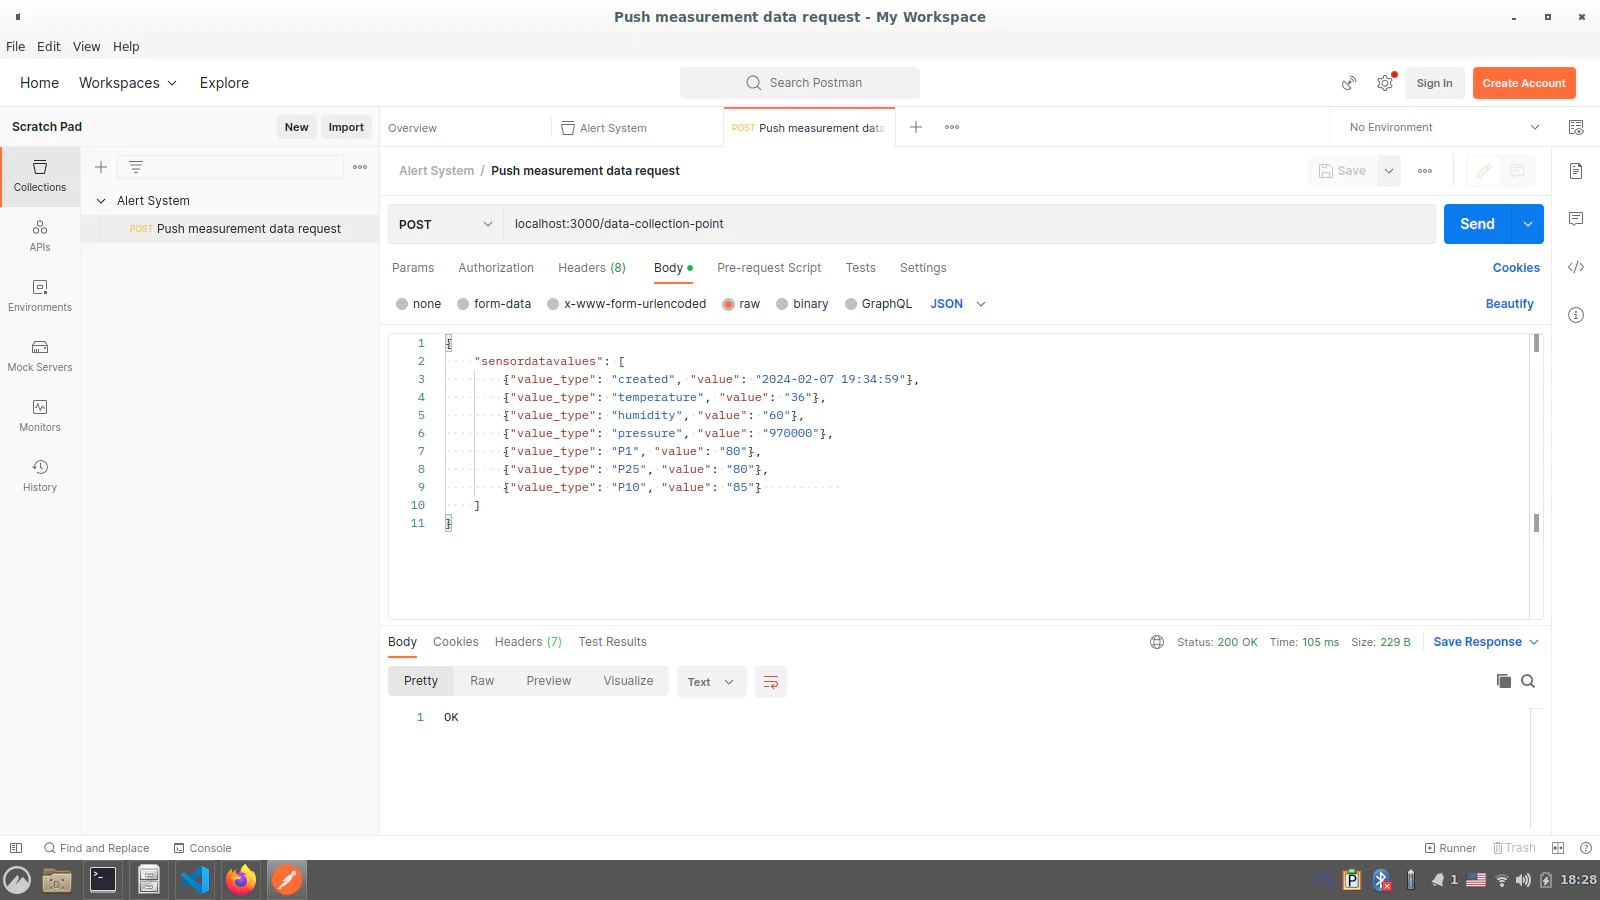
After sending the request, you should see something similar in the console:

node index.js
Data collection point listening on port 3000

checkTemperature() - Temperature: 36
Temperature alert triggered
raiseEmailAlert() - msg: 2024-02-07 19:34:59 - Received temperature value: 36C, this has exceeded the limit of 30C.
checkPM10() - PM10: 85
PM10 alert triggered
raiseEmailAlert() - msg: 2024-02-07 19:34:59 - Received PM10 concentration value: 85, this has exceeded the limit of 80

If there are the corresponding new messages in your mailbox, it means that your system works correctly. Congratulations! Now you can enhance the system with data-pull staff.

Air quality alert system – the data-pull approach

Suppose, the sensor layer exposes an endpoint providing current readings of the air condition parameters. To simulate such a service, you can use the `json-server` tool. This is a package for creating web services from JSON data or JavaScript code. It can be installed as a common node package:

npm install --save-dev json-server@0.17.4

where 0.17.4 is the latest stable version of json-server at the moment of writing.

Flag --save-dev indicates that this package is used during development and will not be part of the alert system application.

To use the json-server tool, you need to prepare test data as a JavaScript file, e.g. test-sensor-data.js:

module.exports = function() {
	return {
    	sensordata: {
            	sensordatavalues: [
                	{value_type: "created", value: "2024-02-01 20:29:59"},
                	{value_type: "temperature", value: "20"},
                	{value_type: "humidity", value: "60"},
                	{value_type: "pressure", value: "970000"},
                	{value_type: "P1", value: "50"},
                	{value_type: "P25", value: "70"},
                	{value_type: "P10", value: "84"}      	 
            	]
        	}
    	}
}

Then you start the mock service with the following command:

npx json-server test-sensor-data.js -p 3500

You need to add the mock sensor host connection parameters to your configuration settings:

// It gathers all the configuration for our server in the same place.

"use strict";

module.exports = {
	server: {
    	hostName: "localhost",
    	portNo: 3000
	},

	//
	// Threshold values that trigger alerts.
	//
	alertLimits: {
    	maxSafePM10: 80, // Air quality is deemed to be 'poor' when PM10 is greater than 80.
    	maxTemperature: 30
	},
	sendGridParams: {
    	to: '<recipient email address>',
from: '<your verified sender email address>'
	},
	sensorHost: {
    	connectionParams: {
        	hostname: 'localhost',
    	port: 3500,
    	path: '/sensordata',
    	method: 'GET'
    	},
    	samplingInterval: 60000
	}
};

where sensorHost.samplingInterval is the frequency of retrieving the measurement data.

Now you can use the http package in the index.js script to send requests to the sensor layer endpoint for pulling the data:

// Our data processor receives incoming data via HTTP POST and pulls the measurement data from the sensor layer.

"use strict";

const express = require('express');
const http = require('http');
const bodyParser = require('body-parser');
const config = require('./config.js');
const raiseEmailAlert = require('./email-alert-system.js');
const app = express();
app.use(bodyParser.json());
app.use(bodyParser.urlencoded({
        	extended: false
    	})
);
const httpServer = http.Server(app);

let port = config.server.portNo;
if (port == null || port == "") {
	port = 3000;
}

httpServer.listen(port, () => { // Start the server.
  	console.log("Data collection point listening on port " + port);
});

app.post("/data-collection-point", (req, res) => {
 
	try{
  	const measurementData = processSensorData(req.body);
  	checkTemperature(measurementData);
  	checkPM10(measurementData);
  	res.sendStatus(200); // Respond to the client with HTTP STATUS 200 (status ok).
	} catch (err) {
  	console.error(err);
  	res.sendStatus(400);
	}
    
});

setInterval(pullSensorData, config.sensorHost.samplingInterval);

function pullSensorData() {

  const req = http.request(config.sensorHost.connectionParams, (res) => {
  	let data = '';
    
  	res.on('data', (chunk) => {
    	data += chunk;
  	});

  	res.on('error', (err) => {
    	console.error('pullSensorData() - Failure: ' + err.message);
  	});
    
  	res.on('end', () => {
    	console.log('pullSensorData() - ' + data);
    	const dataObj = JSON.parse(data);
    	const measurementData = processSensorData(dataObj);
    	checkTemperature(measurementData);
    	checkPM10(measurementData);
  	});
  });
  req.end();
}

function processSensorData(sensorData) {

  const measurementData = {};
  sensorData.sensordatavalues.forEach((item, i) => {
	switch (item.value_type) {
    	case "created":
      	measurementData["timestamp"] = item.value;
      	break;
    	case "temperature":
      	measurementData["temperature"] = item.value;
      	break;
    	case "humidity":
      	measurementData["humidity"] = item.value;
      	break;
    	case "P1":
      	measurementData["pm1"] = item.value;
      	break;
    	case "P25":
      	measurementData["pm25"] = item.value;
      	break;
    	case "P10":
      	measurementData["pm10"] = item.value;
      	break;
     	 
    	default:
  	}
  });
  return measurementData;
}

function checkTemperature(data) {
	const temperature = data.temperature;
	console.log("checkTemperature() - Temperature: " + temperature);
	const temperatureLimit = config.alertLimits.maxTemperature;
	if (temperature > temperatureLimit) {
  	console.log("Temperature alert triggered");
  	const alertMsg = data.timestamp + " - Received temperature value: " + temperature + "C, this has exceeded the limit of " + temperatureLimit + "C.";
  	raiseEmailAlert(alertMsg);
	}
}

function checkPM10(data) {
  	const pm10 = data.pm10;
	console.log("checkPM10() - PM10: " + pm10);
	const pm10Limit = config.alertLimits.maxSafePM10;
	if (pm10 > pm10Limit) {
  	console.log("PM10 alert triggered");
  	const alertMsg = data.timestamp + " - Received PM10 concentration value: " + pm10 + ", this has exceeded the limit of " + pm10Limit;
  	raiseEmailAlert(alertMsg);
	}
}

If you start the application now, you can see in the console something like the following output:

pullSensorData() - {
  "sensordatavalues": [
	{
  	"value_type": "created",
  	"value": "2024-02-01 20:29:59"
	},
	{
  	"value_type": "temperature",
  	"value": "20"
	},
	{
  	"value_type": "humidity",
  	"value": "60"
	},
	{
  	"value_type": "pressure",
  	"value": "970000"
	},
	{
  	"value_type": "P1",
  	"value": "50"
	},
	{
  	"value_type": "P25",
  	"value": "70"
	},
	{
  	"value_type": "P10",
  	"value": "84"
	}
  ]
}
checkTemperature() - Temperature: 20
checkPM10() - PM10: 84
PM10 alert triggered
raiseEmailAlert() - msg: 2024-02-01 20:29:59 - Received PM10 concentration value: 84, this has exceeded the limit of 80

and, correspondingly, a new message in the mailbox. After the time interval defined in the configuration (sensorHost.samplingInterval) , you should see a similar output added in the console and the next message in the mailbox. If it is the case, it means that your pull-data stuff works correctly!

Troubleshooting and additional notes

If you see the following output in the console after running the application:

API key does not start with "SG."

This means that the environment variable SENDGRID_API_KEY is not set. You can set it, for example, by running the sendgrid.env script: source ./sendgrid.env.

Remember that with your SendGrid account you can send emails only from your verified email address . Otherwise, you get error 403 with a message like: ‘The from address does not match a verified Sender Identity. Mail cannot be sent until this error is resolved. Visit our docs to see the Sender Identity requirements.

Conclusion

In this tutorial, you created an alert service to send email notifications under conditions defined by the business logic. This application can be used as a prototype for real IoT projects as well as in other commercial and industrial systems. Used technologies allow easily adjusting the application behavior according to specific needs for each particular use case. SendGrid service provides a lot of possibilities for customization of the email sending process, like dynamical templates, sending multiple emails with address tags, to name a few. You can check SendGrid documents for details.


Sergiy Pylypets is a Full Stack Developer and Data Engineer in Nový Dům, Central Bohemia, Czechia, reach out on LinkedIn to connect.