Getting started with Spring MVC and Twilio
Time to read:
November 13, 2015
Written by
This post is part of Twilio’s archive and may contain outdated information. We’re always building something new, so be sure to check out our latest posts for the most up-to-date insights.

In this tutorial we will take a very beginner look at Spring MVC and use it build a ‘Hello World’ style application. We will then take that what we’ve built and turn it into a SMS sending and voice calling application using theTwilio REST API.
Spring MVC is a framework built on top of Java servlets that provides the components needed to build web applications using the model-view-controller architecture. It is one of the many tools provided by the Spring project.
If you’re just interested in the finished code you can find it on my Github.
Getting Started
Before we jump into the code it’s important to understand the model-view-controller (MVC) architecture that Spring MVC implements.
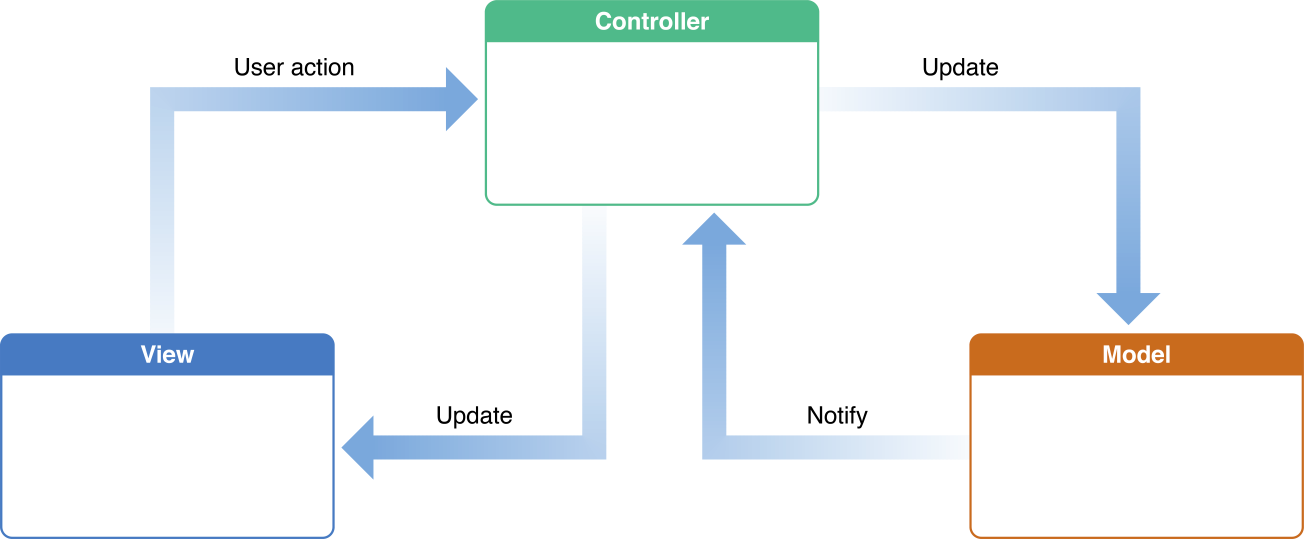
The MVC Pattern is a way of separating the logic of a program from the representation.
The model does all the heavy stuff like calculate data, work with user input, and save things. The view is what the user sees and interacts with. The controller keeps track of changes in the view (for example a pressed button) and updates the model and the view. These three components work together in Spring MVC to create a dynamic and responsive application.
If you’re confused about the MVC architecture check out Google Chromes’ awesome explanation of it.
Environment Setup
Now that we have a better understanding of the framework we’re working with, we can set up our environment.
Some of the content in this post will be modified content from Spring MVC’s Getting Started tutorial. Feel free to go through their guide to reinforce your understanding of Spring MVC concepts.
Before you start you’ll need to have the Java Developent Kit 1.8 or later and Maven 3.0 installed. We will be using Maven later on to build and run our application. You’ll also need to have a Twilio account and Twilio phone number.
Open a terminal and create a new directory for this project. Inside that directory run the following:
Build tools like maven can be pretty confusing, so we are using the command above to simply clone a github repo to get started.
Inside this directory you’ll see two sub-directories: initial/ and complete/. We will be doing all of our work inside the initial/ directory. This folder will conveniently contain blank versions of the three files we will need to modify throughout this post: GreetingController.java, Application.java, and greeting.html.
The Web Controller
We are first going to create our web controller. The controller will handle incoming HTTP requests and return the appropriate view. Our view will be discussed more in the next section.
Open initial/src/main/java/hello/GreetingController.java and insert the following code, then we will go over what it does:
At the top of the file we are importing a number of packages from the Spring MVC framework. The @Controller line is an annotation. Spring uses an annotation-based programming model for MVC controllers. @Controller is telling Spring to treat the GreetingController class as a web controller. You can read more about the implementing controllers in the Spring MVC documentation here.
Other annotations such as @RequestMapping, @RequestParam, and @ModelAttribute are used to specify the behavior of controllers.
The @RequestMapping(“/greeting”) annotation is telling the controller that requests made to the /greeting extension should return the view named greeting. If you come from a NodeJS background this line is similar to something like router.get(“/greeting”, ...).
Right now our greeting method does not accept any parameters and simply returns greeting. greeting is referring to the name of the HTML file (view) that the controller should return. Later we will add more to this method to allow request parameters to make the page more dynamic.
The View
Views are responsible for rendering our HTML content. Our greeting view that is being returned in the GreetingController will be created in greeting.html. For now, this file is going to contain nothing more than some text telling us that our server is working. Open initial/src/main/resources/templates/greeting.html and add the following:
Later on we will modify this file so that it can render data from our GreetingController using a templating engine.
The Application
Finally we need a way to start our application. In order to run any Java program we need to define a main method. We will define our main method in initial/src/main/java/hello/Application.java. Add the following code to that file and save it:
@SpringBootApplication adds a number of convenience annotations to the Application class that are beyond the scope of this post. The most important line is SpringApplication.run(); which is used to actually launch the application.
You may have noticed that we’ve covered the controller and the view but not the model. We do not need a model yet because our view is static and simply renders an HTML page. Our model will be added in the ‘Adding Request Parameters’ section.
Hello, World
To start your server run the following command from the top of your initial/ directory:
This Maven command will compile your java files, build your project, and start your server. If there are any syntax errors in your .java files you’ll see a BUILD FAILURE message and your server will not start.
Alternatively, you can compile your project into a .jar file and then run it. To do this use the following commands instead of the one above:
Note: Anytime you make changes to your .html or .java files your server will needed to be restarted for the changes to take effect.
With your server running navigate to http://localhost:8080/greeting and you should see a page that says “Hello World”. Congrats! You’ve successfully built a basic Spring MVC application. You can stop the server with Ctrl+C.
Sending SMS
Now that we have our application working let’s make it a little more interactive. How are we going to do that? Using Twilio, of course!
We’re going to use the Twilio Java SDK to integrate Twilio into our app. Since this library is available from a public Maven repository, all we need to do to use the SDK is update our pom.xml file. pom.xml is the file that Maven uses to build our project and manage its dependencies.
We need to add the Twilio SDK to our project dependencies. To do this, paste the following highlighted code inside of the block in your initial/pom.xml file (source):
With this dependency added, the Twilio SDK will be downloaded and added to your project automatically the next time you start the application.
Now that we have the Twilio SDK, let’s make our GreetingController.java file a little more interesting. We want to send outgoing SMS messages from our application to our phone.
First we need to import the parts of the Twilio library that we are going to make use of. At the top of the file, add the following highlighted lines right below the rest of the import statements:
To use Twilio we need to authenticate by using some account credentials. We will do this by defining a few constants. Add the following highlighted lines to GreetingController.java:
Be sure to use your actual Twilio credentials in the strings above. TWILIO_NUMBER should be set to a Twilio phone number that you have already purchased.
Next, below your greeting method we will add a new method called sendSMS. This method will be called from inside of our greeting method and will be used to create and send the outgoing text message.
Place the following code below your greeting method:
The code above is instantiating a new TwilioRestClient object and adding a list of parameters to it using a Message object. Twilio requires that three parameters are set in order to send an outgoing SMS:
- "Body" is the message that you want to send.
- "To" is your cellphone number.
- "From" is a Twilio phone number that you own.
Lastly we need to call this function from our greeting method. Modify the method so that it looks like the following:
Our sendSMS method will now be called right before the greeting view is returned.
Restart your server with $ mvn spring-boot:run from the top of the initial/ directory and navigate back to http://localhost:8080/greeting. The number you specified in the "To" parameter should receive an SMS with the message “Hello, World!”.
Making Calls
Our application is now capable of sending text messages. Naturally, the next step is to allow it to make phone calls as well.
We first need to import two more things from the Twilio library. Add the following lines below the rest of your import statements:
Our new method is going to be called makeCall. Paste the following code into your GreetingController.java below the sendSMS method.
This method is similar to the sendSMS method above, only instead of Message and MessageFactory objects we are using Call and CallFactory objects. Also, instead of a message body, we need to include a URL that Twilio can reach to receive TwiML instructions for the outgoing call. Check out the Twilio documentation on making calls to get a better understanding of why we are doing this.
Again, we need to modify our greeting method to call our makeCall method instead of sendSMS. Update that code to look as such:
Here we are simply commenting out the call to the sendSMS method and calling makeCall instead.
Restart your server again and navigate back to http://localhost:8080/greeting. This time you should receive a phone call that plays you some classic video game music.
Adding Request Parameters
Now that we are able to send texts and make calls, let’s give the user the option of which service to use. To accomplish this we can use request parameters. Request parameters are fields that get added to a query string when you navigate to certain URLs.
Open up GreetingController.java again. We are going modify greeting again to allow the user to specify if they want to receive a call or text, as well as the phone number they wish to reach. Replace your whole greeting method with the code below:
There’s a lot of new stuff going on here:
These first two lines after the method header are the two request parameters we are adding. They are identified by the @RequestParam annotation. @RequestParam is used to bind query string parameters to parameters of the greeting method. In this case, we are binding the query parameter "mode" to a String called mode.
We are also setting this parameter’s required value to false, meaning that the query string does not require that mode be specified. In the event that it is not specified the defaultValue of “text” will be used.
Similarly, we are binding the query parameter “number” to a String called number. This parameter is going to be required. If we do not include it in our query string we will receive a 400 (Bad Request) response.
The last parameter is a new Model object that we are naming model. This model is what allows data from the controller to be rendered in a view, as discussed in the introduction.
These next two lines are adding the values of our two request parameters, mode and number, to our model so that they can ultimately be accessed by our greeting view.
Here we have some simple logic that checks what our mode request parameter was set to and responds appropriately. The two possible values for mode are going to be "call" or "text". If set to "call", the makeCall function will be called. If set to "text", the sendSMS function will be called. In both cases, the "number" request parameter will be passed.
Finally, we need to update our sendSMS and makeCall functions to use the phone number we are passing instead of the phone number we hard-coded in previously. To do this we only need to modify the method header and the To parameter of each function.
For sendSMS:
For makeCall:
th:text might look new to you. This is a simple first look at a view template in Spring MVC.
There are many different templating engines that can be used with Spring. For this post we are we are using thymeleaf, which is what the ‘Spring MVC Getting Started’ uses. We do not have to worry about installing thymeleaf since it’s already part of the repo you cloned.
th:text is telling the view to render the proceeding values as plaintext.
${ } is the syntax thymeleaf uses to take data from the model and display it in the view. If you come from a JavaScript background, this may seem similar to the syntax for the Handlebars templating engine. The variable names inside of the braces must match up with the names of the attributes we added to our model in the GreetingController.
Now, when you navigate to our application in the next section you’ll see it render either:
“Your text is being sent to 5555555555.”
or
“Your call is being sent to 5555555555.”.
Final Tests
With all these changes saved, restart your application. We can test our SMS functionality by going to http://localhost:8080/greeting?mode=text&number=5555555555. Replace the number parameter with your cellphone number. You should receive the same text message as before.
Next, navigate to http://localhost:8080/greeting?mode=call&number=5555555555. If you receive a phone call, then congratulations! We are finished with the application.

Wrapping Up
This is just a small taste of what Spring MVC has to offer and how you can use it with Twilio. Be sure to refer to the Twilio documentation as well as the Spring MVC documentation to see what else possible.
Spring MVC shares a lot of similarities with another framework called Tomcat. If you are interested in building more with Java check out my recent post on building a standalone voicemail with tomcat and twilio.
If you ran into any issues or have feedback on this tutorial, please don’t hesitate to leave a comment below or reach out to me via Twitter @brodan_ or email me at chranj@twilio.com.


Related Resources
Twilio Docs
From APIs to SDKs to sample apps
API reference documentation, SDKs, helper libraries, quickstarts, and tutorials for your language and platform.
Resource Center
The latest ebooks, industry reports, and webinars
Learn from customer engagement experts to improve your own communication.
Ahoy
Twilio's developer community hub
Best practices, code samples, and inspiration to build communications and digital engagement experiences.