How to Create A Text-To-Subscribe App in PHP Using Twilio and Laravel

May 24, 2019
Written by
Samuel Ogundipe
Contributor
Opinions expressed by Twilio contributors are their own

How to Create A Text To Subscribe App in PHP Using Twilio and Laravel.jpg

Introduction

The world has gone global and almost everyone has access to the internet every day. However, we shouldn’t leave out those without smartphones or regular PC’s. One way to cater to them is by creating SMS friendly applications, where even with the least data-capable phones, they can access our services. In this tutorial, we will use Laravel and the Twilio SMS API to make a text-to-subscribe app.

Perquisites

This tutorial assumes that the reader has a basic knowledge of PHP and Laravel. It also assumes that you have Composer set up and installed on your local system. 

Set Up A Twilio Phone Number

To create a text-to-subscribe app, we need a phone number where our users can send text messages to. When the messages are received they will call our API to trigger the actions. 

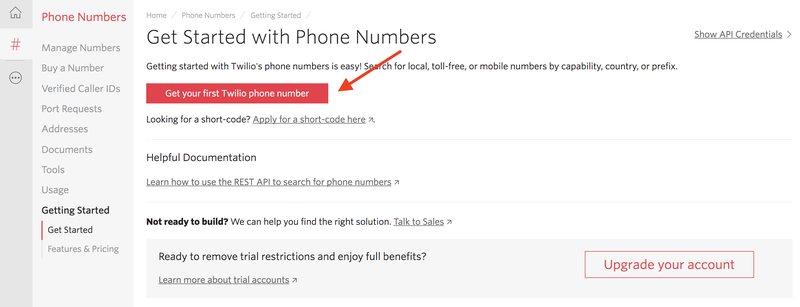
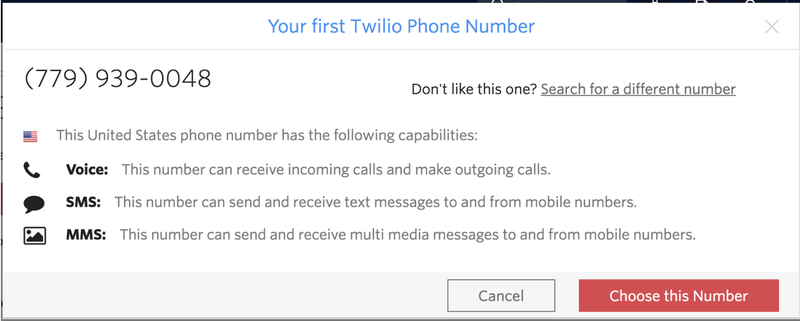
Login to your Twilio account if you already have one, or sign up for a new one. Once you are logged in, locate the # sign at the left side-bar of the site, and click on it. This will open a new page which shows a button that says “Get your first Twilio phone number”. Click the button and choose the selected number as shown below:

Extend The Inbuilt Laravel Registration Form To Accept A Phone Number

Now we have our phone number ready, let’s create a Laravel app. To do that, we run:

# install the latest version of laravel installer
$ composer global require laravel/installer
# create the laravel app
$ laravel new twilio_sms_app

Now that we have our basic app set up, we need to create the auth scaffolding so we can edit it while extending the inbuilt Laravel authentication system. To do that, we run:

$ php artisan make:auth

Once the command has completed, before we run our migrations, let’s edit our user's migration to have a new column called phone. Open database/migrations/2014_10_12_000000_create_users_table.php file and replace the code with:

<?php
use Illuminate\Support\Facades\Schema;
use Illuminate\Database\Schema\Blueprint;
use Illuminate\Database\Migrations\Migration;


class CreateUsersTable extends Migration
{
    /**
     * Run the migrations.
     *
     * @return void
     */
    public function up()
    {
        Schema::create('users', function (Blueprint $table) {
            $table->increments('id');
            $table->string('name');
            $table->string('email')->unique();
            $table->timestamp('email_verified_at')->nullable();
            $table->string('password');
            $table->string('phone');
            $table->rememberToken();
            $table->timestamps();
        });
    }


    /**
     * Reverse the migrations.
     *
     * @return void
     */
    public function down()
    {
        Schema::dropIfExists('users');
    }
}

If you look at the code above, you will notice the addition of this line $table->string(‘phone’);

Next, we need to update the controller, models, and views to recognize the new phone field. Open app/Http/Controllers/Auth/RegisterController.php and replace with:

<?php


namespace App\Http\Controllers\Auth;

use App\User;
use App\Http\Controllers\Controller;
use Illuminate\Support\Facades\Hash;
use Illuminate\Support\Facades\Validator;
use Illuminate\Foundation\Auth\RegistersUsers;


class RegisterController extends Controller
{
    /*
    |--------------------------------------------------------------------------
    | Register Controller
    |--------------------------------------------------------------------------
    |
    | This controller handles the registration of new users as well as their
    | validation and creation. By default this controller uses a trait to
    | provide this functionality without requiring any additional code.
    |
    */


    use RegistersUsers;


    /**
     * Where to redirect users after registration.
     *
     * @var string
     */
    protected $redirectTo = '/home';


    /**
     * Create a new controller instance.
     *
     * @return void
     */
    public function __construct()
    {
        $this->middleware('guest');
    }


    /**
     * Get a validator for an incoming registration request.
     *
     * @param  array  $data
     * @return \Illuminate\Contracts\Validation\Validator
     */
    protected function validator(array $data)
    {
        return Validator::make($data, [
            'name' => ['required', 'string', 'max:255'],
            'email' => ['required', 'string', 'email', 'max:255', 'unique:users'],
            'phone' => ['required', 'string', 'max:30', 'unique:users'],
            'password' => ['required', 'string', 'min:6', 'confirmed'],
        ]);
    }


    /**
     * Create a new user instance after a valid registration.
     *
     * @param  array  $data
     * @return \App\User
     */
    protected function create(array $data)
    {
        return User::create([
            'name' => $data['name'],
            'email' => $data['email'],
            'phone' => $data['phone'],
            'password' => Hash::make($data['password']),
        ]);
    }
}

In the code above, we will notice two new additions: 

  • The first addition is the phone field we have added in the validator-rules, which sets the phone field to be unique and also required.
  • The second addition is in the array passed to the User::create call where we add the phone field to the data to be stored while creating a new user.

Now that our controller knows of this new field, we are ready to add it to the fillable array in our model, or else, it will be ignored. Open the /app/User.php file and add the phone field to the fillable array, so that it reads as follows:

 protected $fillable = [
        'name', 'email', 'password', 'phone',
 ];

For the final stage of extending this field, we have to add an input to collect and display errors from the field in the register view field. Open  resources/views/auth/register.blade.php and add the following block to the form:

<div class="form-group row">
    <label for="password" class="col-md-4 col-form-label text-md-right">{{ __('Phone') }}</label>
    <div class="col-md-6">
        <input id="phone" type="text" class="form-control{{ $errors->has('phone') ? ' is-invalid' : '' }}" name="phone" required>


        @if ($errors->has('phone'))
            <span class="invalid-feedback" role="alert">
                <strong>{{ $errors->first('phone') }}</strong>
            </span>
        @endif
    </div>
</div>

Implement A Callback API To Interact With Your Twilio Phone Number 

Now that we have set up our app to receive phone numbers on registration, it is time to set up a callback to interact with our Twilio number. First, let’s create a new model and controller to handle subscriptions. To do that, let’s run:

$ php artisan make:model -mc subscriptions

The above command will generate a model, controller and migration file for subscriptions. Open the newly generated migration and replace it with the following code:

<?php

use Illuminate\Support\Facades\Schema;
use Illuminate\Database\Schema\Blueprint;
use Illuminate\Database\Migrations\Migration;

class CreateSubscribtionsTable extends Migration
{
    /**
     * Run the migrations.
     *
     * @return void
     */
    public function up()
    {
        Schema::create('subscriptions', function (Blueprint $table) {
            $table->increments('id');
            $table->unsignedInteger('user_id');
            $table->foreign('user_id')->references('id')->on('users');
            $table->boolean('status');
            $table->timestamps();
        });
    }


    /**
     * Reverse the migrations.
     *
     * @return void
     */
    public function down()
    {
        Schema::dropIfExists('subscriptions');
    }
}

The migration above is simple. Here, we create a table that holds the user_id which is the id of the client and the subscription status which is a boolean. Next, we run migrations so we can have all the tables migrated.

NOTE: Before you run migrations, you must have updated the DB driver and connection details in your .env file. 

$ php artisan migrate

Add the following route to our routes/api.php file:

Route::post('/twilio/callback', 'SubscriptionsController@index')->name('twilio');

In this route, we called the index method of our SubscriptionsContoller class, which we will create now. Open the app/Http/Controllers/SubscriptionsController.php, and add the following use statement:

use Illuminate\Support\Facades\Log;

We want to use the Log class above to see what the content Twilio sends to us will look like. Next, create a new index() method as seen below:

public function index(Request $request){
  Log::info($request->all());
}

To get the Log from Twilio, we need to set our development API as our callback URL. To do that, we need to expose our API to the public and then set it as our callback URL in Twilio settings. We will expose our API to the public by installing and using  Ngrok. You can install Ngrok by following the instructions here. Once installation is complete, we fire it up by directing DNS traffic to the port Laravel is running from:

./ngrok http 8000

Next, we add the generated link to our callback by going here, clicking on the number we want to use, and then updating the webhook with our new link so it looks like this:

Adding Verified Caller IDs So We Can Test Our App

An existing non-Twilio phone number, like the number to a wireless phone or a landline in your home or office, must be validated on your Twilio project before it can be used for an outbound call or SMS testing. A free trial account is available, should you need it for testing.

  1. Login to your account at www.twilio.com/console.
  2. Click Phone Numbers #
  3. Click Verified Caller IDs.
  4. Click the red + sign icon 
  5. +, or Verify a number.
  6. Enter the desired phone number to verify, and then click Call Me.

NOTE: Click Text you instead to receive a text message for verification.

Now that we have verified our phone number, we can send any text to the phone number which we created via Twilio from our verified number, and the post value would be logged. If we check our Laravel log, we will see a structure similar to this:

array (
  'ToCountry' => 'US',
  'ToState' => 'LA',
  'SmsMessageSid' => 'SM3c21558e00d699bb6a92c4b45eee13ed',
  'NumMedia' => '0',
  'ToCity' => 'LULING',
  'FromZip' => NULL,
  'SmsSid' => 'SM3c21558e00d699bb6a92c4b45eee13ed',
  'FromState' => NULL,
  'SmsStatus' => 'received',
  'FromCity' => NULL,
  'Body' => 'Test tweako',
  'FromCountry' => 'NG',
  'To' => '+19852404228',
  'ToZip' => '70070',
  'NumSegments' => '1',
  'MessageSid' => 'SM3c21558e00d699bb6a92c4b45eee13ed',
  'AccountSid' => 'AC06acaecd9c1558893647cb13f177442d',
  'From' => '+2348052016214',
  'ApiVersion' => '2010-04-01',
)

Implement The Twilio SDK To Send Messages Back To The Subscribing Number

Now that we know the structure of the incoming message data. let’s implement the actual subscribing and responding via SMS. To get started, add the Twilio SDK to your Laravel project by running the following:

$ composer require twilio/sdk

Next, replace the content of app/Http/Controllers/SubscriptionsController.php with:

<?php

namespace App\Http\Controllers;

use Illuminate\Http\Request;
use Illuminate\Support\Facades\Log;
use Twilio\Rest\Client;
use App\User;
use App\subscriptions;


class SubscriptionsController extends Controller
{
    //
    private $client;
    public function __construct()
    {
        $account_sid = 'XXX_ACCOUNT_SID';
        $auth_token = 'XXX_ACCOUNT_TOKEN';
        $this->client = new Client($account_sid, $auth_token);
    }
    public function index(Request $request){
        $from = $request->input('From');
        $to = $request->input('To');
        $message = strtolower($request->input('Message'));
        // check if number is registered
        $isRegistered = User::where('phone', $from)->first();
        if(!$isRegistered){
            return $this->askToRegister($from, $to, $request->getSchemeAndHttpHost());
        }
        switch ($message) {
            case 'subscribe':
                # code...
                return $this->subscribe($from, $to, $isRegistered);
                break;
            case 'cancel':
            return $this->unSubscribe($from, $to, $isRegistered);
                # code...
                break;
            default:
                return $this->showAccepted($from, $to,  $isRegistered);
                break;
        }
    }


    public function subscribe($userNumber, $myNumber, $userDetails){
        $subscribe = subscriptions::where('user_id', $userDetails->id)->first();
        $message = '';
        if($subscribe){
            if(!$subscribe->status == true){
                $message .= "You are already subscribed to the service. Send cancel if you want to unsubscribe";
            }else{
                $message .= "You have been sucessfully subscribed. Send cancel if you want to unsubscribe";
                $subscribe->status = 1;
                $subscribe->save();
            }
        }else{
            $message .= "You have been sucessfully subscribed. Send cancel if you want to unsubscribe";
            $flight = new subscriptions;
            $flight->user_id = $userDetails->id;
            $flight->status = true;
            $flight->save();
        }
        $body = "Hi $userDetails->name, $message";
        return $this->sendSms($userNumber, $myNumber, $body);
    }


    public function unSubscribe($userNumber, $myNumber, $userDetails){
        $subscribe = subscriptions::where('user_id', $userDetails->id)->first();
        $message = '';
        if(!$subscribe){
            $message .= "You are not yet subscribed to the service, Please send 'subscribe' to subscribe";
        }else{
            if($subscribe->status == false){
                $message .= "You are already unsubscribed to the service. Send subscribe if you want to subscribe";
            }else{
                $message .= "You have been sucessfully unsubscribed from the service. Send subscribe to rejoin";
                $subscribe->status = false;
                $subscribe->save();
            }
        }
        $body = "Hi $userDetails->name, $message";       
        return $this->sendSms($userNumber, $myNumber, $body);
    }


    public function showAccepted($userNumber, $myNumber, $userDetails){
        $body = "Hi $userDetails->name, \r\n you have sent an incorrect keyword. \r\n Please try any of this: \r\n 1.) subscribe \r\n 2.) cancel";
        return $this->sendSms($userNumber, $myNumber, $body);
    }
    public function askToRegister($userNumber, $myNumber, $url){
        $body = 'Hi there, you are not a registered number yet. Please logon to '.$url.' to register';
        return $this->sendSms($userNumber, $myNumber, $body);
    }


    public function sendSms($userNumber, $myNumber, $body){
        return $this->client->messages->create(
            // Where to send a text message (your cell phone?)
            $userNumber,
            array(
                'from' => $myNumber,
                'body' => $body
            )
        );
    }
}

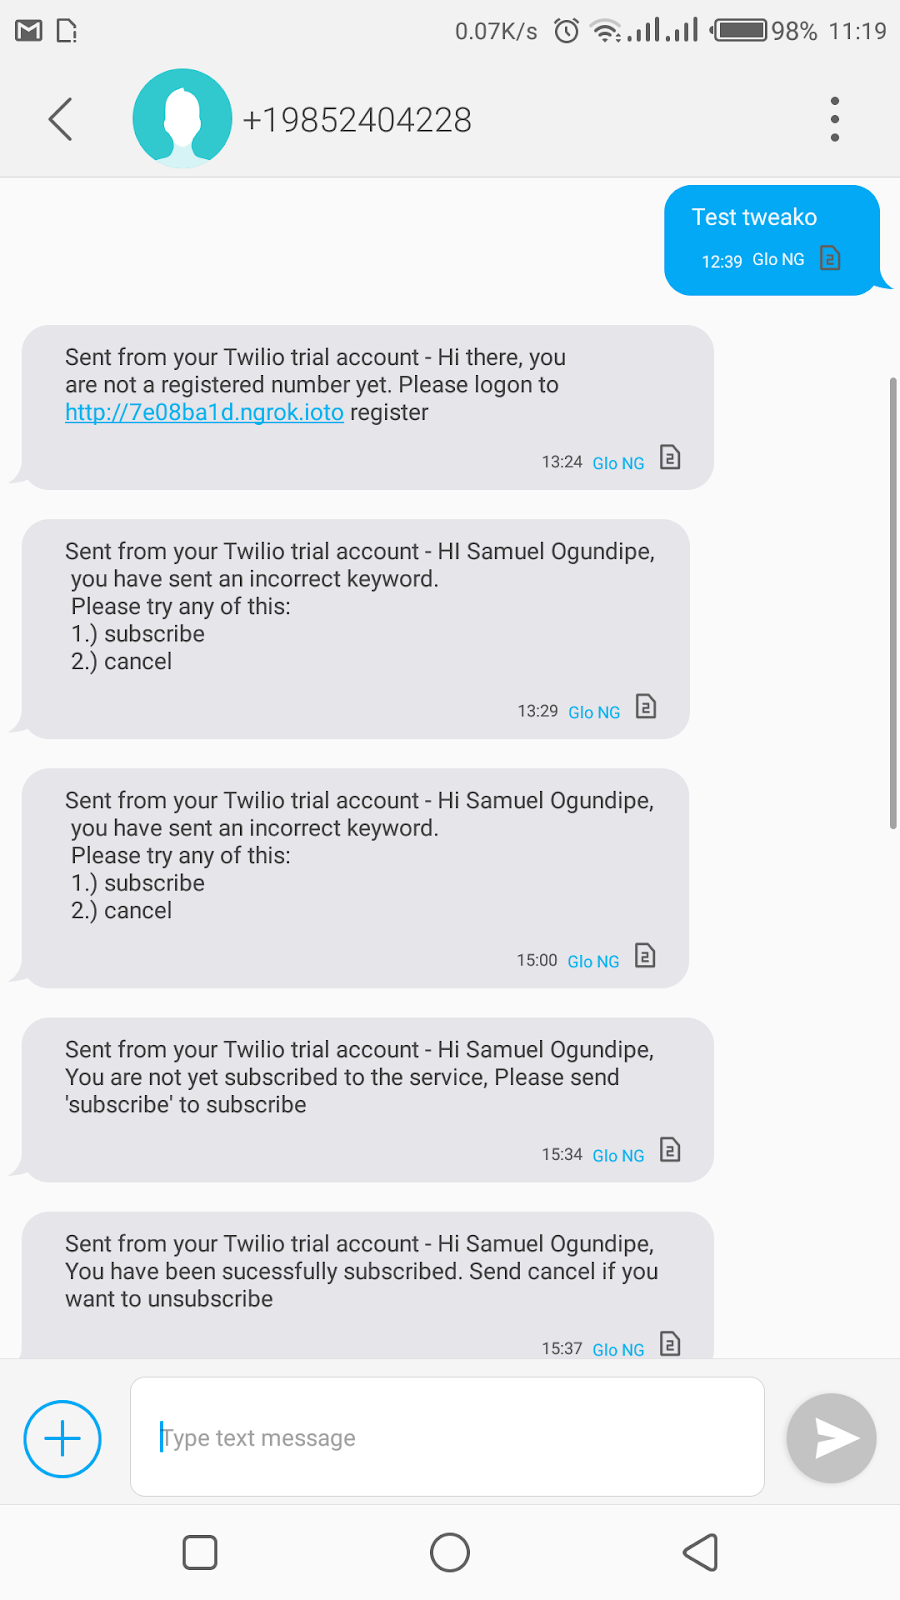
What is going on in the code above? First, we require the Twilio SDK. Then we set it up using our account sid and the secret key. (To know where to get your own credentials, please read here.) Next, we capture the message, sender, and the phone number to which it was sent (our Twilio number). We then see if the user is already registered or not. When the user isn’t registered, we send them a message asking the user to register. 

In the event that the user is registered, we check for which command the user has sent and trigger the corresponding function. When the command isn’t one we observe, we send the user the list of commands we accept. 

Conclusion

Now you have set up a simple text to subscribe app! You can see how easy it is to repeat this formula and set up more interesting applications in less time. You could extend the current application by accepting registrations via the text to subscribe method, which makes your app even better.  The code base to this lesson is available in a publicly hosted GitHub Repository. Please experiment with it and let me know

Ogundipe Samuel. Software Engineer and Technical writer. I would love to connect with you on my WebsiteGithub and Twitter.