How to Send an SMS with Twilio, Rust, and OpenAPI
Time to read:
July 11, 2022
Written by
Reviewed by

Rust maintains its status as the most beloved programming language for seven years in a row according to Stack Overflow’s 2022 Developer Survey, so I decided to see what the hype was all about and figure out how I could integrate the language with Twilio’s products. With OpenAPI and Twilio’s OpenAPI specification, you can generate your own helper library in any supported language, including Rust.
In this tutorial, you will learn how to set up a Rust file that, once executed, will send a text message to your specified phone number using Twilio’s Programmable Messaging API.
Prerequisites
To follow along with this tutorial, you will need:
- A free or paid Twilio account. If you are new to Twilio, click here to sign up for a free Twilio account and get a $10 credit when you upgrade!
- A Twilio phone number
- A personal phone number
Setting up your developer environment
The first step is to install Rust onto your computer. Follow these instructions to install Rust and the required build tools if you do not have any installed in your system.
Next, install the OpenAPI Generator using one of the methods provided. There are multiple methods for Linux, macOS, and Windows, so choose the method most suitable to your preferences and operating system. You don’t need to generate any libraries after installing the generator, but it may help to do so to verify if you installed the generator correctly.
Now it’s time to create the folder structure for this tutorial. Close and reopen your terminal to ensure the necessary Rust tools can be accessed from your terminal, then navigate to the directory you want to store this project in and run the following lines of code:
This code creates a new directory called rust-sms-tutorial, then navigates into it.
Then, this code generates a Rust library from Twilio’s OpenAPI specification and stores it in a folder called twilio-rust.
Finally, this code creates a new Rust project called rust-sms, navigates into it, and creates the file .env. If you are planning to commit this project to an online repository, ensure that you do not commit your credentials by creating a .gitignore file.
Next, you’ll be installing the crates that you will use for this tutorial:
dotenv: to load important credentials that are stored safely in a file called .envtokio: to perform asynchronous tasks and await responsesopenapi: to utilize Twilio services
Open up the file Cargo.toml and copy and paste the following code below the line [dependencies] on the bottom of the file:
To install the crates in your application and compile your entire Rust project, run the following command:
The compilation process will take a bit of time to complete; once it’s finished, your terminal should look like this:
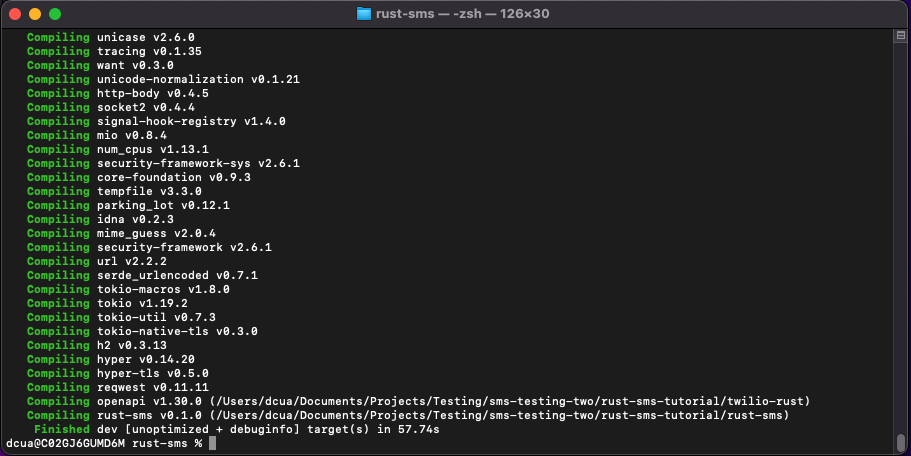
Now, you can move onto the next step: getting the required credentials.
Getting your Twilio credentials
Open the .env file that you generated earlier then copy and paste the following code:
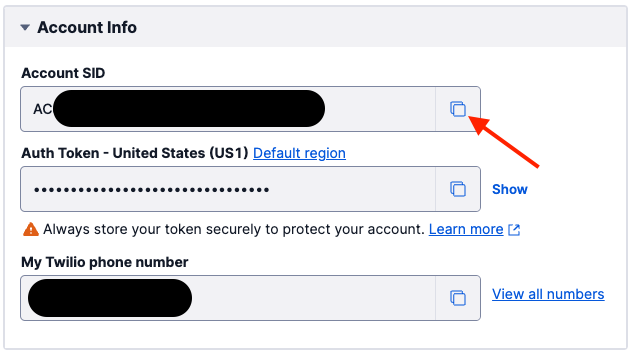
Navigate to your Twilio Console and locate the box at the bottom of the page labeled Account Info. Copy your Account SID and paste it immediately after TWILIO_ACCOUNT_SID= in your .env file.
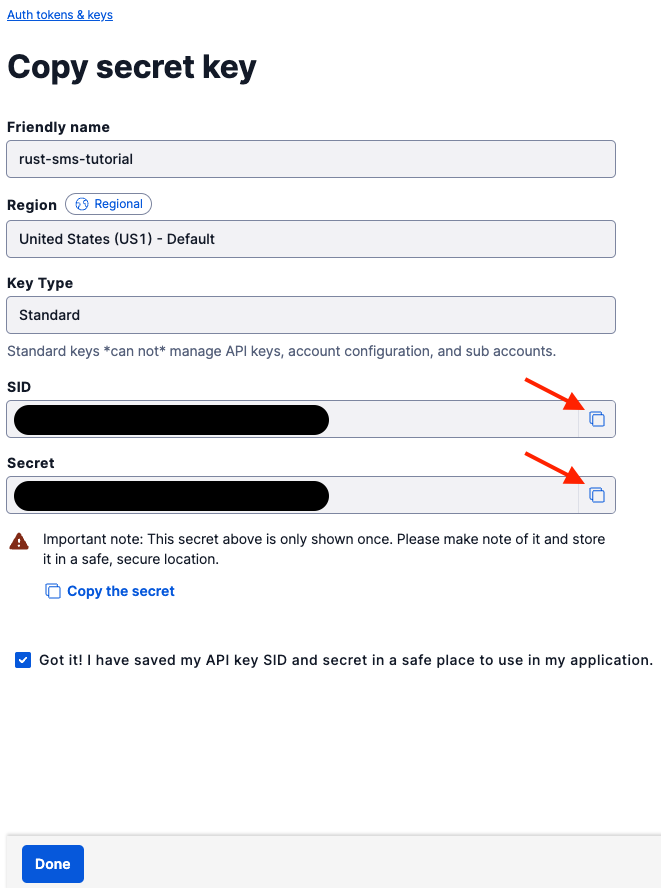
Next, navigate to the Auth tokens & API keys page by clicking this link. Hit the blue button in the top left corner labeled Create API key. Under Friendly name, enter a name that will distinguish this API key from any others you’ve made. For this tutorial, I named my API key “rust-sms-tutorial”. Hit the blue button on the bottom of the screen labeled Create API Key.
Copy your API key SID located under the SID heading and paste it immediately after TWILIO_API_KEY_SID= in your .env file. Repeat that process with your API key secret located under the Secret heading and paste it immediately after TWILIO_API_KEY_SECRET= in the same file.
Finally, add the Twilio phone number you want to send the message from (located in the Active Numbers page, assuming you acquired a Twilio phone number) immediately after TWILIO_PHONE_NUMBER= and the phone number you want to send the message to immediately after TO_NUMBER=.
With your credentials set, you can now add the code that will send your first SMS in Rust!
Sending an SMS
First, you’ll need to import the necessary modules into your main file. In src/main.rs, replace the preexisting code with the following:
This code pulls in modules from the dotenv and openapi crates you installed earlier, as well as the standard Rust module env, which allows you to read your environment variables after they’ve been loaded.
Next, define your main function by copying and pasting the following code below the imports:
This code initializes the main function with the tokio::main attribute that creates an asynchronous runtime. Additionally, it loads and reads your credentials found in .env, then imports the default configuration necessary for your Twilio API to work and sets the basic_auth parameter in the configuration.
Below the line that sets the basic_auth parameter but above the closing curly bracket, add the highlighted code:
This final portion of the code pulls in the create_message() function from the twilio_api module, sets the necessary parameters to send a message and awaits a response, then either sets the result variable to a Message struct and prints the message’s SID, or panics if an error occurs.
Run the following command in your terminal and you should get a text message sent from your Twilio phone number to the number you designated:
Your main.rs file should look like this:
Conclusion
Congratulations—you’ve successfully sent your first Twilio SMS with Rust! This barely scratches the surface of functionality that both Rust and the Twilio API provide, so check out the official Rust book to learn more about Rust and the official Twilio documentation to learn how to utilize all of Twilio’s products. You can also check out some more things you can do with the Twilio OpenAPI Specification and check out the documentation page that inspired this post.

I can’t wait to see what you build!
Dainyl Cua is a Developer Voices Intern on Twilio’s Developer Network. They would love to talk at any time and help you out. They can be reached through email via dcua[at]twilio.com or through LinkedIn.


Related Resources
Twilio Docs
From APIs to SDKs to sample apps
API reference documentation, SDKs, helper libraries, quickstarts, and tutorials for your language and platform.
Resource Center
The latest ebooks, industry reports, and webinars
Learn from customer engagement experts to improve your own communication.
Ahoy
Twilio's developer community hub
Best practices, code samples, and inspiration to build communications and digital engagement experiences.