Web Powered SMS Inbox with Service Worker: Push Notifications
Time to read: 11 minutes
February 18, 2016
Written by
Recently I have been building a web application that I can use as a fully featured SMS messaging application for a Twilio number. It has a list of all messages sent and received and can be used to send new messages and reply to existing conversations.
It’s a pretty tidy little application that hasn’t taken long to build so far, but it currently has one drawback. To check for new messages you have to open the application up and look at it. Nightmare. This is how web applications have worked for a long time, however, starting last year with Chrome and earlier this year with Firefox, this is no longer a limitation of the web. The Service Worker is the API that powers this. From MDN:
Service workers essentially act as proxy servers that sit between web applications, and the browser and network (when available). They are intended to (amongst other things) enable the creation of effective offline experiences […] . They will also allow access to push notifications and background sync APIs.
Both Chrome and Firefox now support push notifications via Service Workers and in this post we are going to add a feature to the SMS application to send a push notification whenever the connected Twilio number receives an incoming message.
The tools we will need
In order to build this feature today you will need:
- A Twilio account (sign up for a free account here)
- A Twilio number that can send and receive SMS messages (buy your number in your account portal here)
- A Google account (we’ll be using the Google developer console later)
- Node.js to run the application
- ngrok so that we can direct webhooks to our application
- Firefox and Chrome to test out the notifications
Got all that sorted? Great, let’s get the application up and running.
Running the application
First we’ll need to clone the base application from GitHub:
The application will be going through further updates, so the above commands include checking out the version of the application which we will be working with in this post. If you just want the code from this post, check out the repo’s with-push-notifications branch.
Once you have the application downloaded install the dependencies:
We need to add some configuration to the app so that we can access our Twilio number. Copy the file named .env.example to .env and fill in your Twilio Account SID and Auth Token, available in your account portal, and your Twilio number that you want to use with this application.
Now start the app:
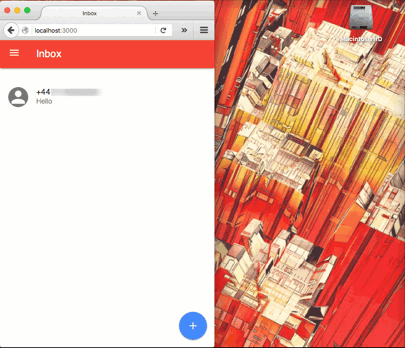
Load up the app in your browser, it will be available at http://localhost:3000. Send an SMS to your Twilio number, refresh the app and you’ll see the incoming message. Now we’ve dealt with that user experience, let’s add push notifications to the application.
Introducing the Service Worker
To use a Service Worker we need to install it from the front end of our application. We’ll then need to get the user’s permission to send push notifications. Once that is done we’ll write the Service Worker code to handle incoming push notifications. Finally, we’ll need to update our back end to receive webhooks from Twilio when it receives an SMS for our number and trigger the push notification.
If you want to read a bit more in depth about how the Service Worker actually works, then check out this introduction to the Service Worker on HTML5 Rocks. If you want to dive straight into the code, carry on below.
Note that to work in production, Service Workers require HTTPS to be setup on the server. In development however, they do work on localhost.
Installing the Service Worker
We need to create a couple of new files, our application’s JavaScript and the Service Worker file.
Add the app.js file to the bottom of views/layout.hbs:
Open up public/js/app.js and let’s install our Service Worker:
We check for the existence of the Service Worker in the navigator object and then attempt to register our script. That registration returns a Promise which resolves with a registration object. That object has a pushManager which we need to subscribe to.
We pass one argument to the pushManager‘s subscribe method. The argument is currently required and it indicates that this subscription will be used to show visible notifications to the end user. Subscribing also returns a Promise which resolves with a subscription object. We’ll just log this for now. We also finish the Promise chain to catch and log any errors that may occur during the process.
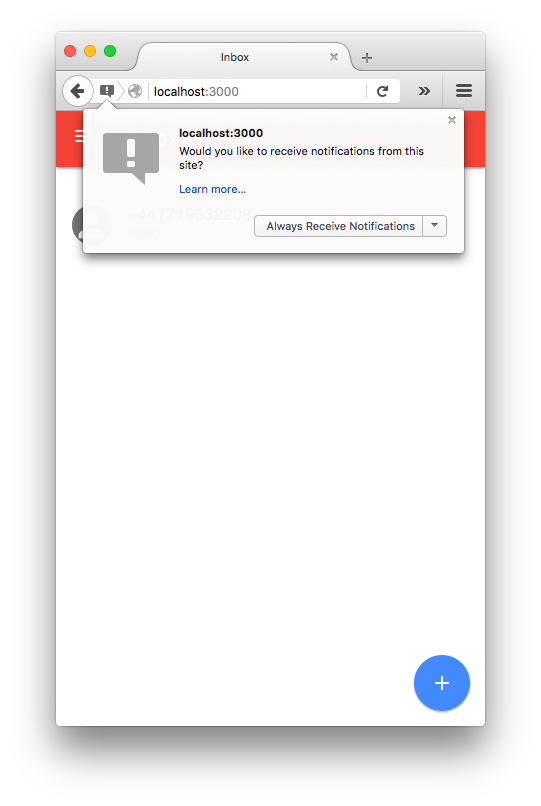
Save the file and load up the application in Firefox (this is important, we haven’t done everything we need for Chrome just yet). As the page loads you will see a permissions dialog asking whether you would like to receive notifications from this site. If you approve the dialog and check the console you will see the subscription object in the log.
Inspecting the subscription object you will find an endpoint property. This endpoint is a unique URL that refers to this browser and this application and is what you use to send the push notification to this user. We need to save this on our server so that our back end application can send the notifications when we get to implementing that part.
Storing the endpoint
Let’s build a route on the server side of our application to receive that endpoint and save it for use later. Open up routes/index.js and declare a new variable after we instantiate our Twilio client:
We’re just going to save the endpoint to memory for this application as there is currently no other storage in the app and including a database is out of scope for this article. Now, underneath that, create a new route for the application that receives the endpoint and sets it to the variable that we just created.
This route just saves the endpoint and returns a 200 OK status. Let’s update our Service Worker installation script to post the endpoint to this route:
I’m using the new Fetch API here which is both a significantly nicer API than the old XMLHttpRequest API that we’ve all come to live with love. Browsers that support Service Workers also support the Fetch API, so we don’t need to any more feature detection.
In this case we don’t expect to do anything with the result from fetch but as it returns a Promise our catch at the end will log any issues with it.
Now we’re delivering our push notification endpoint to our server, let’s write the Service Worker code itself.
Implementing the Service Worker
The Service Worker listens to incoming events, so we need to write handlers for the ones we care about. For this application we are going to listen for the push event, which is fired when the Service Worker receives a push notification, and the notificationclick event, which is fired when a notification is clicked.
Within public/service-worker.js the keyword self refers to the worker itself and is what we will attach the event handlers to.
Open up public/service-worker.js and paste in the following code that responds to the push event.
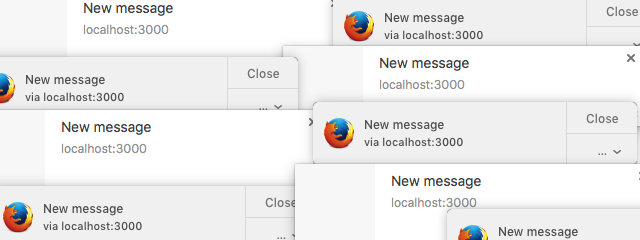
When the Service Worker receives a push notification this will show a very simple notification with a title of “New message”. We’re just adding a title to the notification here, but there’s more options available.
The other thing to note in this example is that we pass the result of the call to showNotification to event.waitUntil. This method allows the push event to wait for asynchronous operations in its handler to complete before it is deemed over. This is important because Service Workers can be killed by the browser to conserve resources when they are not actively doing something. Ensuring the event stays active until the asynchronous activities are over will prevent that from happening whilst we try to show our notification. In this case, showNotification returns a Promise so the push event will remain active until the Promise resolves and our notification shows to the user.
Next, let’s create a simple handler for when the notification we show above is clicked on.
For this, we listen for the notificationclick event and then use the Service Workers Clients interface to open our application in a new browser tab. Like the notification, there’s more we can do with the clients API, but we’ll keep it simple for now.
Now that we’ve set our Service Worker up we need to actually trigger some push notifications.
Receiving webhooks and sending push notifications
We want to trigger a Service Worker push notification when our Twilio number receives an incoming text message. Twilio tells us about this incoming message by making an HTTP request to our server. This is known as a webhook. We’ll create a route on our server that can receive the webhook and then dispatch a push notification.
Let’s create the route for our webhook on our server. Open up routes/index.js and add the following code:
Here we are just writing two of the parameters we receive from Twilio in the webhook, the number that sent the message and the body of the message, to the console and then returning an empty <Response> element as XML to let Twilio know that we don’t want to do anything more with this message now.
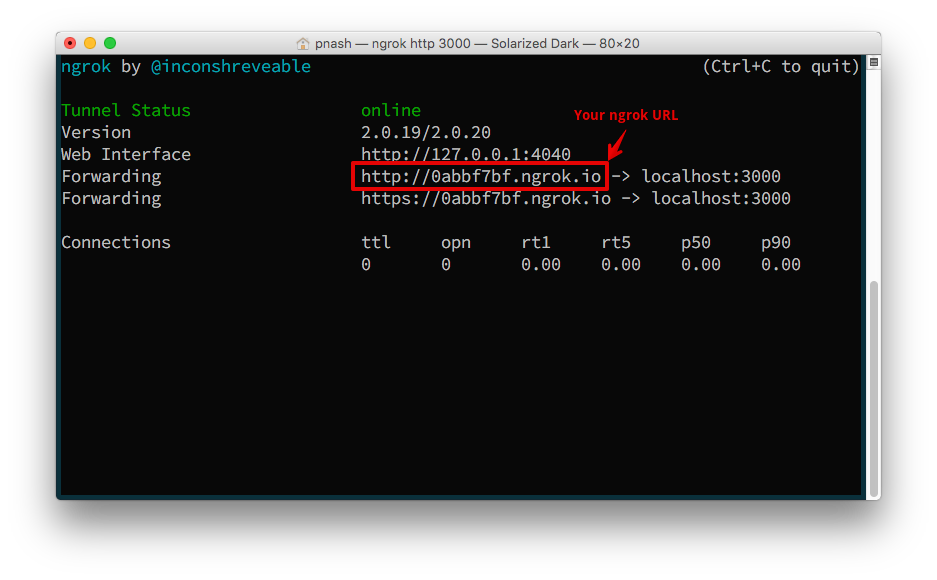
Let’s hook up our Twilio number to this webhook route to check that it’s working. Restart your server. It will be running on localhost:3000 so we need to make that available to Twilio. This is where ngrok comes into play. Start ngrok up tunnelling traffic through to port 3000 with the following command:
Grab the URL that ngrok gives you as the public URL for your application and open up the Twilio account portal.
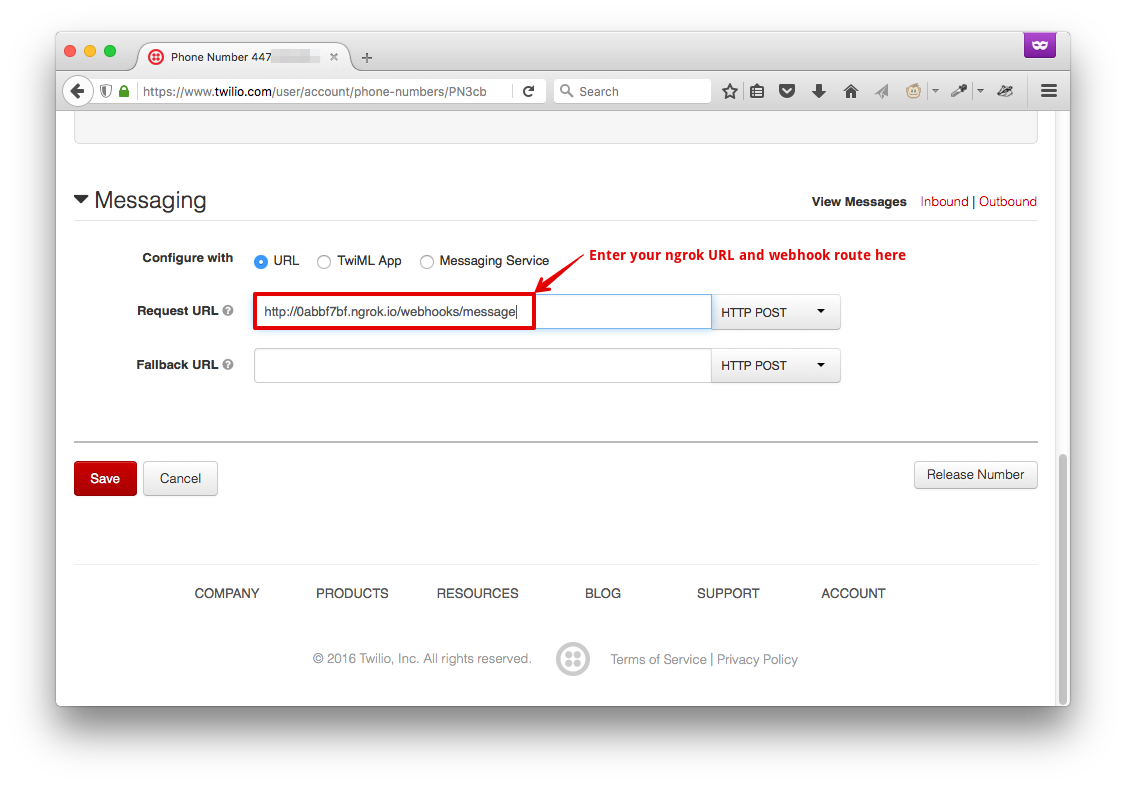
Edit the phone number you bought for this application and enter your ngrok URL + /webhooks/message into the Request URL field for messages.
Now, send a message to your Twilio number. You should see the parameters appear in the console. Great, we’re receiving our incoming text messages. Now we need to trigger our push notification.
The web push module
To help us send push notifications, especially as it is currently different between Firefox and Chrome, we are going to use the web-push module that is available on npm. Install that in the application with the following command:
Next require the web-push module in our routes/index.js file.
Now, in the /webhooks/message route, we can trigger a push notification. We’ll use the endpoint we saved earlier and we can also set a time limit for how long the push service will keep the notification if it can’t be sent through immediately. Update the webhook route to the following:
I’ve set the timeout for the notification to 2 minutes (120 seconds) in this case, but you can choose the most appropriate for your application.
Let’s test this again. Restart your server, visit the application in Firefox and then send an SMS to your Twilio number. You should receive the push notification and see the notification on screen.

Even better, close the tab with the application loaded and send another text message.
Woohoo, push notifications are working… in Firefox.
Push notifications for Chrome
As Firefox only recently launched support for push notifications, they were able to conform closely to the W3C Push API spec. When support in Chrome was released the spec wasn’t as mature. So right now, Chrome uses Google Cloud Messaging to send notifications, the same service that Android developers use to send notifications to their mobile apps. Thankfully the Web Push module covers most of the difference, we just need to add a couple of things.
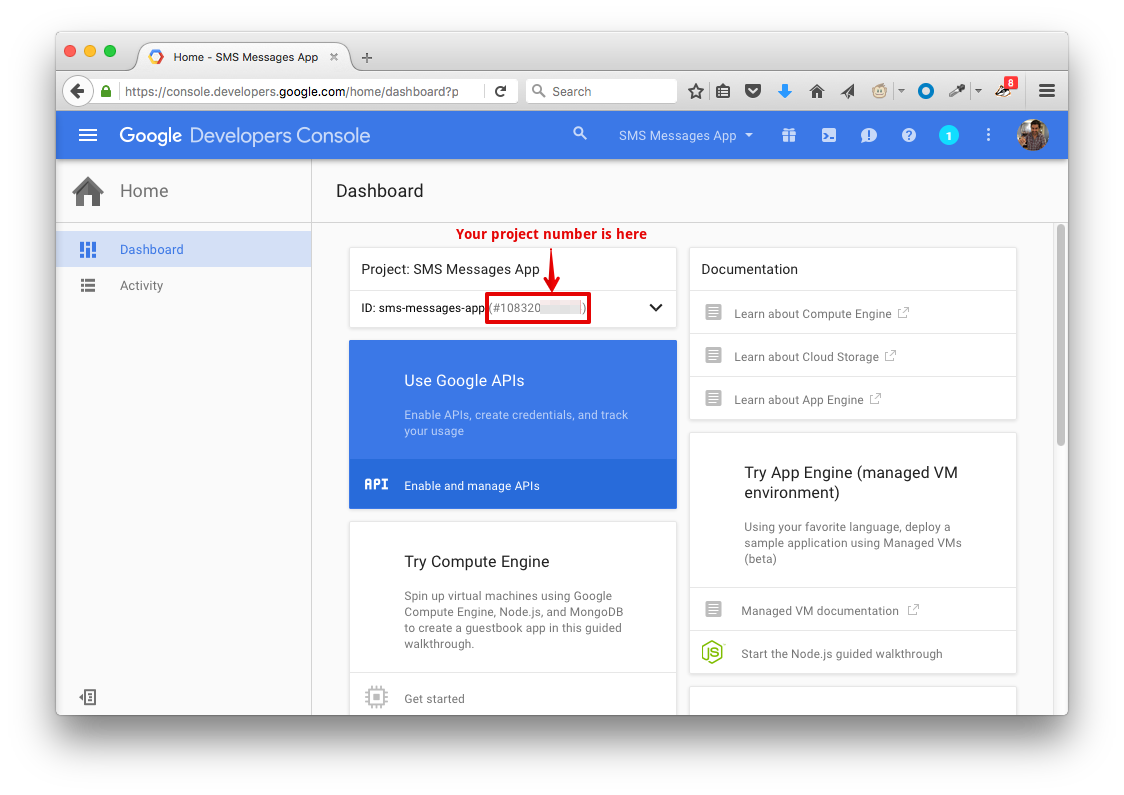
To add support for Chrome to our application we need to create ourselves a project in the Google Developer Console. You can call the project whatever you want, but take note of the project number that is generated.
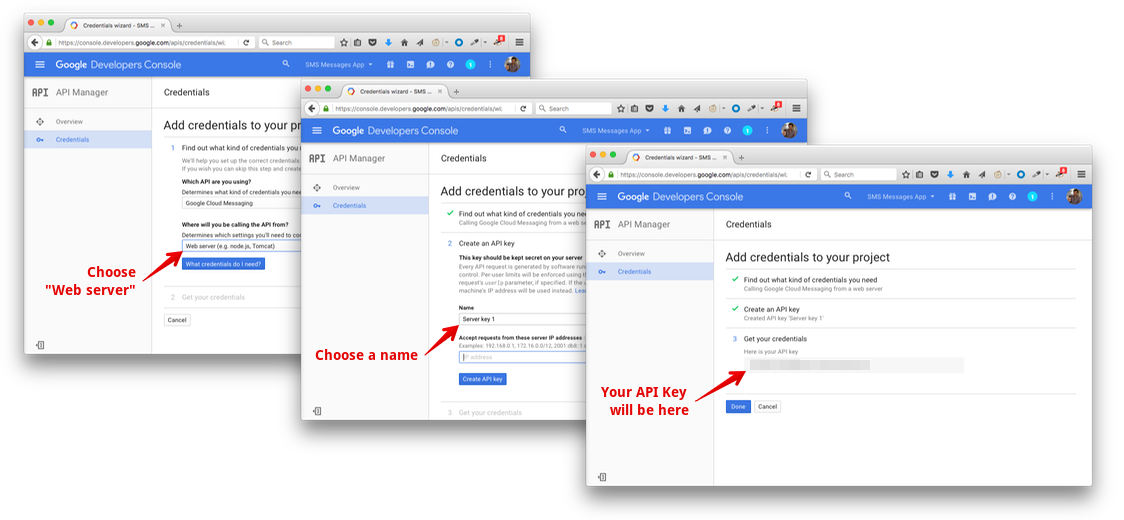
Once you have created the project, click through to “Enable and manage APIs”, find the Google Cloud Messaging service and enable it. Once that is enabled, click “Go to credentials” and fill in the fields with “Google Cloud Messaging” and “Web server” and submit. Then name the key and generate it.
Now you have your API key and project number, head back to the code. We need to provide the project number to the browser and the API key to our server. We do that by adding a web app manifest to our front end and by configuring the Web Push module with the API key on the server.
Web App Manifest
A Web App Manifest is a JSON file that gives metadata about a web application to a browser or operating system to make the installable web application experience better. We are going to use a very minimal app manifest in order to get our push notifications working, so create the manifest file in the public directory:
And fill the manifest file with a few details:
Note, this is where you need to fill in your project number from the Google Developer Console.
Now we need to make our application aware of the manifest. Open up views/layout.hbs and add the following tag to the of the layout:
That’s the front end sorted, now to the server. Open up your .env file and add one line with your API key:
Finally, open up index/routes.js and set the API after you require the Web Push module.
Restart the application, load up localhost:3000 in Chrome, start sending text messages and watch the notifications arrive!
The web is getting pushy
We’ve seen today how to get started with Service Workers and use them to send push notifications when we receive an incoming SMS message to our Twilio number. If you want to check out the completed code from this post, take a look at this branch on the GitHub repo.
There’s lots more we could do with Service Workers now, how about:
- Implement browser push notifications for IP Messaging or TaskRouter
- Show information about the incoming SMS in the notification
- Use the Service Worker to make this application work offline too
If you’re excited about what the Service Worker brings to the web then I’d love to hear about it. Hit me up on Twitter at @philnash or drop me an email at philnash@twilio.com.

Related Resources
Twilio Docs
From APIs to SDKs to sample apps
API reference documentation, SDKs, helper libraries, quickstarts, and tutorials for your language and platform.
Resource Center
The latest ebooks, industry reports, and webinars
Learn from customer engagement experts to improve your own communication.
Ahoy
Twilio's developer community hub
Best practices, code samples, and inspiration to build communications and digital engagement experiences.