Add screen sharing to your Twilio Video application
Time to read:
January 28, 2018
Written by
In recent posts we’ve seen how to capture a user’s screen in Chrome and Firefox. Now it’s time to combine this with a real video chat application and share screens as part of a video chat.
What we’re building
In this post we’ll take the Twilio Video quickstart application and add screen sharing to it. When we are done your application will let you make calls between browsers and share screens from one to the other.
What you’ll need
To build this application you will need a few things:
- A Twilio account – you can sign up for free here
- Node.js – we need to run a server to generate access tokens for the Twilio Video service
- The Chrome extension we built in the first post (if you didn’t follow this post, there will be a copy of the extension in the repo later)
- Ngrok for testing in Firefox like last time
To get started, clone the repo from GitHub and checkout the building-screen-sharing branch:
This repo is slightly different to the quickstart repo, it includes the work from the last two blog posts, including the Chrome extension needed for screen capture in Chrome. You can follow the instructions for installing the extension from the blog post.
To prepare the video chat app change into the video-chat directory and install the dependencies:
Once that is complete, add some credentials so that we can connect to the Twilio Video service. First, copy the file .env.example to .env. Open .env and fill in the details. You’ll need your Twilio Account Sid from the Twilio console and an API key and secret.
When that is complete, run:
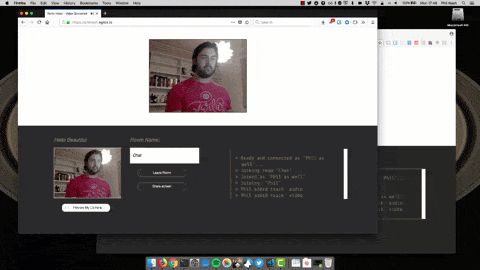
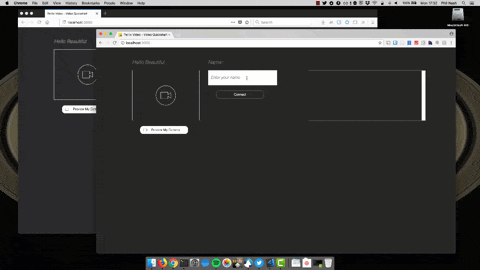
Open http://localhost:3000/ and you should be able to enter a username then a room name to join that room. Repeat the process in another browser and you’ll be in a video chat with yourself. If that’s all working you’re ready to start adding the screen sharing feature.
Adding screen sharing
To add the screen sharing there are a few tasks ahead. Firstly, check that the browser has support for capturing the screen first, otherwise we won’t do anything else. Then when a user wants to share their screen we need to work out which browser they are using and use the code from the previous two posts to get the stream. Then add the stream to the room and finally we should make a way to stop the screen sharing too.
Let’s get started.
Checking for support
Normally I like to write progressively enhanced, standards based JavaScript to detect features like this. However, as you’ve seen in the blog posts leading up to this, screen capture is not standardised yet, so we need to write some… “dirty code”.
Support for screen capture in Firefox is based on the support of the mediaSource constraint in the mediaDevices API. We can test for that with:
This is a good feature test, sadly it doesn’t do the whole job. Firefox will report that mediaSource is supported as far back as version 33, however that support was limited to a trusted set of sites. So, we also need to check that the version of Firefox we have is 52 or higher. We can read this data from the user agent with a regular expression.
Open video-chat/src/index.js and add the full function to test for Firefox support at the top.
There are a number of ways to detect if a Chrome extension is installed but they are beyond the scope of this blog post. Look out for a further post in which we explore this. For the purposes of this post I’m going to check that we can make calls against the chrome object on the window.
We also need a way to tell whether we can use screen capture at all.
Getting the user’s screen
Using the functions above and the knowledge from the previous two posts we can now get the user’s screen in browsers that support it. You’ll need the ID of your Chrome extension for this part. Add the following lines to your video-chat/src/index.js file and replace the YOUR_EXTENSION_ID placeholder with your ID:
Now we can use this function when the user wants to share their screen.
Putting it all together
For the final parts of this, we’ll hook up the interface to the function above. There is a hidden button which will be activated when we join a room. In the roomJoined function there is already some hiding and showing of buttons, add to that:
Under the event handler for the leave room button, create handlers for the share and unshare buttons:
Within the handler for the share button we want to use our getUserScreen function to get the media stream from the user’s screen and get the video track. We’ll then publish that track for the localParticipant in the room. If that is all successful we’ll change the buttons around.
For the unshare button we want to be able to unpublish the track again. For this, we’ll need a reference to the screen track. At the top of the file, declare a new screenTrack variable.
In the callback to getUserScreen remove the var keyword.
For the unshare button handler, use the screenTrack variable to unpublish the track from the localParticipant.
And that’s all the code!
Share that screen
Start the application again, if it’s not already running, with npm start. If you want to test this in Firefox, it requires the page to be served over HTTPS. You can get this easily by running ngrok and using the HTTPS URL to tunnel through to your localhost. If you’re in Chrome you can just go to http://localhost:3000.
Set up a video chat with a friend (you can send them the ngrok link) or yourself across two browsers. Once you’re in, hit the share screen button and once you’ve selected which screen to share it will appear in the other video chat.
Screen share all you like, within the right browsers
With the techniques from these three blog posts you can now screen share in your video chats in Firefox and Chrome (and Opera, with the same Chrome extension, as it happens).
There are loads of things you can do with this, from building a collaborative presentation app to augmenting customer support with browser based screen sharing. An easy feature to start with would be adding a local preview of the user’s screen so that they can see what they are sharing.
Check out the repo on GitHub for all the code from this and the previous blog posts and go add more collaboration to your video chat apps!
I’d love to hear what you build with this feature. Let me know in the comments, drop me an email at philnash@twilio.com or hit me up on Twitter at @philnash.
Related Posts
-
 How To Build An AI Phone Agent With Twilio Conversation Relay in Node.jsDhruv Patel Dylan Frankcom
 -
Build Real-Time Speech to Speech with Twilio Media Streams and NVIDIA PersonaPlexChristopher Connolly
-
Build and Test a Patient Appointment Scheduling Agent with Twilio and BluejayDeepti Naidu Rohan Vasishth
Related Resources
Twilio Docs
From APIs to SDKs to sample apps
API reference documentation, SDKs, helper libraries, quickstarts, and tutorials for your language and platform.
Resource Center
The latest ebooks, industry reports, and webinars
Learn from customer engagement experts to improve your own communication.
Ahoy
Twilio's developer community hub
Best practices, code samples, and inspiration to build communications and digital engagement experiences.