Screen Capture in Firefox
Time to read:
October 25, 2017
Written by
This post is part of Twilio’s archive and may contain outdated information. We’re always building something new, so be sure to check out our latest posts for the most up-to-date insights.
Screen sharing is a hugely useful feature you can build into a video chat. We recently saw how to capture the screen using Chrome. Support in only one browser is not much fun so you’ll be pleased to hear we can access screen capture in Firefox too. Let’s see how.
What you need
- Firefox
- A text editor
- A local web server – I like to use servedir for things like this
- Either ngrok or an equivalent tunnelling service or TLS certificates set up for localhost (we’ll see why later)
Screen capture
It was not straightforward to implement screen capture for our own application with Chrome as we needed to build an extension. Firefox, on the other hand, has supported screen capture since version 33 using the mediaSource constraint in the mediaDevices API.
However, before Firefox version 52 your site needed to be on an allow list to access screen capture in Firefox. You can see who is allowed by opening about:config in Firefox and searching for “screensharing”.
Since Firefox version 52, this capability was made available to all sites that are served over HTTPS. You could build an extension that added your site to the list, however as Firefox is up to version 56 as I write this, we won’t explore that within this post.
The code
To get access to a media stream of the screen in Firefox, the code looks a bit like this:
This works slightly different to the Chrome example in which you could pass an array of potential sources, including “window”, “screen” or “tab”. In Firefox you can only request one mediaSource at a time from the choices “screen”, “window” or “application”.
To explore how this all works in Firefox let’s build the same example application that we built for Chrome, capturing the screen then showing it in a <video> element.
Building screen capture
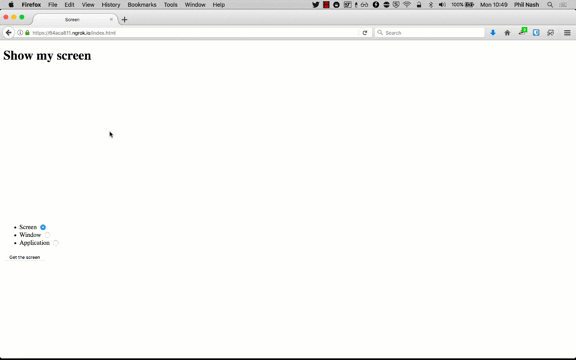
Create a new directory for this project as well as a file called index.html. All the work will be in the HTML for this example, so that is the only file you will need.
We’ll use the same HTML structure as the Chrome example, except we’ll add a set of radio buttons to select the source we want. Add the following to index.html:
<!DOCTYPE html>
<html lang="en">

<head>
  <meta charset="UTF-8">
  <meta name="viewport" content="width=device-width, initial-scale=1.0">
  <meta http-equiv="X-UA-Compatible" content="ie=edge">
  <title>Screen</title>
</head>

<body>
  <h1>Show my screen</h1>

  <video autoplay id="screen-view" width="50%"></video>
  <ul>
    <li>
      <label for="screen">Screen</label>
      <input type="radio" name="capture" id="screen" value="screen" checked>
    </li>
    <li>
      <label for="window">Window</label>
      <input type="radio" name="capture" id="window" value="window">
    </li>
    <li>
      <label for="application">Application</label>
      <input type="radio" name="capture" id="application" value="application">
    </li>
  </ul>
  <button id="get-screen">Get the screen</button>
  <button id="stop-screen" style="display:none">Stop the screen</button>

  <script>

  </script>
</body>
</html>
Within the <script> tags we’ll start with some of the code we already had from the previous project. This code selects the video and button elements that we need to use, initialises a stream variable and sets up a listener to stop the stream when the “Stop screen” button is pressed.
Now, when a user clicks on the “Get screen” button we’ll work out whether they want to share the screen, window, or application and then pass that to getUserMedia.
Once we have access to the stream, we set it to the src of the video object, hide the get screen button, and show the stop screen button. If there’s an error we can log that in the catch function.
And that is all the code we need! Let’s see it in action.
Capture the screen
To run this example we need to serve the HTML from a local web server. I like to do this with the npm module servedir. If you have Node.js and npm installed, you can install it with:
npm install servedir -gYou can then navigate using the command line to the directory you saved your index.html file in and serve it on localhost:8000 by entering:
serve .If you have another method you use to serve static files on localhost you can use that too.
Set up your web server and open it up in Firefox. Click the “Get screen” button and…
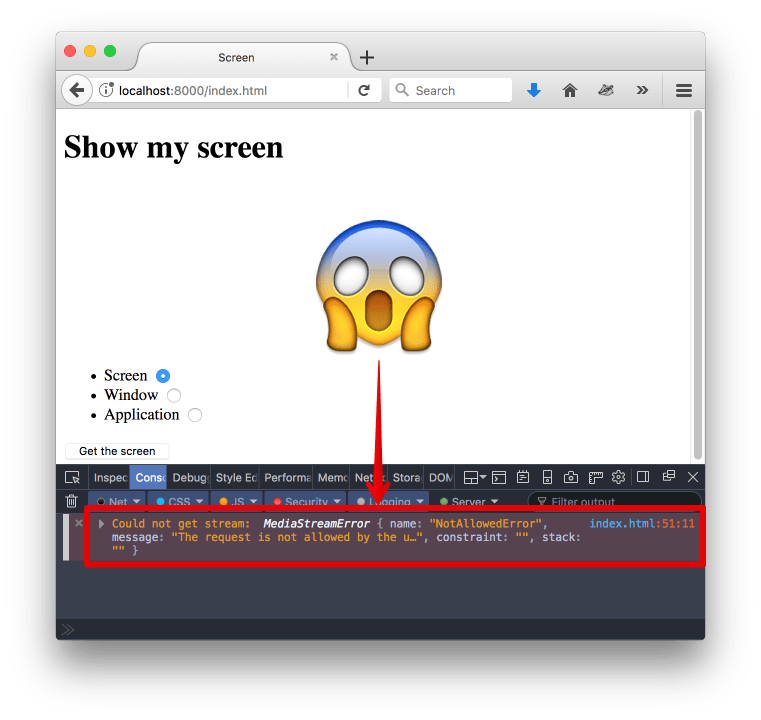
Error!
What went wrong?
Firefox’s implementation of the mediaDevices API requires the site accessing screen capture to be served over HTTPS, even when served on localhost. Since we’re just loading the site over a regular HTTP connection we get an error.
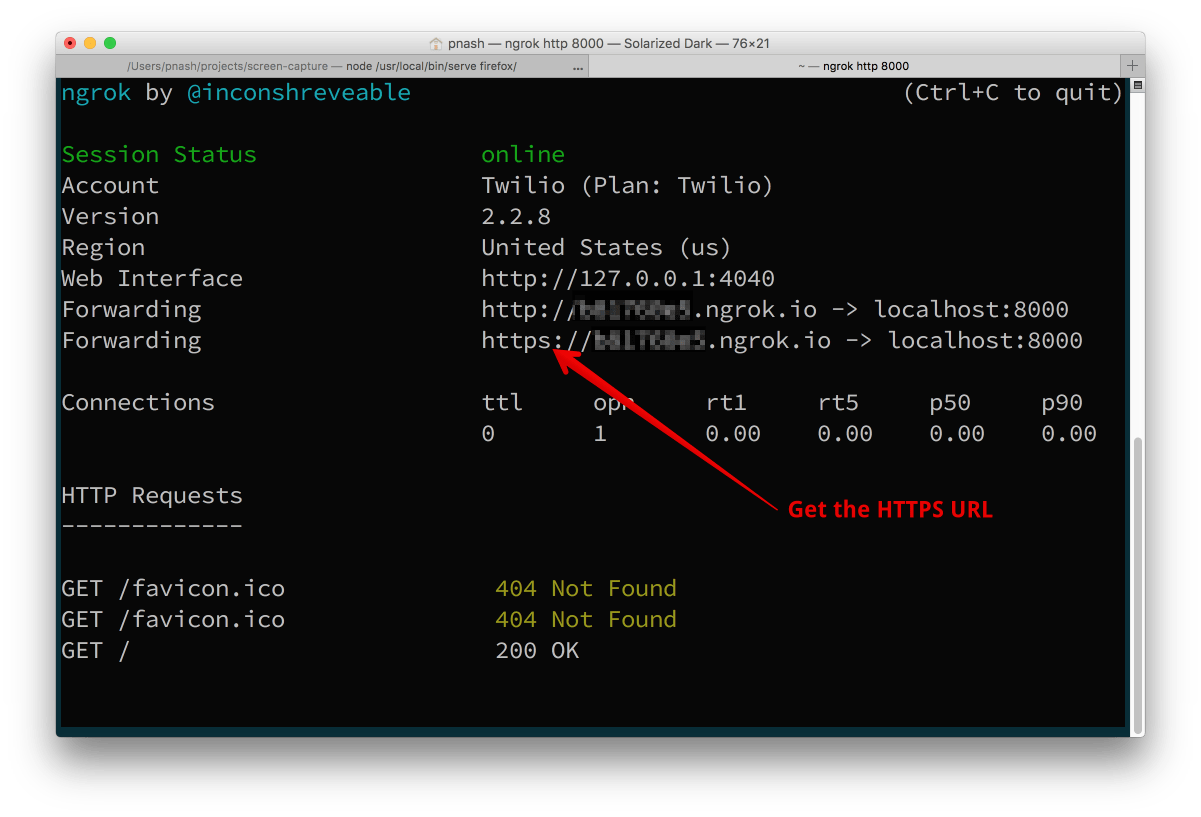
To workaround this locally you can generate a self signed TLS certificate and configure your local web server to use it to serve the site up over HTTPS. There’s an easier solution though. I normally like to use ngrok for testing webhooks locally, but it can also give you an HTTPS URL with which to test your application.
Spin up ngrok for the port you are serving the HTML
ngrok http 8000Grab the HTTPS URL and enter that in Firefox instead.
Now press the “Get screen” button and you’ll be able to give access to screen and see it in the <video> element on the page. You can also explore the results that “screen”, “window” and “application” give you when selecting the media you want to capture.

Next steps
Now we’ve seen screen capture in both Chrome and Firefox. If you want the code for both, check out the GitHub repo.
Next up, we’ll look at using what we’ve seen in these two blog posts to build a screen sharing application using Twilio Video.
Do you have an interesting use case for screen capture in browsers? Drop your ideas or any questions in the comments below. Or feel free to reach out on Twitter at @philnash or by email at philnash@twilio.com.

Related Resources
Twilio Docs
From APIs to SDKs to sample apps
API reference documentation, SDKs, helper libraries, quickstarts, and tutorials for your language and platform.
Resource Center
The latest ebooks, industry reports, and webinars
Learn from customer engagement experts to improve your own communication.
Ahoy
Twilio's developer community hub
Best practices, code samples, and inspiration to build communications and digital engagement experiences.