Add a Custom Chat Channel to Twilio Flex
Time to read: 8 minutes
January 28, 2020
Written by

In this post, I'll show you how to add a custom chat channel, such as Socket.IO, into Twilio Flex. There are several different ways to integrate a custom channel, but in this article, we will look at the one that doesn't require the development of an additional Flex UI plugin.
Prerequisites to Add a Chat Channel to Twilio Flex
Before we can start, you'll need to make sure you have a few things set up.
- If you haven't yet, sign up for a free Twilio account
- You'll also need a Flex instance set up. Visit our Quickstart if you don't already have one.
After that, you're ready to chat – let's look at the message flow.
Adding a Chat Channel in Flex
Before digging into how a custom chat can be integrated, we need to understand the flow a message goes through before appearing in the Flex UI. Let's look at a standard web chat message as an example.
When a customer opens the Flex WebChat UI component, he's greeted by a message from the bot. Two things are happening at this stage:
- A new user is created with Friendly Name
Customer - A new chat channel is created, and the user above is added to that channel

Note that at this stage, there is only one member in the channel (i.e., the Task Router Worker was not added to the channel yet), and there are no messages in the channel.
When the user sends a message in the chat, the following happens:
- A new message is added to the channel
- A new Task is created in the "Flex Task Assignment" TaskRouter workspace. This task has the following attributes:
{"channelSid":"CH********","name":"Customer","channelType":"web"}. Note that thechannelSidis the SID of the chat channel created above - A Reservation for the task is created (if any worker is available)
Once the TaskRouter Worker accepts the reservation, it is added to the chat channel. At this point, the conversation between Customer and Agent is all happening within the chat channel.
Flex chat messages orchestration
You may be wondering how that is happening. The diagram below provides a high-level view of the flow.
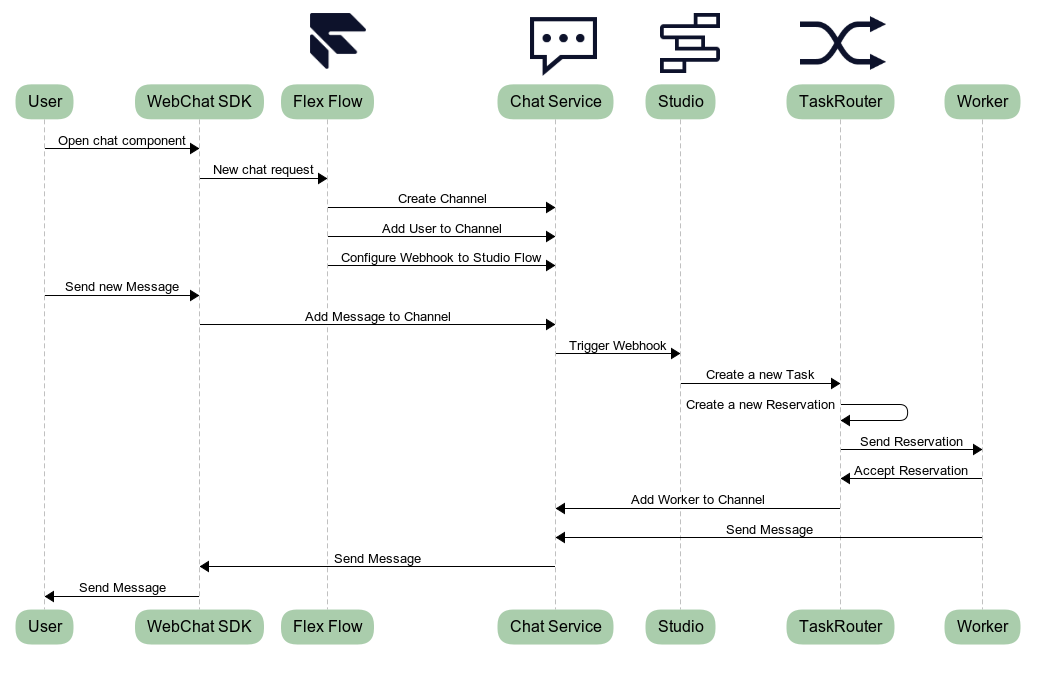
The key to this flow is the Flex Flow. The main properties for a Flex Flow are:
channelType: Which type of channel this chat is using. There are some predefined one (web,facebook,sms,whatsapp,line) or you can usecustomfor your own channel. You can define multiple Flex Flows for a channelType, but only one can have theenabledproperty set totrueintegrationType: Which product the flow integrates with to handle incoming messages. The allowed values are:studio: A new message will trigger a Twilio Studio flow. This is particularly useful when you want to IVR / chatbot to your chat before transferring it to an Agent.task: A new message will trigger the creation of a Task in Twilio TaskRouterexternal: A new message will trigger a call to your own Webhook. You can use that to integrate the flow with your infrastructure or other Twilio products. At the end of your flow, if you want your chat to be handled by Flex you need to create a new Task in the Flex TaskRouter Workspace
integration: this is an object that holds properties related to the specificinegrationType. See more on this later.chatServiceSid: The sid of the Chat Service that will be used when creating a new Channel for a new chat
The integration property can have the following values:
- For Twilio Studio integrations:
integration.flowSid: the Twilio Studio Flow SID (FWXXXXXXXXXXXXXXXXXXXXXXXXXXXXXXXX)
- For Twilio TaskRouter integrations:
integration.workspaceSid: The Twilio TaskRouter Workspace SID (WSXXXXXXXXXXXXXXXXXXXXXXXXXXXXXXXX)integration.workflowSid: The Twilio TaskRouter Workflow SID (WWXXXXXXXXXXXXXXXXXXXXXXXXXXXXXXXX). The Workflow must belong to the Workspace defined aboveintegration.creationOnMessage: If set totruethe Task is created when the first message is received. By default, the Task is created when the channel is added.
- For external integrations:
integration.url: The URL of your Webhook
For a full list of the properties of the integration object, have a look at the documentation.
From the flow chart above, you can see that when a new chat message is sent in the Flex Flow, we have the information needed to create a new channel in the Chat Service and to set the webhook for the Studio Flow.
Implementing a Chat Channel
Enough theory for now. Let's see how to add a customer web chat to Flex.
As mentioned at the beginning of this article, this method doesn't change the webchat component in Flex. The main compromise is that we are going to re-use the default Flex Chat Service that comes pre-provisioned when you create a new Flex project. This default chat service is called "Flex Chat Service" and you can find its SID on this page in the console.
To get a new channel integrated, you'll need to do the following:
- Create a new Twilio Studio Flow (optional)
- Create a new Flex Flow associating it to the Twilio Studio Flow (either the default one or the one you created) and the "Flex Chat Service"
- Implement a middleware that is going to receive messages from your chat channel and send them to Twilio
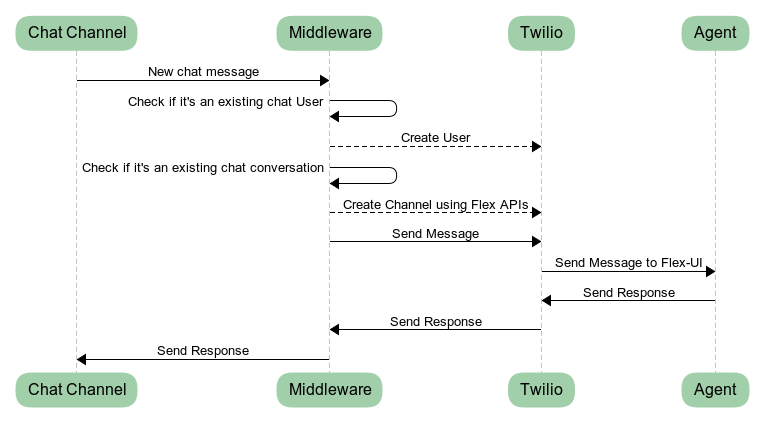
The flow will look like this:
Create a new Studio Flow (optional)
This step is optional - you can re-use the default flow provided by your Flex project.
- Navigate to your Twilio Studio Dashboard and click on the "plus" icon to add a new flow.
- Give a name to the new Flow, e.g., Custom Webchat Flow
- In the template selection pop-up, select "Start from Scratch". Look at the other templates, in case you want your webchat to go to some additional steps before being assigned to a Flex Agent.
- Once the Studio Flow editor opens, look for the "Send To Flex" Widget, and drop it on the canvas
- Connect the "Incoming message" trigger to "Send To Flex" widget
- Select the "Send to Flex Widget" and choose the following values:
- Workflow: "Assign to Anyone"
- Channel: "Programmable Chat"
- Attributes: Paste the following:
{"name": "{{trigger.message.ChannelAttributes.from}}", "channelType": "web", "channelSid": "{{trigger.message.ChannelSid}}"}
- Click on "Save"
- Click on "Publish" to publish the Flow
The main points to note in the steps above are decisions around the Workflow and Channel. These two settings are needed to connect the Task that gets created as the result of triggering this Studio Flow with the chat Channel used to exchange messages between the Agent and the Customer.
Create a new Flex Flow
Flex Flows cannot be created directly in the console. Instead, we are going to use the Twilio CLI.
Once you have installed the CLI, use the following command to create a new flow:
$ twilio api:flex:v1:flex-flows:create \
--friendly-name="Custom Webchat Flex Flow" \
--channel-type=custom \
--integration.channel=studio \
--chat-service-sid=<Flex Chat Service SID> \
--integration.flow-sid=<Flex Studio Flow SID> \
--contact-identity=custom \
--enabled
Where:
- <Flex Chat Service SID>: This is the SID (IS****) of the chat service called "Flex Chat Service" in the Programmable Chat Dashboard
- <Flex Studio Flow SID>: This is the SID (FW****) of the Studio Flow you created in the previous chapter or (if you skipped that chapter) the one called "Webchat Flow' in the Studio Dashboard
If the command executed with no error, write down the SID of the newly created Flow. Now head to the Flex Messaging in the console, and you should see a new "Custom Webchat Flex Flow".
Middleware
Now that the provisioning is done let's implement the middleware between Flex and our external service (here, Socket.io). We need two functions in the middleware: createNewChannel() and sendChatMessage().
createNewChannel()
This function uses the Flex API to create a new channel and configure a webhook that gets called when a message is added to the channel. The latter is needed to handle the chat messages arriving from Flex properly. To do that, this function should:
- Use the Flex Channel API to create a new chat channel. This is implemented using the JavaScript
client.flexApi.channel.create()in lines from 2 to 9 of the code below. - Once the channel is created, use the Chat Channel API to configure a new webhook for the
onMessageSentevent of the chat channel. This is implemented using the JavaScriptclient.chat.services().channels().webhooks.create()in lines from 12 to 20 below.
This is an example of how to implement this function using JavaScript:
When creating a new channel, make sure that you set the target property correctly. This represents the Target Contact Identity (e.g., the To phone number for an SMS). If a chat channel with the same target value is already present, then Flex will use the existing channel instead of creating a new one. That also means that the Studio flow is not triggered, and a new task is not created.
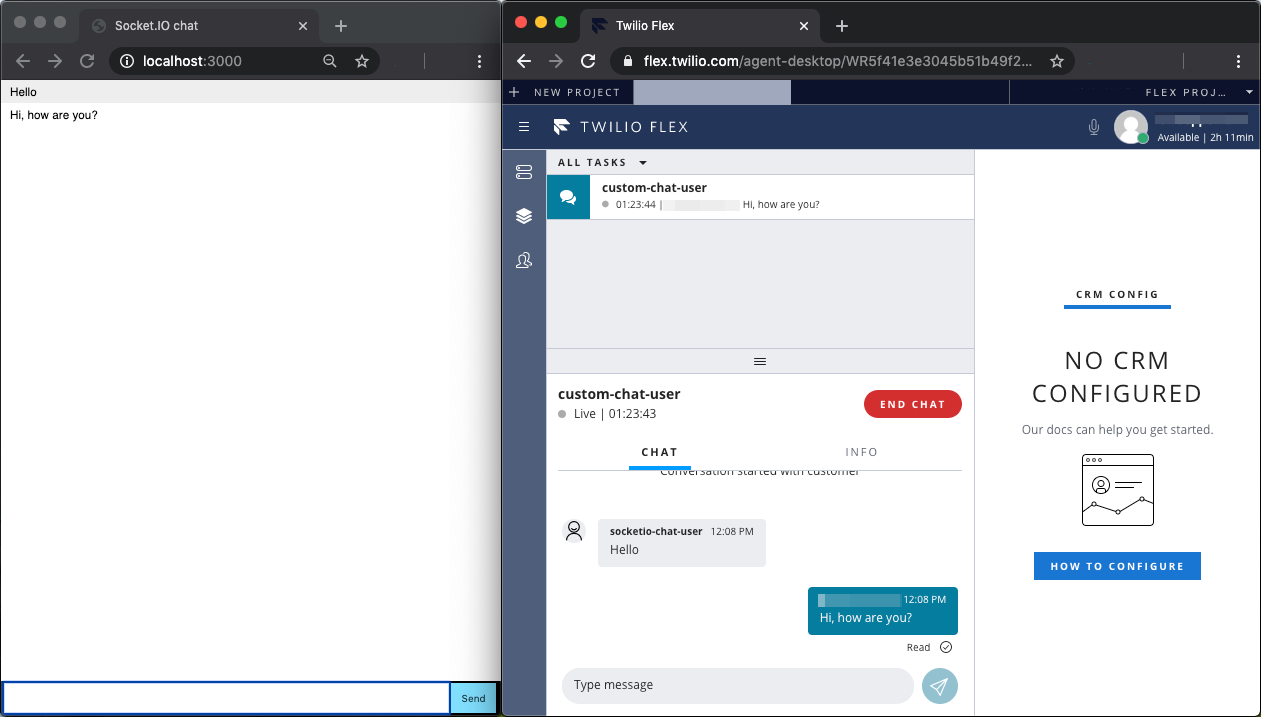
The target value is also used in the Flex UI as the name of the new task. This is what a new task looks like for a channel with a target value set to "custom-chat-user"

sendChatMessage()
This function sends the actual message to the Flex Chat. For this function to trigger the creation of a new task, we need to make sure that the webhook gets called when a new message is added.
As explained in this section of the Flex documentation, "only actions from SDK-driven clients (like mobile phones or browsers) will cause webhooks without further action on your part". So, in this case, we need to construct the REST API manually making sure that HTTP header X-Twilio-Webhook-Enabled is set to true in the HTTP request:
Testing the solution
To test the solution, we are going to build a webchat using socket.io sample chat (see here for a step by step guide on how to create this chat). To make the integration to Flex, we need to add:
- A new POST endpoint (
/new-message) that will handle the message coming from flex. This is the webhook URL we configured in thecreateNewChannel()function defined above:
- A function to send a message to Flex once a new chat message is sent from the browser. To decide if a new channel is needed (i.e., if it's a new chat), we are using the
flexChannelglobal variable. This works well for this specific demo, but you may want to implement different logic for that in a production instance.
Ending a chat
To ensure that the user gets notified when an agent ends a chat, you may want to add a webhook for the onChannelUpdated event. You can do so adding a new webhook creation in the createNewChannel() function:
When this webhook is called, your middleware should check for the Attributes value in the POST request. This is a JSON object that contains a status key. When the Agent ends the chat, the status is set to "INACTIVE". You should monitor this status change to ensure that you gracefully close the chat and perform any necessary clean-up operations in your middleware and backend.
Next Steps with Your New Flex Chat Channel
The full working code for this demo is available in this repo, along with instructions on how to set up, run, and use it.
There are still several features that you may want to explore next such as chat typing indicator, user presence, Flex UI component for your webchat. This tutorial and the code in the repository should provide a starting point for you to build and integrate your custom channel in Flex.
Giuseppe Verni is a Principal Solutions Engineer at Twilio. He's currently helping companies in EMEA design great customer engagement solutions powered by Twilio. He can be reached at gverni [at] twilio.com, or you can collaborate with him on GitHub at https://github.com/vernig.
Related Resources
Twilio Docs
From APIs to SDKs to sample apps
API reference documentation, SDKs, helper libraries, quickstarts, and tutorials for your language and platform.
Resource Center
The latest ebooks, industry reports, and webinars
Learn from customer engagement experts to improve your own communication.
Ahoy
Twilio's developer community hub
Best practices, code samples, and inspiration to build communications and digital engagement experiences.