Asynchronous JavaScript: Introducing async and await
Time to read:
July 01, 2020
Written by
Reviewed by

Asynchronous processing is one of the most important aspects of the JavaScript language. JavaScript is a single-threaded language, so it needs a mechanism to deal with the actions like performing time-intensive and potentially unreliable activities like making REST API calls, reading files from the disk, or interacting with user input.
In JavaScript the mechanism used is an event loop, which processes a callback queue in order from oldest item to newest. Each item in the queue is a message that’s processed completely before moving on to the next next message. Each message is a function that returns a response to code elsewhere in the application. Functions used in this way are called callback functions.
Because of callbacks, JavaScript can use a number of techniques for getting around its single-threaded nature to implement asynchronous processing. Unfortunately, some of those techniques, JavaScript Promises and RxJS Observables, force you to introduce at least one nested level in your code. That makes the code less readable and maintainable.
Fortunately, recent editions of JavaScript come with an additional technique for working with asynchronous code: async and await. It's a perfect choice when you want your program to synchronously block while some asynchronous action is performed, then continue working once that action is finished.
This post will introduce you to async and await fundamentals and show you specific examples. Then you’ll have the opportunity to create a real-world application that uses async and await to perform asynchronous processing.
Understanding asynchronous JavaScript before async and await
Before getting started with async and await it’s helpful to have an understanding of callbacks, which are part of the foundation of all JavaScript asynchronous processing. It’s also important to understand Promises, which add capabilities to the event loop and callback process. Promises are used in close coordination with the async and await functionality.
Callbacks
Callbacks are the oldest, most basic technique of running JavaScript code asynchronously. A callback is “a function passed into another function as an argument, which is then invoked inside the outer function to complete some kind of routine or action.” (MDN)
Callbacks have a considerable disadvantage when they run synchronously: they block the event loop until they’re finished and can thereby cause programs to become unresponsive and appear “frozen”. You can see an example of this in functions that use the sync-request library, which executes synchronously.
You can write a function which uses a callback in the following way:
The getStatusCodeCB function has a url parameter, which is a string containing an URL to which you want to perform an HTTP request and get the status code from the response. The second parameter is callback, which is a function that should be executed once the status code is retrieved.
The function uses the setTimeout API to put the request() call and the callback function invocation in the callback queue after time specified as a second parameter of setTimeout. Because setTimeout is asynchronous, the getStatusCodeCB function body is executed asynchronously and doesn’t block the JavaScript stack, which is executed synchronously.
Promises
Another way of executing code asynchronously in JavaScript is to use a Promise. A Promise is an object that provides a proxy for a value that will be determined based on the results, if any, of an asynchronous action that will occur later. A Promise also has a state, which indicates the status of the operation.
The above code defines a getStatusCodePromise function that returns a Promise object. When the Promise returned by the getStatusCodePromise function resolves it returns the response code from the request to the address specified in the url parameter. The .then() method of the Promise object specifies what to do when the promise is resolved.
Both solutions are good, and equivalent when you want to run an action asynchronously using an external API like setTimeout, setInterval, or fetch. Unfortunately, these solutions don't work well with asynchronous actions that are dependent on other actions, like waiting for user input before executing some conditional logic based on the data entered.
Note: If you want to learn more about callbacks, Promises, the event loop, or other asynchronous JavaScript features, checkout the posts listed in the Additional resources section below. They’re part of a comprehensive library of tutorials on asynchronous JavaScript.
Understanding the async and await keywords
The async and await keywords were added to the JavaScript specification in the ECMAScript 2017 release, the 8th version of the specification. This was a substantial improvement in JavaScript’s asynchronous programming capabilities and celebrated by developers everywhere.
In the 9th version, ECMAScript 2018, an asynchronous iterator was introduced. This new feature made it possible to use the await keyword in for…of loops.
async
The async keyword can be used only with a function declaration. It tells the JavaScript runtime environment (V8, Node.js, or Deno) that it should wrap the function body in a Promise. The Promise will be returned by the function instead of the return statement value; the return value will be used in the resolution of the Promise asynchronously.
The following two functions return equivalent output: a Promise object which is resolved with the status code of the GET request made to the address provided in the url parameter:
If you want the Promise returned by the async function to reject, use the throw statement:
An async function doesn’t need to return a value; it can return void. When it does, it’s equivalent to the Promise resolving without a value:
The postDataAsync function won’t emit any data when its Promise resolves, but the Promise state will change to fulfilled or rejected. By examining the Promise state, the program can determine if an asynchronous operation was successful.
await
The await keyword may only be used with a Promise object. It informs the JavaScript runtime environment that it should hold up program execution until the associated Promise resolves. Another constraint is that await can be used only inside an async function.
To force the JavaScript runtime to hold program execution until the Promise resolves and provides a value, insert the await keyword before the Promise invocation:
To handle Promise rejection, place the await statement in the try…catch block:
An alternative to declaring an asynchronous function where the logic resides is to call it after it’s initialized. For example, you can wrap your code in an anonymous asynchronous function and invoke it immediately:
Now that you’ve had a quick refresher on how asynchronous processing works in JavaScript and have been introduced to the async and await keywords you can get some experience using these tools in a practical scenario.
Understanding the tutorial project
In this tutorial you will create a console application with an interactive command-line menu. It’s code you can reuse in your console projects, like command line interface (CLI) tools.
While you’re building the menu application this tutorial will show you aspects of the async and await keywords. You’ll use them to create functions that return Promises and to invoke the synchronous wait for a Promise to resolve.
The code in this post uses the readline-promise library to read command-line input, so you’ll gain some experience with it, as well. This library extends the Node.js readline module by adding an asynchronous iterator and other features.
Prerequisites
To accomplish the tasks in this tutorial you’ll need the following tools:
- Node.js and npm (The Node.js installation will also install npm.)
- Git
- Visual Studio Code (or another IDE or code editor)
To get the most out of this post you should also have a basic working knowledge of JavaScript.
There is a companion repository containing the complete source code for the project available on GitHub.
Twilio account – Although it’s not required for this tutorial, if you sign up for a Twilio account using this link you can receive an additional $10 credit on your account.
Setting up the project
You have two options for setting up the Node.js project for this tutorial. You can:
- use the code in the companion repository, which also includes the code for the previous posts in this series on asynchronous JavaScript
- start from scratch so your project includes just the code in this tutorial
To clone the companion repository, execute the following command-line instructions in the directory where you would like to create the project root directory:
This code includes a number of branches that provide code illustrating how to use JavaScript callbacks, Promises, RxJS Observables, and other JavaScript features.
To start just the command-line menu project from scratch, execute the following command-line instructions in the directory where you’d like to place the project root directory:
You can learn more about initializing Node.js projects in this post by Twilio's Phil Nash.
Install the readline-promise library using the following command in the project root directory or below:
Building the application
Open the project in the IDE or code editor of your choice.
await(ing) user input
To build the entry point for your application, create a start.js file in the async-await folder and place the following JavaScript code into it:
The above code imports the readline-promise library, which will be used to collect input from the user and pass it to the program as a Promise object. The declaration of the rl constant sets up an instance of the readlinePromise object using a configuration that assigns the output to the system’s standard output and listens for the user input through the standard input, both of which are the console.
After initializing the readline object, the code declares the MenuOptions constant. It’s a Map representing available program options to display in the menu. Thus far, there is only one: “Exit”. You’ll add more options as you progress through writing the app.
The asynchronous function displayMenu, is the entry point for the program. It starts by clearing the console. Then it iterates through the elements of the MenuOptions map and displays available options in the console. Once it’s finished it’s time to wait for user input.
In the declaration of the chosenOption constant, the code asks the user for interaction using the rl.questionAsync method. This method returns a Promise which resolves when the user enters input.
You can use the await keyword together with this method invocation, which will cause a synchronous wait for user input and place the user input in the chosenOption constant. It is useful here because until you have information from the user, you don’t know what to do next.
By using the await keyword you avoid a nested level in which you would have had to use the then() method of the Promise object. You are able to avoid the additional call because you’ve declared the displayMenu function using the async keyword.
The user input is a string value, so the parseInt method converts it to an integer before assigning it to the chosenOption constant. At the end of the function the value of chosenOption is used in the switch statement to determine which action to perform. Thus far, there are two:
case 4 finishes the program by invoking the close method of the rl object, which clears the callback queue and letsNode.js exit.
default handles illegal input. If the user enters a number that is out of range, or any other invalid input, the function displays a notice in the console. Then the program awaits acknowledgement by the user and calls the displayMenu function recursively.
Testing the basic functionality
This is a good point to see if everything is working correctly.
Run the program by entering the following Node.js CLI command in the async-await directory:
You should see the following output in the console window:
After choosing option 4 by entering “4” and confirming your choice by pressing Enter the program will exit.
If you haven’t been following along with the coding and want to catch up to this step using the code from the GitHub repository, execute the following commands in the directory where you’d like to create the project directory:
Enhancing the program
For sure you don’t want your program to have only one option: “Exit”.
Create a sum.js file in the project root directory and insert the following JavaScript code:
The above code introduces the asynchronous function getOperand. The function returns a Promise<number> object, which resolves with a randomly generated number from 0 to 10.
The question is, why does this function return a Promise while the return statement invokes methods that return integers? That’s the magic of the async keyword: it tells the JavaScript runtime to wrap the function body in a Promise which resolves with the value from the return statement.
The second function, addTwoNumbers, is exported from the file so you will be able to use it in the start.js file, where your program entry point resides. The function clears the console, waits for generation of the random numbers, and adds them. Before the function returns it displays the operands and their sum.
Notice that the addTwoNumbers function declaration is preceded by the async keyword, so you can use await in it, to “unwrap” the Promise object returned by the getOperand function. If you didn’t use await you would get a Promise object on which you would still need to call the then method to retrieve the value.
Notice that the addTwoNumbers function doesn’t have a return statement. This, together with async in the declaration, indicates that the function’s return type is Promise<void>, a Promise that notifies the caller that some of the asynchronous action has been finished without providing any output of that operation.
Add the following import statement at the beginning of the start.js file:
Add a new option to the menu by replacing current MenuOptions declaration with the following:
Add the new case into the switch statement inside the displayMenu function:
Now, whenever a user chooses “1” from the menu, the program will call the addTwoNumbers function, wait for it to finish with await, and ask the user to press Enter to get back to the menu. Once a user executes this operation the displayMenu function will be invoked recursively.
After those modifications your start.js file should look like this file in the companion repository.
Testing the enhanced application
Now that you’ve added some functionality to the application you can do some worthwhile testing.
Run the program with the following Node.js command:
Choose option 1 from the menu and verify if it works as desired. Your output should be similar to the following, with the values of the operands and sum changing with most iterations:
To close the program press Enter to get back to the menu and select option “4”.
The code up to this point is in branch step18 of the companion repository.
Understanding the await performance pitfall
You’ve got the async-await under your belt, but there is one more thing of which you need to be aware. As you already know, await synchronously waits for a Promise to resolve. And it really does, with no mercy. Sometimes it may hurt.
Create a new file called sumSlow.js and place the following JavaScript code into it:
This function returns a Promise, which resolves with a randomly generated number after 3 seconds. To delay the output, the code uses the setTimeout function, which is asynchronous.
Add the following function to the bottom of the sumSlow.js file:
This function is very similar to what you’ve implemented earlier. The only additional logic is to use console.time and console.timeEnd to measure how fast this function runs.
Import the addTwoNumbersSlow function into the start.js file by adding following statement at the top of the file:
Add a new entry to the MenuOptions map:
And a new case in the switch statement inside the displayMenu function, which controls the program flow:
Run the program and choose option “2” from the menu. Check how much time this function needs to return:
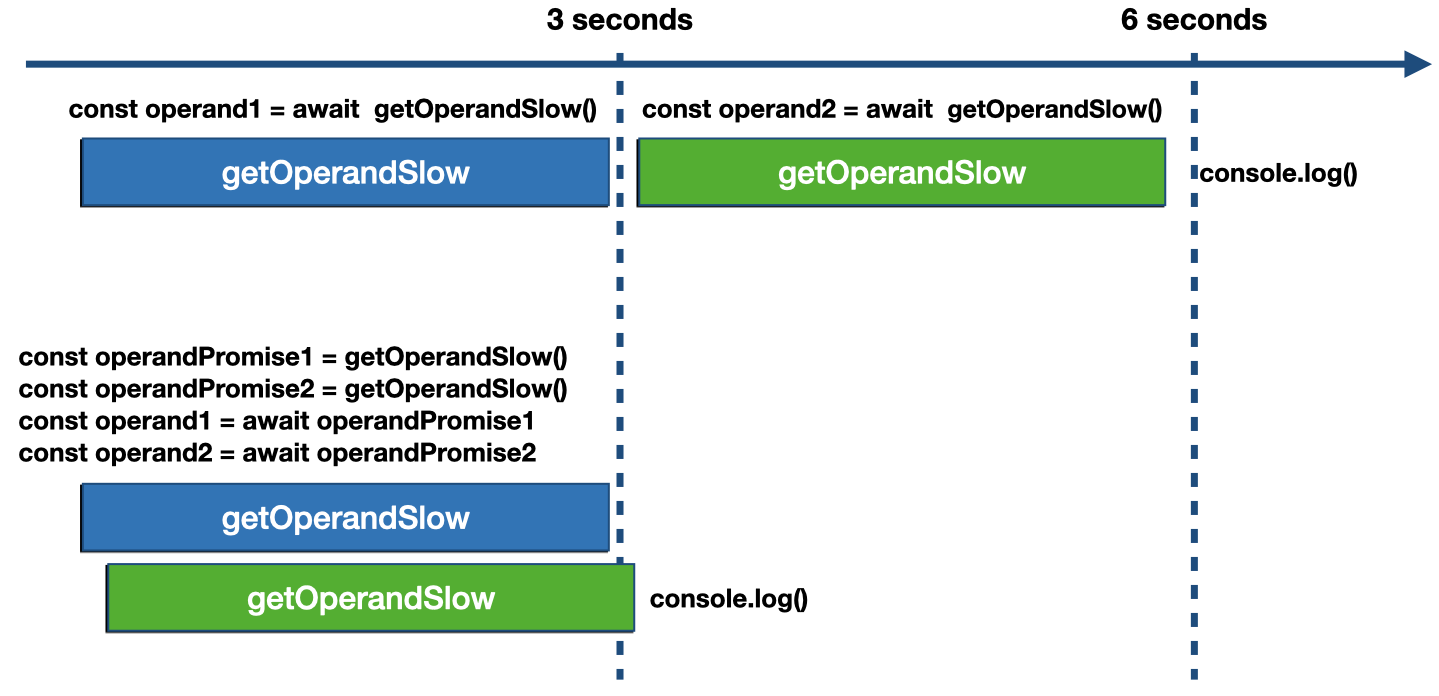
As you can see, the function needs over 6 seconds to finish. Why? The reason is the way you use await in the addTwoNumbersSlow function:
During the retrieval of the first operand, you’ve synchronously blocked the program with the await keyword. Because of that, the second call was initialized after 3 seconds and took another 3 to resolve.
This can be easily fixed. Add the following function to the bottom of the sumSlow.js file:
The difference between the addTwoNumbersSlow and addTwoNumbersFaster is how you call the promises:
You’ve started the lifecycle of both promises at the same moment and after that you’ve blocked the program by using the await keyword to wait for the results. Thanks to that, those promises are running in parallel.
The comparison of those two implementations is depicted in the diagram below:
Adjust the import statement from ./sumSlow in the start.js file by adding addTwoNumbersFaster so that it looks like the following:
Add new entry to the MenuOptions map:
Add new a new case to the switch statement inside the displayMenu function:
After those modifications your start.js file should look like this.
Run the program and invoke the function you just implemented by choosing option “3” from the menu. In the console you should see that the time elapsed is approximately half that of the first implementation:
Your actual values should vary slightly from the number shown above, based on how long it actually takes your system to do the computation.
The code up to this point is branch step19 in the companion repository.
Summary
This post provided an introduction to how asynchronous processing works in JavaScript and how callbacks and Promises provide asynchronous functionality. It showed you how these language features work and then described how the async and await keywords work with those features to provide more convenient and more readable access to asynchronous processing.
In a case study project you saw how to implement an interactive command-line menu system using async, await, and Promises. You also saw how to use the readline-promise library.
Additional resources
To bone up on JavaScript fundamentals pertaining to asynchronous processing, see the post:
Asynchronous JavaScript: Understanding Callbacks
If you want to learn more about JavaScript Promises, check out the following posts here on the Twilio blog:
Asynchronous JavaScript: Introduction to JavaScript Promises
Asynchronous JavaScript: Advanced Promises with Node.js
Asynchronous JavaScript: Using RxJS Observables with REST APIs in Node.js
You might also want to learn about RxJS (ReactiveX JavaScript), which is a better asynchronous tool for some programming situations:
Asynchronous JavaScript: Introducing ReactiveX and RxJS Observables
Asynchronous JavaScript: Using RxJS Observables with REST APIs in Node.js
There are also 3rd-party resources that are essential references for JavaScript developers. Here are a few:
MDN web docs: Javascript – The Mozilla Developer Network provides a comprehensive JavaScript reference site, with tutorials and reference information.
Node.js Docs – If you’re writing server-side JavaScript, the Node.js reference documentation is an essential resource.
RxJS – The site for learning resources and reference information for RxJS, a JavaScript implementation of the observer, iterator patterns along with functional programming with collections.
Which Operator do I use? – A helpful tool for choosing the best Observables operator for a desired action.
Want to have some fun while you sharpen your programming skills? Try Twilio’s video game:
TwilioQuest – Defeat the forces of legacy systems with this 16-bit style adventure.
Maciej Treder is a Senior Software Development Engineer at Akamai Technologies. He is also an international conference speaker and the author of @ng-toolkit, an open source toolkit for building Angular progressive web apps (PWAs), serverless apps, and Angular Universal apps. Check out the repo to learn more about the toolkit, contribute, and support the project. You can learn more about the author at https://www.maciejtreder.com. You can also contact him at: contact@maciejtreder.com or @maciejtreder on GitHub, Twitter, StackOverflow, and LinkedIn.
Gabriela Rogowska contributed to this post.


Related Resources
Twilio Docs
From APIs to SDKs to sample apps
API reference documentation, SDKs, helper libraries, quickstarts, and tutorials for your language and platform.
Resource Center
The latest ebooks, industry reports, and webinars
Learn from customer engagement experts to improve your own communication.
Ahoy
Twilio's developer community hub
Best practices, code samples, and inspiration to build communications and digital engagement experiences.