Build a Pictionary Web App with Twilio Video, Twilio Sync, and JavaScript

Time to read: 15 minutes
January 27, 2023
Written by
Reviewed by
Introduction
In this tutorial, you will learn how to build a web app that allows you to play Pictionary in a video room. Pictionary is a game where players draw pictures on a board to help their team guess a word or phrase before the time runs out. Players take turns drawing and guessing.
To build this web app, you will use the Twilio Programmable Video JavaScript SDK to create a video room where room participants ( players ) can join and communicate with each other. You will use the Canvas API to build a whiteboard where the players can draw pictures. You will also use the Twilio Sync Javascript SDK to share the drawing on the whiteboard with all the players.
The Twilio Programmable Video JavaScript SDK is a collection of tools that allows you to add real-time video and voice capabilities to your web or mobile apps.
The Canvas API is a tool for creating graphics using JavaScript and HTML, it can be used for various purposes such as animation, game graphics, and real-time video processing.
Twilio Sync Javascript SDK is a software development kit that allows you to add real-time data synchronization functionality to your web and mobile applications.
By the end of this tutorial, you will have a web app that looks like the following:

Tutorial Requirements
To follow this tutorial you will need the following:
- A free Twilio account
- A basic understanding of how to use Twilio and Javascript to build a video web app;
- Node.js v12+, NPM, and Git installed;
Getting the boilerplate code
In this section, you will clone a repository containing the boilerplate code needed to build the Pictionary web application.
Open a terminal window and navigate to a suitable location for your project. Run the following commands to create the project directory and navigate into it:
Use the following commands to clone the repository containing the boilerplate code and navigate to the boilerplate directory:
This boilerplate code includes an Express.js project that serves the client application and generates the necessary access tokens for utilizing the Twilio Video and Sync APIs within the client application.
This Node.js application comes with the following packages:
dotenv: is a package that allows you to load environment variables from a .env file without additional dependencies.express: is a lightweight Node.js web application framework that offers a wide range of features for creating web and mobile apps. You will use the package to create the application server.nodemon: is a Node.js development utility that automatically restarts your application when a file is changed.twilio: is a package that allows you to interact with the Twilio API.uuid: is a package that is utilized to generate universally unique Identifiers, it will be used to create a unique identity when creating a Twilio access token.
Use the following command to install the packages mentioned above:
Collecting and storing your Twilio credentials
The .env file included in the cloned repository is where you will store your Twilio account credentials that will be needed to create access tokens for both the Twilio Video and Twilio Sync APIs. In total, you will need to collect and store four twilio credentials.
The first credential required is the Account SID, which is located in the Twilio Console. This credential should be stored in the .env file once obtained:
The second and third required credentials are an API Key SID and API Key Secret, which can be obtained by following this guide. After obtaining both credentials, copy and store them in the .env file:
The fourth credential required is a Sync Service SID. A Sync Service is the top-level scope of all other Sync resources (Maps, Lists, Documents).
Navigate to the Twilio Sync Service page, create a new Sync Service, and copy the Sync Service SID. This credential should also be stored in the .env file once obtained:
Understanding the server.js file
Inside the server.js file, the express.js framework was used to create a web server that listens on port 3000, and the twilio module was used to interact with the Twilio API. The server has one endpoint named /join-room that accepts a POST request with a roomName property in the request body and returns a Twilio access token in the response body to the client.
The server uses the twilio module to either fetch or create the specified room by calling the findOrCreateRoom() function. It then generates an access token by calling the getAccessToken() function. The token is granted with a Video Grant and a Sync Grant, which allows the client to access the specified room and Twilio Sync service.
Understanding the public directory
This directory contains two files, index.html, and styles.css, that handle the client-side layout for a Pictionary application. The index.html file creates the user interface for the application, including a navigation bar, a canvas for drawing, and a div for displaying the webcam.
The file also links to the styles.css stylesheet and includes scripts for the Twilio Video and Twilio Sync SDKs, Bootstrap, a file named index.js, and a file named whiteboard.js. The styles.css file and Bootstrap are used to style the application. The index.js file will contain the code that creates a video room, while the whiteboard.js file will contain the code that creates a shareable whiteboard for drawing Pictionary words.
To see what this all looks like, go back to your terminal and use the following command to start your application server:
Then, in your browser, navigate to http://localhost:3000/.
Joining a video room
In this section, you will create the index.js file that was referenced in the boilerplate index.html file. This file is responsible for allowing the client application to request a Twilio access token with both a video grant and a Sync grant, use this access token alongside the Twilio Video SDK to join a video room, and display the players’ webcam feeds.
Open a new terminal tab and navigate to the public directory inside your project:
Create a file named index.js inside the public directory and add the following code to it:
Here, first, the code gets an element from the DOM with the id of webcam-feed-container and declares a variable named accessToken. The element will be used to display the players’ webcam feeds, and the variable will be used to store and share the access token across files.
After getting the element that will be used to display the webcam feeds, a function named startRoom() was created.
Inside the startRoom() function, the room name was set and a fetch request was made to the '/join-room' endpoint to get an access token, then the token and the room name were passed to a function named joinVideoRoom().
Add the following code below the startRoom() function:
The joinVideoRoom() function created above uses the Twilio Video SDK connect() method to join a room with the provided token and room name.
Add the highlighted code inside the startRoom() function, before the closing curly brace:
Once the room is joined, the above code sets up event listeners for when new local or remote participants connect or disconnect.
When a participant connects, a function named handleConnectedParticipant()—which you’ll create shortly—will be called.
When a participant disconnects, a function named handleDisconnectedParticipant() will be called. You’ll create this shortly as well.
The code also set up event listeners for pagehide and beforeunload to disconnect the room when the user leaves the page.
Lastly, the code returns the access token.
Now, add the new handleConnectedParticipant() function below the joinVideoRoom() function:
When a new participant joins the video room, the handleConnectedParticipant() function is called and it creates a new div element for that participant, sets its class and id attributes, and appends it to the webcamFeedContainer element.
This function then iterates through each of the participant's tracks and calls a function named handleTrackPublication() for each track.
This function also sets up an event listener that listens for when a new track is published by the participant and calls a function named handleTrackPublication() when a new track is published.
Add this handleTrackPublication() function below the handleConnectedParticipant() function:
The handleTrackPublication() function checks if the track is already subscribed to, and if it is, it calls the displayTrack() function which takes the track as an argument and attaches it to the participant's div element.
This function also sets up an event listener that listens for when the track is subscribed to and calls the displayTrack() function with the track as an argument.
Now add the handleDisconnectedParticipant() function below the handleTrackPublication() function:
This function stops listening for the disconnected participant by removing all event listeners associated with the participant, using the removeAllListeners() method.
Additionally, this function removes the visual representation of the participant's video and audio tracks from the page by getting the div element associated with the disconnected participant using the participant's identity and removing it from the DOM using the remove() method.
Lastly, the startRoom() function is invoked.
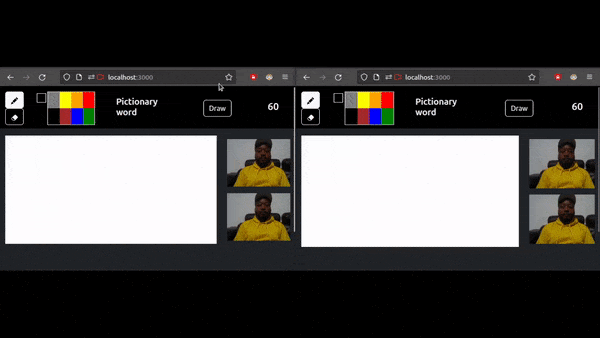
Open your preferred browser, open two tabs and in each tab navigate to the http://localhost:3000/ URL. On both tabs you should see a blank white canvas and two webcam feeds, one for each participant that joined the video room :
Creating the whiteboard
In this section, you will use the canvas API to create the whiteboard where the players will draw the Pictionary word.
Create a file named whiteboard.js inside the public directory and add the following code to it:
In the first part of the above code, the code gets a reference to the canvas element on the page with the id whiteboard and then gets the 2D drawing context for that canvas. This allows the code to draw and manipulate the canvas. This element will be used as the whiteboard.
In the second part of the above code, the code gets references to various elements on the page such as buttons for start drawing, a pencil, an eraser, and a color picker. These elements will be used to control the drawing tools, erase a drawing, and set and visualize the color of the pencil.
Add the following code to the bottom of your whiteboard.js file:
In the first part of the above code, the code gets references to text fields on the page, one for the generated Pictionary word and one for the countdown timer. These elements will be used to display the Pictionary word and to show the countdown timer.
In the second part of the above code, the code declares three variables: isDrawing, eraserSelected, and selectedColor. The isDrawing variable will be used to determine if a player is drawing on the canvas. The eraserSelected variable will be used to determine if a player selected the eraser tool. The selectedColor variable will be used to store the pencil color selected by a player.
Add the following code at the bottom of your whiteboard.js file:
Here, you created and called a function named managePencilColor(). This function allows the user to change the color of the pencil by clicking on the color buttons, and it updates the pencil color in the UI by setting the background color of the element with the id pencil-color to the selected color.
Add the following code at the bottom of your whiteboard.js file:
Here, first, the code sets up an event listener on the Draw button that listens for a click event. When the Draw button is clicked, a function named clearCanvas() is called.
After setting an event listener on the Draw button, this code sets up event listeners on the Pencil button and Eraser button that listen for click events.
When the Pencil button is clicked, the eraserSelected variable is set to false and when the Eraser button is clicked, the eraserSelected variable is set to true.
Lastly, the function named clearCanvas() was defined. This function clears the entire canvas by using the canvas context's clearRect() method.
Add the following code below the clearCanvas() function:
Here, you created a function named startDrawing(). This function starts a new drawing operation on the canvas by calculating the position of the mouse pointer, setting the isDrawing variable to true, starting a new drawing path, and moving the pencil to the position of the mouse pointer on the canvas, so the local player can start drawing on the canvas.
Add the following code below the startDrawing() function:
In the block of code above, you created a function named draw(). This function will only allow the player to draw on the canvas if the value stored in the isDrawing variable is equal to true.
The draw() function allows the player to draw on the canvas by calculating the position of the mouse pointer, setting the color of the pencil, and creating a line from the previous position of the pencil to the current position of the mouse pointer on the canvas, and then draws this line on the canvas.
Additionally, this function checks if the value stored in the eraserSelected variable is equal to true. If that is the case, the pencil color will be set to white and since white is the canvas background color this will produce the erasing effect.
Add the following code to the bottom of whiteboard.js:
This function stops the current drawing operation by setting the isDrawing variable to false, so the draw() function will no longer execute when the user moves the mouse pointer on the canvas.
Add the following code below the stopDrawing() function:
The code above sets up event listeners on the canvas element that listen for mouse events such as mousedown, mousemove, and mouseup.
When the mousedown event is triggered (when the user presses down on the mouse button while the cursor is over the canvas), the startDrawing() function is called.
When the mousemove event is triggered (when the user moves the cursor while holding down the mouse button), the draw() function is called.
When the mouseup event is triggered (when the user releases the mouse button), the named stopDrawing() function is called.
Together, these event listeners allow for drawing on the canvas by starting a drawing operation when the mouse button is pressed down, continuing the drawing operation as the cursor is moved, and ending the drawing operation when the mouse button is released.
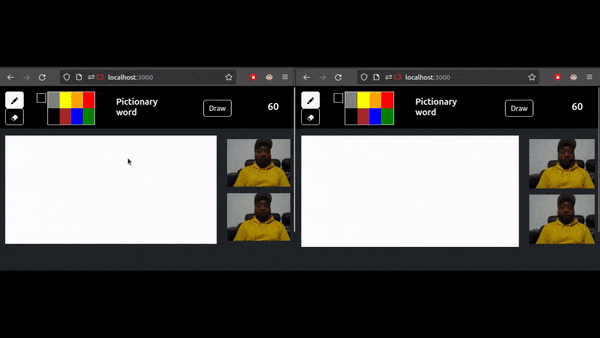
Make sure your server is running in your terminal. Then go back to your browser, and refresh the tabs running this application. On both tabs use a different pencil color to draw on each tab and watch how the whiteboard is not being shared:
Sharing the whiteboard
In this section, you will use the Twilio Sync SDK to share the whiteboard with all the players.
Go back to your whiteboard.js file and add the following code below the line where you declared the selectedColor variable, around line 15 towards the top of the file:
This code declares and initializes several variables, these variables are used for synchronizing the drawing state between the players, maintaining the position of the pencil on the canvas, and buffering the drawing state at regular intervals.
Add the highlighted lines to the bottom of the startDrawing() function:
Here, you set the value for the variables lastX and lastY to x and y respectively. These variables are used to store the last x and y coordinates of the mouse pointer on the canvas. They are used to keep track of the position of the local player's pencil when drawing on the canvas.
Add the highlighted code inside the draw() function below the context.stroke(); line:
The above code records the lines that are being drawn by the local player on the canvas and stores them in the buffer array at regular intervals and updates the lastX, and lastY variables.
Add the highlighted line of code to the bottom of the stopDrawing() function:
In the line added above, a function named flushBuffer() was called. The flushBuffer() function is responsible for sending the buffered data to remote players connected to the same room so that their canvas can be updated with the new drawing.
Add the following code below the mouseup event listener at the bottom of the whiteboard.js file:
Here, you defined and called a function named checkAccessToken(). This function is checking if the access token retrieved in the index.js file is available and if it is, then it calls a function named startSharingTheCanvas(), otherwise, it continues to check for the access token every 1 second for a total of 20 seconds. If the token is not available after 20 seconds, it stops the checking.
To create this new startSharingTheCanvas() function, copy and paste the following code at the bottom of the whiteboard.js file.
This function uses the Twilio Sync library to share the canvas with other players in the same room.
It creates a new instance of the Twilio Sync client and listens for updates to the 'canvas' document. It checks if the update was not made locally, and if that is the case it will apply the update to the canvas by calling a function named syncCanvas().
This function contains a switch statement that checks the value passed in the action property.
This code uses the action property to set the action that should be performed in the remote player client application. There will be two types of actions: draw and start-timer.
The first action will be used to tell the remote player client application to update the canvas with the values stored in the data property.
The second action will be used to start the timer in the remote player client application. You will create this action handler in the next section.
Add the following code below the startSharingTheCanvas() function:
This code defines a function syncCanvas() that takes in a data object as an argument. This function is used to apply updates made by remote players to the canvas.
The syncCanvas() function loops through the lines array stored in the data received, and for each line, it sets the color, starting point, and end point, and then it draws the line on the canvas.
Add the following code below the syncCanvas() function:
This code defines a function flushBuffer() which is responsible for flushing the buffer of lines that were drawn on the canvas by the user.
If the buffer is not empty, it calls a function named updateDocument(), passing in the buffer of lines, and the string draw as arguments, and then it clears the buffer.
Add the following code below the flushBuffer() function:
This code defines a function named updateDocument() which takes in two arguments, data, and action.
This function is used to update the canvas document on Twilio's servers. The update function sends the data and action properties to the Twilio server, which then updates the document with the new data.
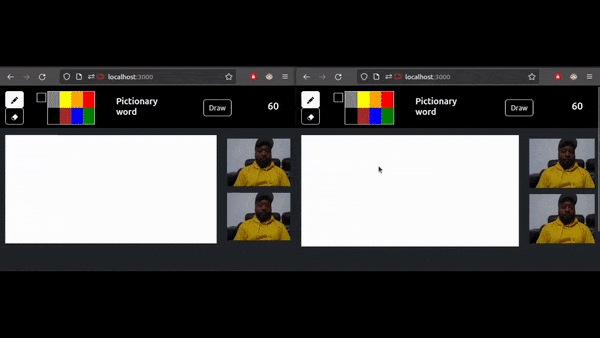
Go back to your browser, and refresh the tabs running this application. Use a different pencil color to draw on each tab and watch the whiteboard being updated with both colors:
Adding a word generator and a timer
In this section, you will add a word generator and timer to the application. In this section, you will also restrict the number of players drawing on the whiteboard to one.
Open the twilio-pictionary-boilerplate/server.js file and add the following code above the findOrCreateRoom() function (located around line 22):
Here, you created an array named pictionaryWords, which contains the Pictionary words that will be sent to the player that has to draw.
Add the following code below the /join-room endpoint, near the end of the file:
This code creates an endpoint named /generate-pictionary-word that, when accessed, returns a random word from the Pictionary words array. If the array is empty, it sends a response with a message stating that There are no more Pictionary words.
Save and close server.js.
Go back to the whiteboard.js file and add the following variables below the line where you declared the variable named bufferTimer toward the top of the file, with all the other variable declarations:
The isMyTurnToDraw variable will be used to restrict the number of players drawing to one. The isTimeLeft variable will be used to keep track of the time left on the timer.
Replace the contents inside the Draw button click event listener (around line 37 in whiteboard.js) with the following:
With the code above, when the Draw button is clicked, it sends a GET request to the server endpoint /generate-pictionary-word using the fetch API.
The server will respond with a JSON object that contains a randomly generated Pictionary word. The response is then parsed and the word is set as the inner text of the HTML element with the id txtGeneratedWord.
It also sets the variable isMyTurnToDraw to true, calls a function named startTimer() to start the timer, and sends a request to update the Twilio document with the action start-timer by calling the updateDocument() function.
Edit the if statement inside draw() function (around line 72) to reflect the highlighted line:
Now the code checks if the user is currently drawing, if it is their turn to draw, and if the countdown timer for their turn has not expired, before allowing them to draw on the canvas. If all these conditions are met, the user can draw on the canvas.
Add the highlighted condition to the switch statement inside the startSharingTheCanvas() function (function starts around line 122 in whiteboard.js):
This code adds a handler for the start-timer action. When the action is start-timer, it calls a function called startTimer() and clears the element that displays the generated word in the remote player client application.
Create this new startTimer() function now by adding the following code to the bottom of the whiteboard.js file:
The startTimer() function is responsible for starting a 60 second count-down timer when a player is drawing a Pictionary word.
When this function is called the Draw button is disabled, the canvas is cleared and the time left to draw is displayed in the txtCountdownTimer DOM element.
While the Draw button is disabled, only the player who clicked it first will be able to draw the Pictionary word on the canvas while the drawing is being displayed to the other player.
Once the timer stops the Draw button will be enabled and any player will be able to click on it to draw another Pictionary word.
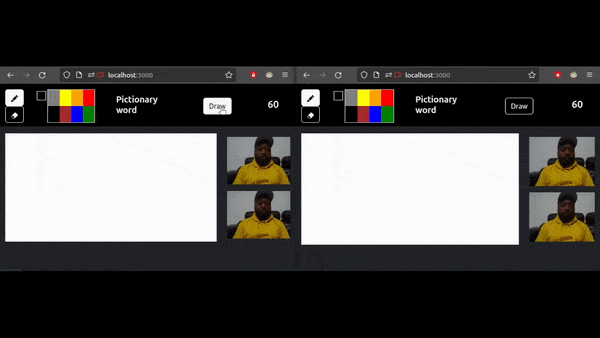
Go back to your browser, and refresh the tabs running this application. In one of the tabs click the Draw button, once the timer starts try to draw the Pictionary word, and watch the whiteboard be updated on the other tab:
Conclusion
In this tutorial, you learned how to use Twilio Video and Sync APIs to build a Pictionary web app. First, you learned how to use the Twilio Video API to create a video room where players could join and communicate with each other. After creating the video room, you learned how to use the Canvas API to create a whiteboard where the players can draw pictures. Lastly, you learned how to use the Twilio Sync API to share the whiteboard with all the players.
The code for the entire application is available in the following repository https://github.com/CSFM93/twilio-pictionary-complete.
Carlos Mucuho is a Mozambican geologist turned developer who enjoys using programming to bring ideas into reality. https://twitter.com/CarlosMucuho
Related Resources
Twilio Docs
From APIs to SDKs to sample apps
API reference documentation, SDKs, helper libraries, quickstarts, and tutorials for your language and platform.
Resource Center
The latest ebooks, industry reports, and webinars
Learn from customer engagement experts to improve your own communication.
Ahoy
Twilio's developer community hub
Best practices, code samples, and inspiration to build communications and digital engagement experiences.