Build a Restful API in PHP with Laravel Sanctum
Time to read:
February 26, 2021
Written by
Reviewed by
Laravel Sanctum is a Laravel package created for the authentication of Single Page Applications (SPAs), mobile applications, and basic token-based APIs. It can be used to issue API Tokens to your users and authenticate Single Page Applications using Laravel’s session. Laravel Sanctum poses as a simple alternative to the existing Laravel Passport package.
Here are some reasons you might want to choose Sanctum over Passport:
- Passport is implemented with OAuth2 authentication. If you are not using that, then Sanctum is your go-to for issuing API tokens
- Sanctum is a featherweight, meaning it is light and simple to implement
- Sanctum works with SPAs (Single Page Applications like Vue, Angular, and React) and supports mobile application authentication
Prerequisites
In order to complete this tutorial, you will need the following:
As you can see Laravel Sanctum does much more, but in this tutorial, we will be using Laravel Sanctum to create APIs.
Getting started
Let’s start by creating a new Laravel application. We’ll do that by running the command below in our terminal:
With laravel_sanctum being the name of the application. This will create a new folder named laravel_sanctum containing our Laravel application.
Now would be a good time to start the Laravel application to make sure everything is working as expected:
Installation and Setup
With the Laravel application in place, let’s add Laravel Sanctum to it. First, we need to install Laravel Sanctum into our application using Composer:
This will create a sanctum.php file in the config directory, as well as the necessary migration files in the migrations directory.
Before we run the migrations the database will need to be set up. Create a database.sqlite file:
Then update the .env file as below:
Building the API
For the sake of simplicity, the API will have only three endpoints. The first endpoint will allow users to register an account, while the second endpoint will allow users to login/authenticate themselves. The third endpoint will fetch the currently authenticated user.
Let’s start with registering for an account. In your terminal create the controller responsible for authentication by running the following Artisan command:
A new file will be generated in the app/Http/Controllers folder called AuthController.php.
Now open the routes/api.php file to create the route responsible for registering a user:
Open up the AuthController and add the code snippet below in it to create the method to register a user:
First, we validate the incoming request to make sure all required variables are present. Then we persist the supplied details into the database. Once a user has been created, we create a new personal access token for them using the createToken() method and give the token a name of auth_token.
Because createToken() will return an instance of Laravel\Sanctum\NewAccessToken, we call the plainTextTokenproperty on the instance to access the plain-text value of the token. Finally, we return a JSON response containing the generated token as well as the type of the token.
Next, let’s add the implementation for returning users to login. Add the code below inside routes/api.php:
Then add the login() method inside of the AuthController:
In the above code, we are checking if the email and password supplied actually match any from the users table and then creating a new personal access token for the user.
Let’s add the last functionality, which is for fetching the currently authenticated user. Add the code below inside routes/api.php:
Next, add the following code to the AuthController:
This code is pretty straightforward. We simply return the currently authenticated user.
Restricting Laravel endpoints to authenticate users
As you might have guessed, the /me endpoint needs to be accessible to only authenticated users. Luckily for us, we can do that using the sanctum authenticated guard.
So let’s update the route as below:
This will make sure requests to this endpoint contain a valid API token in the header.
Before we test the API, let’s uncomment the line below inside app/Providers/RouteServiceProvider.php:
The application should be running on http://127.0.0.1:8000 and we can access the API on http://127.0.0.1:8000/api.
Now, we can make the requests in Insomnia as in the following examples.
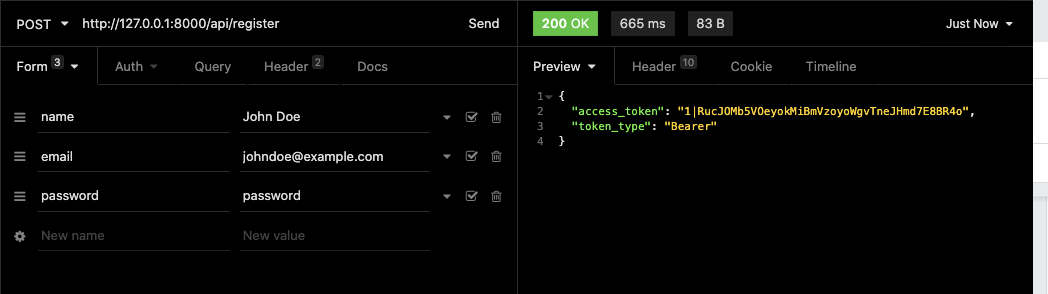
Create a new User
To create a new user, make a POST request to http://127.0.0.1:8001/api/register with a name, email, and password field. Make sure that your password is at least eight characters long.
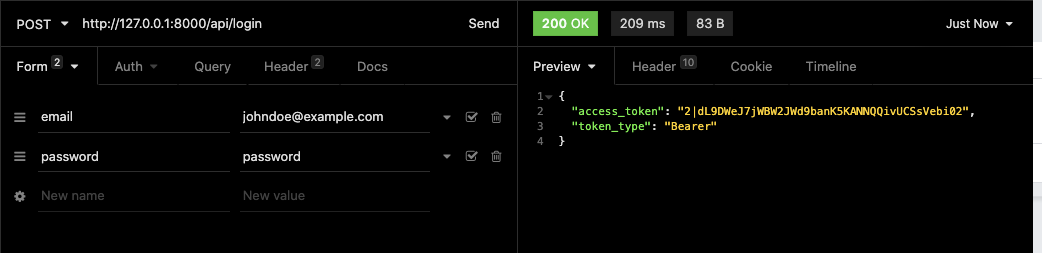
Login the user
To login, make a POST request to http://127.0.0.1:8001/api/login with your email and password (in plain text format).
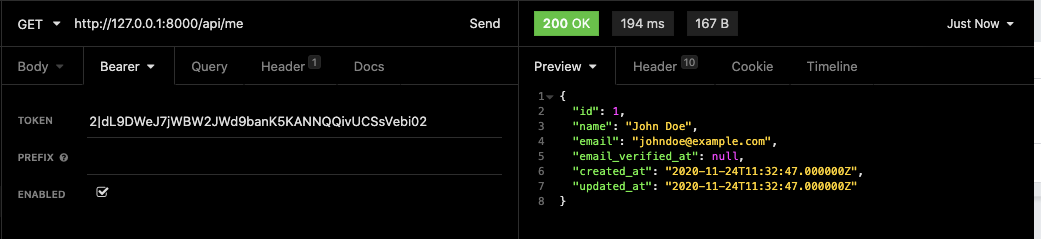
If we try to access the /me endpoint with a valid token, we should get something similar to the image below:

Otherwise, we should get user details as in the image below:
Conclusion
In this tutorial, we looked at what Laravel Sanctum is and what it does. Also, we looked at how it is different from Laravel Passport and when to use it. Finally, we covered how to use Laravel Sanctum to give access to users by creating tokens that can be used to authenticate and give access to users to consume Laravel APIs.
To learn more about Laravel Sanctum, check out the docs.
You can find the complete source code for this tutorial on GitHub.
Chimezie Enyinnaya is a software developer and instructor. You can learn more about him here:
Website: https://adonismastery.com
Twitter: https://twitter.com/ammezie
Email: meziemichael@gmail.com
GitHub: https://github.com/ammezie
Related Posts
-
 How to Approve Real Users and Block Fake Accounts at Sign Up with Lookup and VerifyKelley Robinson
 -
 How to Handle No-Answer/Pickup Scenarios with Voicemail and Callback using Twilio VoiceAmanda Lange Niels Swimberghe
 -
 Build a WhatsApp AI Agent with Node.js, Twilio Messaging, and OpenAI’s GPT-5Chris Gargotta
Related Resources
Twilio Docs
From APIs to SDKs to sample apps
API reference documentation, SDKs, helper libraries, quickstarts, and tutorials for your language and platform.
Resource Center
The latest ebooks, industry reports, and webinars
Learn from customer engagement experts to improve your own communication.
Ahoy
Twilio's developer community hub
Best practices, code samples, and inspiration to build communications and digital engagement experiences.