How to Build an SMS Payment Notification System for Stripe with Laravel
Time to read:
March 20, 2019
Written by
This post is part of Twilio’s archive and may contain outdated information. We’re always building something new, so be sure to check out our latest posts for the most up-to-date insights.

For many online stores, it’s important as a business owner to be able to receive real-time notifications whenever a sale occurs in your store. In this tutorial, we will be looking at how we can achieve real-time notifications via SMS using Twilio’s REST API whenever a new sale occurs on your store.
Technical Requirements
To follow along, you’ll need the following:
Create A New Laravel Project
To get started, we need to install a new Laravel project. There are different ways to go about this, but for the sake of this tutorial, we’ll be using Composer. If you’d prefer an alternative, you can visit the docs to learn about the different ways to install a new Laravel project.
Open your terminal, and run the following command:
This will install a new Laravel project for us in the twilio-stripe directory.
Handling Stripe Webhooks
Next, we’ll be making use of a Laravel package to help us handle incoming webhooks from Stripe. Once again, we’ll be using Composer to install the package.
Since we’re using Laravel 5.7, the service providers would have been automatically registered. To publish the config file associated with the package, run:
This will simply add a stripe-webhooks.php file to the config folder. This package will also log all valid calls to a database. To publish the migrations from the package, run the following command:
This will add a new migration file to the database/migrations folder. You can delete the user and password resets migration that comes by default with Laravel. We won’t be needing them for this tutorial.
Next, edit the .env with your database credentials and then run the migration using:
Create Webhook Endpoint
Let’s add our webhook endpoint to our routes. Edit the routes/web.php file with the following code:
We’ve added a new route using the package we installed earlier. This will automatically register a POST route to a controller provided by the package. You can read more about using the package here.
Disable CSRF Verification
Because Stripe has no way to obtain a CSRF Token from our application, it’s important we disable CSRF verification for the endpoint we created earlier. The VerifyCsrfToken middleware is used for validating all tokens. Luckily, the middleware accepts an except array which accepts a list of endpoints to disable CSRF verification for.
Edit the app\Http\Middleware\VerifyCsrfToken.php file and add the route we created earlier to the except array.
Events
Laravel’s Events provide a great way to separate our application logic while allowing us to subscribe and listen to various events that occur in our application. You can read more about Laravel’s Events here.
The package we are currently using will always trigger an event related to the Stripe event type. Hence, all we need to do is register the particular event we shall be expecting from Stripe and associate a listener to the event.
Registering the Event
Since we want to be notified whenever a sale has occurred in our store, we’ll be looking out for the charge.succeeded event Stripe usually sends out whenever a new charge is created and is successful.
Head over to the app\Providers\EventServiceProvider.php file and register the event under the $listen array.
Creating the Listener
Next, we need to associate a listener to the event we just registered. This listener will be responsible for triggering the SMS notification whenever a new sale has just been recorded.
Run the following command:
This will generate a new listener for us in the app\Listeners folder. We need to let Laravel know the listener we just created is associated with the event we registered earlier.
Edit the app\Providers\EventServiceProvider.php file with the following code:
NOTE: Don’t forget to import the SendSMSNotification class at the top of the file by adding use App\Listeners\SendSmsNotification;.
Set Up Ngrok
Since our application is currently local, Stripe has no way of notifying us about events. However, we can use Ngrok to set up a public URL so that our app is accessible over the web.
Run
NOTE: Depending on how your development environment is set up, you might need to use a different command to expose your local web server to the internet. You can check the docs to find the appropriate command that works for your development environment.
This will display a UI in your terminal with your new Public URL and other information.
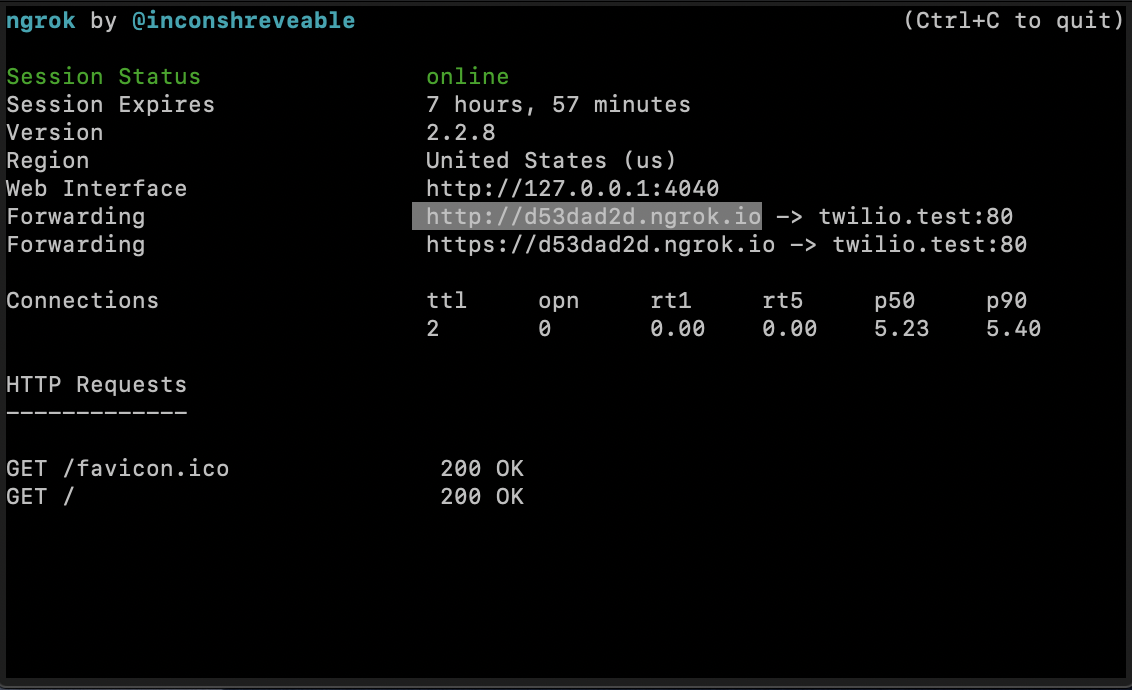
Take note of the first Forwarding URL as this is what will use to configure our Stripe Webhook.
Add Webhook Endpoint To Stripe
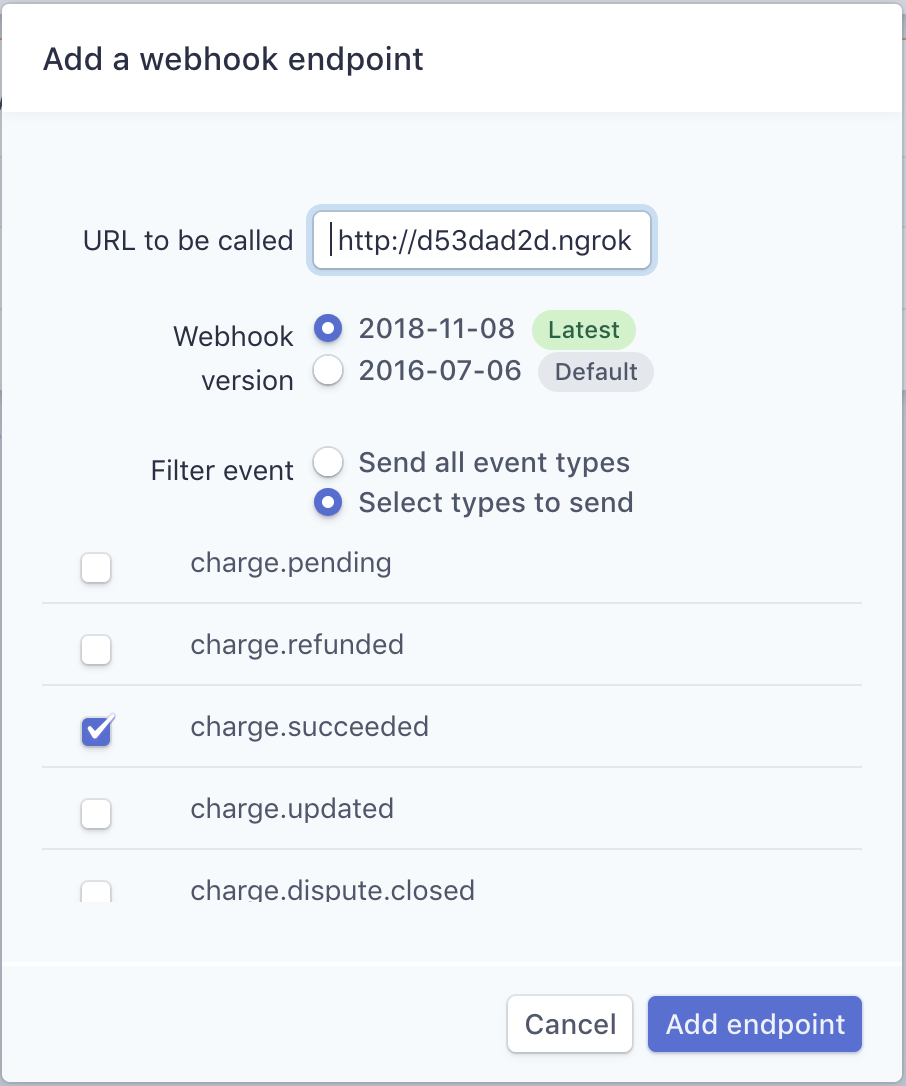
Stripe makes use of Webhooks to notify our applications whenever a specific event has occurred on your Stripe account. Head over to your Stripe Dashboard and set the mode to Test so that we can send test data to the webhook endpoint we will be adding shortly.
Under the Developers->Webhooks section, select Add Endpoint and then add the URL endpoint (e.g. http://d53dad2d.ngrok.io/stripe/charge/succeeded)
NOTE: The Ngrok generated URL will be different in your case
Your configuration should look like something similar to this:
Checking Webhook Signatures
It’s important to validate that any incoming request made to our webhook endpoint is actually from Stripe and not from a third party. As a result, Stripe can sign the webhook event it will send to our endpoint. You can read more about this here.
Our package will automatically take care of verifying the Signature. All we need to note is the signing secret for that particular webhook endpoint and then add it to our .env file.

Add the following to your .env file.
Set Up Twilio
We need to import Twilio into our app so we can start sending outbound SMS messages. We’ll be using the Twilio SDK for PHP to interact with Twilio’s API so we need to install the library.
Run the following command:
Environment and Config Variables
To be able to successfully interact with Twilio’s API, we’ll be needing certain credentials from our Twilio Dashboard. Head over to your Twilio Dashboard and note the following Account Sid, Auth Token. You’ll also need a Twilio phone number to send text messages from.
Next, add those credentials to your .env file.
Then, edit the config/services.php file to reflect a new Twilio array so we can reference the environment variables we just defined.
Create a Twilio Class
We’ll be using a custom Twilio class to interact with the Twilio SDK for PHP we installed earlier.
Create a new Twilio.php file under the app\Services directory and then add the following code:
In the constructor, we have initialized the Twilio credentials we added to our config\services.php file earlier. We also created a new Twilio Rest Client and assigned it to the client property of our class.
The send() method accepts the phone number we would like to send the message to as well as the message itself and then sends the SMS using the Twilio API.
Sending an SMS Notification
Remember the listener we created earlier? It’s time to get it to do its job. Edit the app\Listeners\SendSmsNotification.php file with the following code:
NOTE: Don’t forget to set the PHONE_NUMBER value in your .env file
The handle() method is responsible for triggering the SMS notification. We get the Stripe amount from the payload and then divide by 100 to convert from cents to dollars. Next, we get the phone number we would like to send the text to. Using the Twilio class we created, we send the SMS notification.
Testing
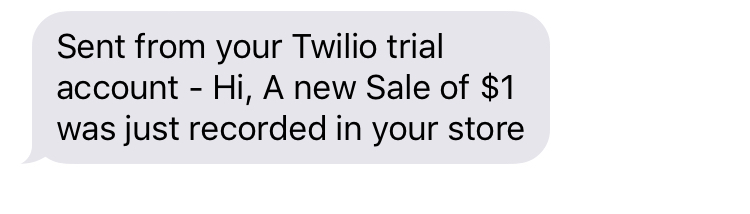
To test, head over to your Stripe account and send a test event to the webhook endpoint we created. You should receive a text informing you that a sale has just been recorded in your store.
Conclusion
In this tutorial we have explored how you can receive SMS notifications from your Laravel app while using the Twilio PHP Library to send outbound SMS. In case you would like to receive SMS notifications for other kinds of events from Stripe, all you need to do is register the type of event and attach a listener similar to the one we created earlier, to the event.
You can find the repo for this tutorial on Github.
Dotun Jolaoso
Twitter: @dotunj_
Github: @dotunj


Related Resources
Twilio Docs
From APIs to SDKs to sample apps
API reference documentation, SDKs, helper libraries, quickstarts, and tutorials for your language and platform.
Resource Center
The latest ebooks, industry reports, and webinars
Learn from customer engagement experts to improve your own communication.
Ahoy
Twilio's developer community hub
Best practices, code samples, and inspiration to build communications and digital engagement experiences.