How to Collect Times and Dates in Voice Calls or SMS using JavaScript
Time to read:
May 13, 2022
Written by
Reviewed by

Twilio offers a wide variety of channels you can use to connect with your customers, for example, through an SMS or Phone Call. One of the ways you can use these channels is to collect data from your customers. Depending on the type of data, this can be a complex undertaking. Collecting individual words or numbers is usually pretty straightforward. However, when asking customers to share specific Times and Dates, this can be far more complex. A typical use-case might be the scheduling of an appointment. This is especially true when allowing customers to communicate in free form (for example, “I would like an appointment next Tuesday at 3 pm”).
In this blog, I will show you how you can extract Times and Dates during a phone call using JavaScript and serverless Twilio Functions without the need for any 3rd party integrations.
Prerequisites
To build this solution, you will need:
- A free Twilio account. If you don’t already have a Twilio account, you can quickly get a free account here.
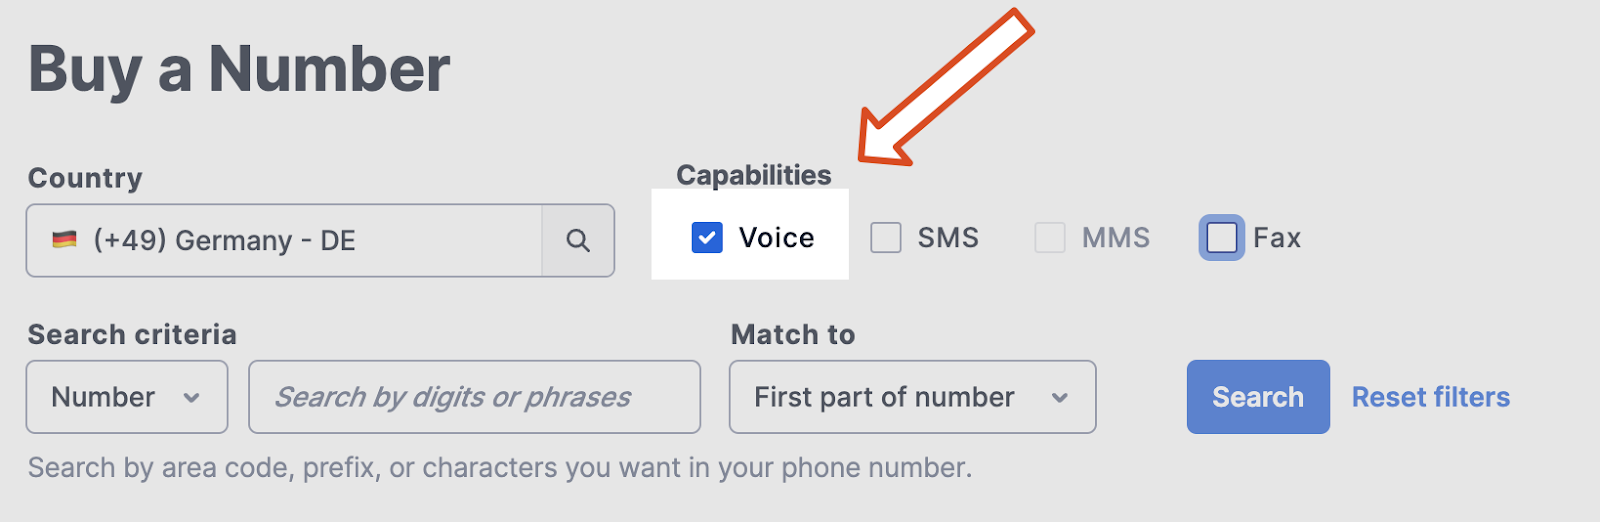
- An active phone number in your account with Voice capabilities. How to do this can be found here.
- Basic Node.js knowledge
Twilio account setup
If you don’t already have a Twilio account, get a free account here.
Then, go and buy a new phone number from Twilio. The cost of the phone number will be applied to your free promotional credit if you're on a trial account.
Create Twilio Functions to handle incoming calls
First, we will create a Twilio Function, which is Twilio’s serverless solution. We will run the code within our function to convert the user’s free-form input about their desired time and date to something our backend systems can handle, for example, to store this information in a database.
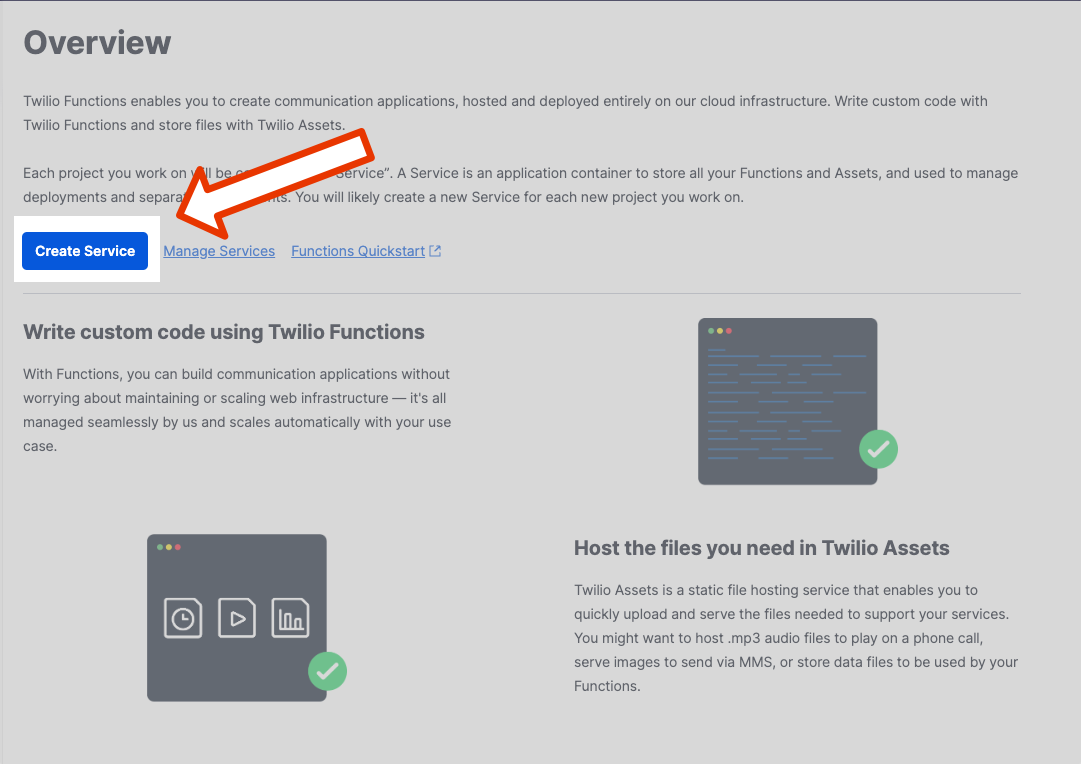
To create a Twilio Function, head to the Twilio Functions product within the Twilio Console.
We will want to create a new Service, so go ahead and click the “Create Service” button.
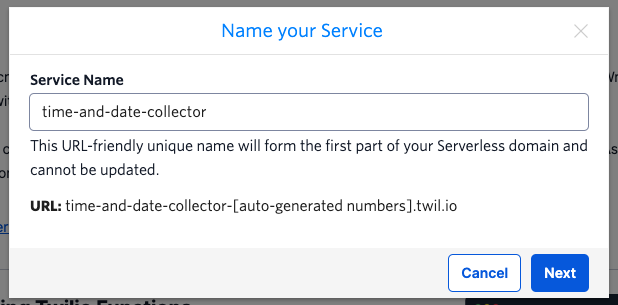
Let’s go ahead and name our service time-and-date-collector
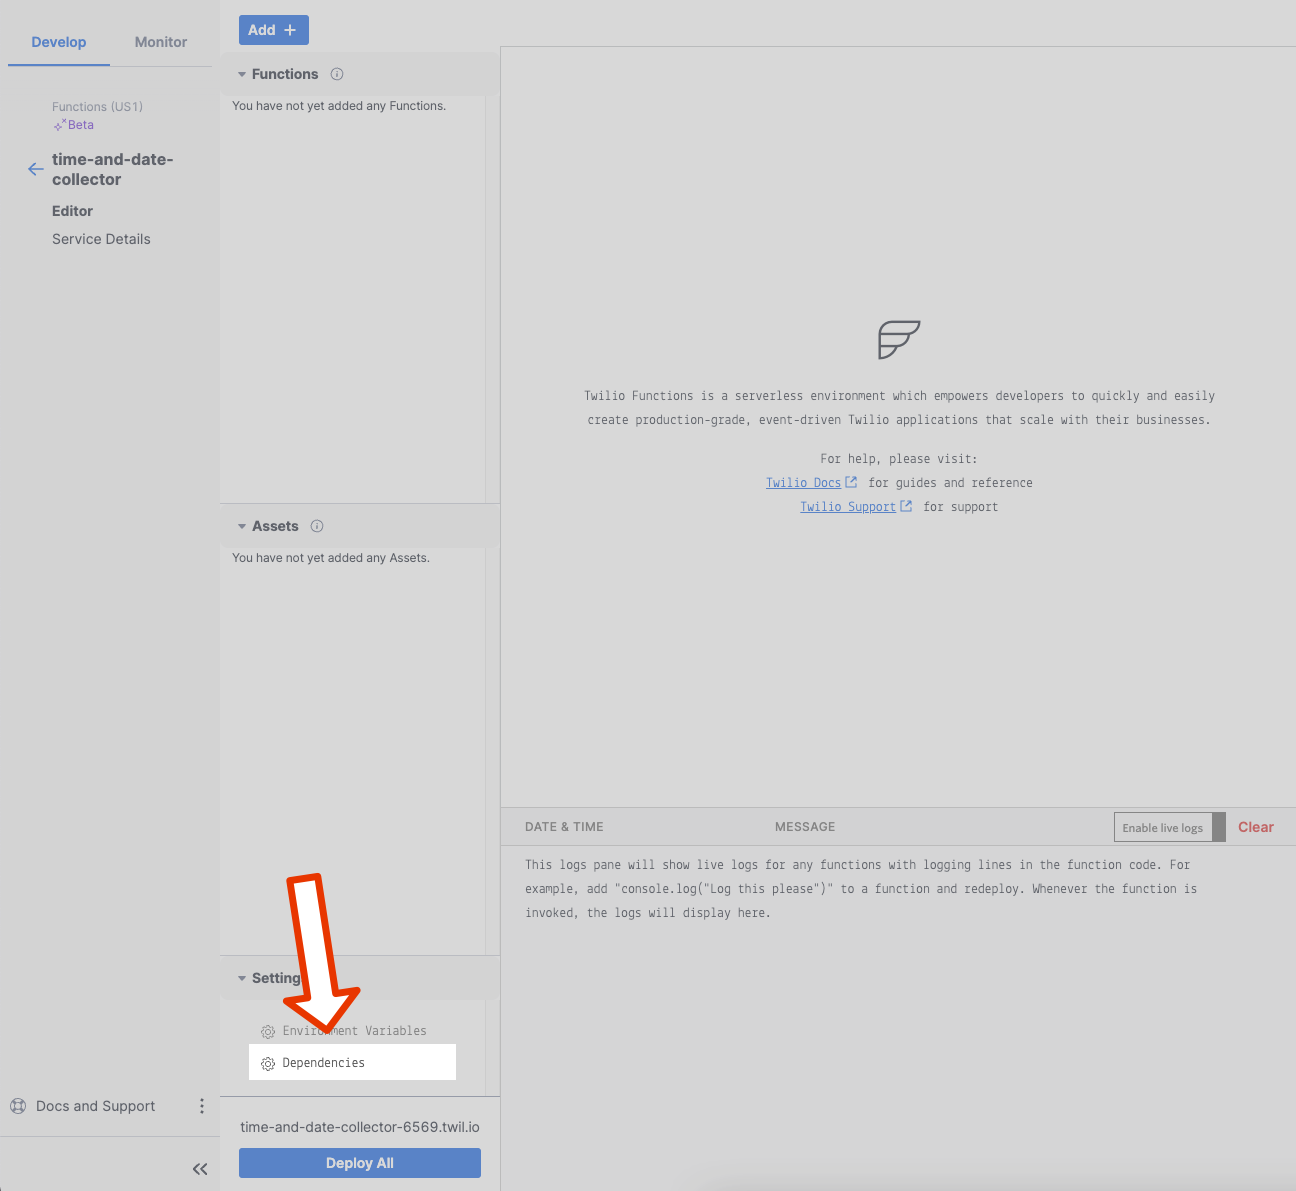
At this point, you will see the overview page for your Twilio Functions Service.
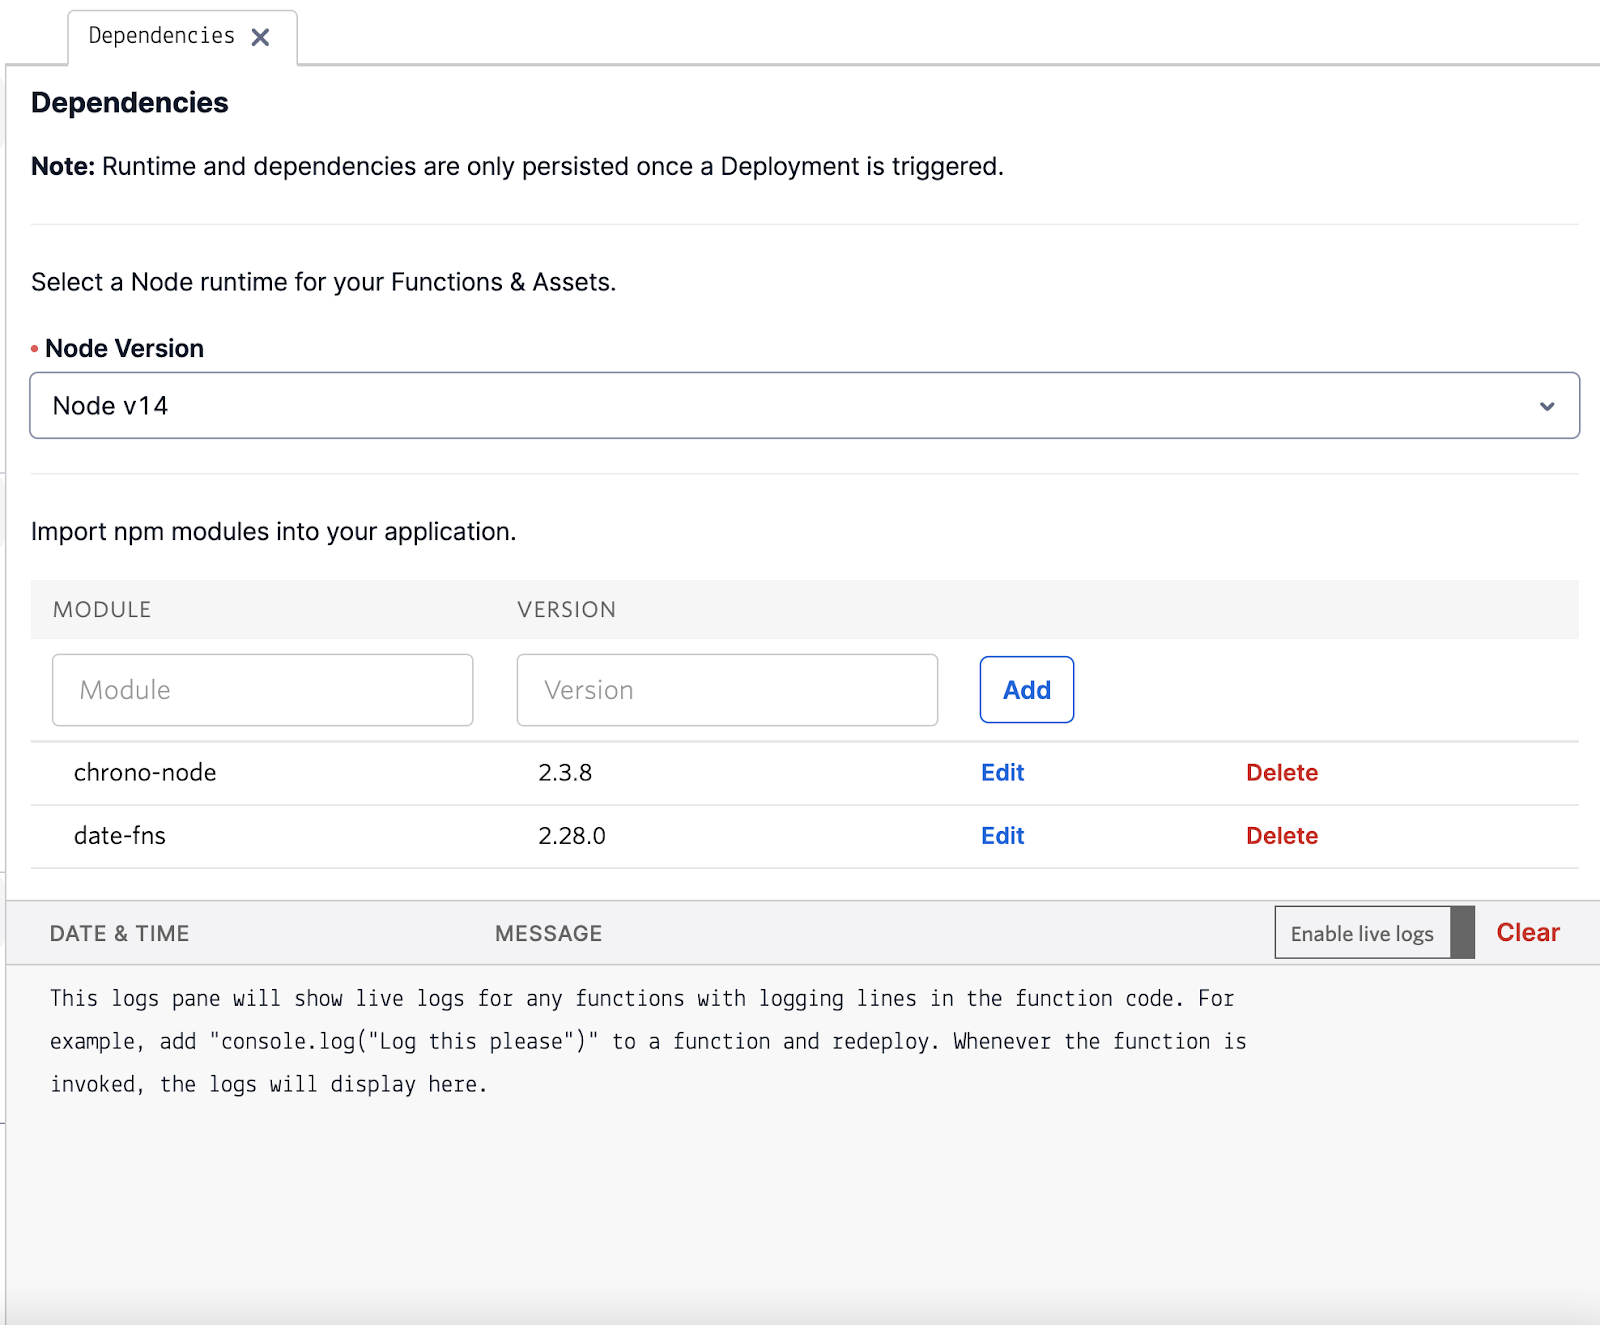
First, we add a JavaScript package called chrono-node to our Service to handle the conversion of free-form time and date inputs to a format our backend systems can process. We will also install a second package called date-fns that can convert these formats back into a human-readable format.
To do this, click on Dependencies in your UI:
Next, let’s add the chrono-node module. Do this by adding chrono-node with version 2.3.8 (the latest version at the time of writing). Then, click the Add button.
We will do the same for the date-fns module by adding date-fns with version 2.28.0.
The result should look as follows:
Let’s go ahead and write some code! We’ll want to add a Twilio Function, which we can do by clicking the Add + button in the top left corner of the screen.
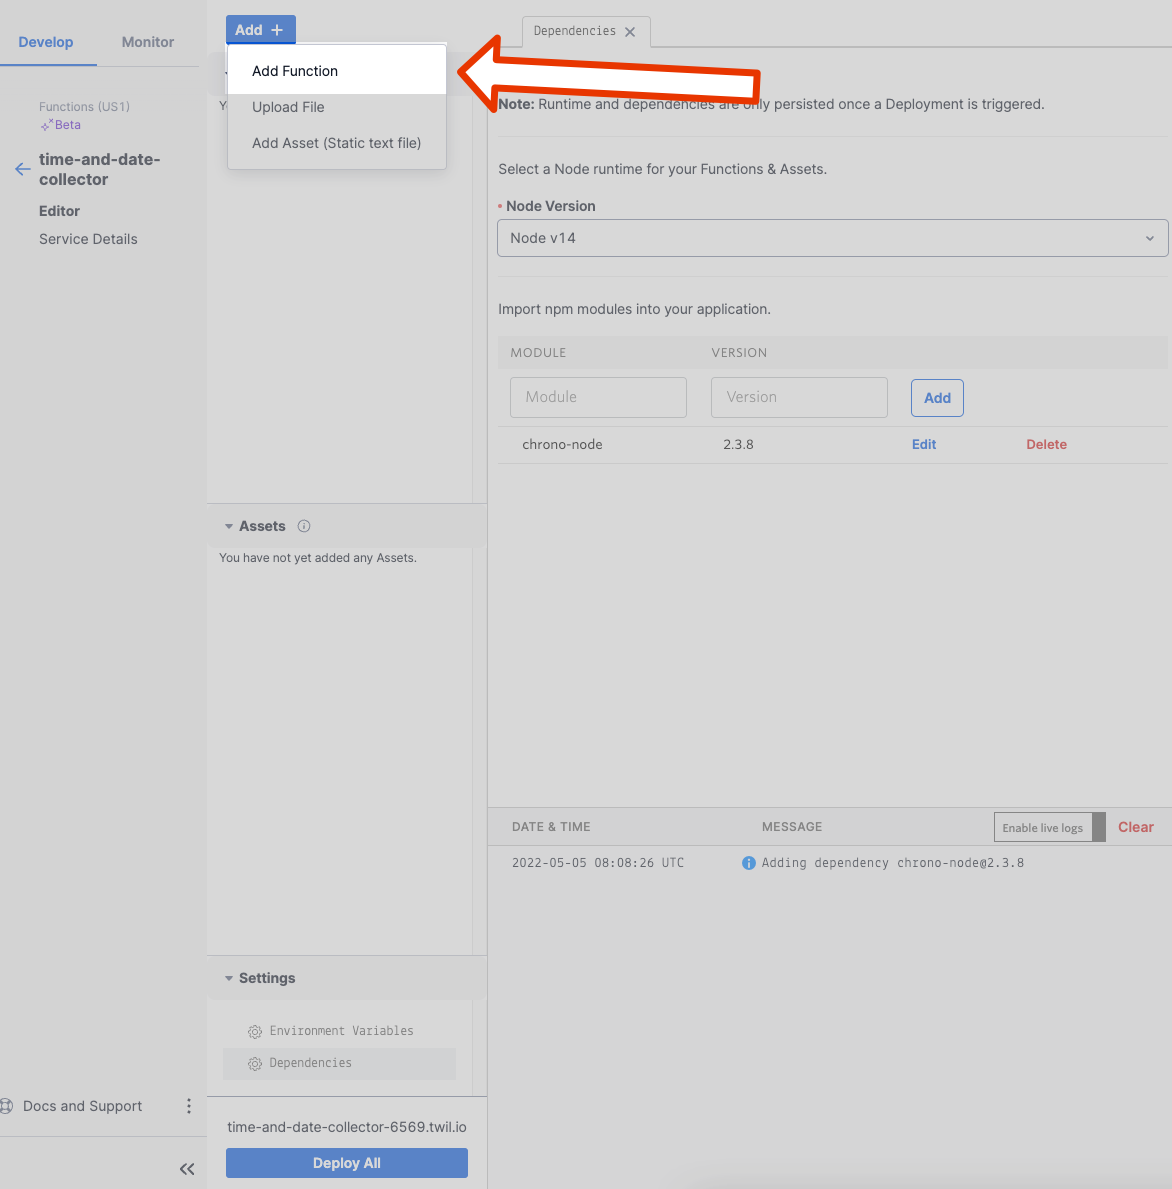
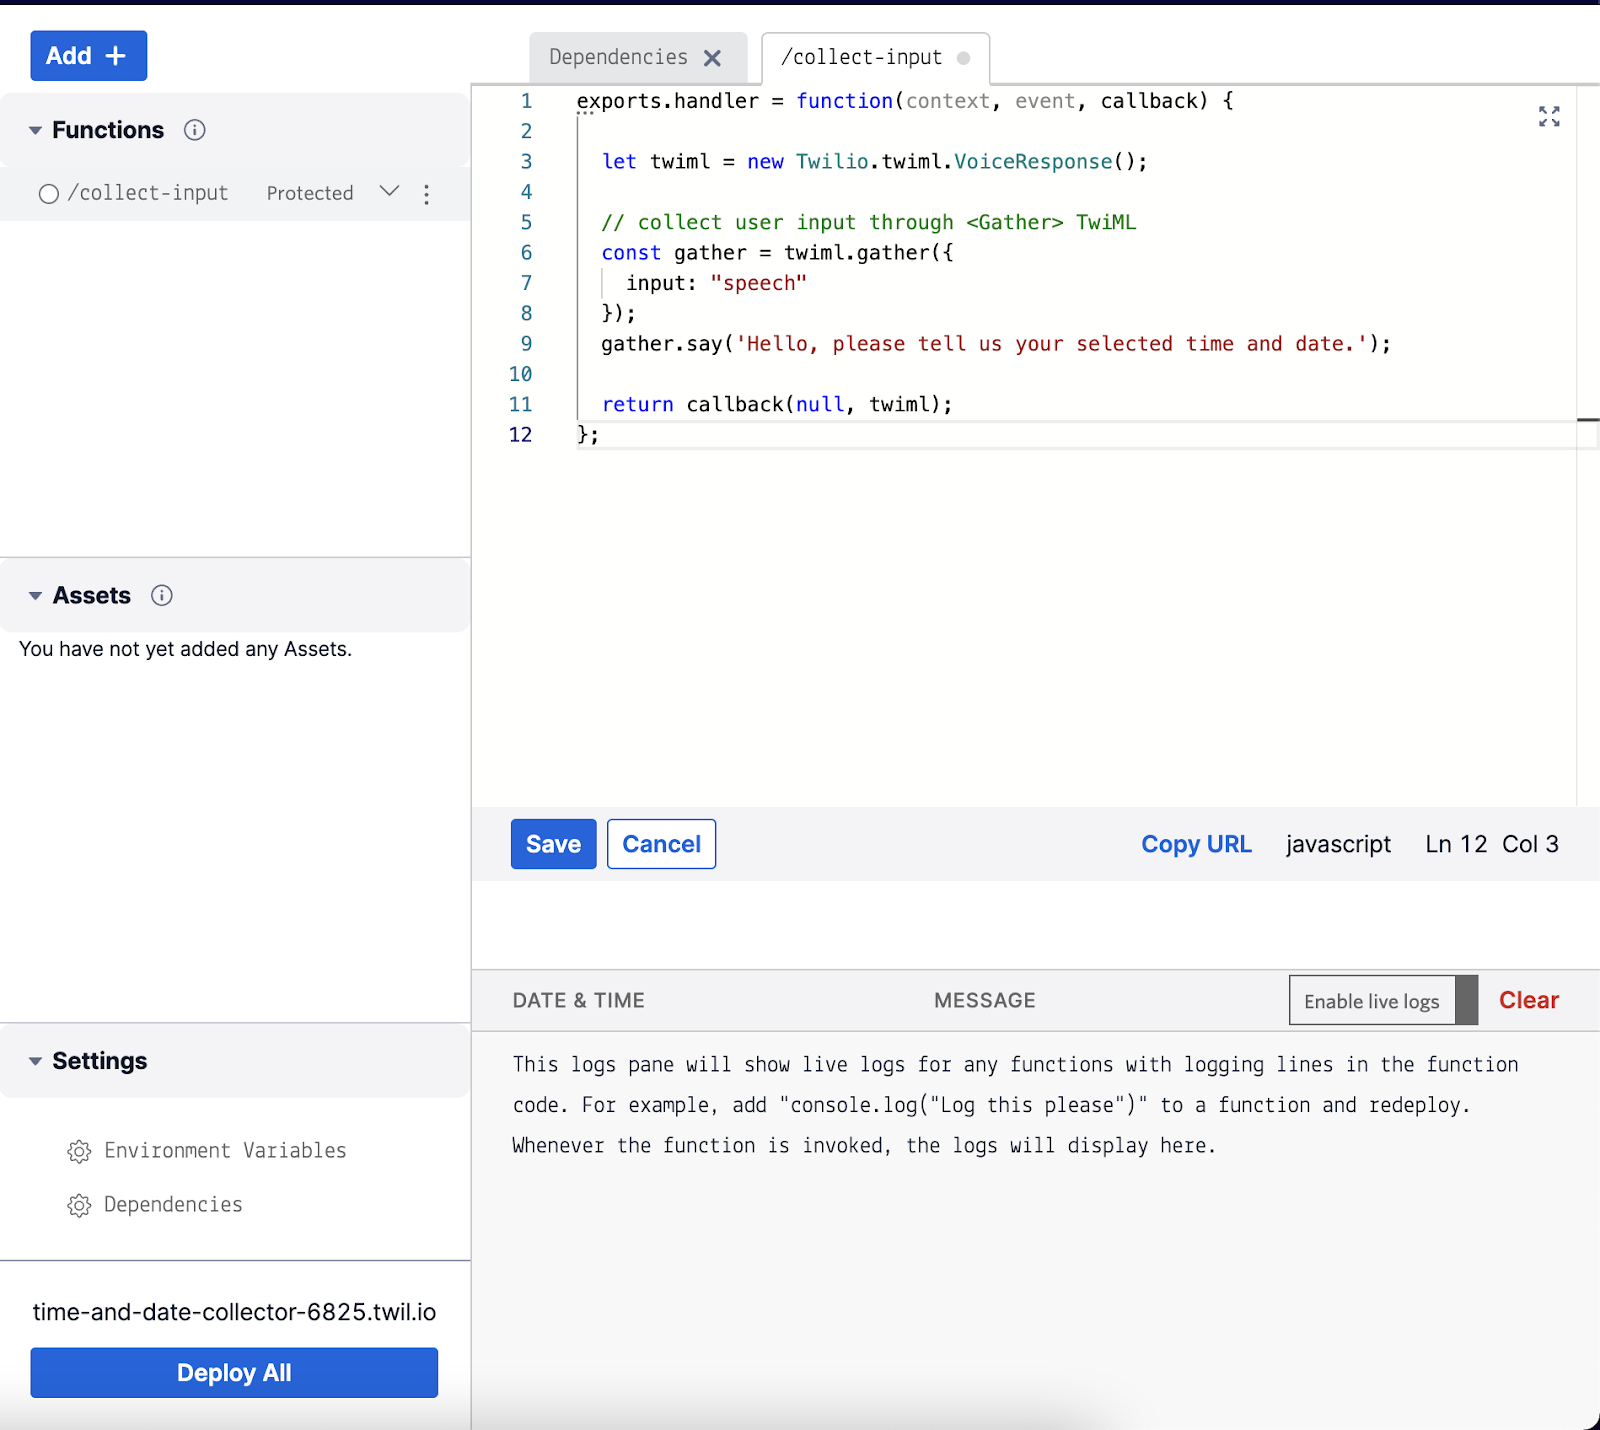
First, let’s create a simple function that requests a Time and Date Input from our user. For this, we will use the <Gather> TwiML. Go ahead and call this function collect-input. This will create a new function with some default code. We will go ahead and exchange it with the following code:
This function will greet the customer and ask them for their time and date input using the <Say> TwiML. Additionally, we’ve defined the expected input to be spoken, not entered through the dial pad (known as using DTMF tones). The end result should look as follows:
Next, let’s define the function that processes the user’s input and converts it to a format we can use in our backend systems.
Let’s create another function called handle-input. Here, we will process the input using the chrono-node package installed earlier. Depending on the user’s input, we will either tell them we could not extract a time and date, or read the time and date out to them by converting the date back into a human-understandable format using date-fns.
Just like earlier, let’s replace the code with the following:
Now, there’s one last thing we need to do, which is to tell Twilio to send the input from our collect-input function to the handle-input function. Head back to the collect-input function and add the action and method parameters to the gather function, so the result ends up looking like this:
Finally, we need to save both functions and deploy them. Click on each function name in the list of functions and click the "Save" button to save a function. Once you've saved both Functions, click the "Deploy All" button on the bottom.
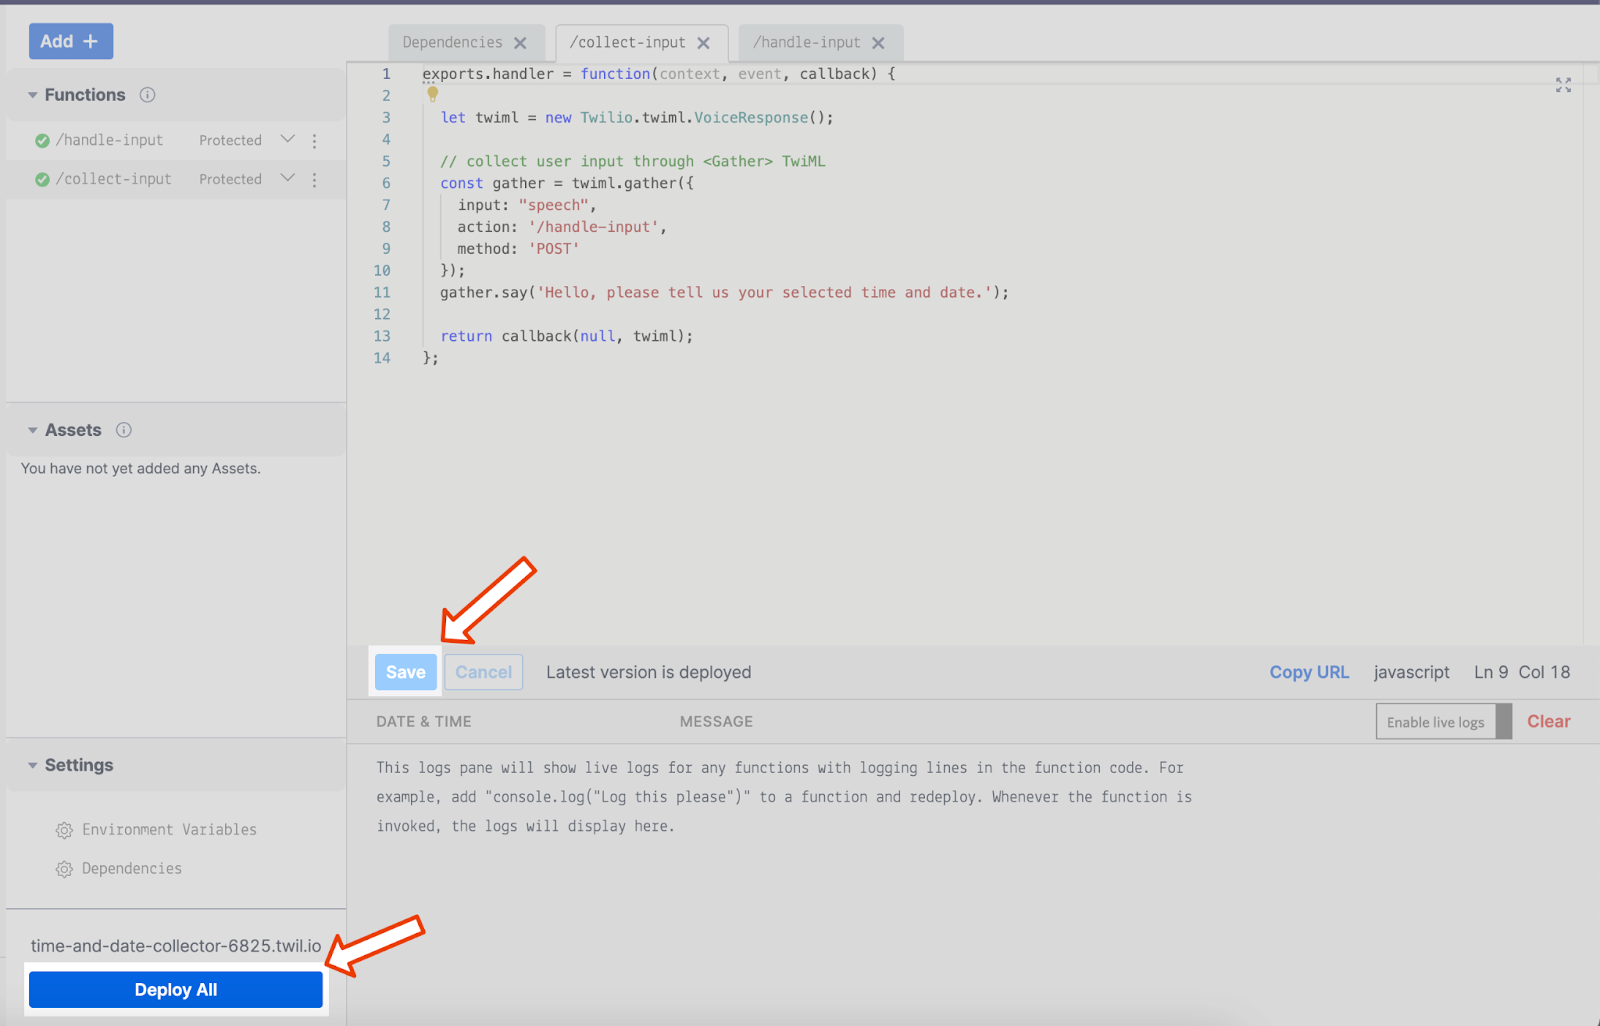
If everything is deployed correctly, you should see two green checkmarks, one next to each function.
Connect this to our number
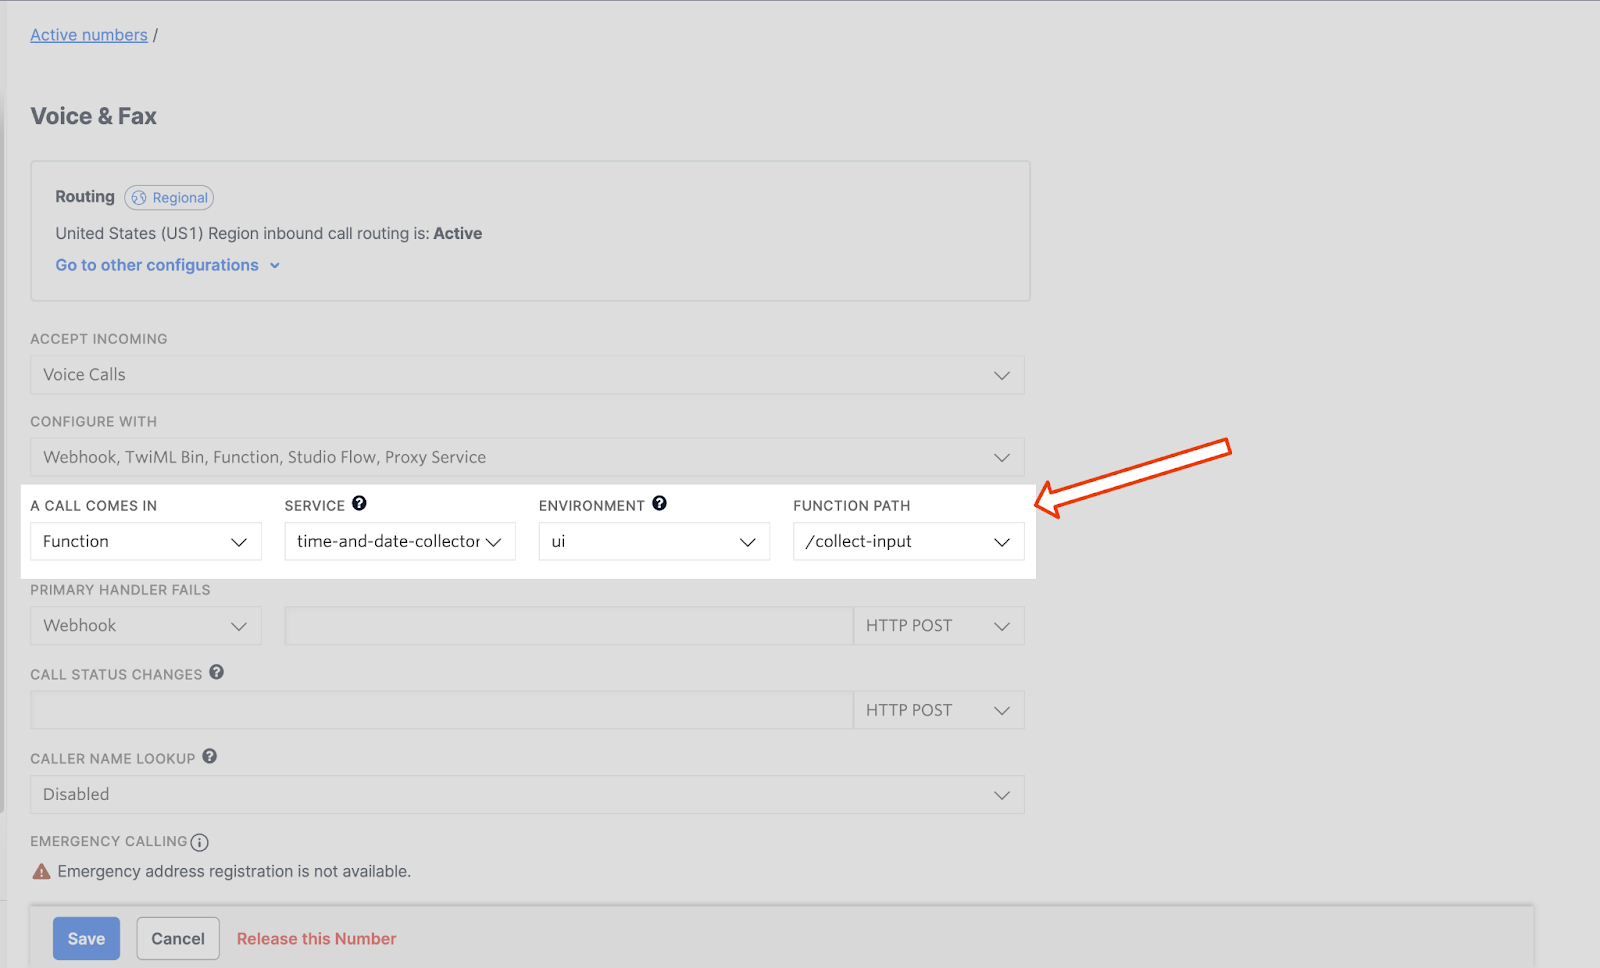
Finally, we need to define how Twilio should handle an incoming phone call by connecting it to our handle-input Functions. To do this, head over to the configuration page of one of the active numbers in your account.
Here we will scroll down to the VOICE AND FAX section of the page. Under the input for A CALL COMES IN click on the dropdown to select Function, then select our time-and-date-collector Service, the ui Environment, and finally the /collect-input function.
Once you’ve done that, press the “Save” button on the bottom of your screen, and you’re all set!
Try it out
Now go ahead and call the number. You should be able to say a free form time and date, and if it’s a recognized input, you’ll be read back your input.
For example, try saying:
“My selected time and date is next Tuesday at three in the afternoon.”
Which – depending on when you ask – would return something similar to:
“Your chosen time was 3 pm. Your selected date was May 17th. Goodbye!”
Review (and ways to extend the use case)
In this blog post, I showed how you could allow your customers to easily input dates and times in regular conversation by simply using a few simple JavaScript packages, all without integrating to 3rd party providers. All this was done quickly using serverless Twilio Functions.
This project can be used as a bare-bones example and can be extended to fit your use case better. For example, we could connect the Functions to your backend or even define an endpoint in your backend to handle incoming calls. Here you could connect to a database to see if the user has already entered a time and date (for example, for an appointment) or check for availability.
Additionally, you can also ask for date and time ranges, for example:
“Tomorrow from 10 to 11 AM”.
You could also extend the conversation and, for example, trigger automatic confirmation SMS using Twilio’s Programmable Messaging or Twilio SendGrid’s Email API.
Ted Gieschen is a Munich-based principal solutions engineer in the DACH region who is passionate about helping customers find elegant technical solutions to their business problems. When Ted isn’t busy finding solutions for his customer’s problems, he’s most likely out running 🏃🏻♂️, climbing 🧗🏻♂️ or snowboarding 🏂. Feel free to reach out to him at tgieschen@twilio.com.


Related Resources
Twilio Docs
From APIs to SDKs to sample apps
API reference documentation, SDKs, helper libraries, quickstarts, and tutorials for your language and platform.
Resource Center
The latest ebooks, industry reports, and webinars
Learn from customer engagement experts to improve your own communication.
Ahoy
Twilio's developer community hub
Best practices, code samples, and inspiration to build communications and digital engagement experiences.