Increase Customer Engagement with Click-to-Text

Time to read: 7 minutes
November 29, 2022
Written by
Reviewed by
Are you still wondering about the power of text? According to Gartner, SMS open and response rates are as high as 98% and 45%, respectively — in contrast to corresponding figures of 20% and 6% for email. And according to Statista, Mobile browsing accounts for about 60% of all website traffic, and continues to grow. And further, according to explodingtopics.com, there are approximately 4.32 billion active mobile internet users, and 42% ordered a product using their smartphones.
For these reasons (and more!), using a specially designed link or button on your mobile webpage or QR codes at your store will help you improve your customer engagement. How’s that?
- Speed: Quickly and seamlessly opt-in your users with just a click.
- Accuracy: You don’t need to worry about your users typing in the wrong phone numbers or keywords.
- Tracking: You can also track based on keywords where your customers are coming from.
In this blog post, you will see how to create a QR code or click-to-text link or button for your mobile website or marketing emails. We will reduce friction, and auto-fill it with your To: number and SMS body text to improve response rates.
Then, we will show you how to use Twilio Studio to respond automatically to SMS requests. This helps, for example, you respond with a different promo code per store.
Finally, we will show you how to enable your workforce to respond to requests on your customer’s desired channel. For example, when someone sends a message with “Call” in the message body, this message will be routed by Twilio Studio to Twilio Flex (Twilio’s flexible cloud contact center), where you will be able to call users back.
Developing a click-to-text solution with Twilio
Imagine mobile product web pages with a simple click-to-text link that produces an Opt-In embedded message like: “Yes, please keep me updated about …”, or “Please sign up for coupons. Text BUYMORE and get 10% off your order”.

At a store, well placed visuals with QR codes that allow click-to-text can provide a nice thank you coupon for customers visiting the store:
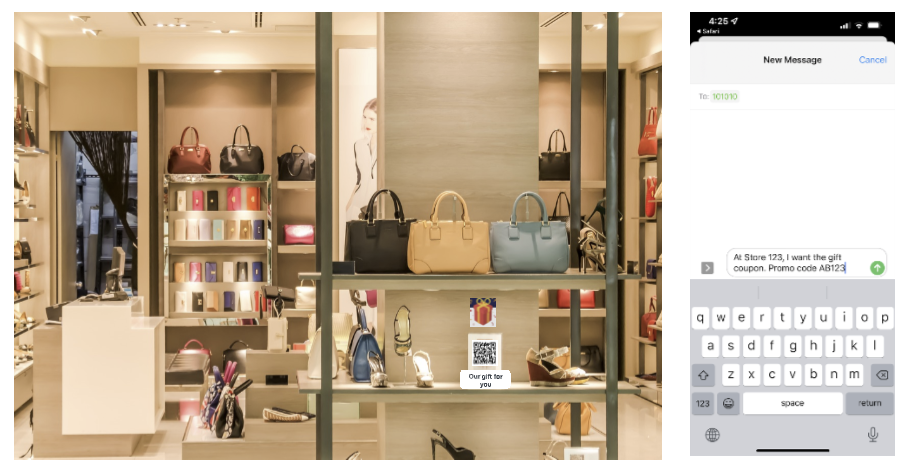
One of the advantages of this approach is that you can obtain customer Opt-In on the spot, and engage with your customers for additional marketing promotions later via text.
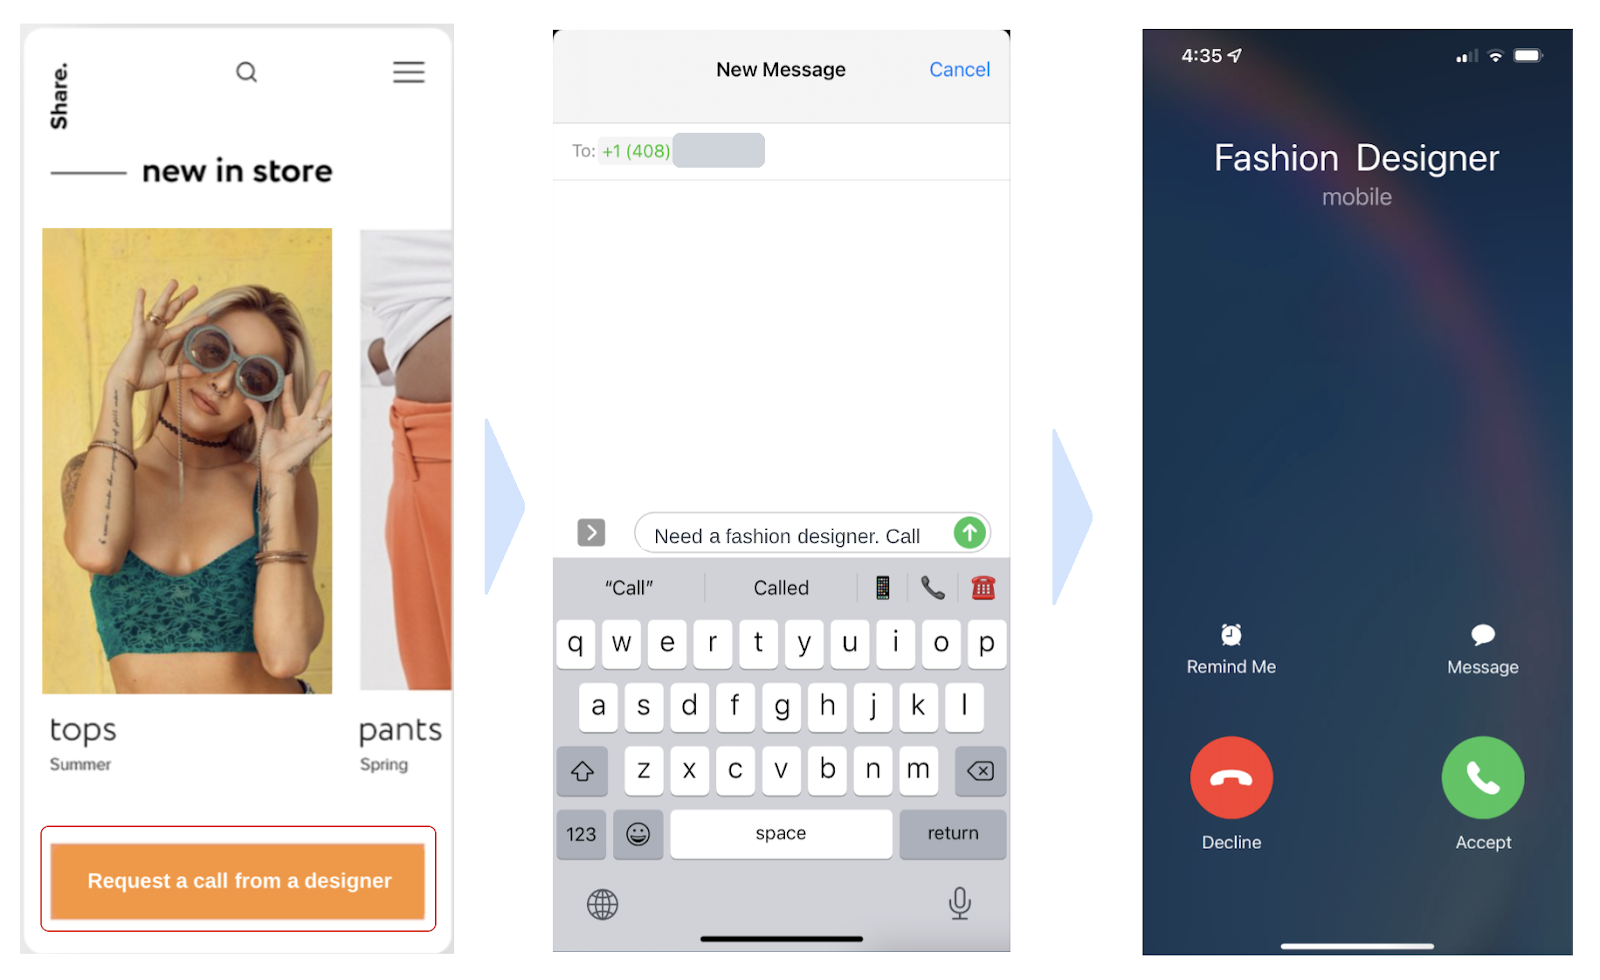
Another important use case is for text-to-call, to show a button to request a call from support or help from an expert. For example, a “Request a call from a designer” button that will create a pre-populated message with the correct To: number and a message “Need a fashion designer. Call”. This message will be routed to the company’s call center, and a fashion designer can accept the request and call the customer.
You can see how click-to-text would be powerful for your company. Here’s the architecture diagram for what we’ll be building today:
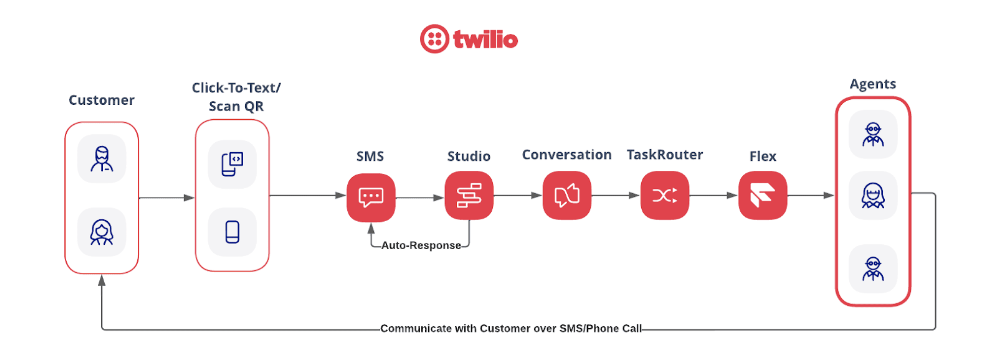
We’ll generate a QR code that customers can scan, then use a variety of Twilio products to route requests to agents on a Twilio Flex instance. From there, they’ll help the customer with what they need.
Let’s get started!
Prerequisites
To get started you will need:
- A Twilio account - sign up for a free developer account here.
Set up your Twilio Flex account
Go to twilio.com and sign up for a free account (or log in to your existing account).
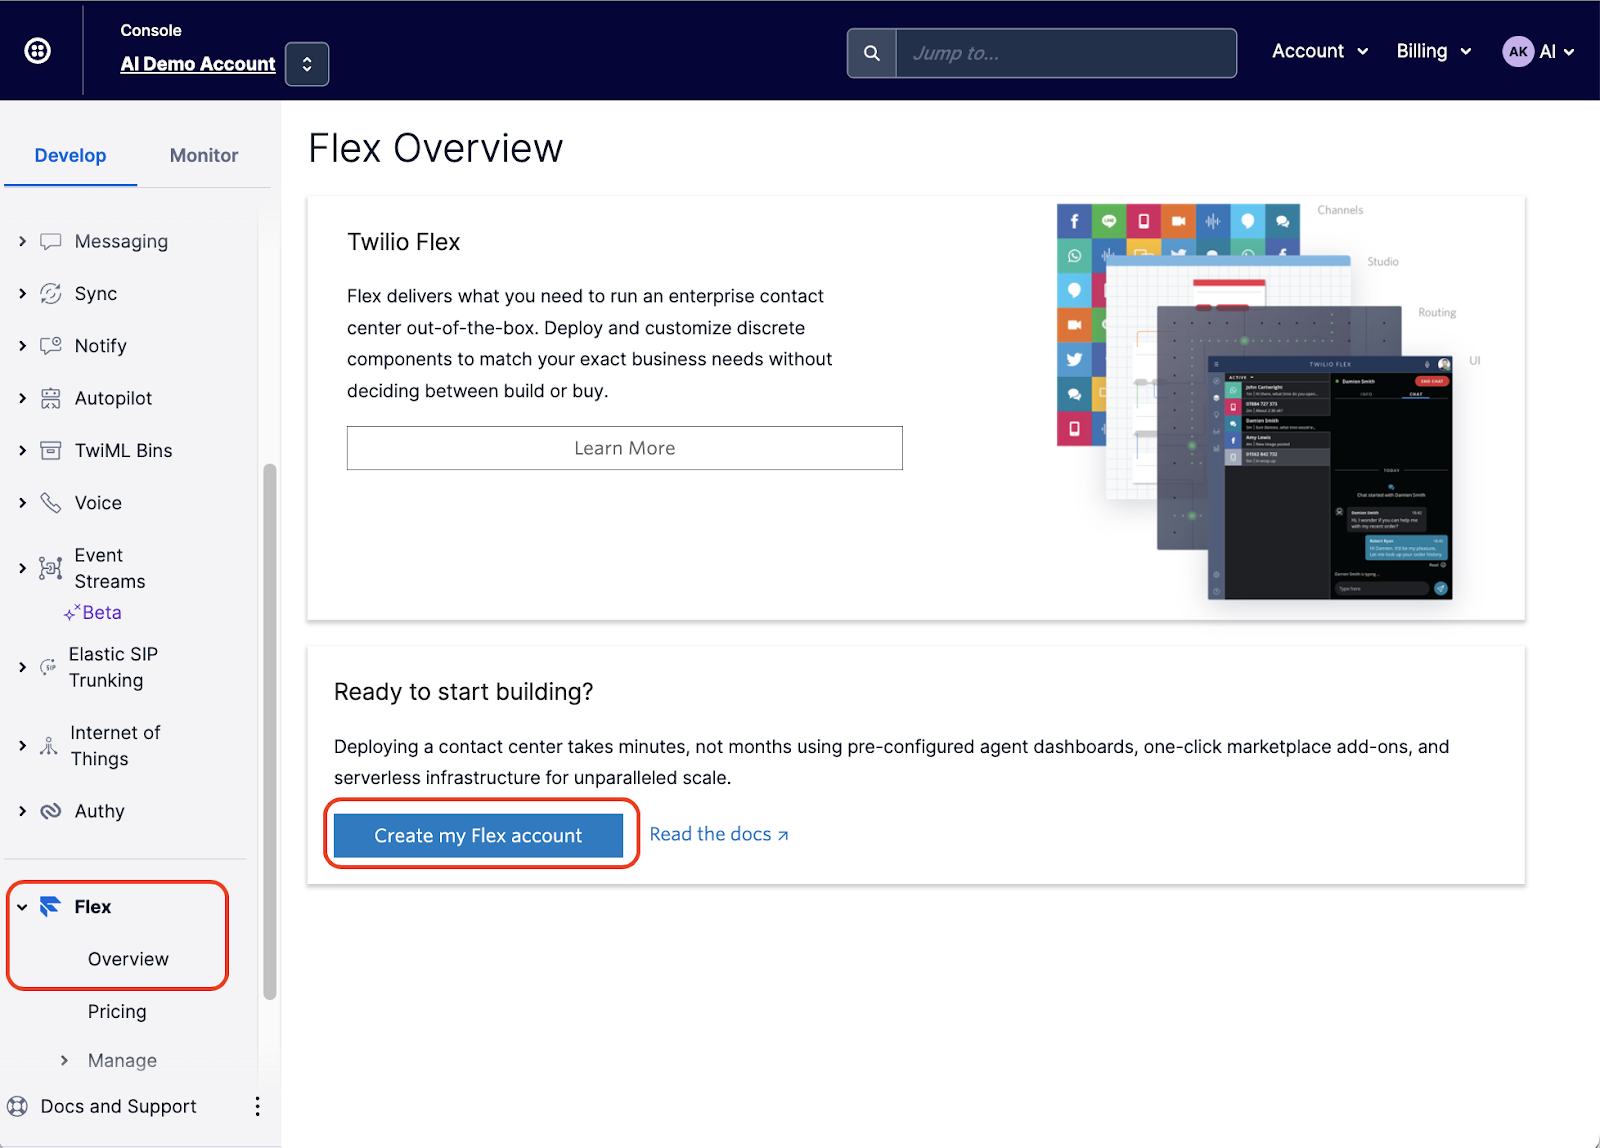
In order to use Twilio's Flex programmable contact center, we will need to create a new Flex-specific account. Check this guide and follow the steps below:
- Access the Flex Overview page in your Twilio Console.
- Click Create my Flex Account.
- Enter the desired account name, and then click Verify.
- Verify an email address and phone number to continue.
Note: We will test sending a text reply and an outbound call later on, and Trial accounts can only send messages or place calls to the number you verified in this step. - Please wait while your new hosted Flex instance is being built. When ready, you will automatically be loaded into Flex.
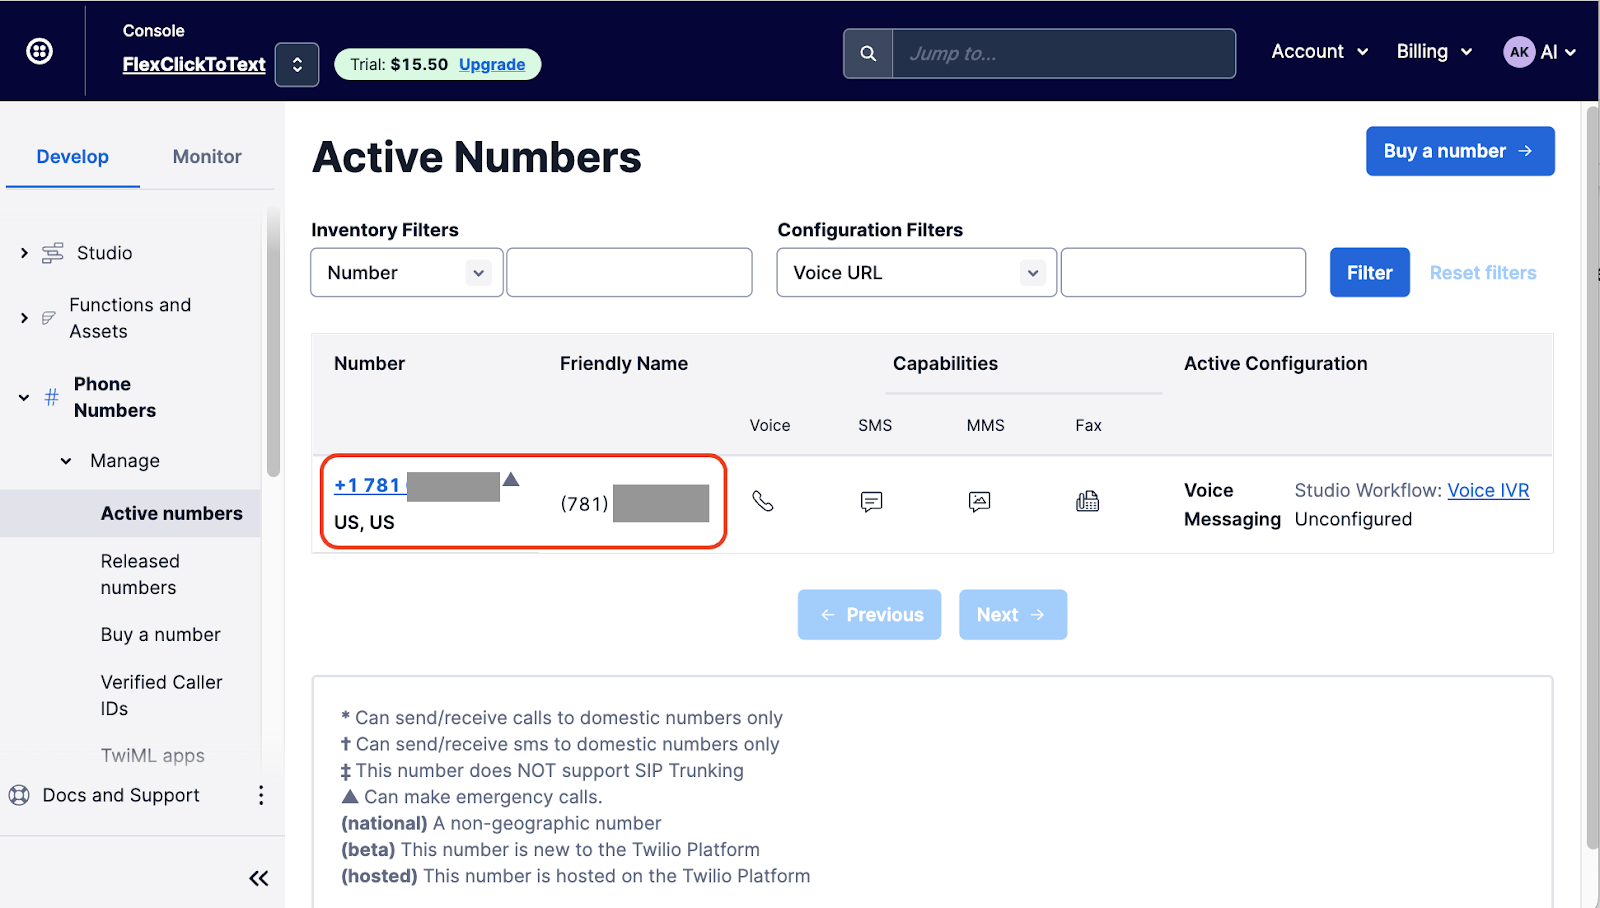
Once the project is up and running, a Twilio number will be automatically provisioned for you. Take note of this number as we will use it in our next step.
Go to Phone Numbers - Manage - Active numbers:
To enable a simple dialpad on the Agent Flex UI to make outbound calls, we need to go to Flex - Manage - Voice, then check the Enabled checkbox under Enable Dialpad. Choose the Caller ID as your Twilio Number, the Task Queue as “Everyone”, TaskRouter Workflow as “Assign to Anyone” and update the Country with “United States of America”:
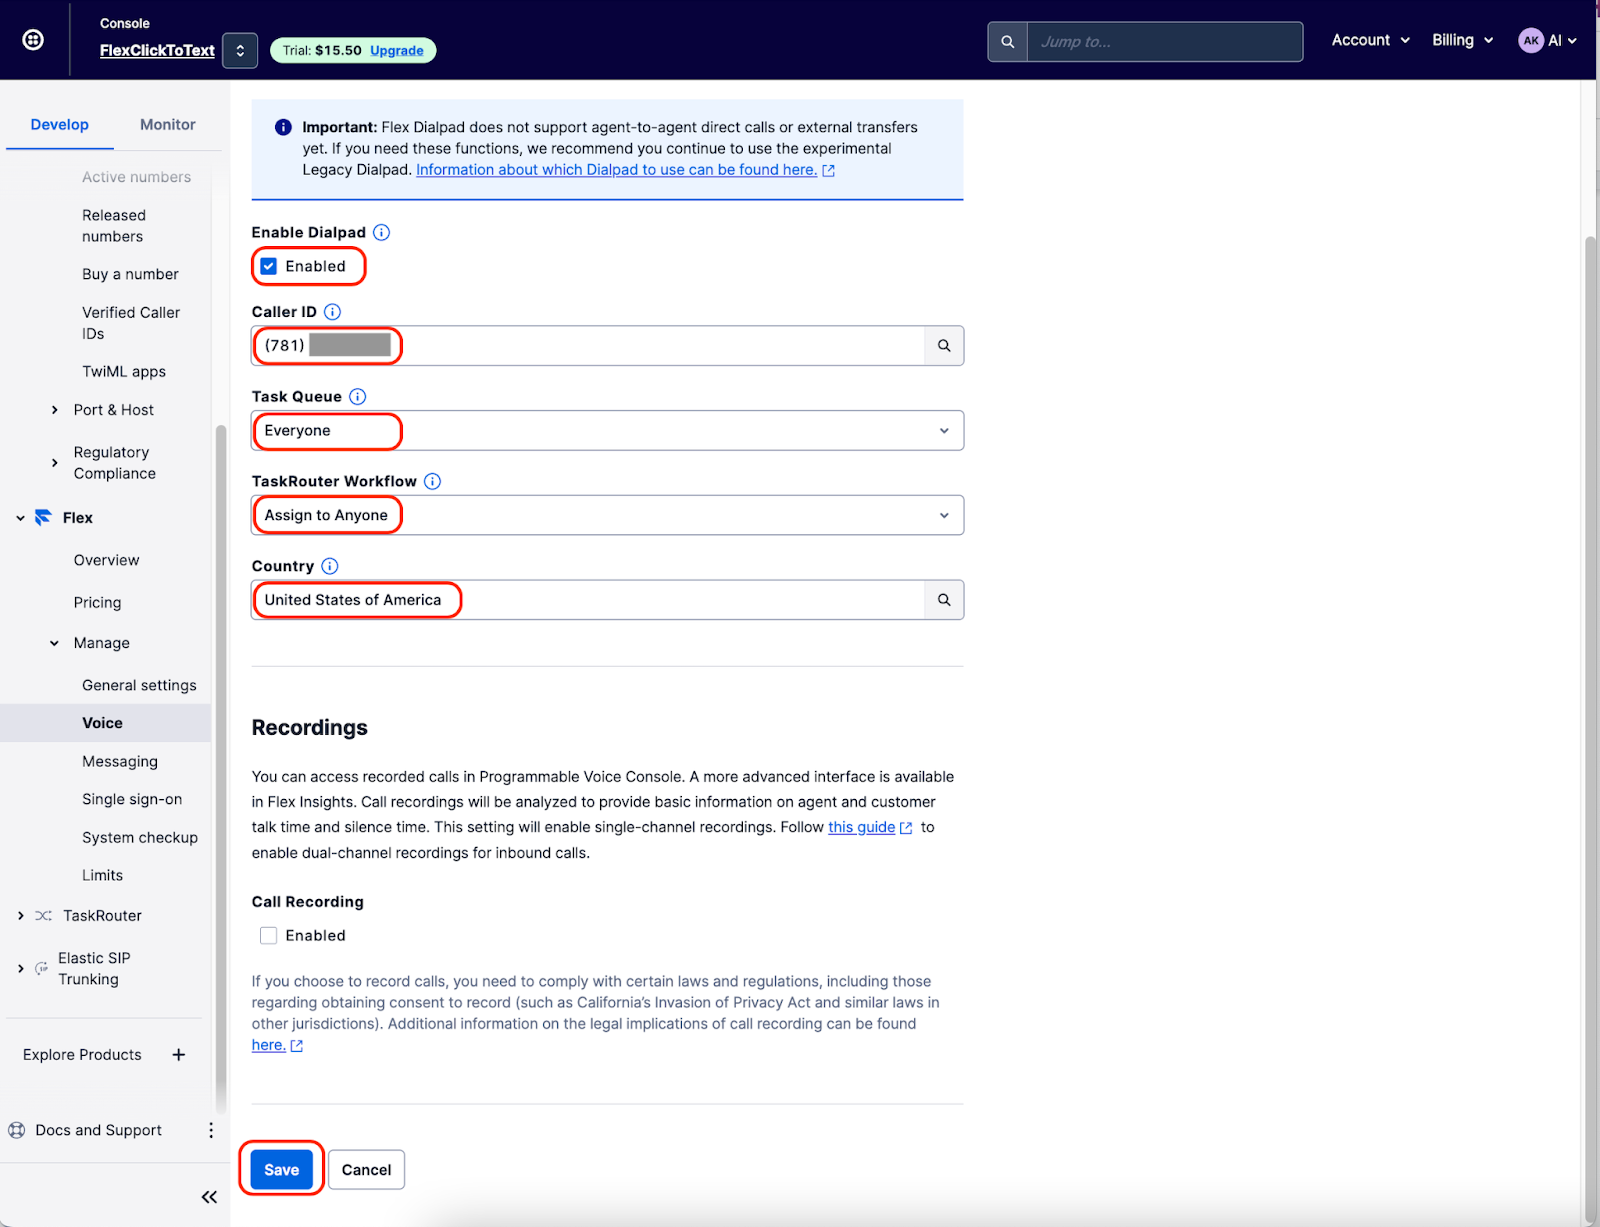
Hit Save at the bottom of the page.
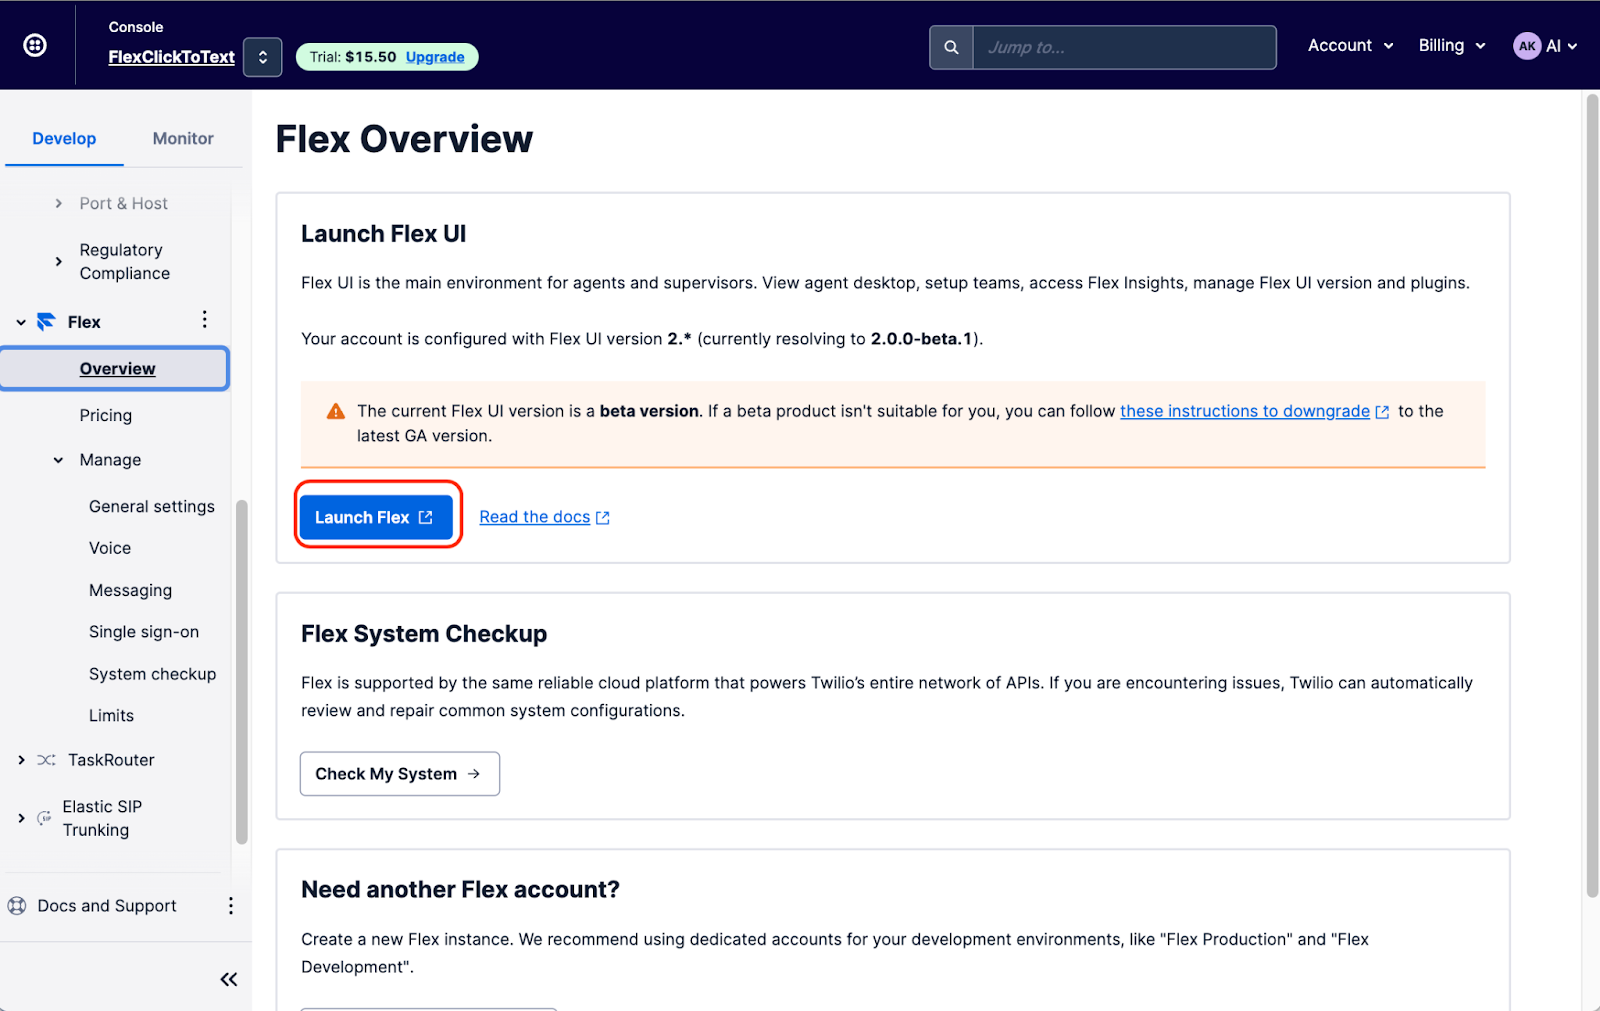
Log into the Flex UI. Go to Flex - Overview, then select Launch Flex.
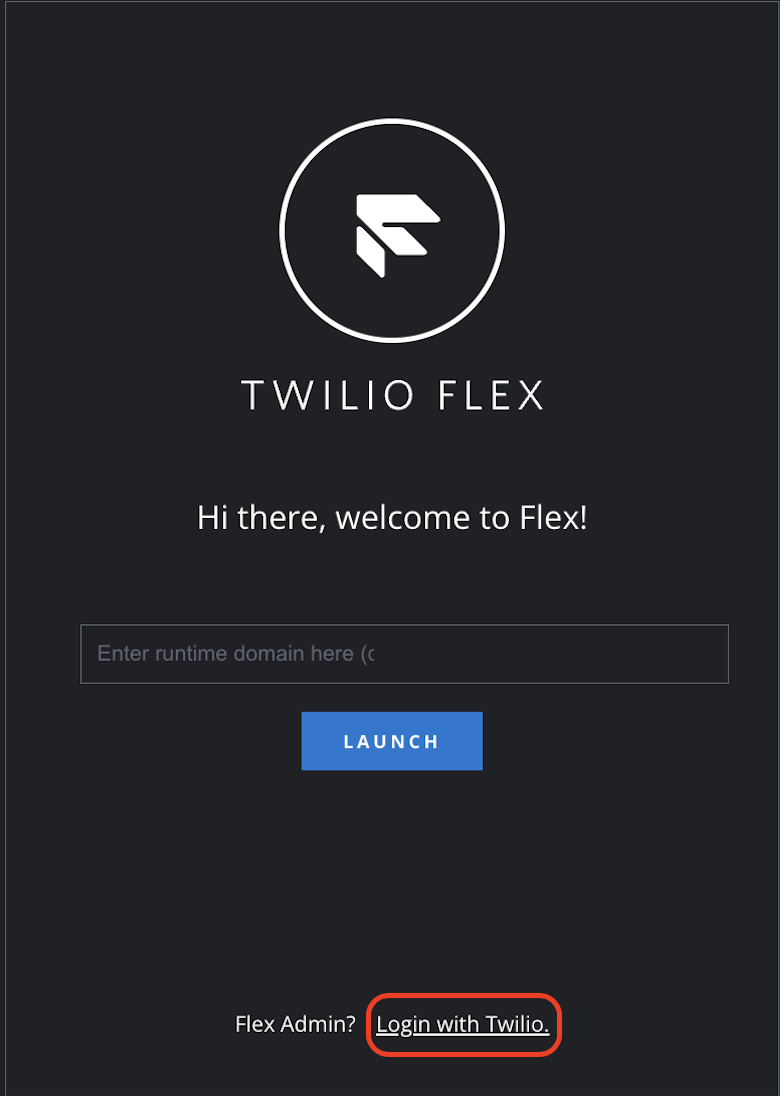
For this simple test, select Login with Twilio:
Feel free to explore Flex and its huge amount of features. For our simple test, go to the Agent view, and change your Status to “Available”:
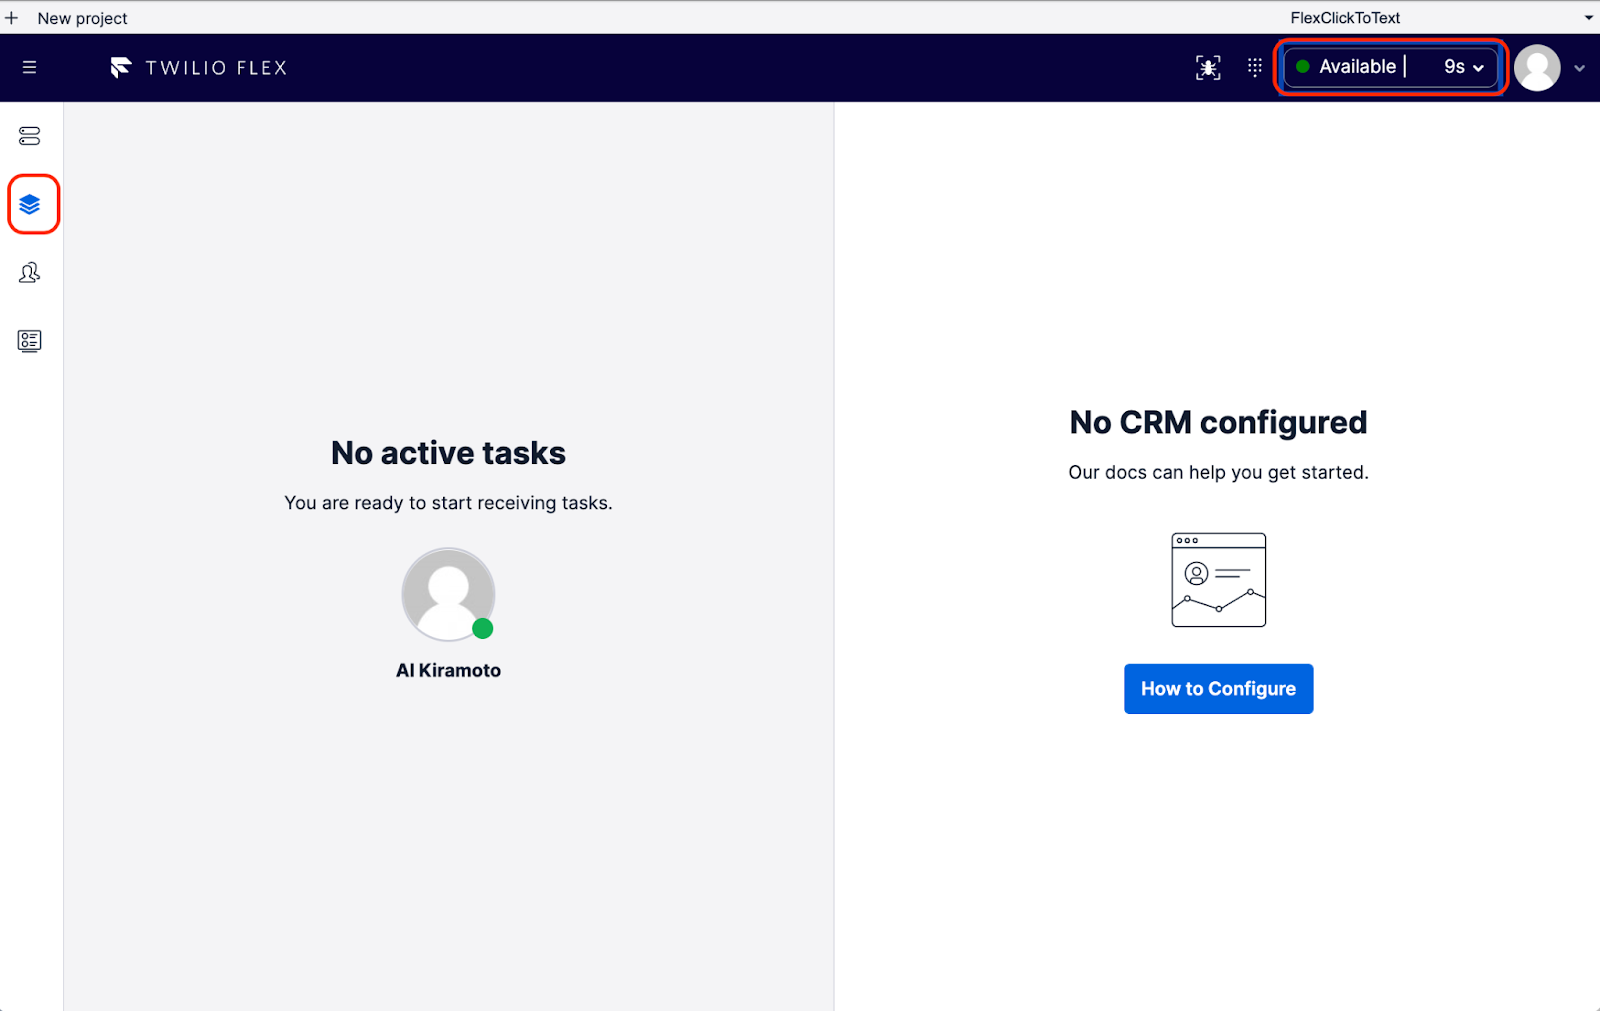
Perform a quick test. Call or Message your Twilio Number (from the number you used to Verify your Flex account) and you will see the requests being routed to your agent.
Modify our Studio Messaging Flow for our click-to-text use case
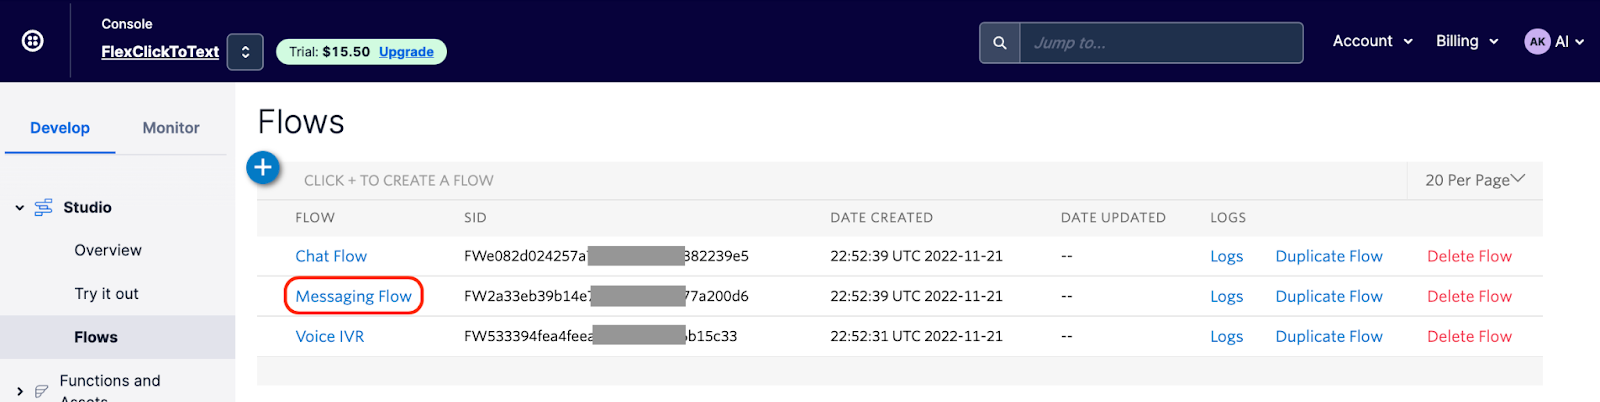
Go to Studio - Flows - Messaging Flow. Click on Messaging Flow:
You should see a pre-provisioned Studio Flow like this:
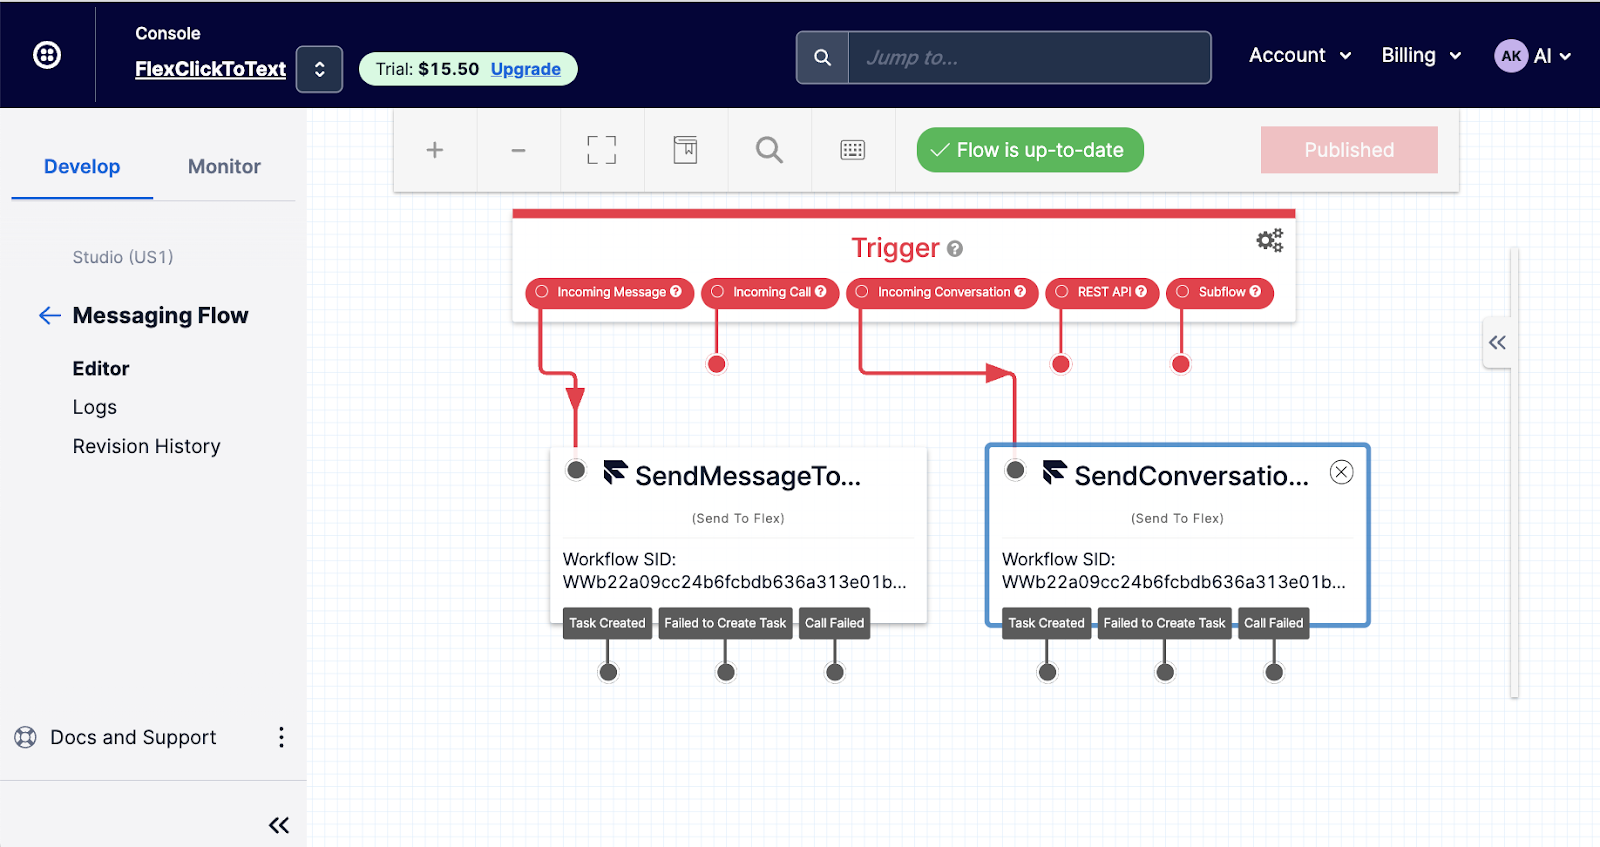
For our use case, we will manually modify this flow for our 4 use cases:
- Customer visits a mobile website, clicks on a click-to-text link, and requests a coupon (and opts in for a SMS Marketing Campaign)
- Customer is at the Store, scans a QR code that generates a text message with the specific store, and requests a gift coupon (and we use that information to track Store success)
- Customer visits a mobile website, clicking on a Request a call from … button that generates a text message with the request (and we use that information to route the request to an agent or specialist, for example, a fashion designer).
- Customer visits a mobile website, clicking on a Request a chat from … button that generates a text message with the request (and we use that information to route the request to an agent or specialist, for example, a fashion designer).
If you are new to Studio, check the Get Started with Twilio Studio first.
Then follow these steps:
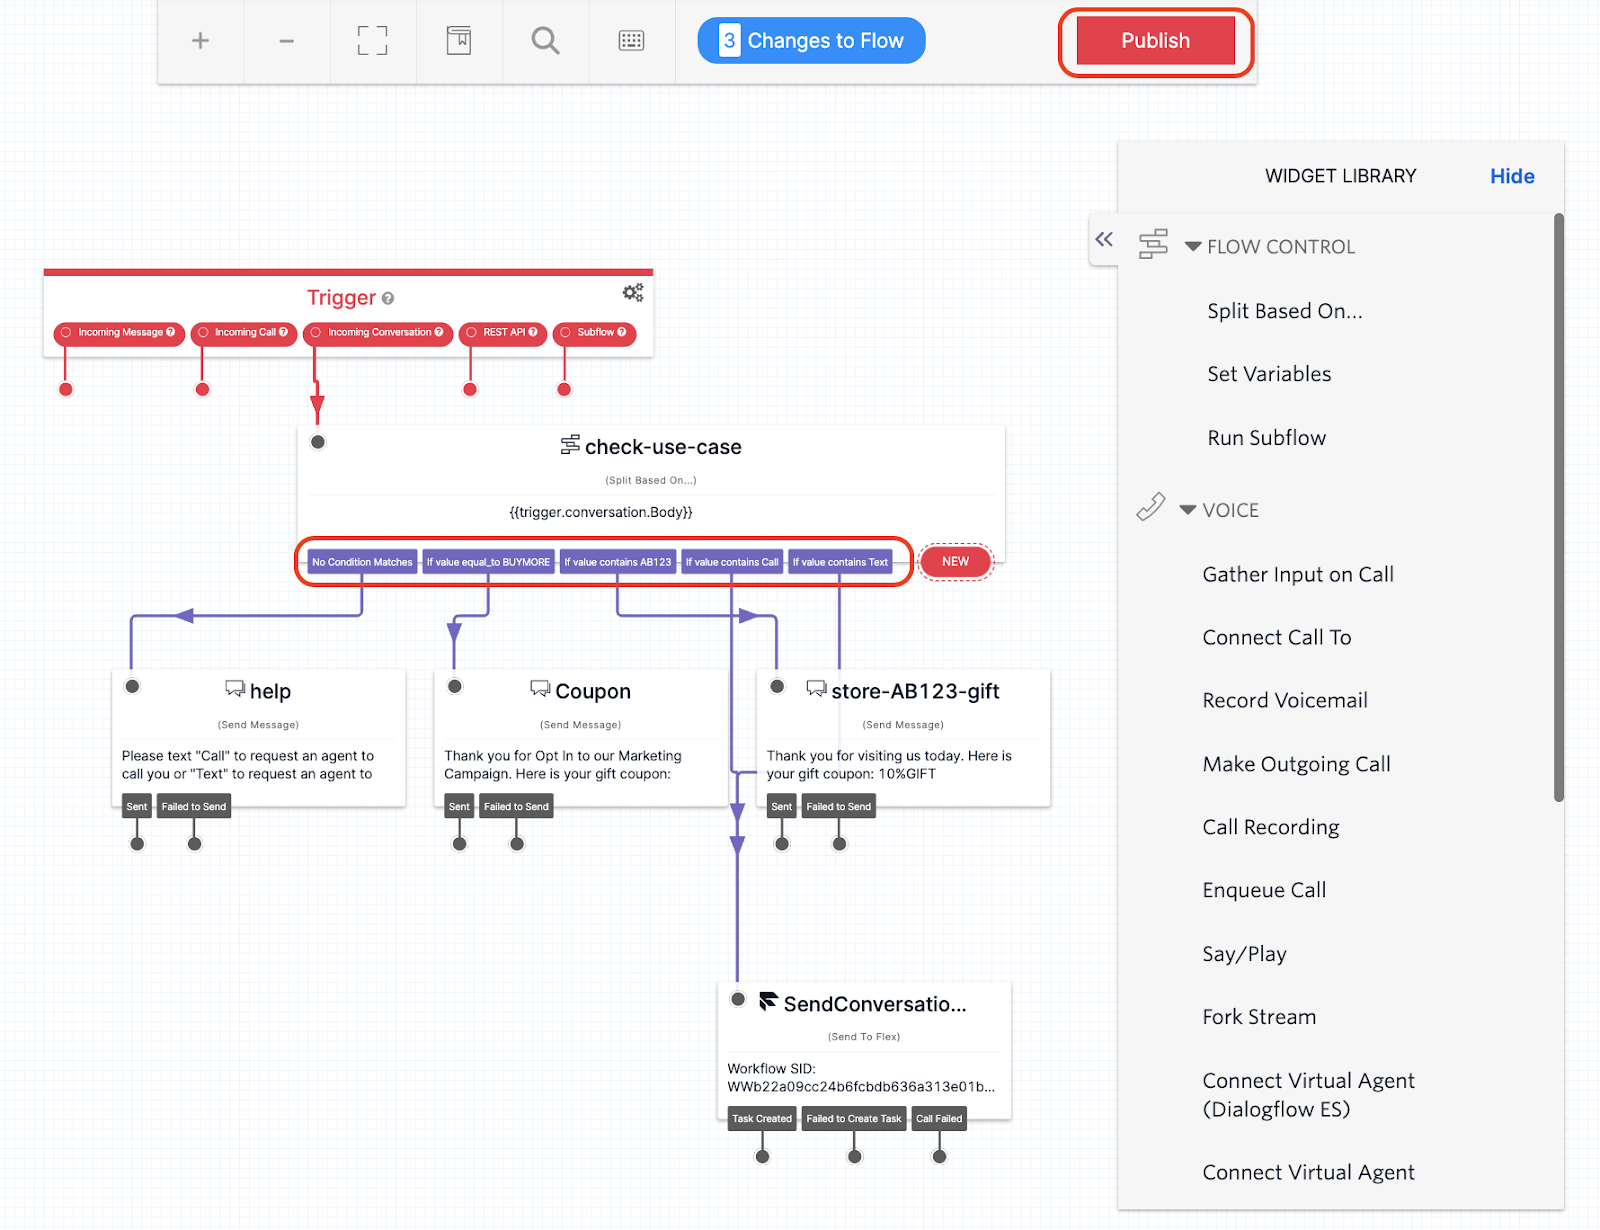
- Delete the Flex widget SendMessageToAgent connected to the Trigger “Incoming Message”. We will use Conversations instead.
- Remove a transition from Trigger “Incoming Conversation” to the Flex widget.
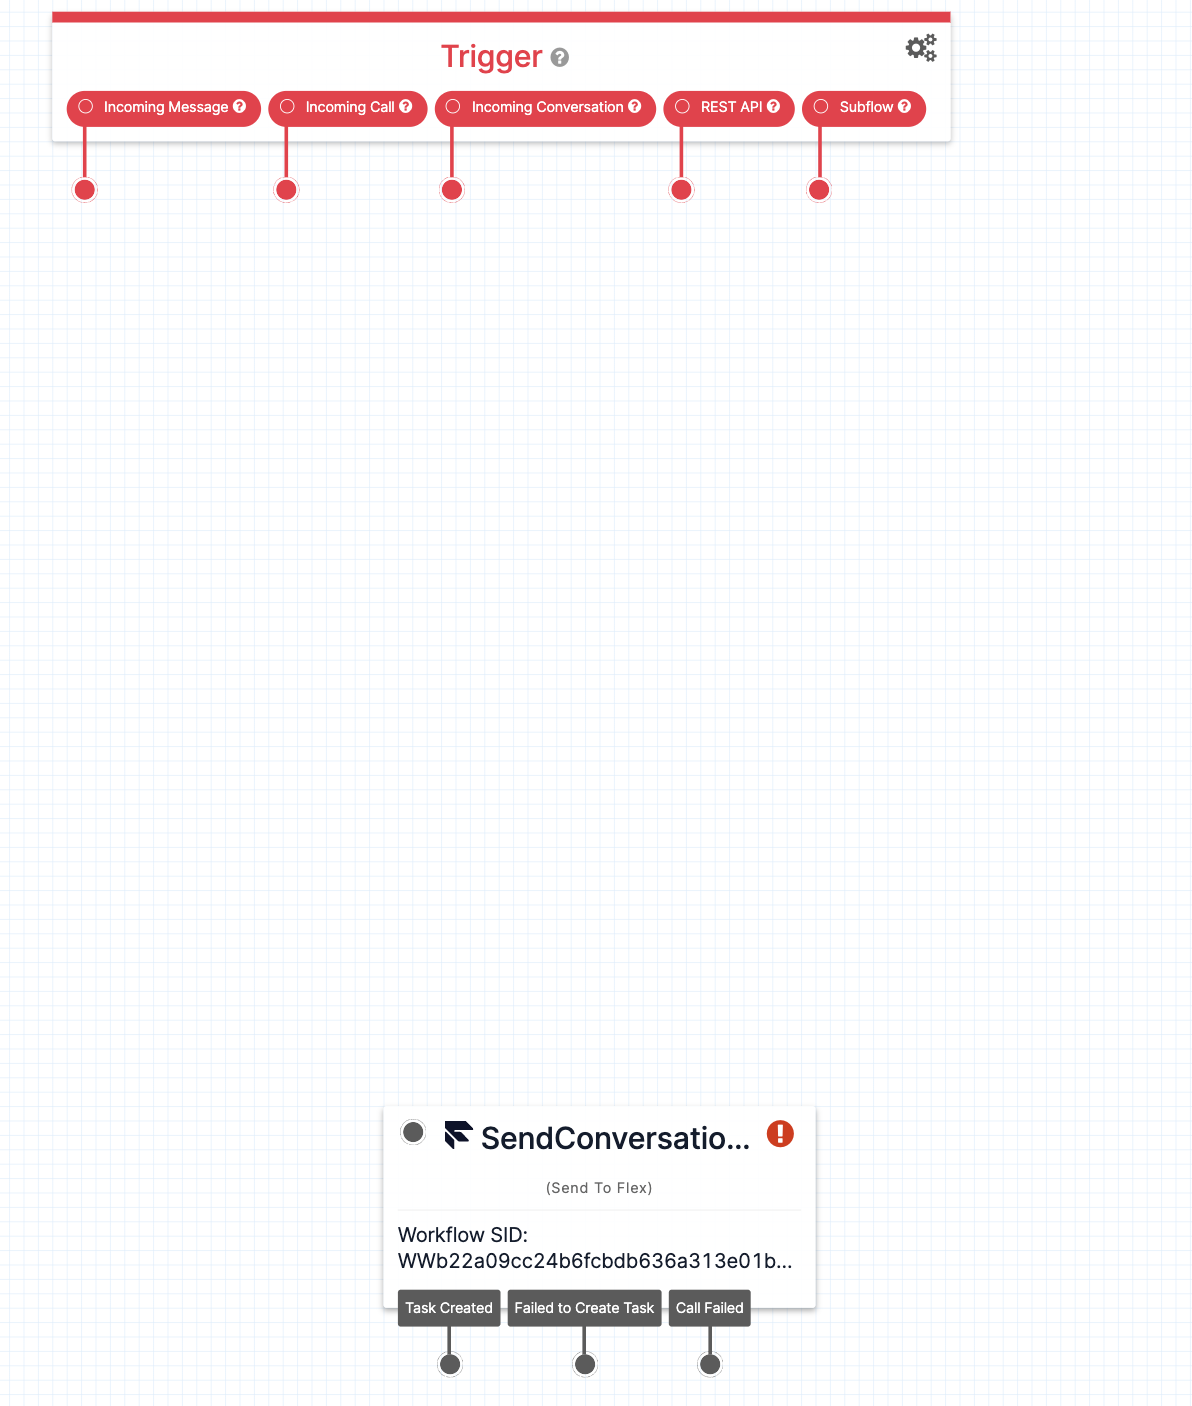
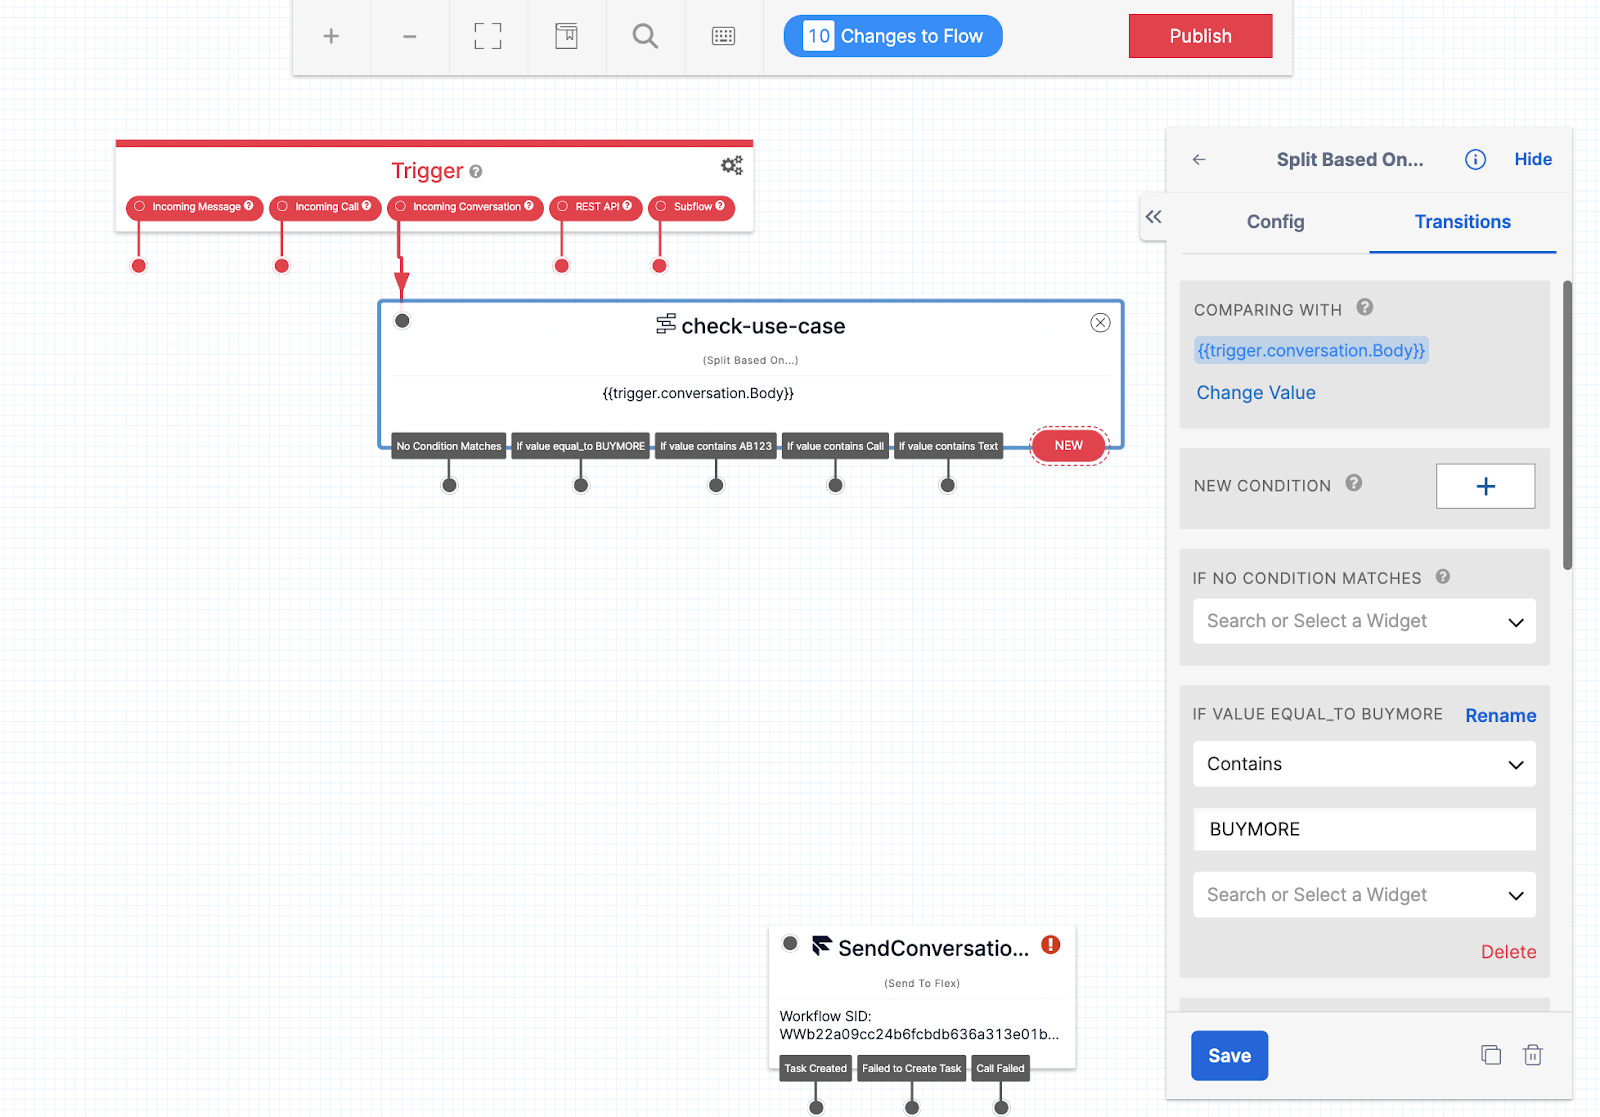
- Add a Split Based On …. Widget:
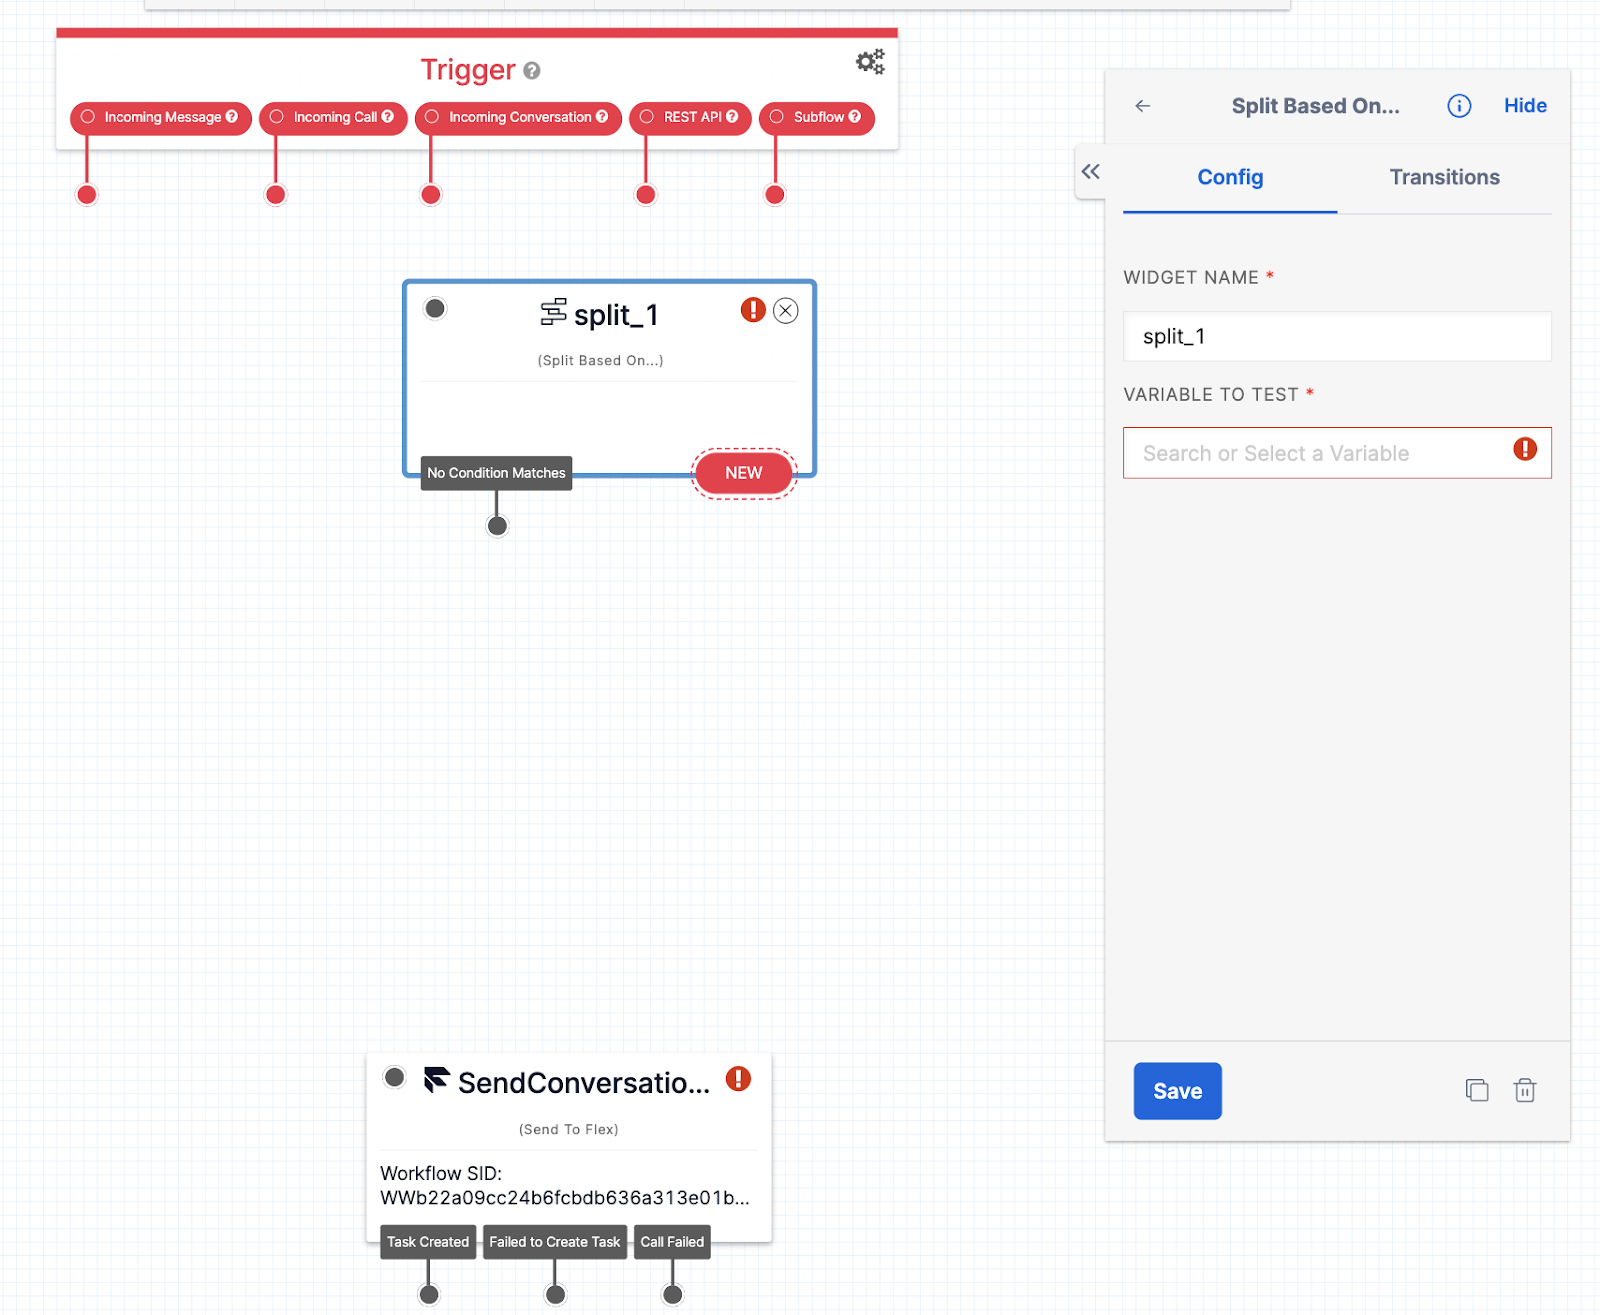
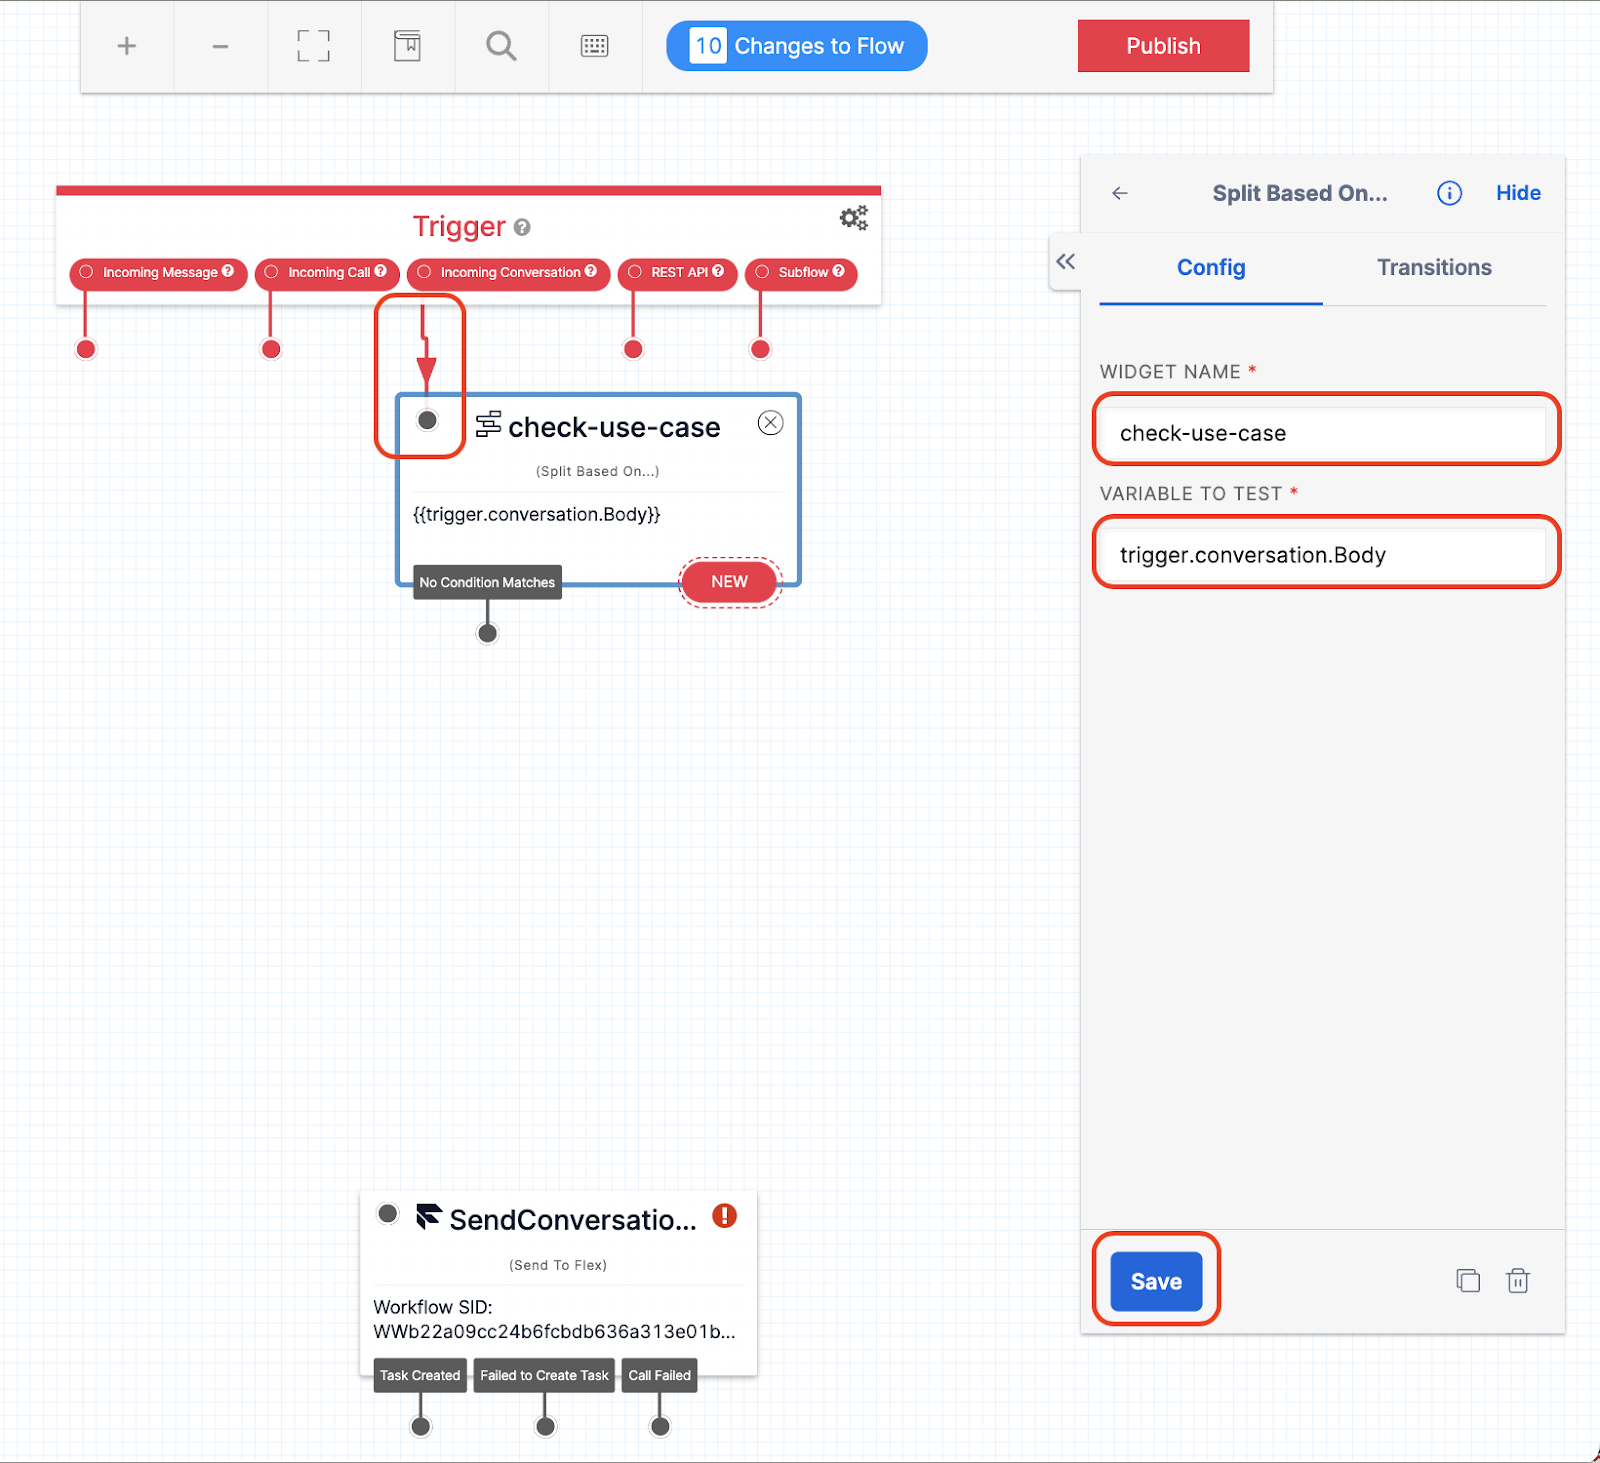
- Connect it to the Trigger Incoming Conversation, name it
check-use-case(or a name you see fit) and configure the VARIABLE TO TEST astrigger.conversation.Body, then hit Save.
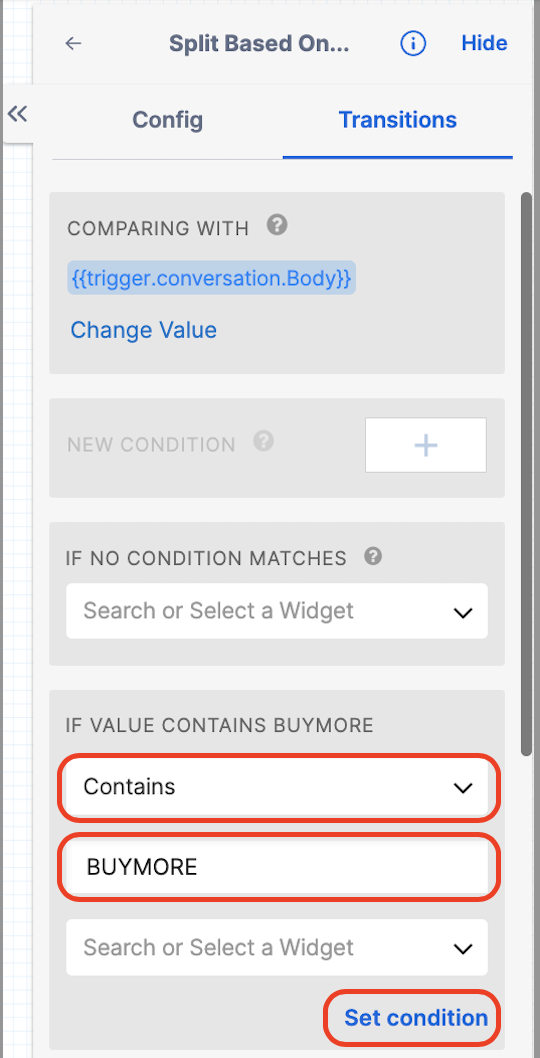
- Select Transitions, then NEW CONDITION +, then from the pull down, select Contains, then type “BUYMORE”, then click on Set condition.
- Select NEW CONDITION +, then from the pull down, select Contains, then type “AB123”, then click on Set condition.
- Select NEW CONDITION +, then from the pull down, select Contains, then Call, then click on Set condition.
- Select NEW CONDITION +, then from the pull down, select Contains, then Text, then click on Set condition.
- Click Save.
- Add a Send Message Widget. Name it help, and on the MESSAGE BODY, enter: “Please text "Call" to request an agent to call you or "Text" to request an agent to message you back.” then hit Save.
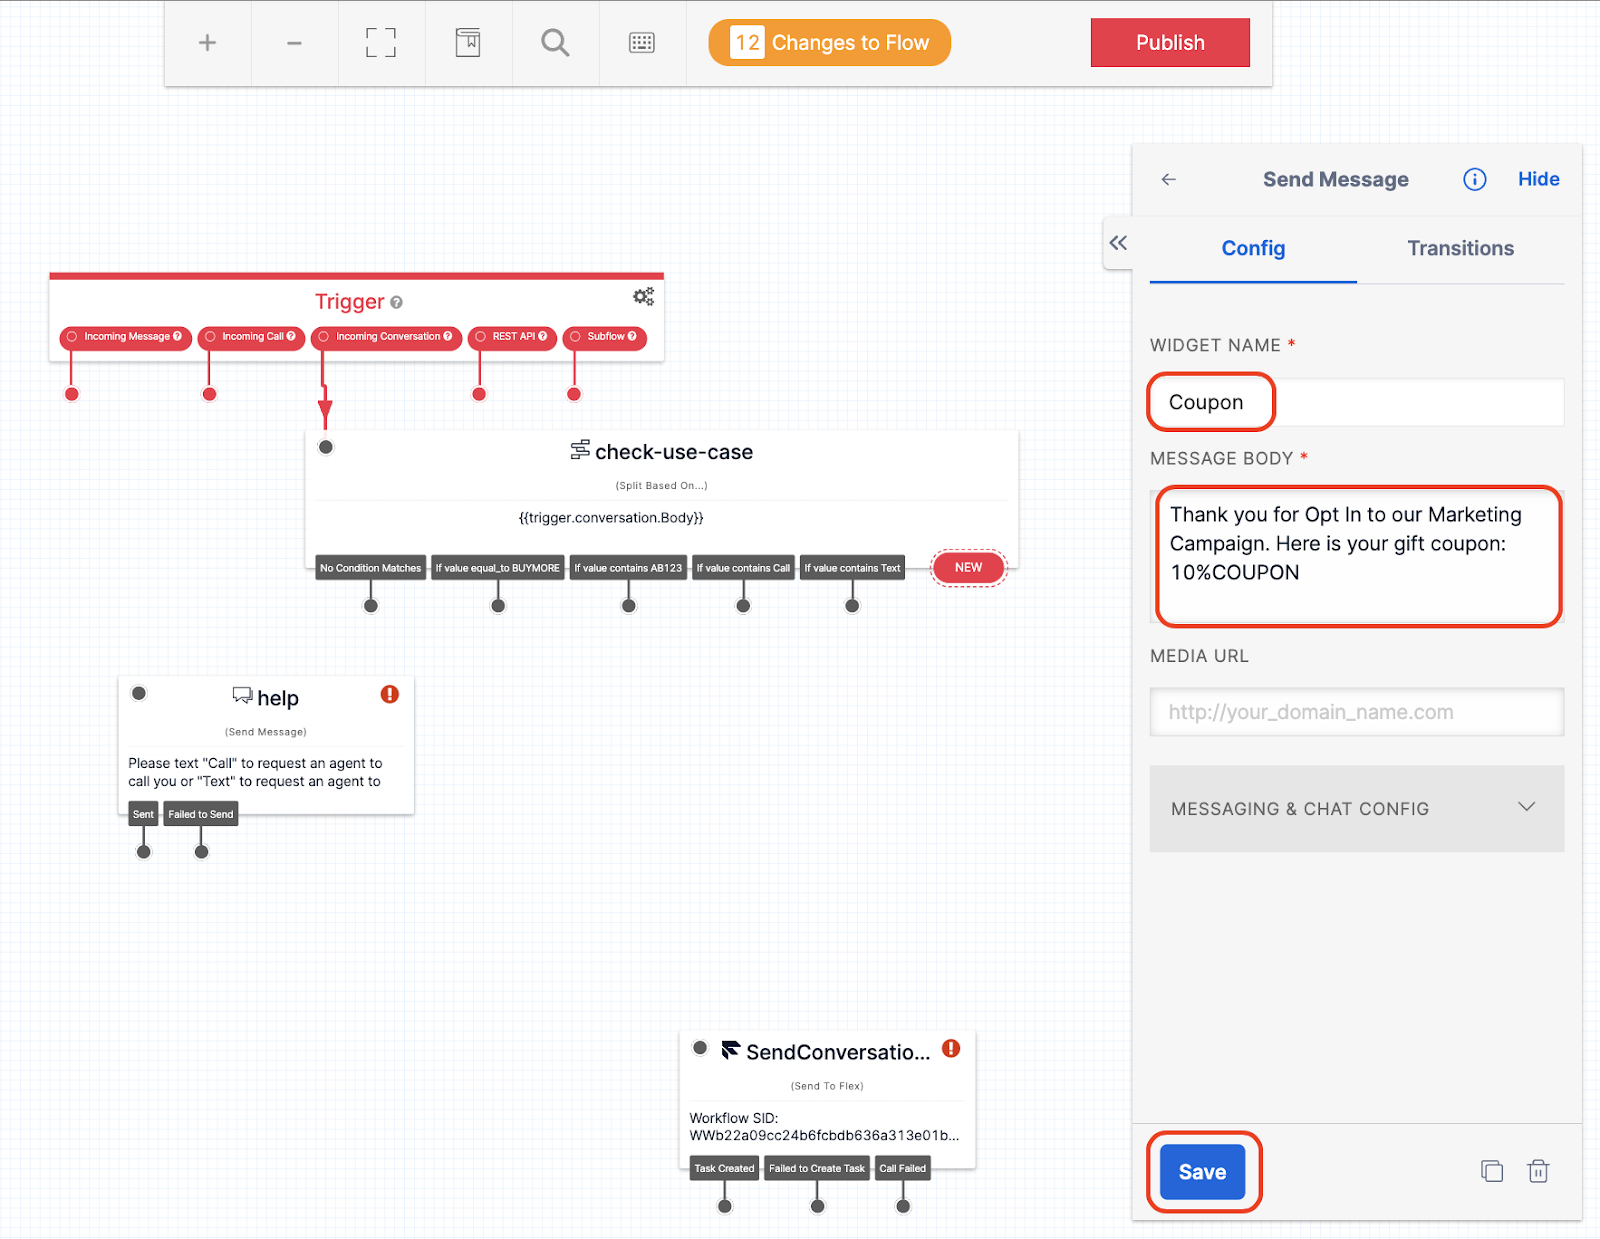
- Add a Send Message Widget. Name it Coupon, and on the MESSAGE BODY, enter: “Thank you for Opt In to our Marketing Campaign. Here is your gift coupon: 10%COUPON.” then hit Save.
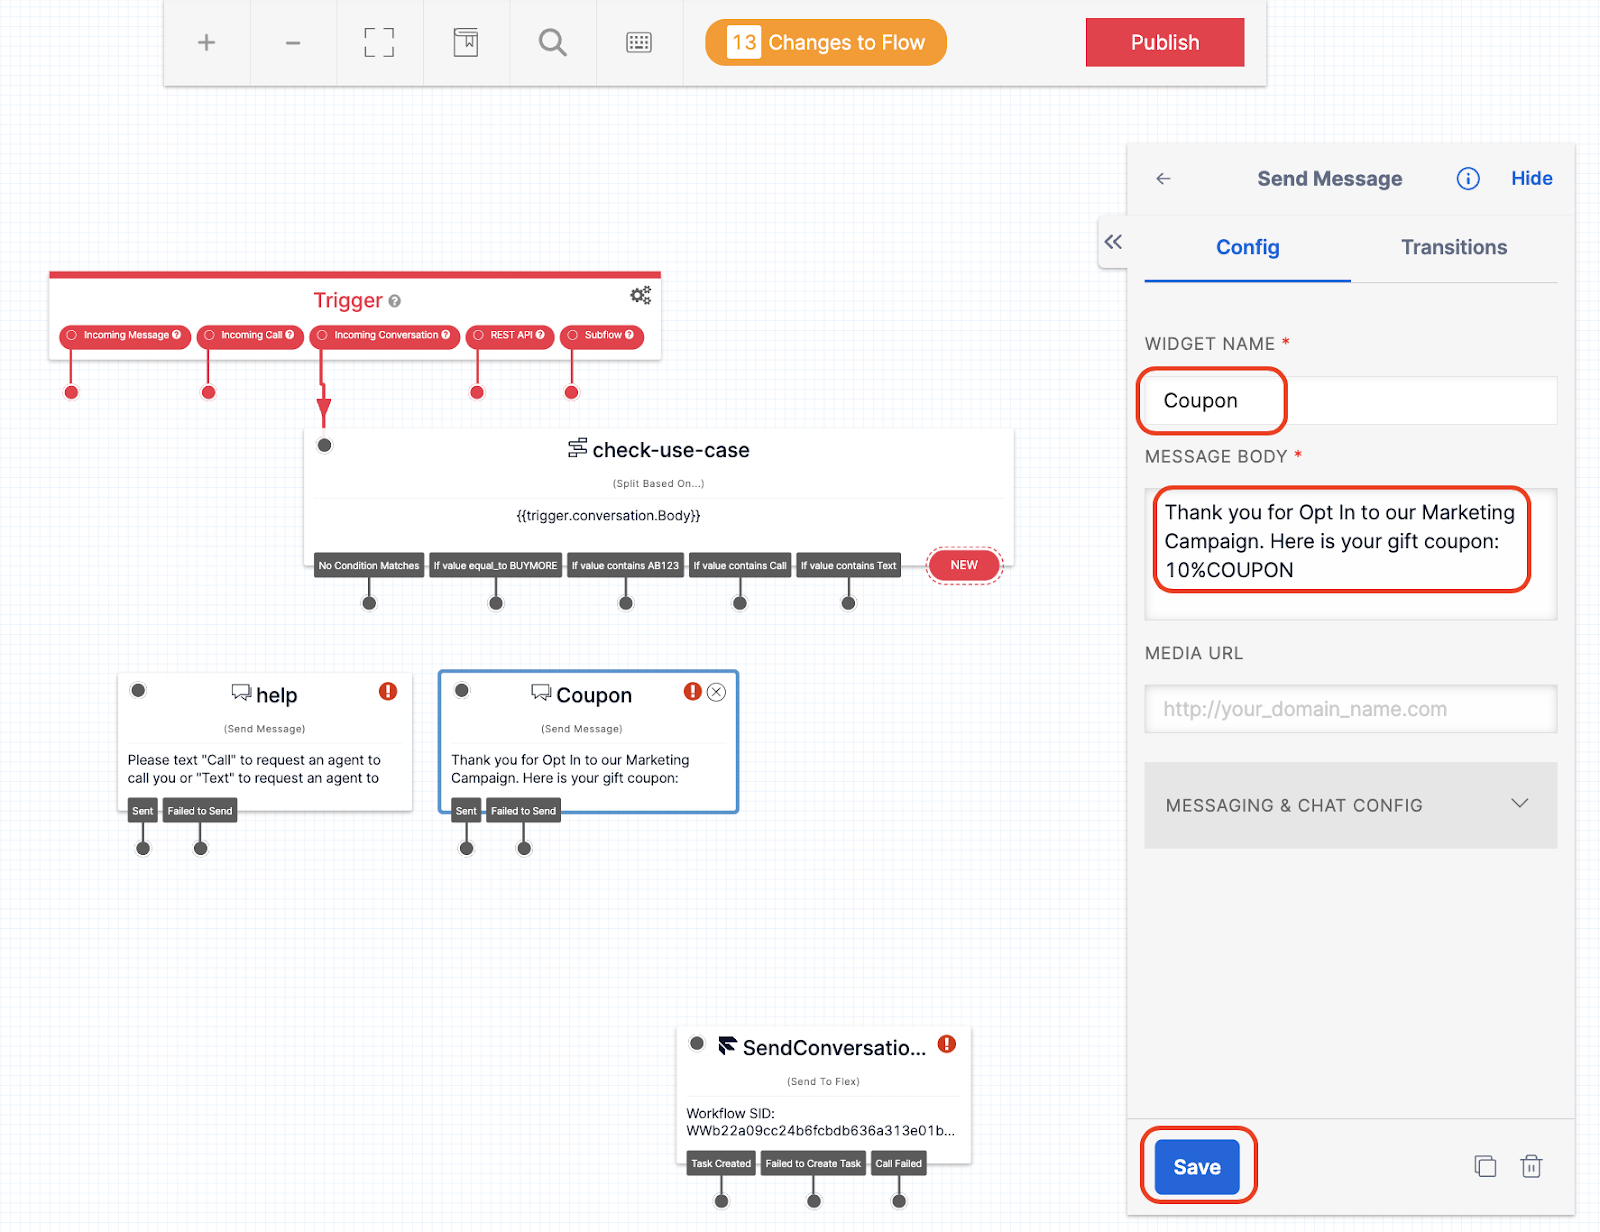
- Add a Send Message Widget. Name it “store-AB123-gift”, and for the MESSAGE BODY, enter: “Thank you for visiting us today. Here is your gift coupon: 10%GIFT.” then hit Save.
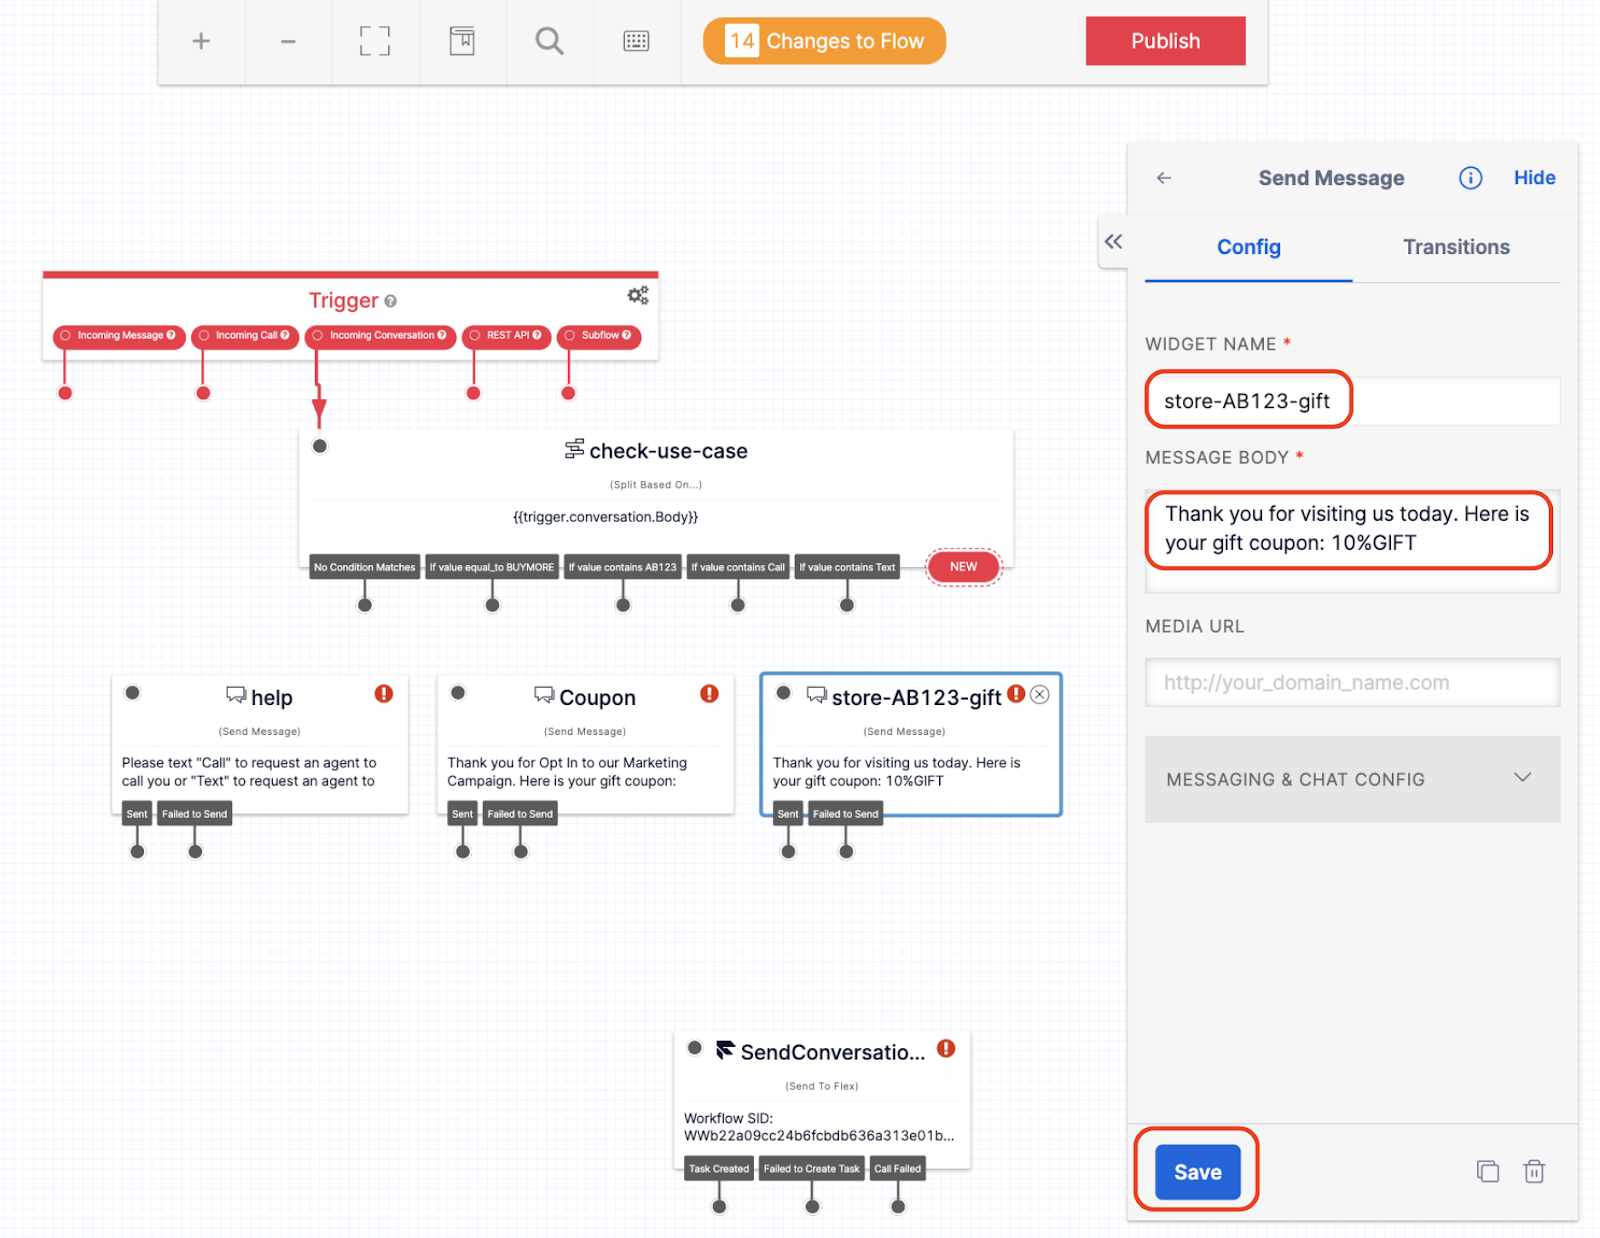
- Connect the Split for No Condition Matches to help, BUYMORE to Coupon, AB123 to store-AB123-gift, and Call and Text to SendConversationsFlex, then hit Publish:
Set up your mobile webpage
Use this tool to generate click-to-text links, buttons, and QR codes for the tutorial (you’ll need to swap it out for production):
It will take you to our click-to-text tool:
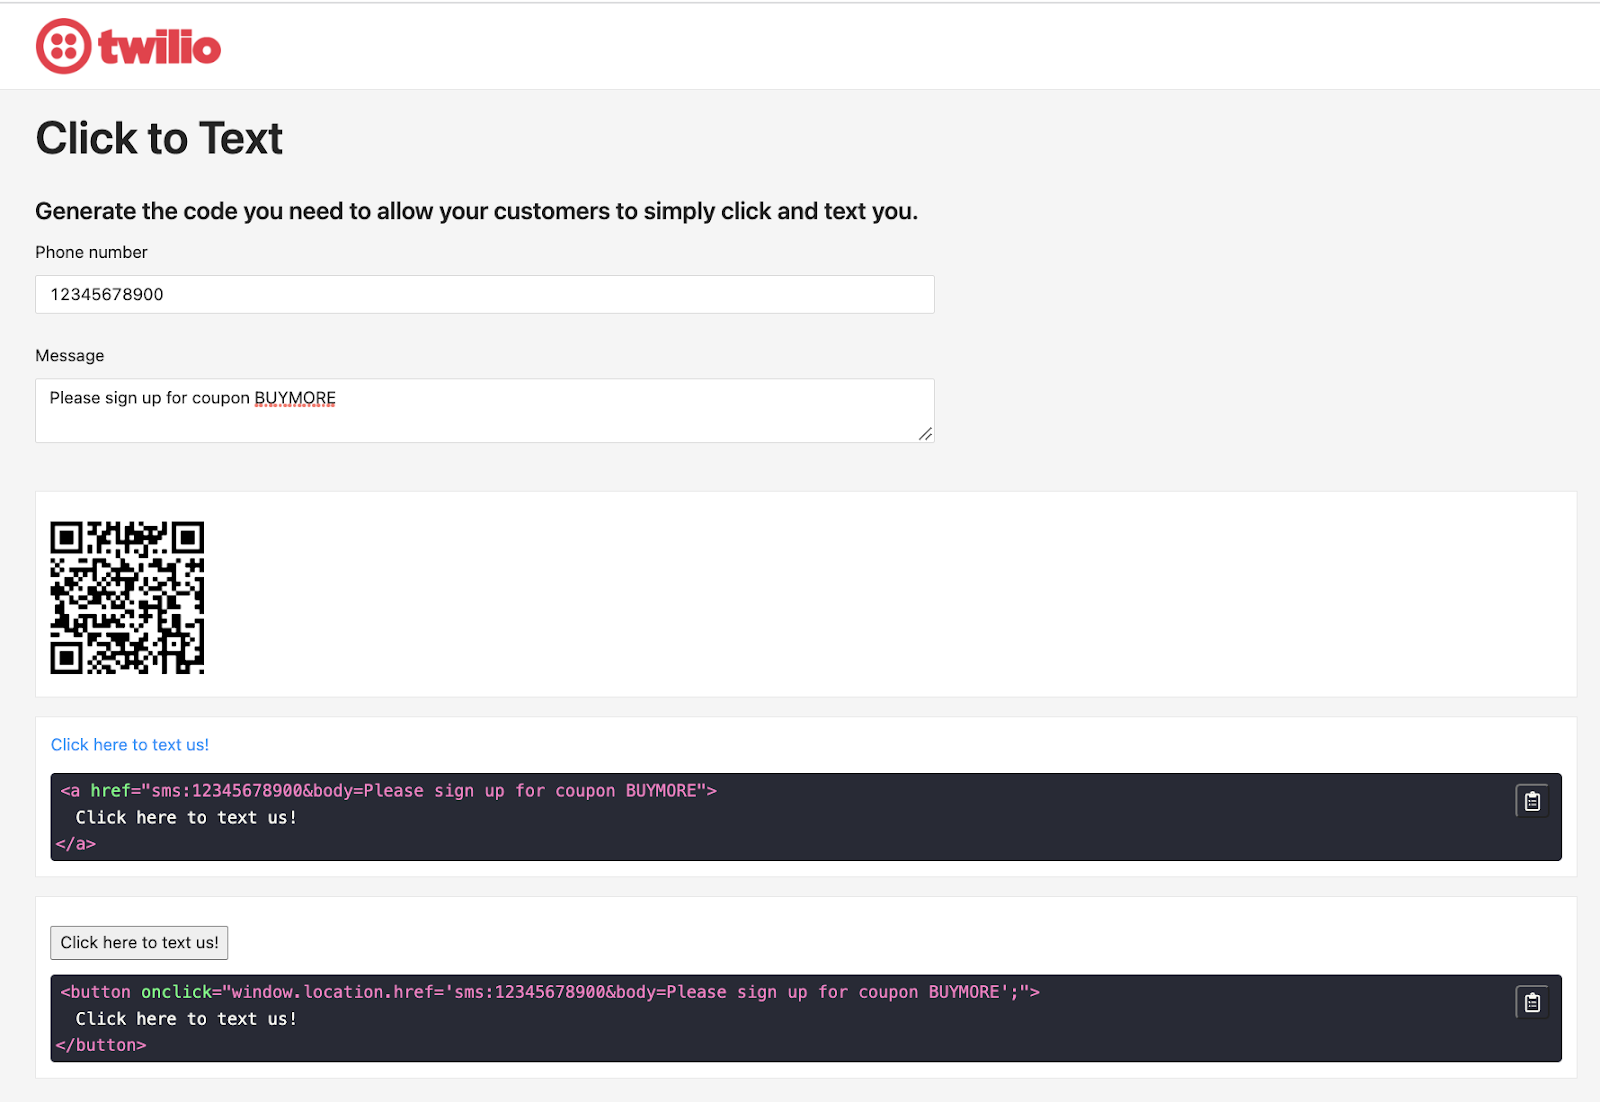
Here is one example of a HTML link names Coupon that pops up the Messaging app and pre-populate the To: number to (123)456-7890 and the Body with BUYMORE:
Here is the same example for a button:
Here is the same example for a QR code:

Test it out
Let's test the first 2 use cases from a mobile phone. Again, use the phone number you used to Verify your Flex Account.
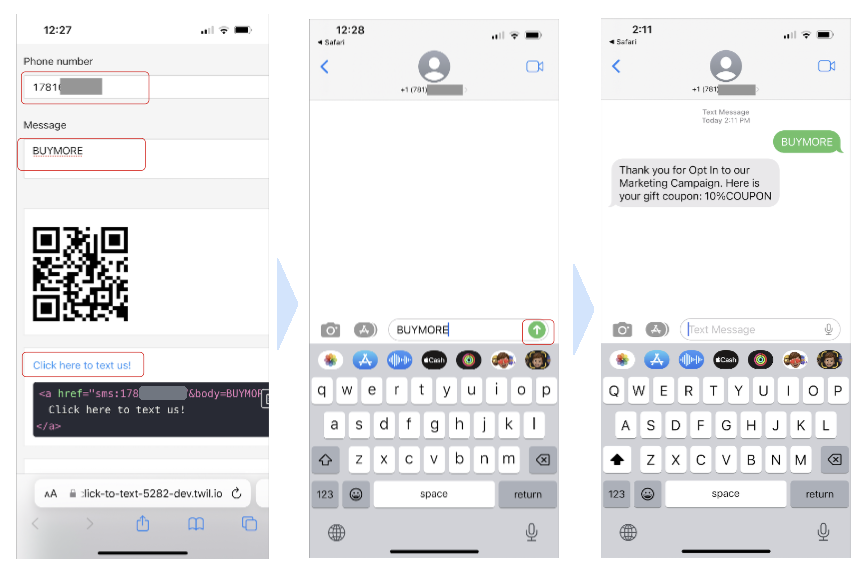
Place this link on your mobile web browser and test:
Enter your Flex Phone number, then test the first use case. On the message, type “BUYMORE”.
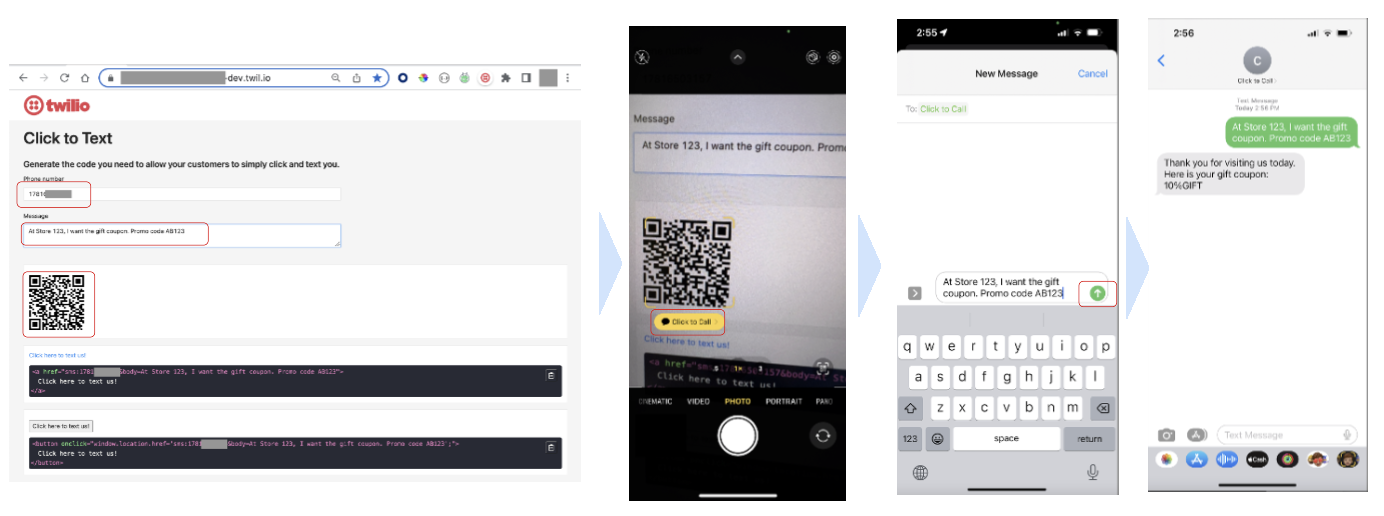
To test the second use case, we will need a computer to generate the QR code to be read by your mobile device. Use a computer's web browser, add your Flex number, and type “At Store 123, I want the gift coupon. Promo code AB123” to generate the QR code. Scan the QR code with your phone, select Click to Call. A new message will be generated. Hit Send.
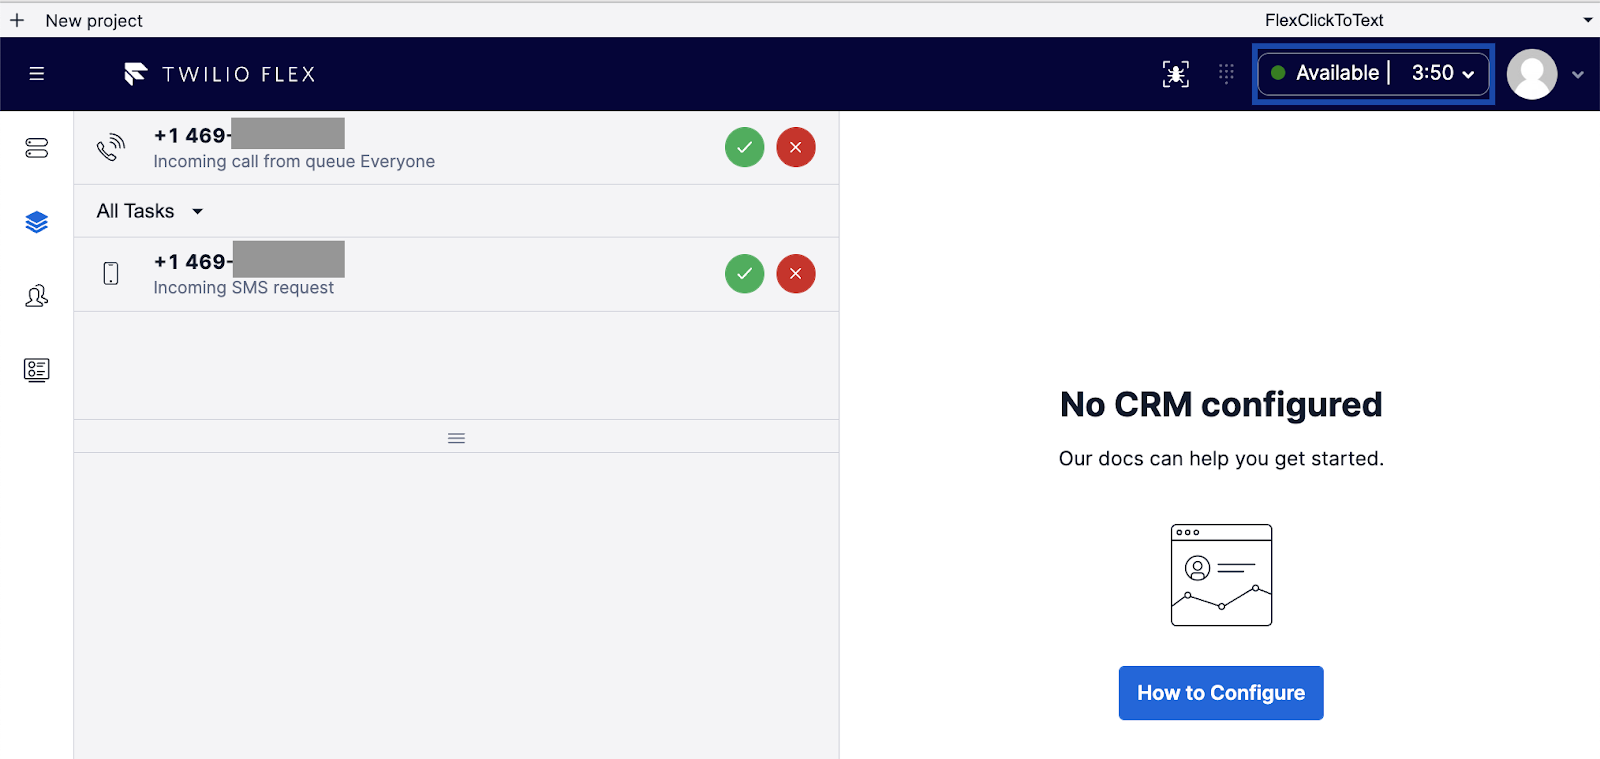
Test the third use case, go back to the mobile device and the mobile browser tool. Type “Need assistance with a new account. Call”, then use the button to generate the automated message. Hit Send. The request will be sent to Flex. Accept the request:
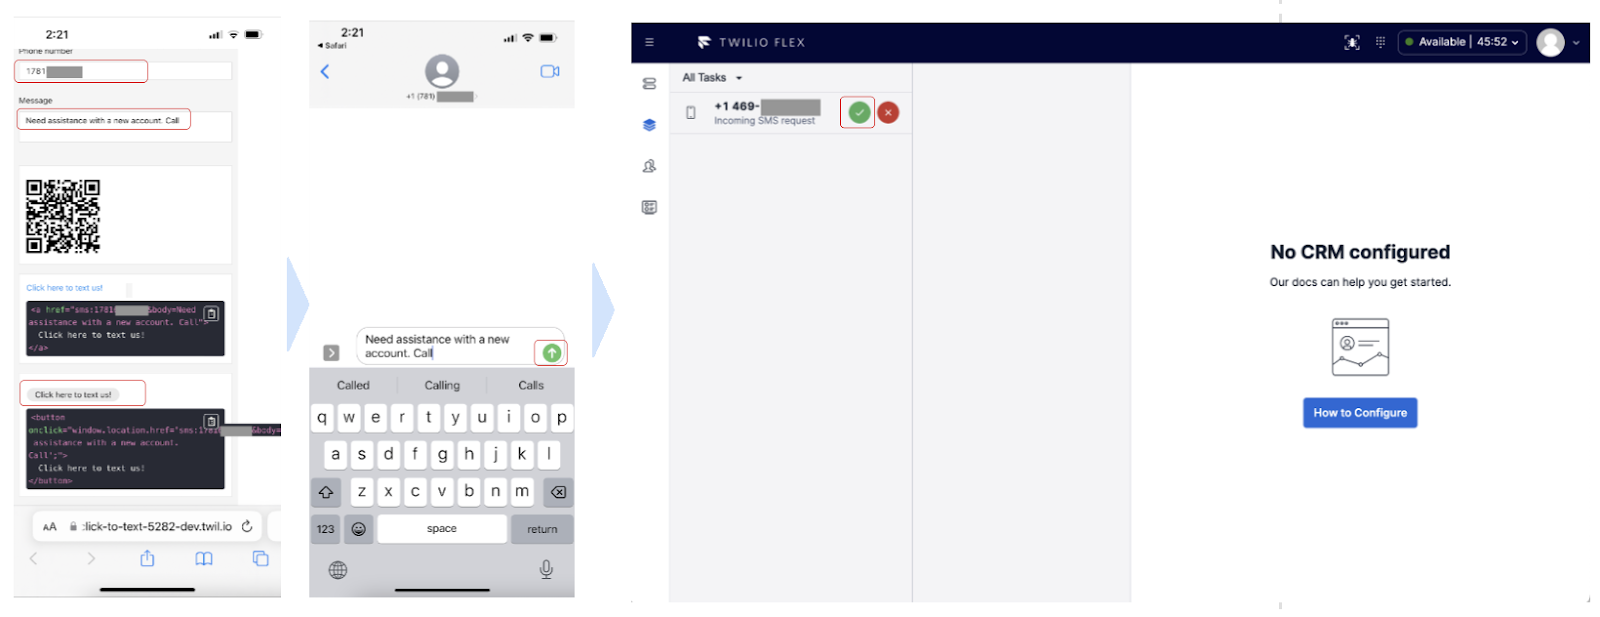
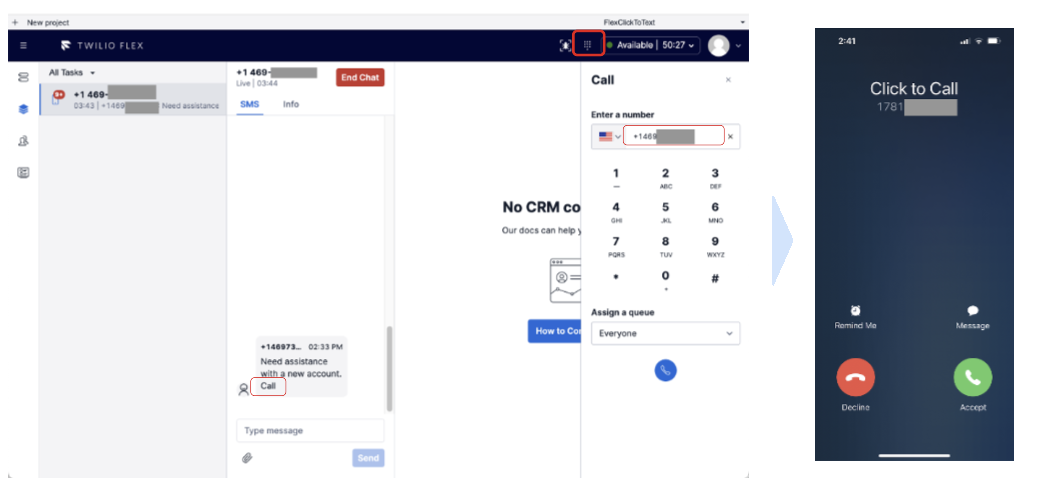
In Flex, you can see the customer request for a Call. Use the dialpad and type the customer’s number. A call is received on the customer’s mobile phone as requested.
Success – you're now ready to personalize your customer communications – and we can’t wait to see what you build!
Supporting Assets/ Documentation/ Links
Al Kiramoto is a Solutions Architect at Twilio. He lives in Dallas - TX and enjoys working with customers and solving business problems - besides a good barbecue and TexMex food. He can be reached at akiramoto [at] twilio.com
Phil Bredeson is a Solutions Architect at Twilio. He helps Twilio customers design scalable and performant solution architectures.
Natalie Huynh is a Solutions Engineer at Twilio. She is always looking for new ways to improve the customer experience through digital communication. She can be reached at nhuynh [at] twilio.com
Related Resources
Twilio Docs
From APIs to SDKs to sample apps
API reference documentation, SDKs, helper libraries, quickstarts, and tutorials for your language and platform.
Resource Center
The latest ebooks, industry reports, and webinars
Learn from customer engagement experts to improve your own communication.
Ahoy
Twilio's developer community hub
Best practices, code samples, and inspiration to build communications and digital engagement experiences.