Create a Simple Notification System using Twilio CLI, Programmable Voice, Messaging, and Email
Time to read: 6 minutes
April 22, 2020
Written by
Reviewed by

If you find yourself needing to broadcast urgent news to your customers or employees, but do not have a notification system in place, this tutorial is for you. In this blog post we'll show you how to create a Bash script to quickly send SMS, voice, or email notifications to several recipients in a CSV.
Prerequisites
If you're sending messages via SMS, voice, and email, you'll need both a Twilio (SMS and Voice) and Sendgrid (email) account. Here's how to get started:
- A Twilio account (Sign up for a free trial account and get a $10 credit)
- A SendGrid account (Sign up for a free trial account, send 40,000 emails for 30 days, then up to 100/day) - needed to send email notifications.
- Homebrew (for Mac users) or Node.js (for Windows users) to install Twilio CLI
Setting up the SendGrid Account
If you haven’t already done so, go to sendgrid.com and signup for a free account or log in to your existing account.
NOTE: You need to own or have control of an email domain for this process to work successfully. We strongly recommend completing the Domain Authentication process to increase email deliverability. The “Don’t Send Email From Domains You Don’t Control” explains why this is necessary. Another good practice is to warm up your IP address to improve your Sender Reputation.
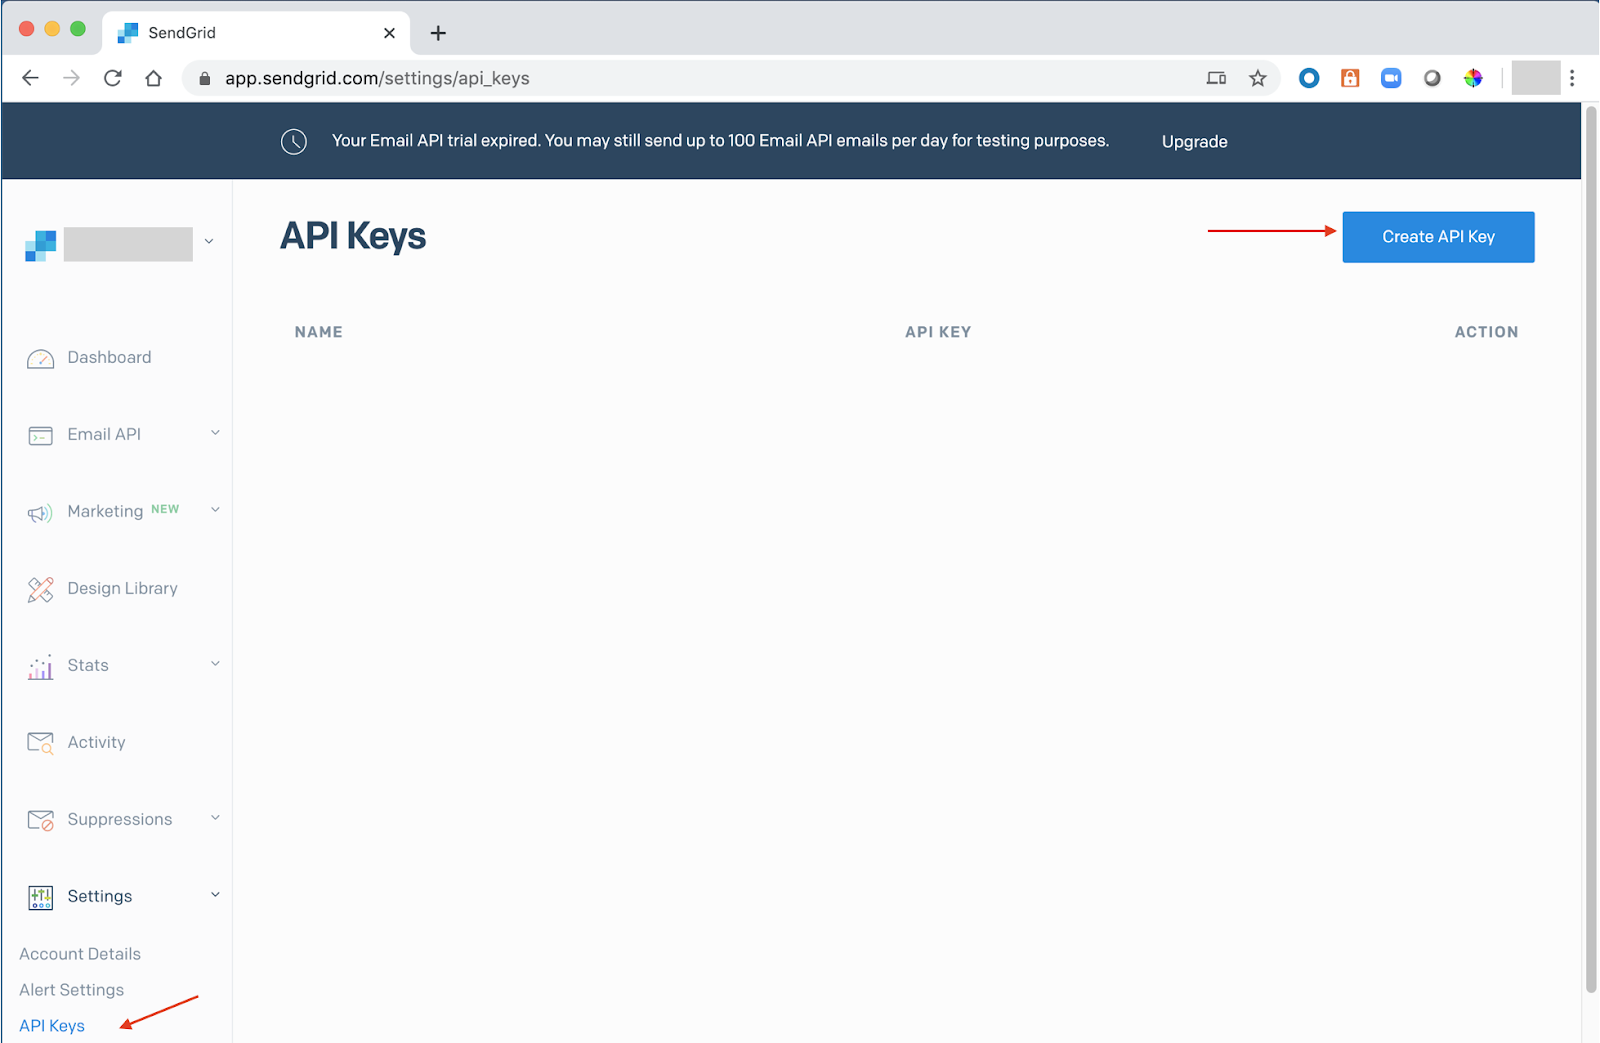
Under the API Keys, select Create API Key:
Select an API Key Name (e.g. Notifications App), choose “Restricted Access”, enable “Mail Send Full Access”, create and view:
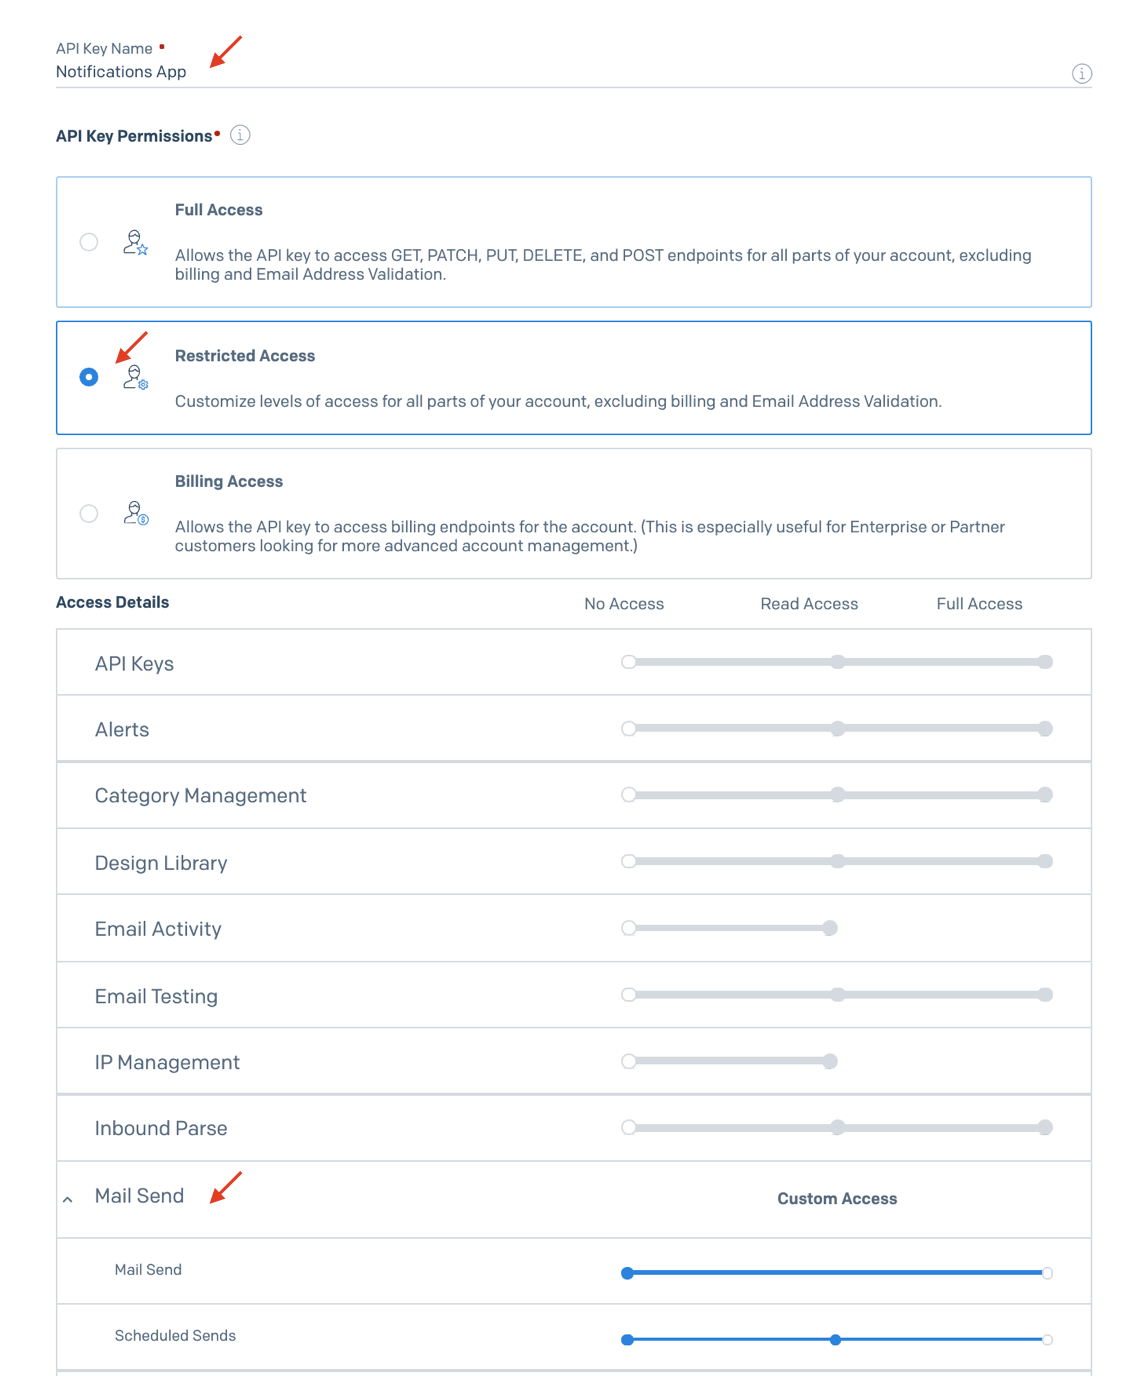
Take note of the API Key created. Copy and paste it to somewhere safe as you will not be able to see it once you leave this page.
Setting up the Twilio CLI
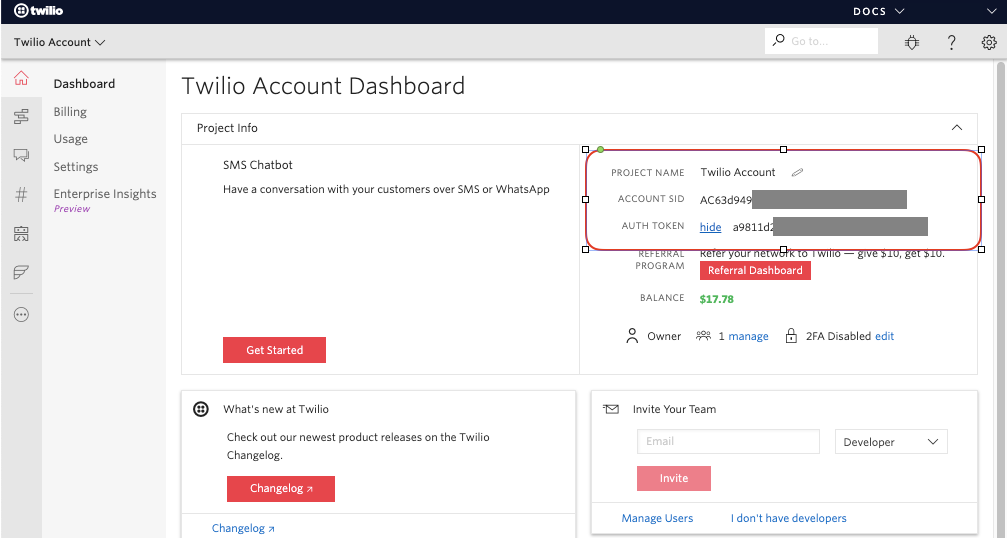
If you haven’t already done so, go to twilio.com and sign up for a free account, or log in to your existing account. Take note of your Account SID and Auth Token as you will need them to login via the CLI in the following steps.
NOTE:You can find your Account SID and Auth Token on your Console:
Twilio CLI is a command line interface tool that allows you to manage your Twilio resources directly from your terminal or command prompt. This will be helpful to prevent us from switching between the browser and our terminal, since we’ll be using the command prompt to develop our application. Install Twilio CLI for your respective operating system by following this guide.
NOTE: To send emails, we need the '--no-attachment' feature appended to 'email:send'. This is available on Twilio CLI 2.0.0 or newer versions.
Once Twilio CLI is installed, login to your account by running this command in your terminal:
You will be prompted to enter a local ID for the credentials known as the Shorthand identifier, followed by your Account SID and Auth Token:

Next, install CLI autocomplete to add support for Bash completion:
Let’s test out the CLI by listing phone numbers available for purchase by area code. Be sure to replace the --area-code with the value of your desired region.

Now purchase an available phone number by replacing the --phone-number attribute with a number from the previous command:

Now that you have tested listing and purchasing a phone number via the CLI, review your phone numbers with a filter for the area code:
Note: There are 3 types of numbers for A2P (application-to-person) messaging (Short Code, Toll-free, Long Code), each with different characteristics. Please check this document to better understand the differences between Short Code and Toll Free.
This blog for SMS performance also outlines the differences and best practices for sending SMS via the various phone number types.
In this blog we will use a Long Code for a simple application with no more than 200 recipients and no more than 1 message per second. If you are planning on sending more than 7,200 messages a day, please contact Twilio.
For higher throughput and scale, consider a Short Code (message only) or a High Throughput Toll Free number instead.
Test if CLI is working properly by sending a simple message to your mobile device:
NOTE: The --from attribute is the Twilio number you purchased and the --toattribute is your test mobile number.
To test email notifications, set the SENDGRID_API_KEY environment variable with a Twilio SendGrid API Key:
Test if CLI is working properly by sending a simple email message:
Your output should be similar to the data below:
NOTE: The --from attribute is your email and the --to attribute is a test email address.
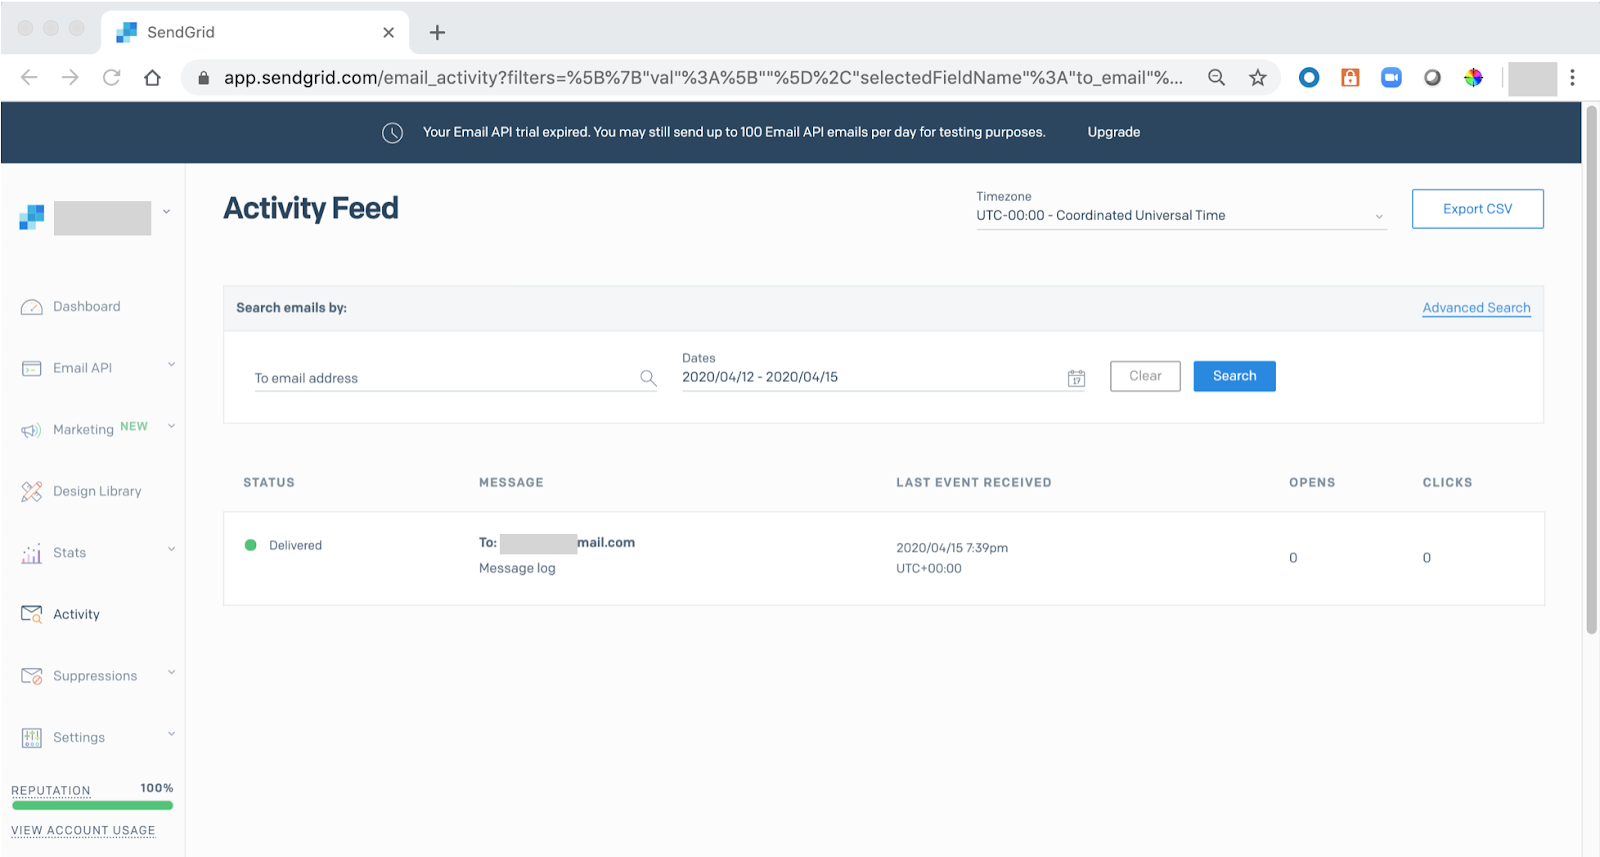
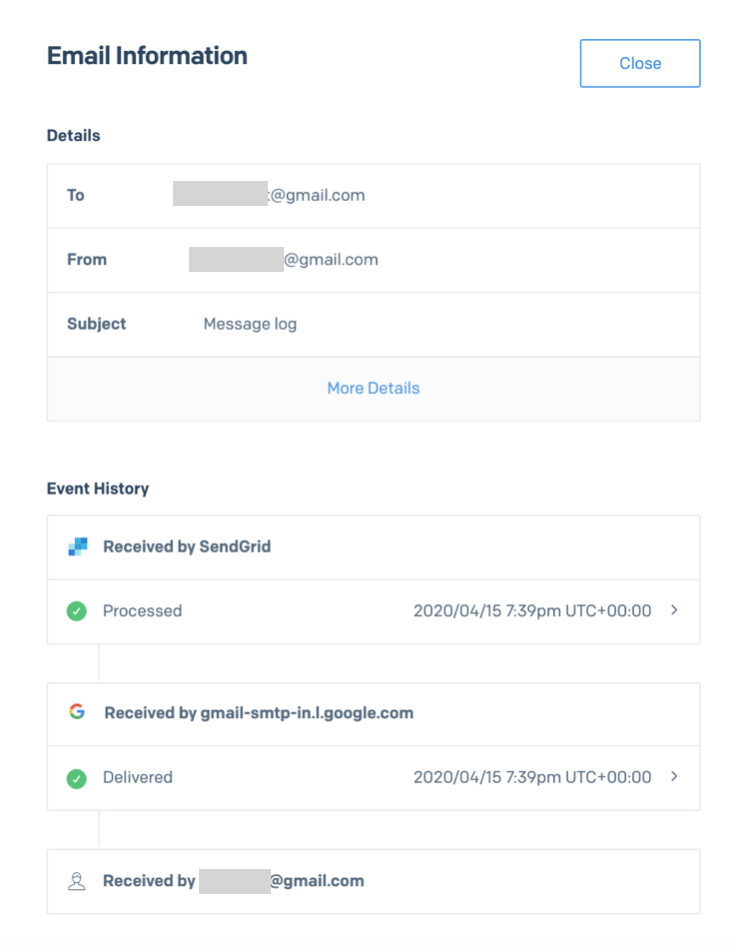
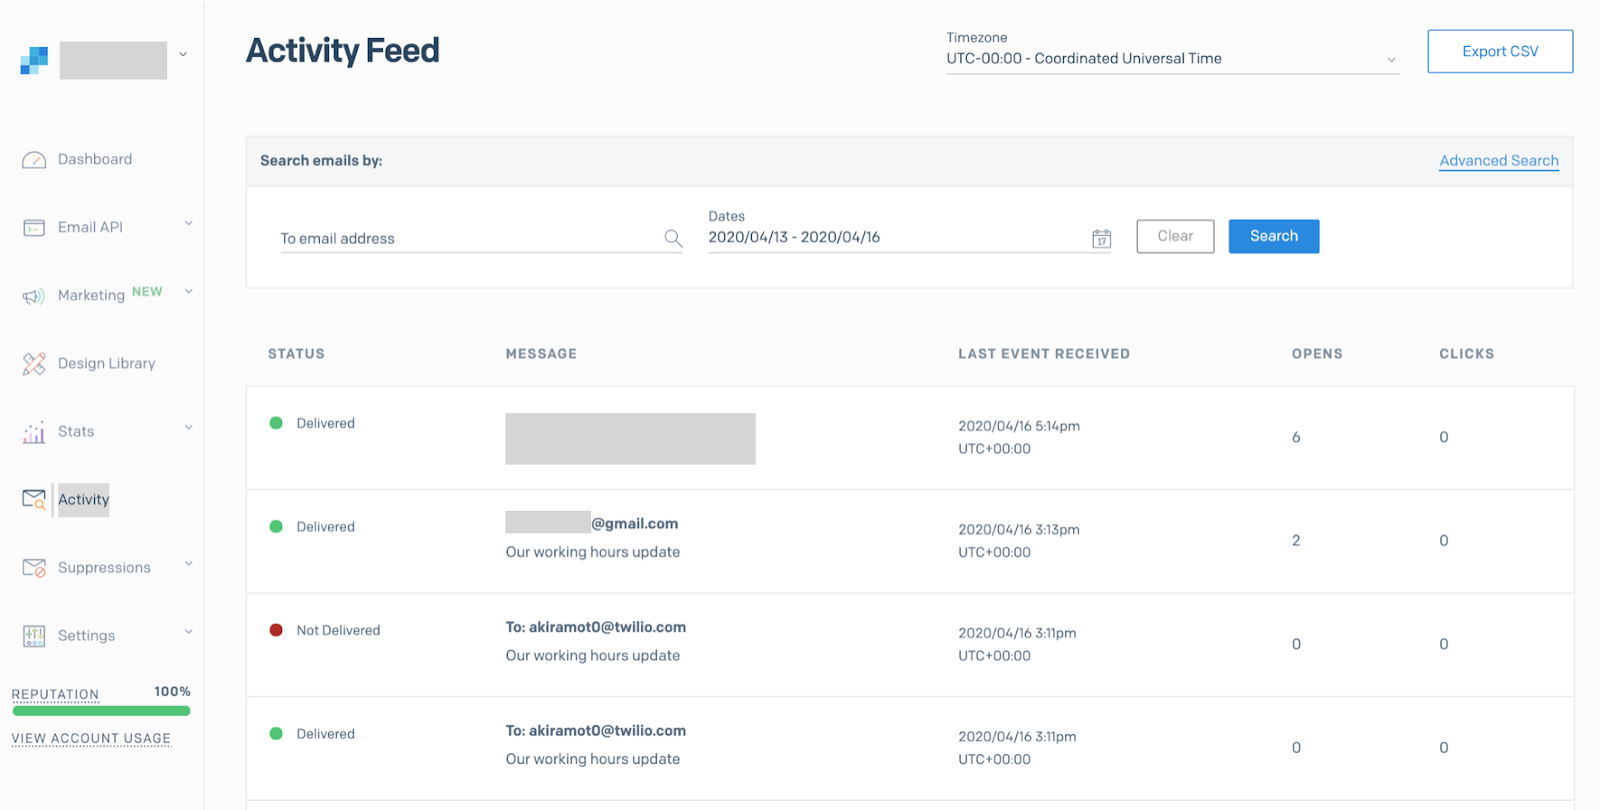
You can verify if your email was successfully delivered using the Activity Feed:
Create Your Employee or Customer List
As mentioned before, a list of recipients will need to be created in a simple spreadsheet (.csv file), containing the information you will use to send notifications. For each use case (SMS vs Voice vs Email) the fields will vary. We will show you a simple example where we want to send SMS, Voice, and Email greetings to our customers by name, and inform them of the store hours on a certain date. We are assuming that customers OPTed IN to receive such notifications. These examples could also be easily modified to send information to employees being notified of an office closure, students and parents about school hours, or any news that is important and requires an immediate response.
In this example, create a small notification.csv file with the following columns and save it to your computer:
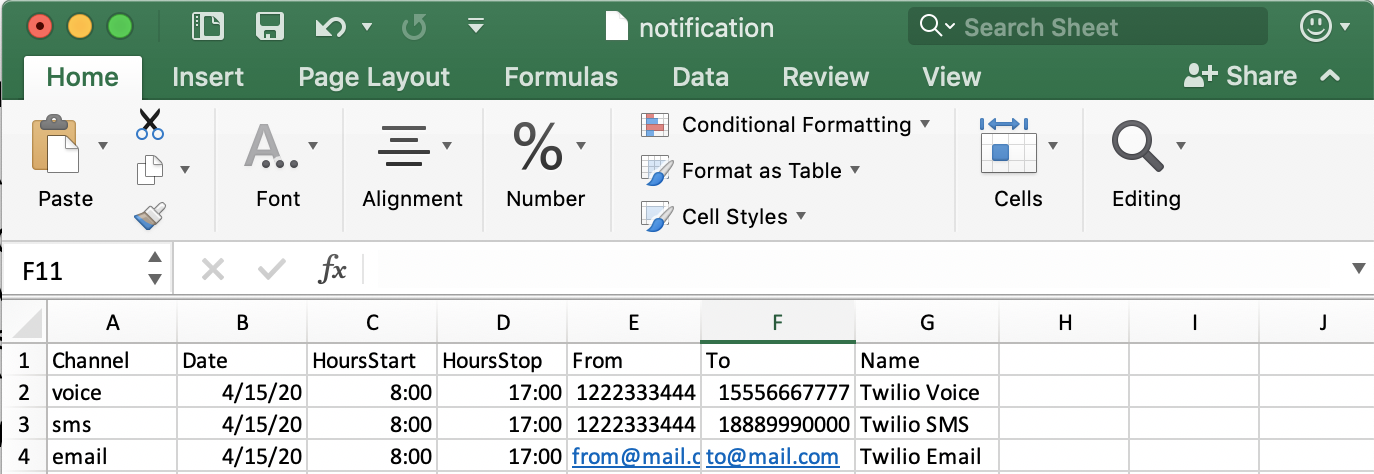
If you prefer to use Vi or any CLI editor, it should look like this:
NOTE: Be sure to replace the From and To columns with the correct phone numbers or email addresses.
Create a Simple Bash Script to Send the Notifications
We will now create a Bash script (or plain text file with a series of commands) to parse our CSV and contact the recipients accordingly. If you are new to programming, please check this guide to learn more about Bash scripts.
In your terminal, create a new file named CliNotifications.sh:
Now open the file in your CLI editor of choice and paste in the following code:
Test the Script
Make sure you saved both files in the same directory.
Execute your script by running ./CliNotifications.sh and check the results.
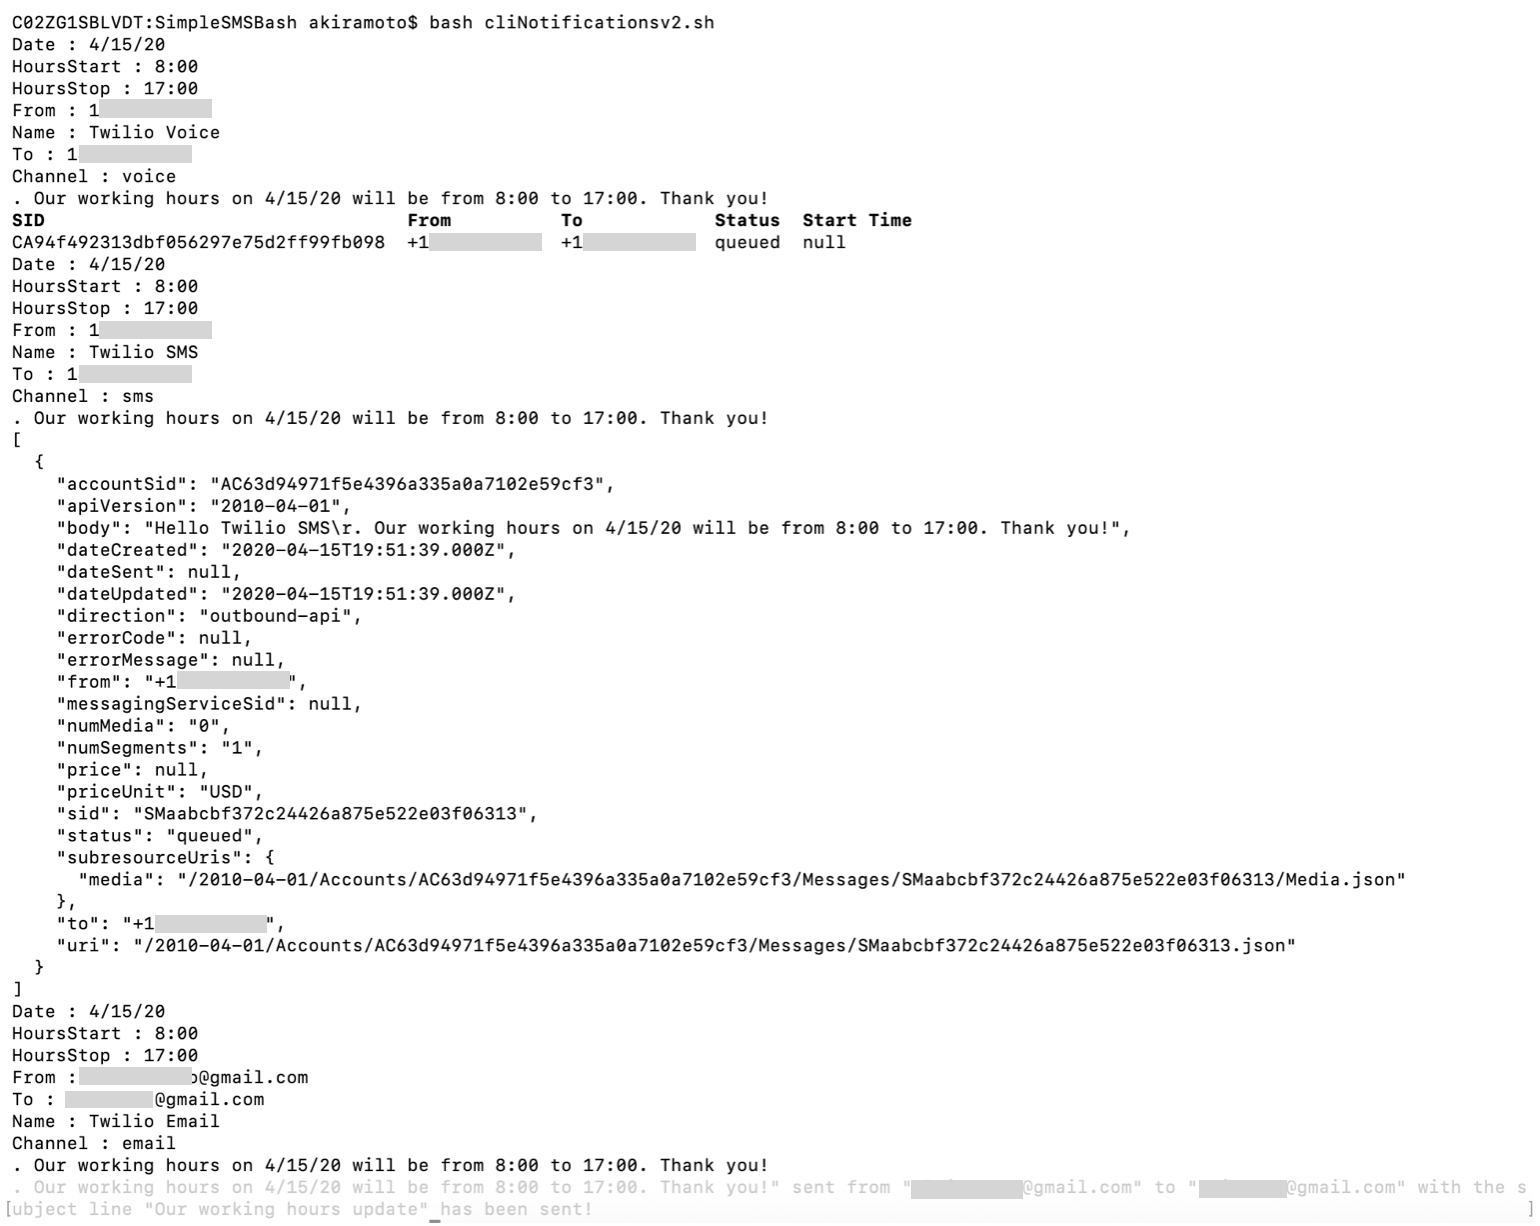
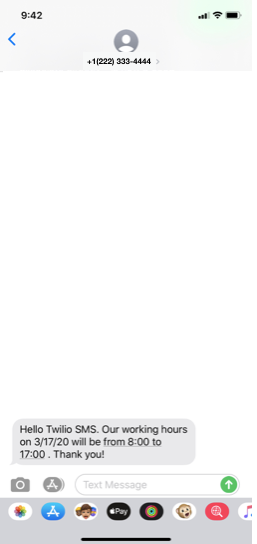
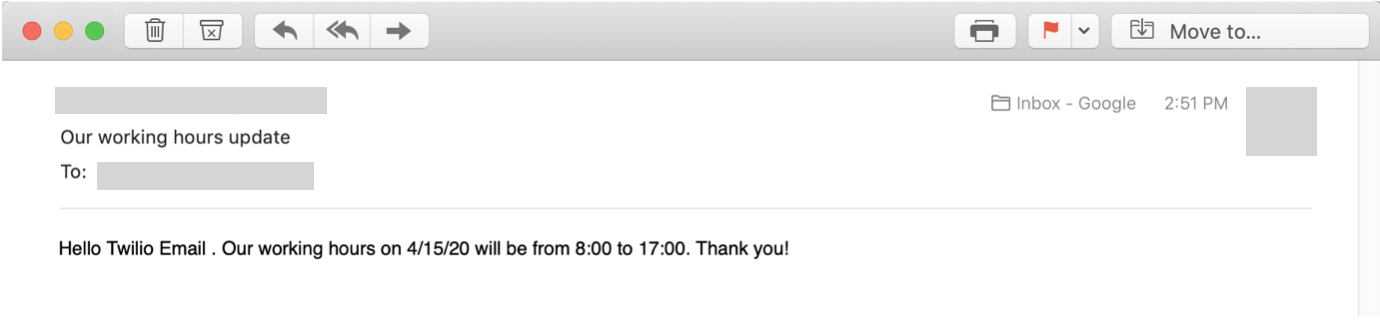
You should have received an SMS message on your first number, a voice message on your second number, and an email notification as shown in the screenshot below.
In case it does not work, follow these steps to troubleshoot:
- If you get a
bash: ./CliNotifications.sh: Permission denied- issue the following command to change the permissionschmod 755 CliNotifications.sh - Check the Debugger for error messages
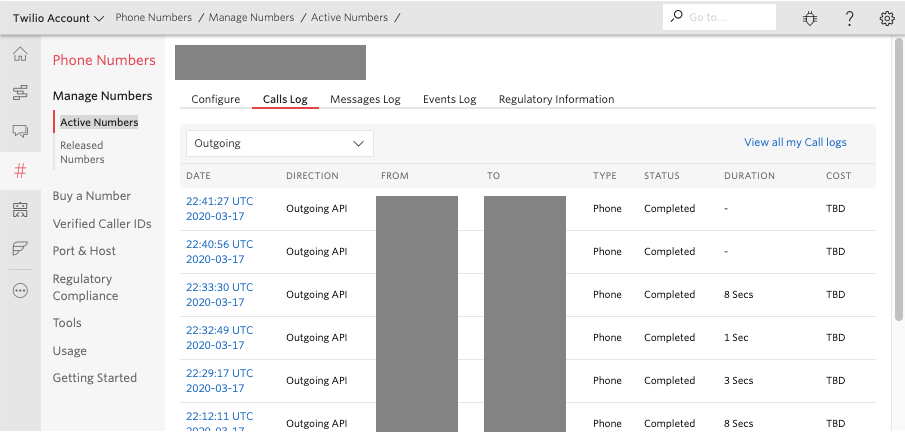
- Check the Calls Log for error messages (Active Numbers => Calls Log tab)
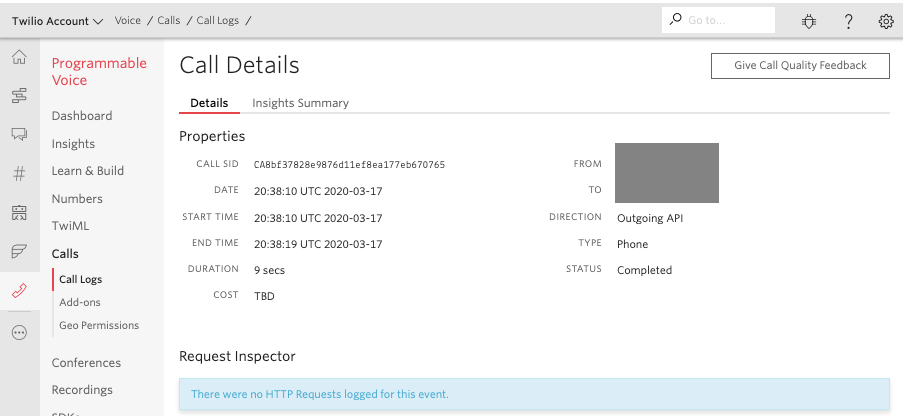
Look on the call Details and Insights Summary tabs:
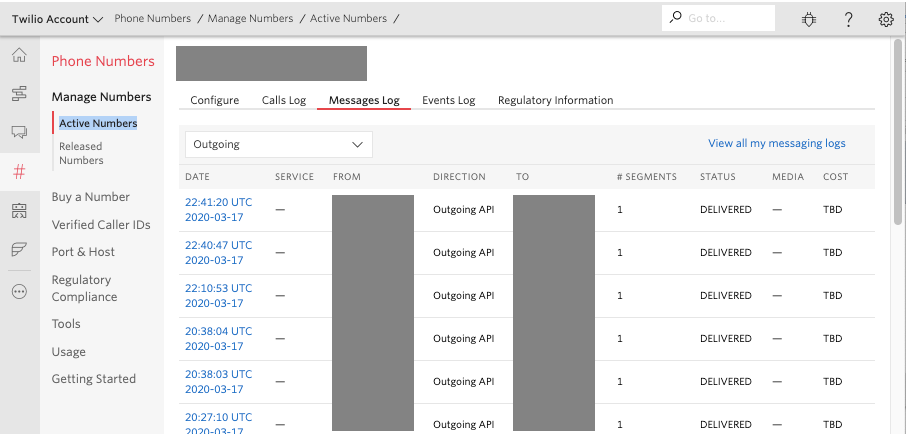
- Check the Messages Log for error messages (Active Numbers => Message Log tab)
- If the email test fails (the Bash script does not load that line), Excel might have added additional formatting information to the file. Try opening the file with a CLI editor like
viornano, and saving it again. - On the SendGrid Dashboard, check the Activity feed. For example:
Enhance with Your Actual Numbers
If all worked well, you can add all the real customers, employees, or students' information to your list. You can also modify the messages by removing or commenting out the following in your code:
Conclusion
In this blog, you have learned how to use Twilio CLI and a Bash script to automate sending notifications to customers, employees, or students.
Note: It is important to observe the proper security and HIPAA compliance measures when using Twilio Programmable Messaging, Voice, and Email to contact patients about their individual health status/symptoms. Contact Twilio if you have any questions.
If your organization would like more guidance on how to build solutions or would like to partner together on your work addressing the outbreak, we’re here to help. Fill out the form on this page.
Possible improvements
Here are a few suggestions on how to extend what we have just built:
- Send notifications using Twilio APIs instead.
- Improve the script to load 2 files, one for static fields (date, hoursStart, hoursStop, from) and another for the ones that vary per customer or employee (name, to).
- Use TwiML bins to enhance the experience by simply adding a simple response in case someone replies to your message.
- Add a conversational IVR using Twilio Studio.
Al Kiramoto is a Solutions Engineer at Twilio. He lives in Dallas - TX and enjoys working with customers solving business problems - besides a good barbecue and TexMex food. He can be reached at akiramoto [at] twilio.com
Additional resources
The following reference resources will provide you with in-depth information on some of the topics mentioned in this post:


Related Resources
Twilio Docs
From APIs to SDKs to sample apps
API reference documentation, SDKs, helper libraries, quickstarts, and tutorials for your language and platform.
Resource Center
The latest ebooks, industry reports, and webinars
Learn from customer engagement experts to improve your own communication.
Ahoy
Twilio's developer community hub
Best practices, code samples, and inspiration to build communications and digital engagement experiences.