Building Blocks for a Modern and Conversational IVR
Time to read:
August 04, 2019
Written by

Many IVRs expect too much from customers - they lack customizability and require your customers to patiently learn how to use the IVR. What if you could replace this with a natural conversational IVR? What if you could add security and personalized customer data and deploy this using multiple channels?
Well, you can! In this two-part blog post, we’re going to use Twilio APIs as “building blocks” to build an IVR for our pseudo-business, Signal Hardware. Here is the stack:
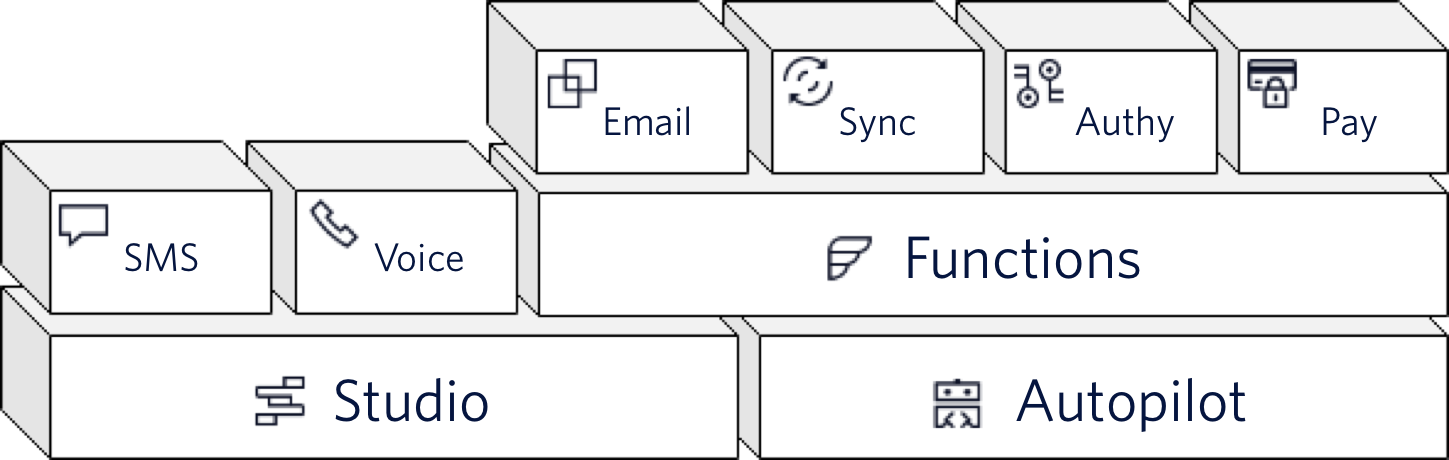
Layer 1 - Studio and Autopilot
In the first Layer of our IVR we’re using Twilio Studio and Autopilot to give us structure, flexibility and control of our workflow.
Studio is a virtual application builder. It allows you to rapidly create communication flows using pre-built widgets. Autopilot is our Natural Language Processing and Machine Learning platform. Where Studio creates our structure inside of a UI, Autopilot allows us to have a conversation where the IVR needs it.
In this IVR, we’re going to switch between Studio and Autopilot.
Layer 2 - Functions and Channels
Twilio Functions are low latency, serverless, standalone functions that you can execute within a pre-configured environment that includes things like helper libraries and API keys. In our IVR, Functions act as the gateway to add personalization and send OTP and email.
SMS and Voice are at the second layer of the stack because we’ll be using both these channels concurrently in Studio and Autopilot to communicate with our customers.
Layer 3 - Email, Sync, Pay and Authy
The building blocks at layer 3 allow us to add our own “flavor” to the IVR. We’re customizing Signal Hardware’s IVR to send an email (Sendgrid), provide 2FA (Authy), make a payment (Pay) and we’re using Sync as our on-the-fly database for customer information - this will make sense in a second.
Let’s Build!
Now that we know our ingredients, it’s time to build our IVR!
Step 1 - Configuration
We’re going to be using a number of Functions in this IVR, so we’ll need to configure our environment variables and dependencies. Let’s do that first.
- Navigate to Function Configuration and under
Environment Variablesset these variables:

- Set up your Sendgrid API Key here. This will be the value for
SENDGRID_API_KEY. - Set up your Authy API Key here - you will need to create a new Application and then copy the “Production API Key”, which will be the value for
AUTHY_API_KEY. Feel free to change the Settings within your Authy Application, but make sure that “Authentication via SMS” isEnabled. - Create a Sync Service here. The SID will be the value for
SYNC_SERVICE_SID. - To get the value for
SYNC_MAP, you will need to create a new Map, you can do this here. I like to create a name for my Map, so that would look like this -
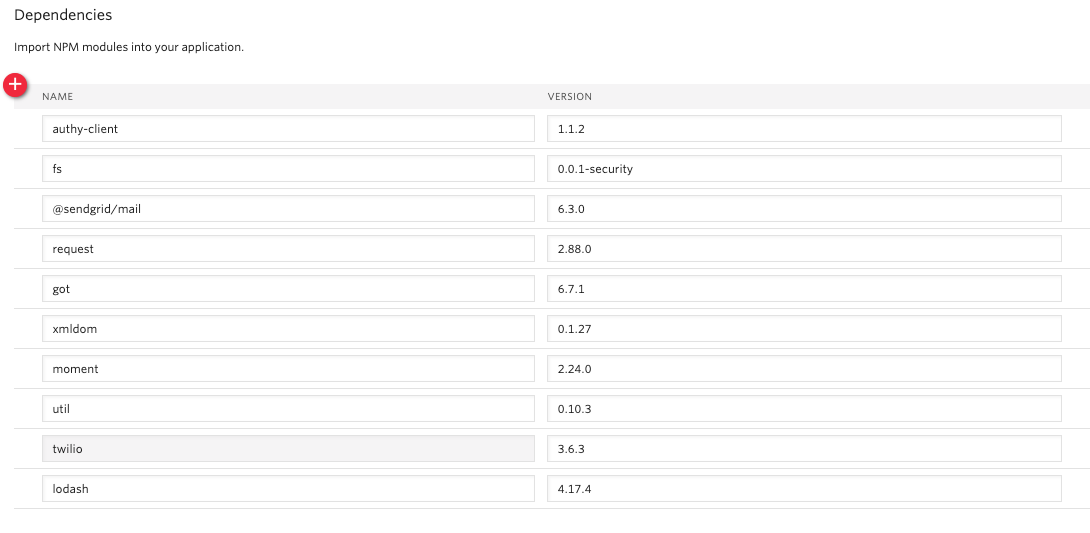
- Under
Dependencies, make sure that you have authy-client, sendgrid/mail and moment imported. If you don’t, you can copy my list of dependencies (versions up-to-date as of 08/02/19)
Step 2 - Create an “on-the-fly” Customer Database
We are going to use SMS and our Sync Map to create a dynamic database that we can use in our IVR straight away. To begin, we’ll need to make sure we have at least one phone number in our Twilio console.
Now it’s time to create our first Function!
- Name your function
Create_Sync_Item - Add a path to your function https://your-runtime.twil.io/create_sync_item
- Add this code and then press Save
Let’s create a second function, which will read the object we have just created from our key, in this case that's a phone number.
- Name your function
Get_Sync_Item - Add a path to your function https://your-runtime.twil.io/get_sync_item
- Add this code and then press Save
Lastly, navigate to your Phone Number and Configure the Messaging Webhook to your Create_Sync_Item function, so it will look like this -
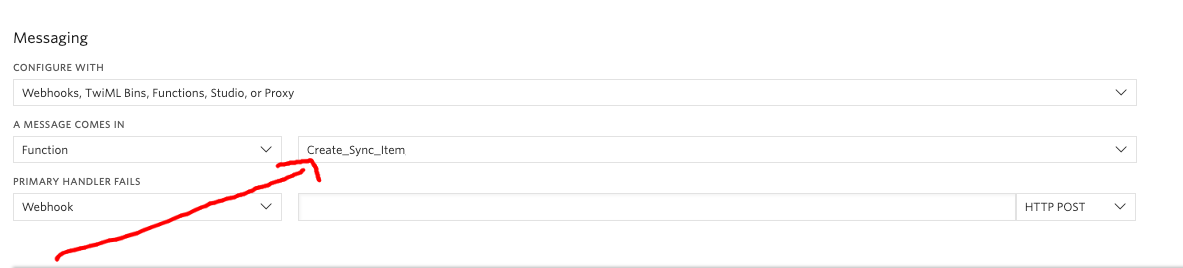
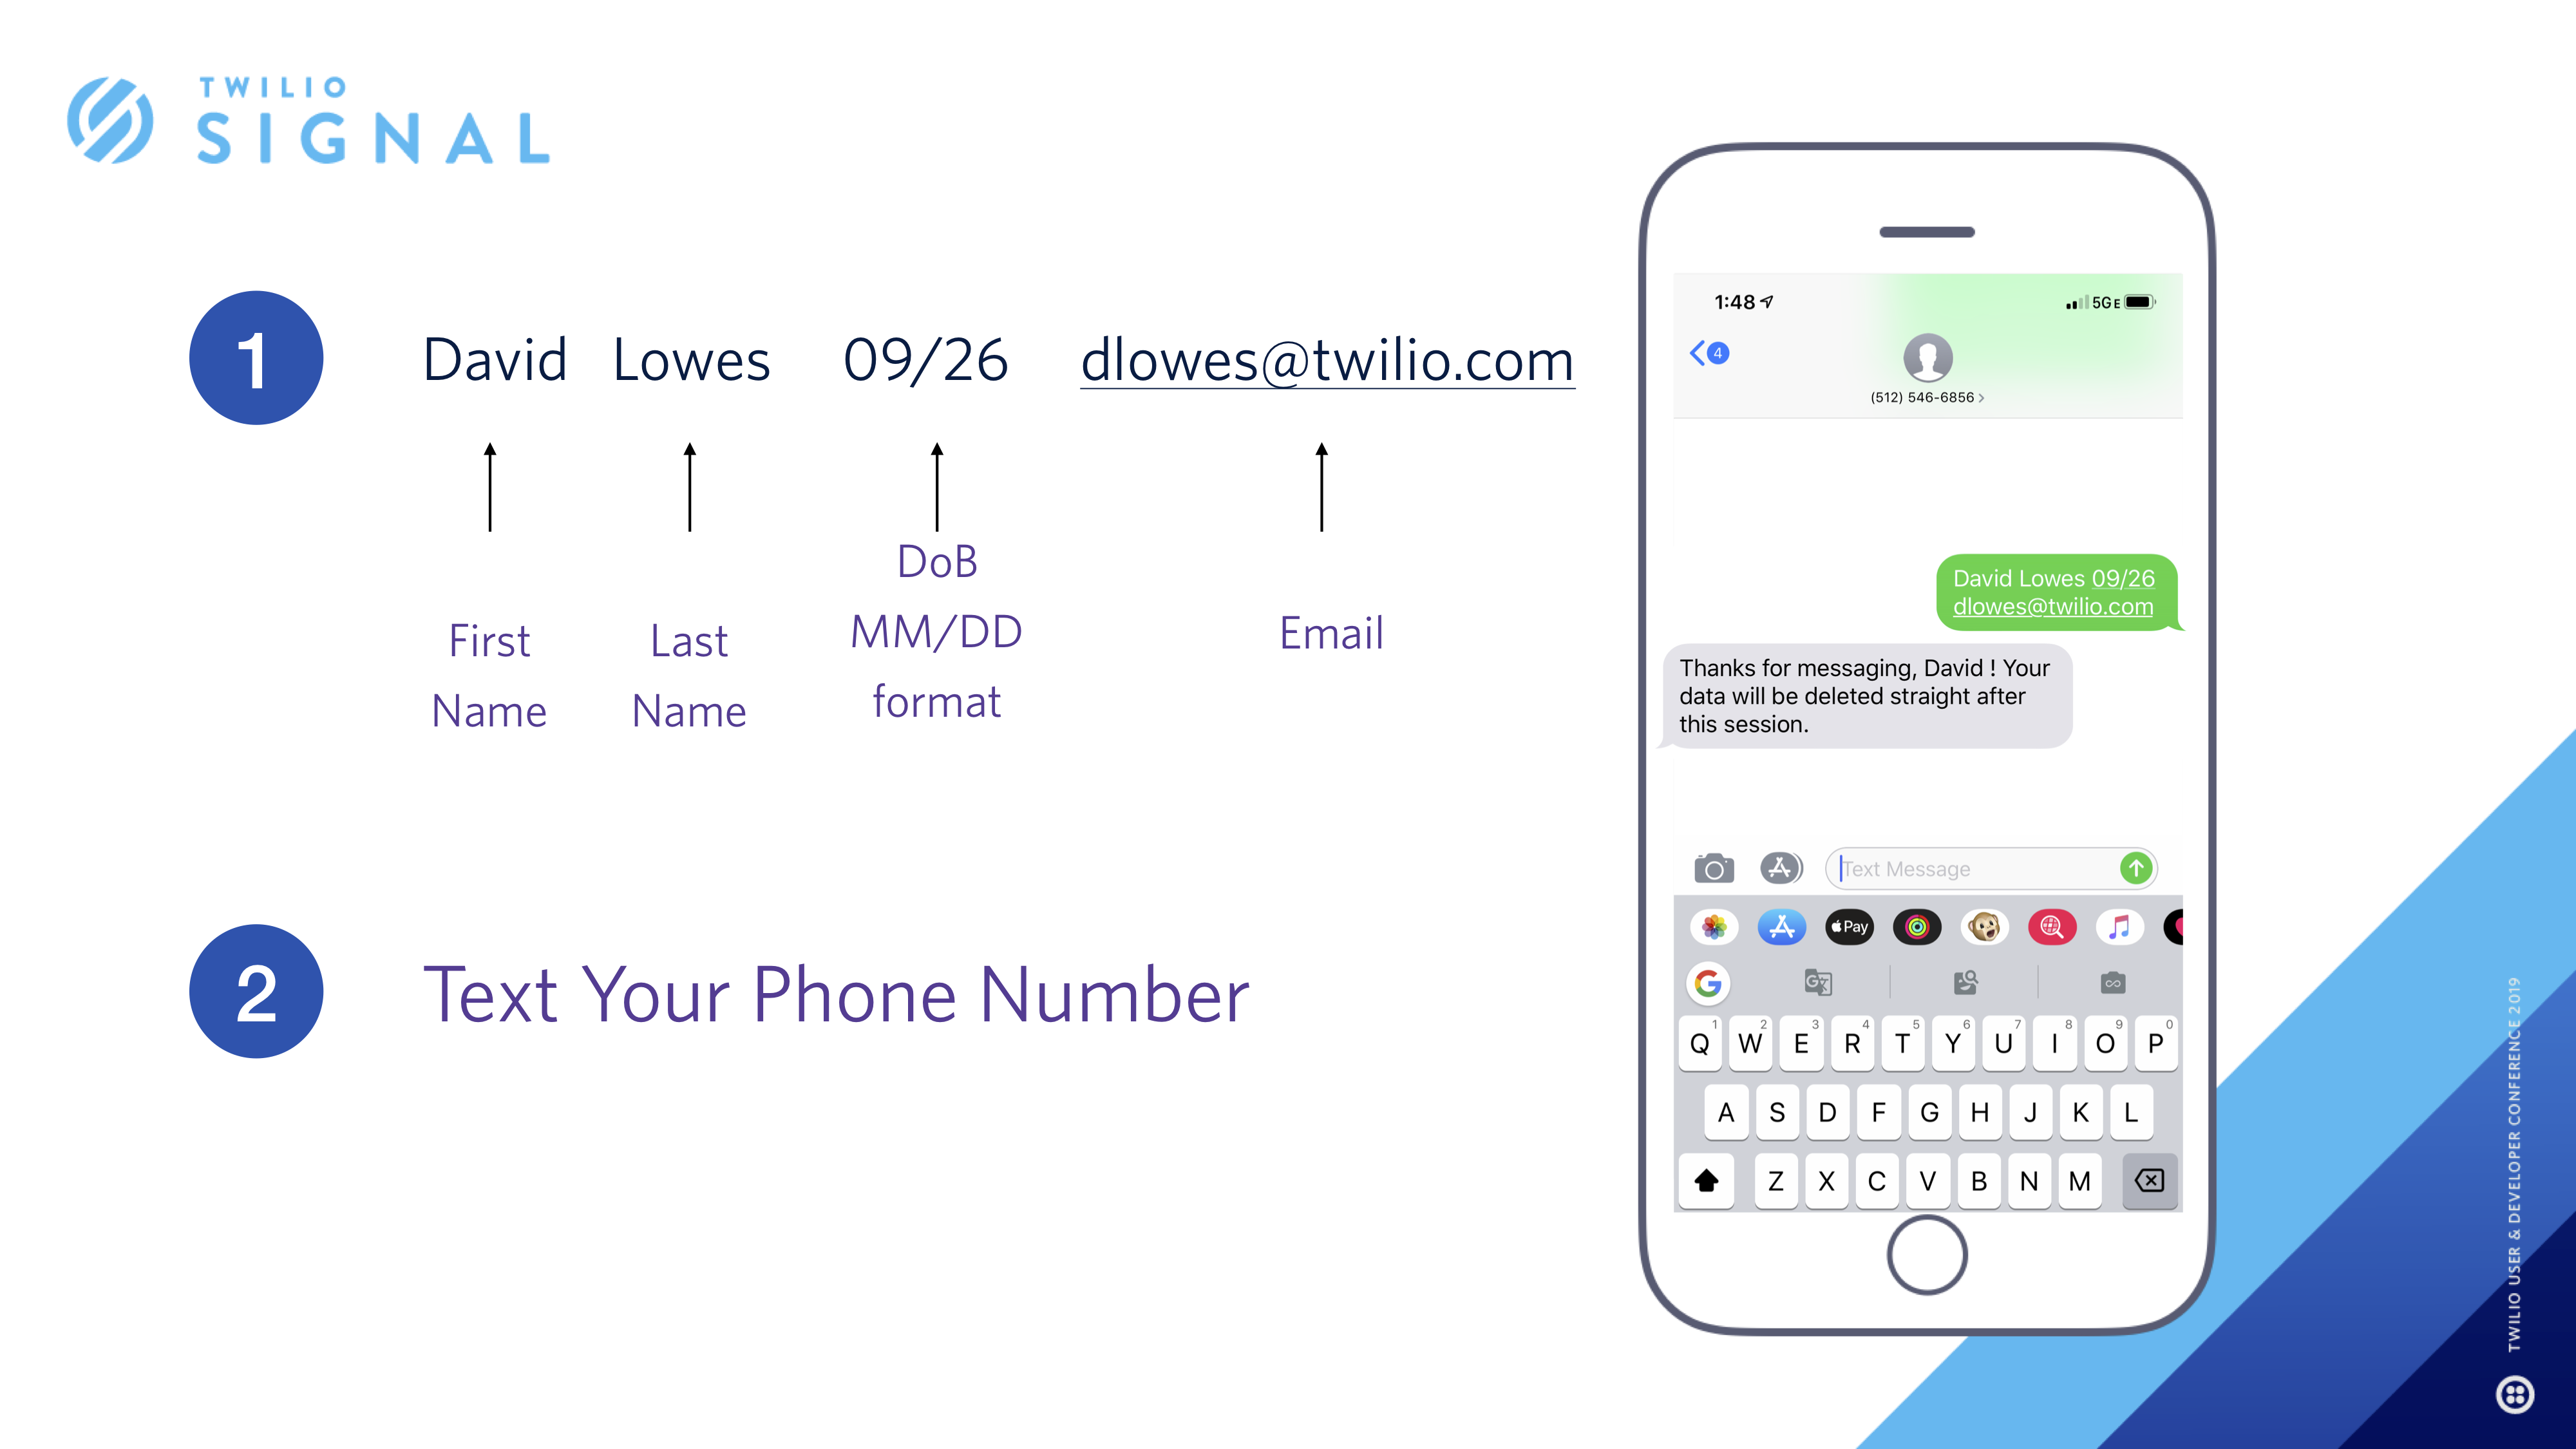
Sweet! We have just created a database that we can dynamically update, along with a Function to read that data which we’ll use later in our IVR. Now let’s test it out. Message that phone number with 4 words, in the specific order and format (including date format of MM/DD) shown below
If that was successful, you can navigate to
https://sync.twilio.com/v1/Services/ISXXXXXXXXXXXX/Maps/MPXXXXXXXXXXX/Items
Where:
ISXXXXXXXXXXXX = Your Service SID
MPXXXXXXXXXXX = Your Sync Map
And you should see something like
Step 3 - Personalise the Entry into our IVR
Navigate to Twilio Studio and create a new Studio Flow. If you’re not familiar with Studio yet, here are some tutorials.
- To start your flow, as soon as a phone call comes in, Trigger your
Get_Sync_ItemFunction, and make sure you add Function Parameters inside the widget, exactly as shown below (phone: trigger.call.Caller)
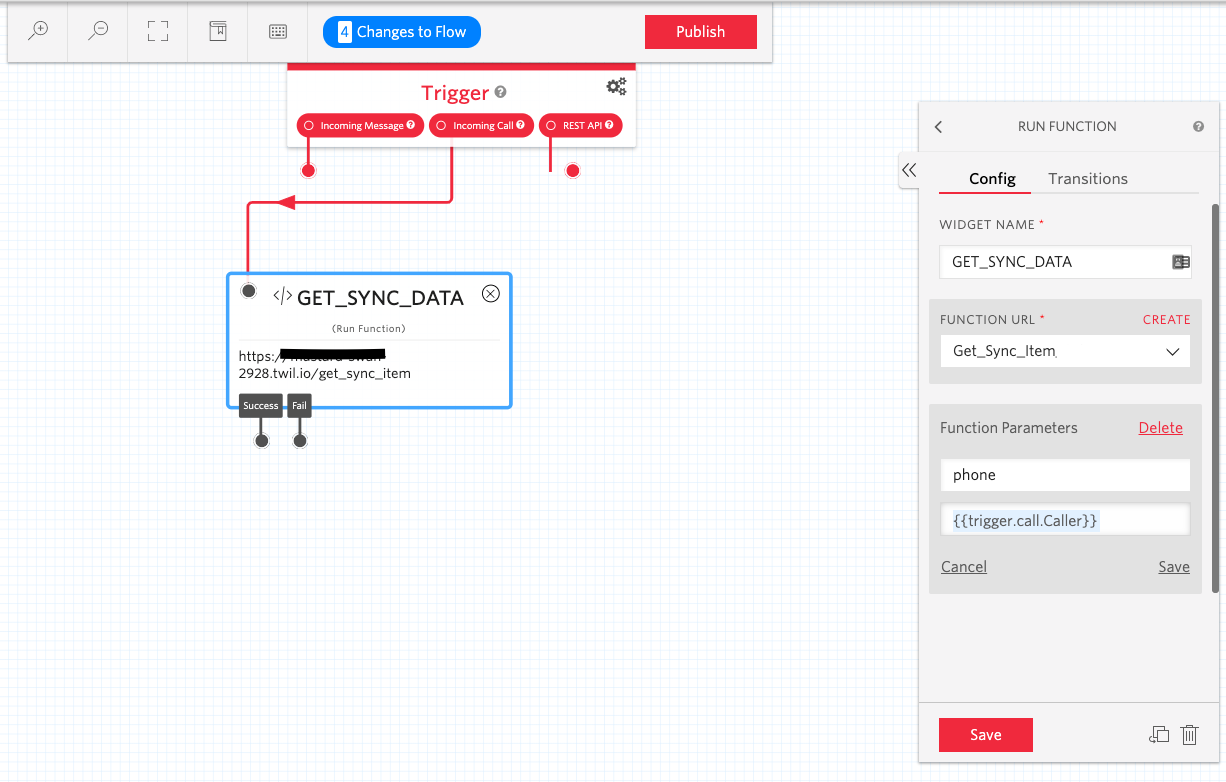
- Drag out a
Gather input on callwidget, select "Say a Message" and type out some text to Say. To personalize the greeting, we’re going to use some information that we have gathered from our GET_SYNC_DATA widget! If your function and widget name are the same as mine, you will do this by using{{widgets.GET_SYNC_DATA.parsed.firstName}}in the body of your message to <Say> the callers first name.
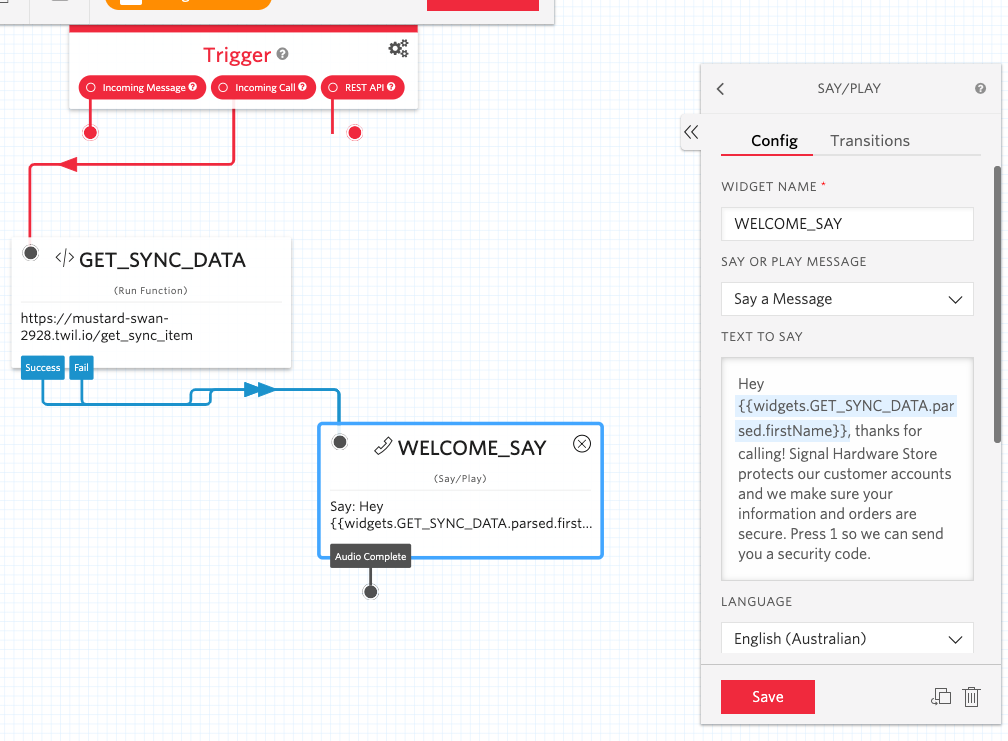
- We’re about to add some security to this IVR, so make sure in your <Say> message, you are asking the user to initiate the security check. In my example, we are just going to use DTMF in a simple flow, so let’s ask the customer to press 1. My message reads "Hey {{widgets.GET_SYNC_DATA.parsed.firstName}}, thanks for calling! Signal Hardware Store protects our customer accounts and we make sure your information and orders are secure. Press 1 so we can send you a security code."
- You might notice that our
Gather input on callwidget will execute on both success and fail of our Function. This is by design to maximize space for illustration. It is recommended that you include a separate widget to handle our function failing.
Step 4 - Add Security via Authy 2FA
Protecting customer data is important, we’re going to add a layer of security right into our IVR.
- Let’s create a new Function named Send_Authy. Choose a path name, perhaps "send_authy' is easiest to use.
- Add this code and press Save -
- Let’s create another Function! Name this one
Verify_Codeand choose a relevant path name. - Add this code and press Save -
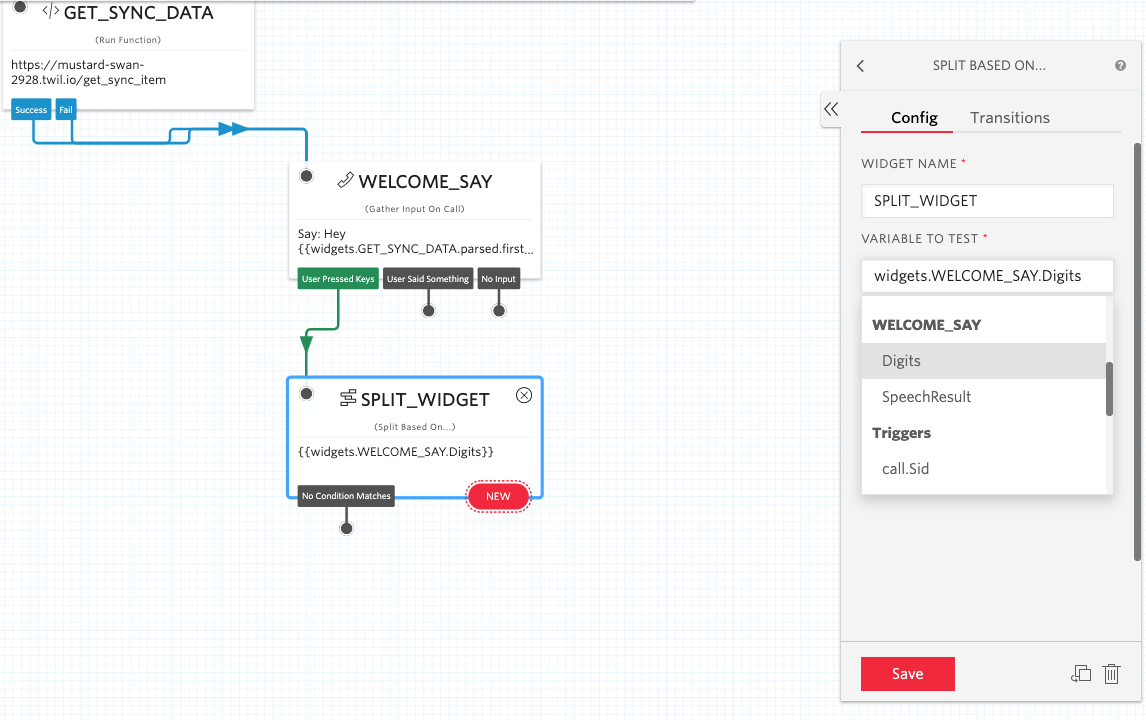
- Time to navigate back to our Studio flow and add some more widgets! Drag out a
Split Based On…widget and connect to ourGather on inputwidget, mine is calledWELCOME_SAY
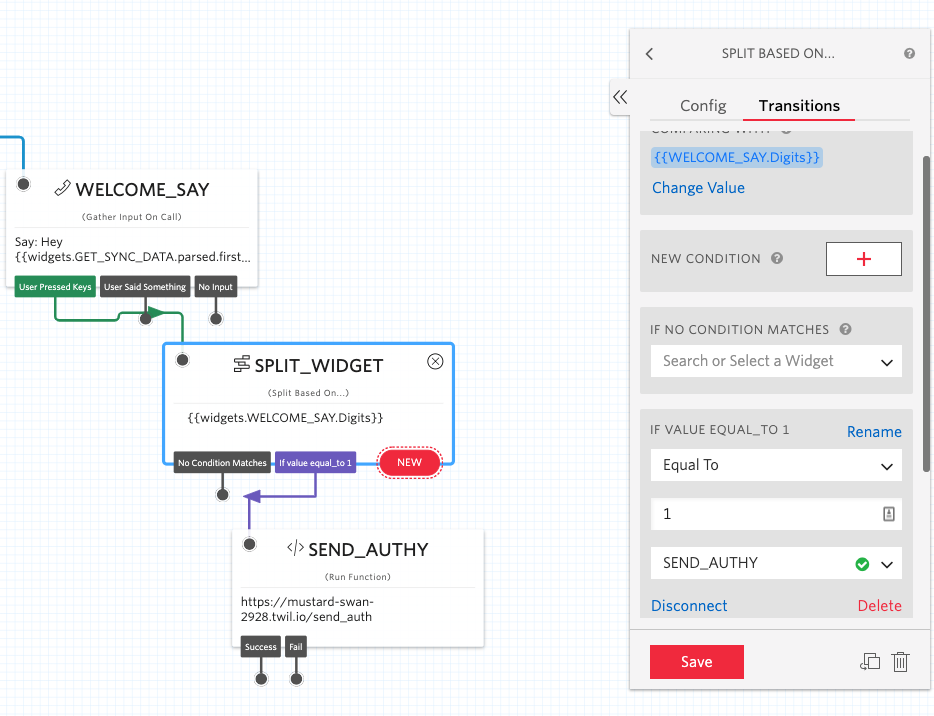
- Drag out another Function widget, connect it to our
Send_AuthyFunction and add the Function Parameters:phone : {{trigger.call.Caller}}(My function name below says “Send_Authy_SIGNAL2019”, yours should just say “Send_Authy”)

- Navigate back to our SPLIT_WIDGET and add a Transition, so that If Value = 1, then we transition to SEND_AUTHY
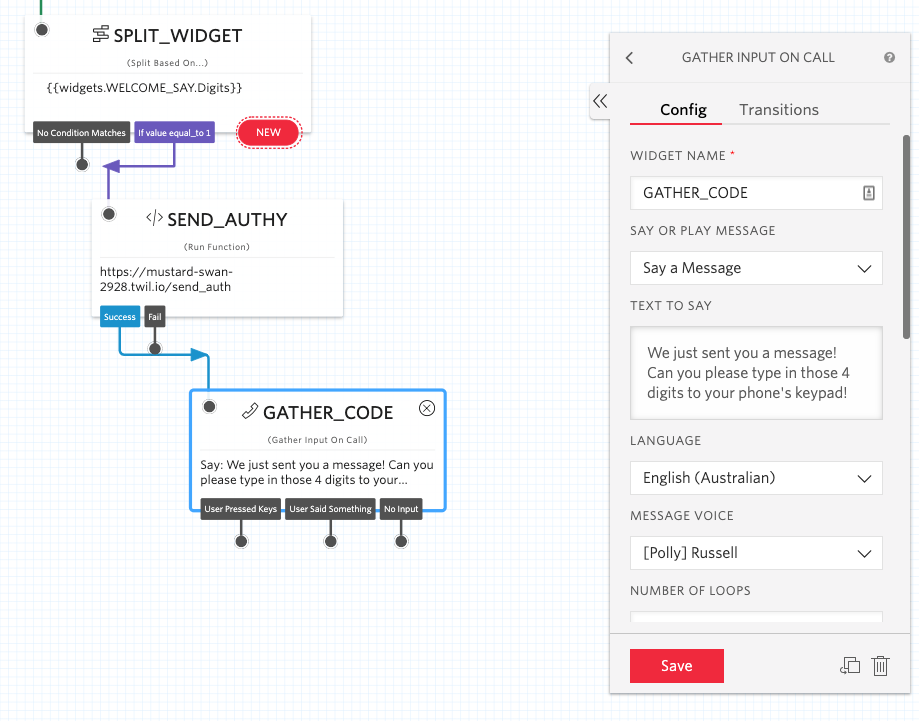
- Drag out another
Gather input on call widget, I’m calling mine GATHER_CODE. Say something like “We just sent you a message! Can you please type in those 4 digits to your phone's keypad!”. If you have configured your Authy service for 4 digit codes only, then navigate to the bottom this widget and where it says STOP GATHERING AFTER, and enter4 digits.
- Again, we are not handling failure on this function, but please add this workflow yourself.
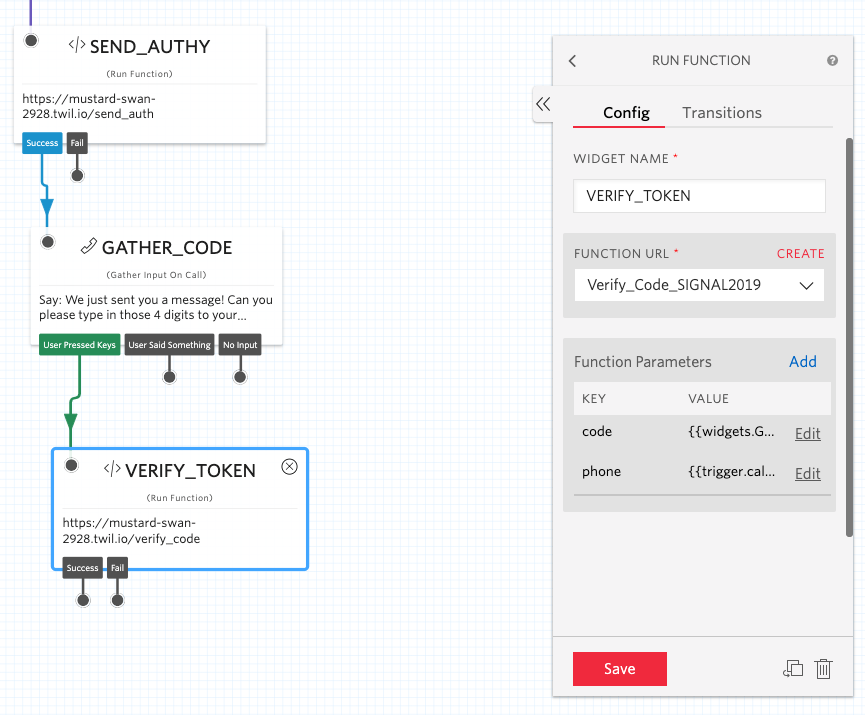
- Drag out another Function, I’m calling mine VERIFY_TOKEN, and connect it to your
Verify_Codefunction (again, mine says Verify_Code_SIGNAL2019, but if you followed my earlier instructions, yours will just say Verify_Code) - Add two Function Parameters
code : {{widgets.GATHER_CODE.Digits}}
phone : {{trigger.call.Caller}}
Okay, that was a lot. But now we have 2FA verification right inside our IVR! Woohoo!
Step 4 - Get Creative
There are many ways to get creative inside of an IVR. In our example, we’re going to send our customers a $100 gift card to thank them for being a loyal customer at our hardware store, which is valid on their birthday! But not by post... We’re going to send them this gift card via email and in real-time.
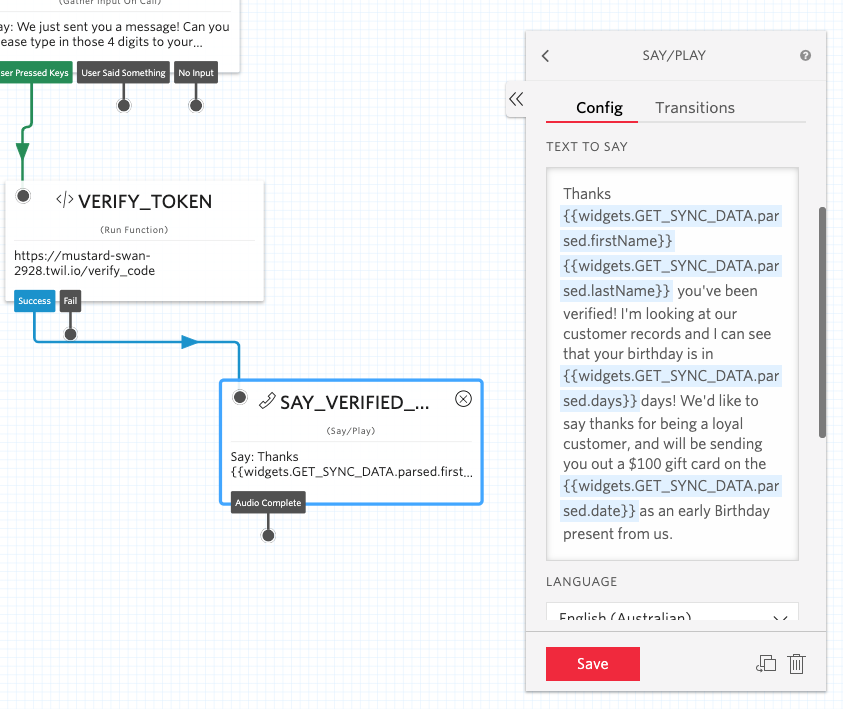
- Drag out a Say/Play widget, mine is called SAY_VERIFIED_OFFER. Type this into the <Say> box - "Thanks {{widgets.GET_SYNC_DATA.parsed.firstName}} {{widgets.GET_SYNC_DATA.parsed.lastName}} you've been verified! I'm looking at our customer records and I can see that your birthday is in {{widgets.GET_SYNC_DATA.parsed.days}} days! We'd like to say thanks for being a loyal customer, and will be sending you out a $100 gift card on the {{widgets.GET_SYNC_DATA.parsed.date}} as an early Birthday present from us."
- Feel free to edit the language to your liking
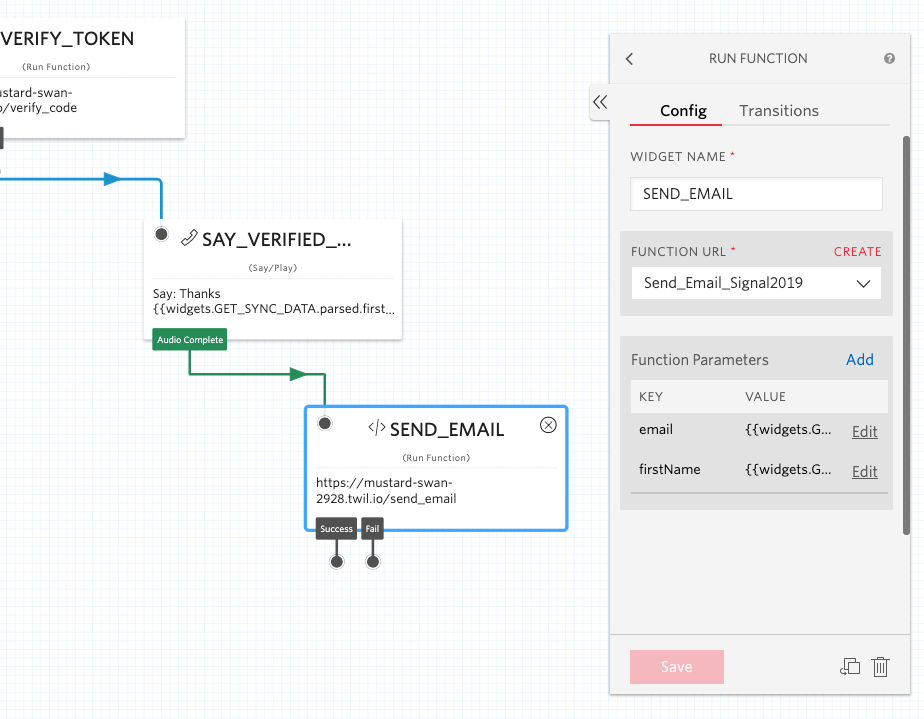
- Head back to Functions and create a new Function called Send_Email (path can be the same) and add this code (I’m giving you both API v2 and v3 code for new and old Sendgrid folk - you choose which you would like to use)
- You will need to add your email address to the from parameter (replace your_email_address@gmail.com) and if you are using V2 of the API, also add your `api_user` name. Feel free to customize the subject and text to your liking.
- Navigate back to your Studio flow and add the Function you just created with these Function Parameters -
- firstName: {{widgets.GET_SYNC_DATA.parsed.firstName}}
- email: {{widgets.GET_SYNC_DATA.parsed.email}}
Let’s test what we’ve done so far. Navigate to the phone number you are using and in Configure, add your Studio Flow to "A Call Comes in", which will look something like this -
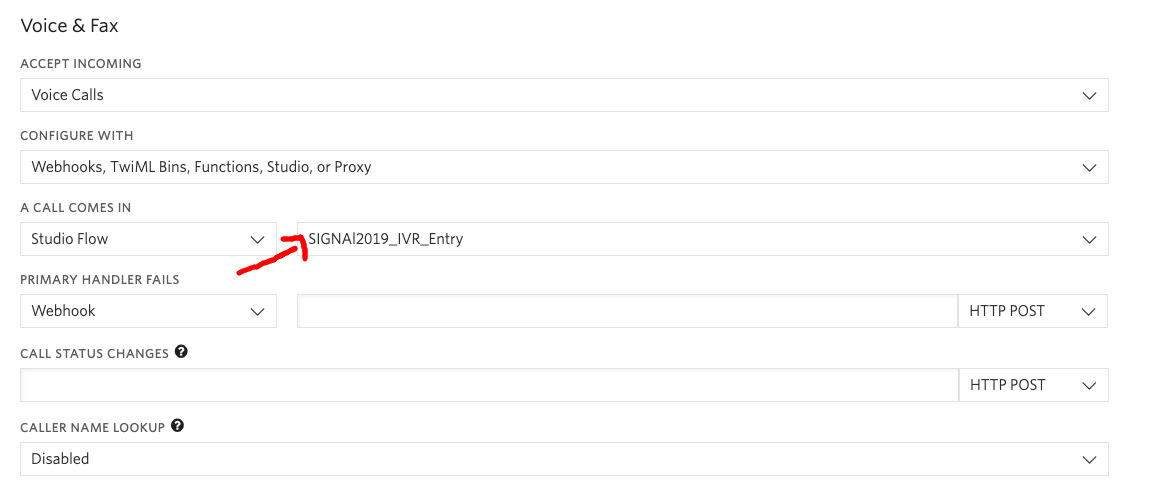
Hit save and call the number!
Step 5 - Have a Conversation
By now we have already built a fairly sophisticated and robust IVR that is authenticating the customer using 2FA, personalizing their experience using a data dip into our system of records and sending them a gift to their preferred communication channel because we have (presumably) computed the value they are as a customer from their spending habits.
But we’re just started. Let’s take a break. Next up we're getting into the real fun stuff - training our IVR to have a conversation using Autopilot!
If you find an error or have questions, please reach out @djlowes!
Related Posts
-
March 2026 Fraud Update: AIT Tactics, Weaponized Trust, and a New Fraud Response GuideDan Nieters Alena Eissman
-
Orchestrate an AI-to-Human Agent Handoff with Twilio Agent Connect, Conversations Orchestrator, Studio, and FlexKinshuk Kar Sarang Shah
-
 Twilio for Disaster-Ready Communities: Our 2030 GoalErin Reilly
Related Resources
Twilio Docs
From APIs to SDKs to sample apps
API reference documentation, SDKs, helper libraries, quickstarts, and tutorials for your language and platform.
Resource Center
The latest ebooks, industry reports, and webinars
Learn from customer engagement experts to improve your own communication.
Ahoy
Twilio's developer community hub
Best practices, code samples, and inspiration to build communications and digital engagement experiences.