How to Create Concise Data-Driven Unit Tests With the Spock Framework
Time to read:
February 28, 2023
Written by
Reviewed by

Unit tests are significant in software engineering to create better and more reliable software services. It is common to come across software use cases that strongly rely on the input data, often called Data-Driven Tests.
Spock is a test framework created with the Groovy language, compatible with any Java project. Spock makes creating Data-Driven Tests fun and easy due to its simplicity and expressiveness.
In this post, you’ll learn how to write concise data-driven unit tests with the Spock Framework.
Prerequisites
For this tutorial, you'll need a couple of things before starting:
- IntelliJ IDEA. The screenshots used in this tutorial use IntelliJ IDEA Community Edition 2022.2.1.
- Java Development Kit (JDK) version 8 installation or higher. I'm using Java SE 17 SDK for this tutorial.
A brief introduction to Groovy and Spock
Groovy is an object-oriented language compiled and interpreted by the Java Virtual Machine (JVM). It is a language fully compatible with any Java project since Groovy classes are compiled just like Java classes.
The difference between Java and Groovy is mostly their syntax. Groovy uses dynamic typing, has more built-in functions, and has a more expressive language. These features make Groovy more flexible and more straightforward than pure Java.
Spock is a test framework written in Groovy that runs using the JUnit test runner architecture. That makes Spock compatible with most Java enterprise applications, IDEs, and infrastructure.
Groovy's simplicity and expressiveness make Spock a good candidate for a test framework. Spock produces more concise and clear code when compared to pure-java test frameworks like JUnit and Mockito.
I’ll show you in the following sections:
- How to set up the Spock Framework in a Spring Application.
- The definition and some examples of data-driven tests for a demo application.
- The next steps with unit tests and the Spock Framework.
Set up the Application
Initialize the Spring Application
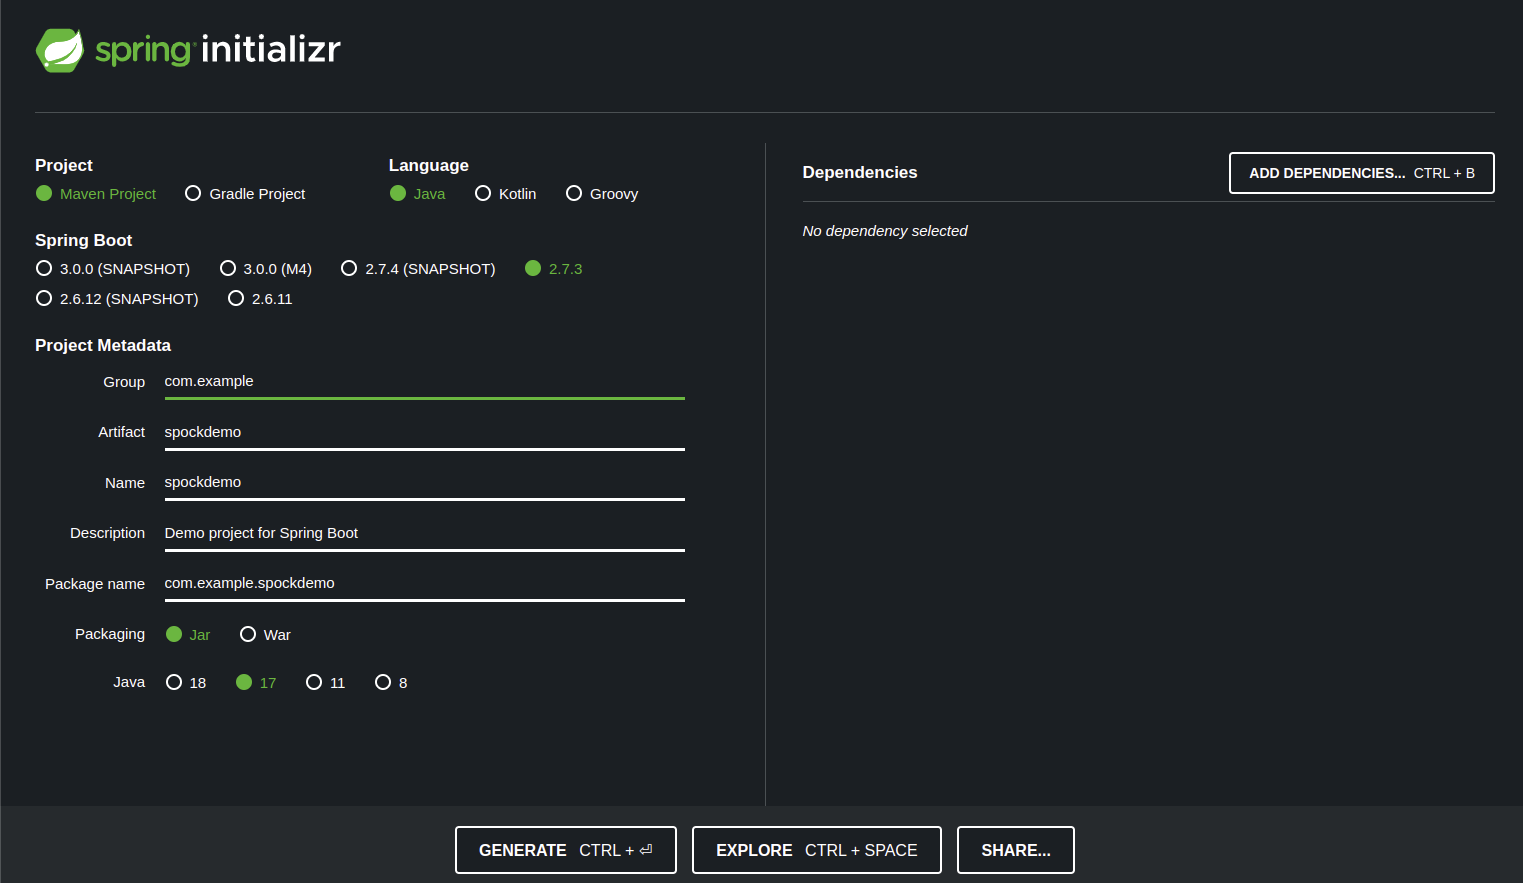
The first step is to create a template Spring application with the Spring initializr tool. To do so:
- Go to the website https://start.spring.io/.
- Choose Maven as the build system.
- Choose Java as the language.
- Pick a 2.7 version of the Spring Boot.
- Change the artifact name to
spockdemo. - Choose JAR as the packaging tool.
- Pick version 17 of Java.
- Click on Generate and save the project on your computer.
The final result of the initializer configuration is like the image below:
Configure the Application using IntelliJ IDEA
After clicking on Generate at the Spring Initializr, the website downloads a .zip file. To import the project into IntelliJ IDEA, do the following steps:
- Extract the downloaded .zip file using your favorite tool.
- Open IntelliJ IDEA. Once there, click on File->Open at the top left corner and choose the extracted archive.
Wait a few seconds for the IDE to index the imported files. After indexation, it is time to pull the Spock maven dependency into our project. To do so, add the following lines anywhere inside the <dependencies> tag at your pom.xml file located in the root directory of the project:
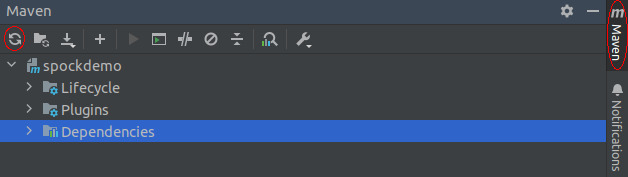
After adding this dependency, you’ll need to reload the project’s dependencies. To do so, go to the Maven menu in the top right corner of IntelliJ IDEA and click on the Reload All Maven Projects button, highlighted in the image below.
The final step is to create the test folder to store Spock tests. It is a good practice to keep them separated from the Java tests. To do that:
- Right-click on the test folder (which is within the src folder of your project directory) and choose the New->Directory option.
- Name the directory groovy.
- Right-click on the groovy directory and go to Mark Directory As->Test Sources Root.
Create the Test Target Java Class
In this tutorial, I’ll use a Body Mass Index (BMI) calculator to be the target application of unit tests. That calculator receives a person's height and weight and returns the BMI category. The equation and table below show how to calculate the BMI value and the interval for each BMI category.
Equation:
BMI value = [weight (kg) / height (cm) / height (cm)] x 10,000
| BMI value | BMI category |
|---|---|
| < 18.5 | Underweight |
| between 18.5 and 25 inclusive | Healthy weight |
| between 25.0 and 30 inclusive | Overweight |
| > 30 | Obesity |
The table and the equation are taken from CDC website
To implement the calculator, create a new package named calculator inside the package spockdemo. You’ll need to create two classes inside the calculator package. Create one class named BMICategory and replace the existing code with the following:
Create the second class named BMICalculator and replace the existing code with the following:
Create the Test Class
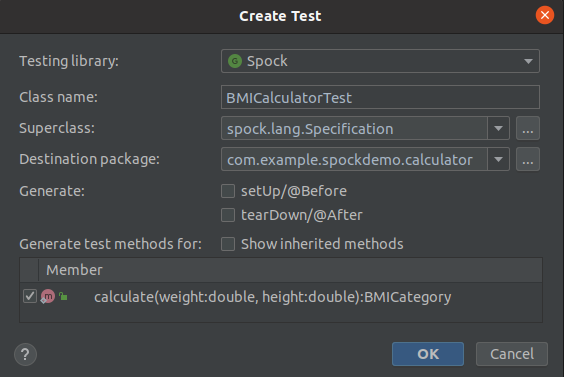
Now it’s time to create the test class for the target class. To create a test class, right-click the BMICalculator class name within the code and go to the Generate… option (or press alt + insert if you are using the default configuration of IntelliJ). Choose the Test… option.
Another window will pop up to set some test parameters. Set the same values as shown in the image below.
After setting the test parameters, another window will pop up to choose the destination directory of the test. Set the directory to the same groovy directory created before.
Implement the Unit Test
Unit tests created using the Spock framework have a structure to follow. That structure is similar to the structure defined in Behavior Driven Development (BDD). The idea is to use given, when, and then clauses to divide the test parts. Here’s a brief explanation of each one:
- given: The definition of the input test data.
- when: Here is where I call the target method.
- then: The assertions of the output values.
Let’s try one example to get used to the parts mentioned above. Replace the BMICalculatorTest content with the following:
Here’s what is going on in the above code:
- Any Spock test class should inherit from the
Specificationclass to work properly. That’s what theextendskeyword at the class name does. - Using the ' def ' keyword, I’ve defined variables to hold the height and weight inside the
givenclause. - Inside the
whenclause, I call the method under test using weight and height. - I validate the
resultvariable with the expected output inside the' then' clause.
You can run the test by clicking the green play button at the left of the BMICalculatorTest class. This test will run just fine. However, you may notice that the code tests just one scenario when the expected output is HEALTHY_WEIGHT. A good test should assert all the possible results from the target class.
Instead of copying and pasting the whole structure to another test and changing the input and expected values, you can use the data-driven testing tools available in Spock.
Unit tests in Spock use two features to be a data-driven test. These features are the where clause and the @Unroll annotation. Here’s a brief explanation:
- The
whereclause defines the input and the expected output in a tabular form. - The
@Unrollannotation replaces variables starting with#in the method name with the variables in thewhereclause.
Let’s see those features in action. Replace the content in BMICalculatorTest with the following:
Here’s what is going on here:
- The
givenclause is not mandatory, so I deleted it. The test data now lives in thewhereclause. - Right above the method name, I’ve put the
@Unrollannotation. That annotation replaces the#height,#weight, and#expectedstrings with the same variables defined in thewhereclause. - For each line in the
whereclause table, Spock executes a new test with the data contained in each column.
Notice how the input and expected values form a table in the where clause of the unit test. Spock shines when testing methods where we can write their input and expected results in a tabular form, like in the BMICalculatorTest class.
In just one method, we tested all possible scenarios of our BMI calculator. See how straightforward and clear that method is. The tabular format of the where clause clarifies the input variables and the expected output of the calculate() method.
Run the Unit Tests
Click on the green play button in the BMICalculatorTest class to run the tests. You can also run the unit tests on your project by clicking on the test button in the Maven menu, located at the top right corner of IntelliJ. You should get the following results:
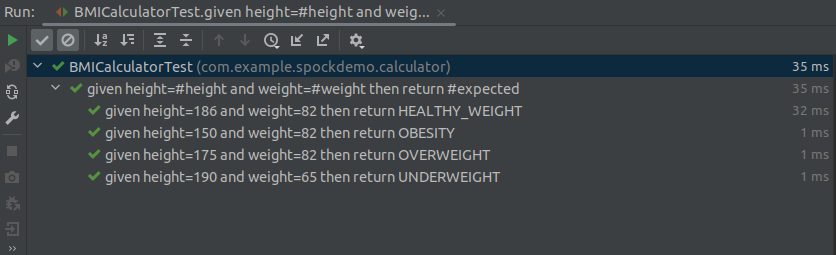
Spock transformed each line in the
where clause into another test. Also, the variables in where were replaced in the method name because of the @Unroll annotation.
Writing nice-to-read test names is good practice for generating good test reports. Using Spock Data-Driven Test features, we can easily achieve that.
What’s next for using the Spock framework?
Unit tests are the best way to test the basic functionalities of software applications. In the test pyramid, they compose about 75% of all tests. Thus, unit tests are created all the time by developers. If you have a framework that lets developers create less test code, you increase their productivity. Spock does that job very well.
As shown in this article, Spock provides a way to create easy-to-follow data-driven tests. Spock divides the test using the given/when/then approach, which makes it easier to read. People that glance at this test code have a good idea about what each clause does. Thus, Spock could also increase the maintainability of the application.
In this post, I’ve demonstrated how to create data-driven unit tests using Spock. For the next steps, I’d highly encourage you to:
- Check the Spock documentation. Spock has many other valuable features like Mocking, Interaction-based testing, and utility classes. The documentation provided by the authors is just like Groovy syntax: concise and objective.
- Glance at the various flavors of tests and the importance of each in this blog post by Martin Fowler. Knowing how to create better unit tests and read their reports can make software engineering more productive and fun!
- Unit tests are handy for software applications that adopt Continuous Integration, Test Driven Development, and Refactoring. Those concepts are prevalent in the current software engineering industry. You might want to check them too!
I’d love to see what you create using Spock!
Pedro Lopes is a backend developer and independent writer. He's a specialist and enthusiastic about distributed systems, big data, and high-performance computing. He can be found on LinkedIn, Github, and his Blog.


Related Resources
Twilio Docs
From APIs to SDKs to sample apps
API reference documentation, SDKs, helper libraries, quickstarts, and tutorials for your language and platform.
Resource Center
The latest ebooks, industry reports, and webinars
Learn from customer engagement experts to improve your own communication.
Ahoy
Twilio's developer community hub
Best practices, code samples, and inspiration to build communications and digital engagement experiences.