Enabling VoIP calls on Twilio Flex
Time to read: 5 minutes
March 14, 2023
Written by
Reviewed by
")
As businesses increasingly move towards remote work and virtual collaboration, the ability to make high-quality voice and video calls over the internet is more important than ever. Twilio Flex, a cloud-based contact center platform, offers an intuitive and flexible solution for managing customer interactions across multiple channels, including voice.
Introduction
Voice over Internet Protocol (VoIP) calls are a type of voice communication that takes place over the internet, bypassing the traditional Public Switched Telephone Network (PSTN). VoIP calls on Twilio are powered by Programmable Voice, which enables developers to build customized voice experiences using Twilio's cloud-based platform. With Programmable Voice, VoIP calls can be integrated into a variety of applications, including native mobile apps and websites, using Twilio's Programmable Voice SDKs.
In this comprehensive guide, we'll walk you through the process of enabling VoIP calls on Twilio Flex, empowering your business to deliver seamless customer experiences through the power of the internet.
Solution overview: inbound and outbound VoIP calls in Flex
The solution consist of the following key call flows:
- Inbound VoIP Calls to Twilio Flex (aka "Client-to-Flex")
- Outbound VoIP Calls to Client (aka "Flex-to-Client")
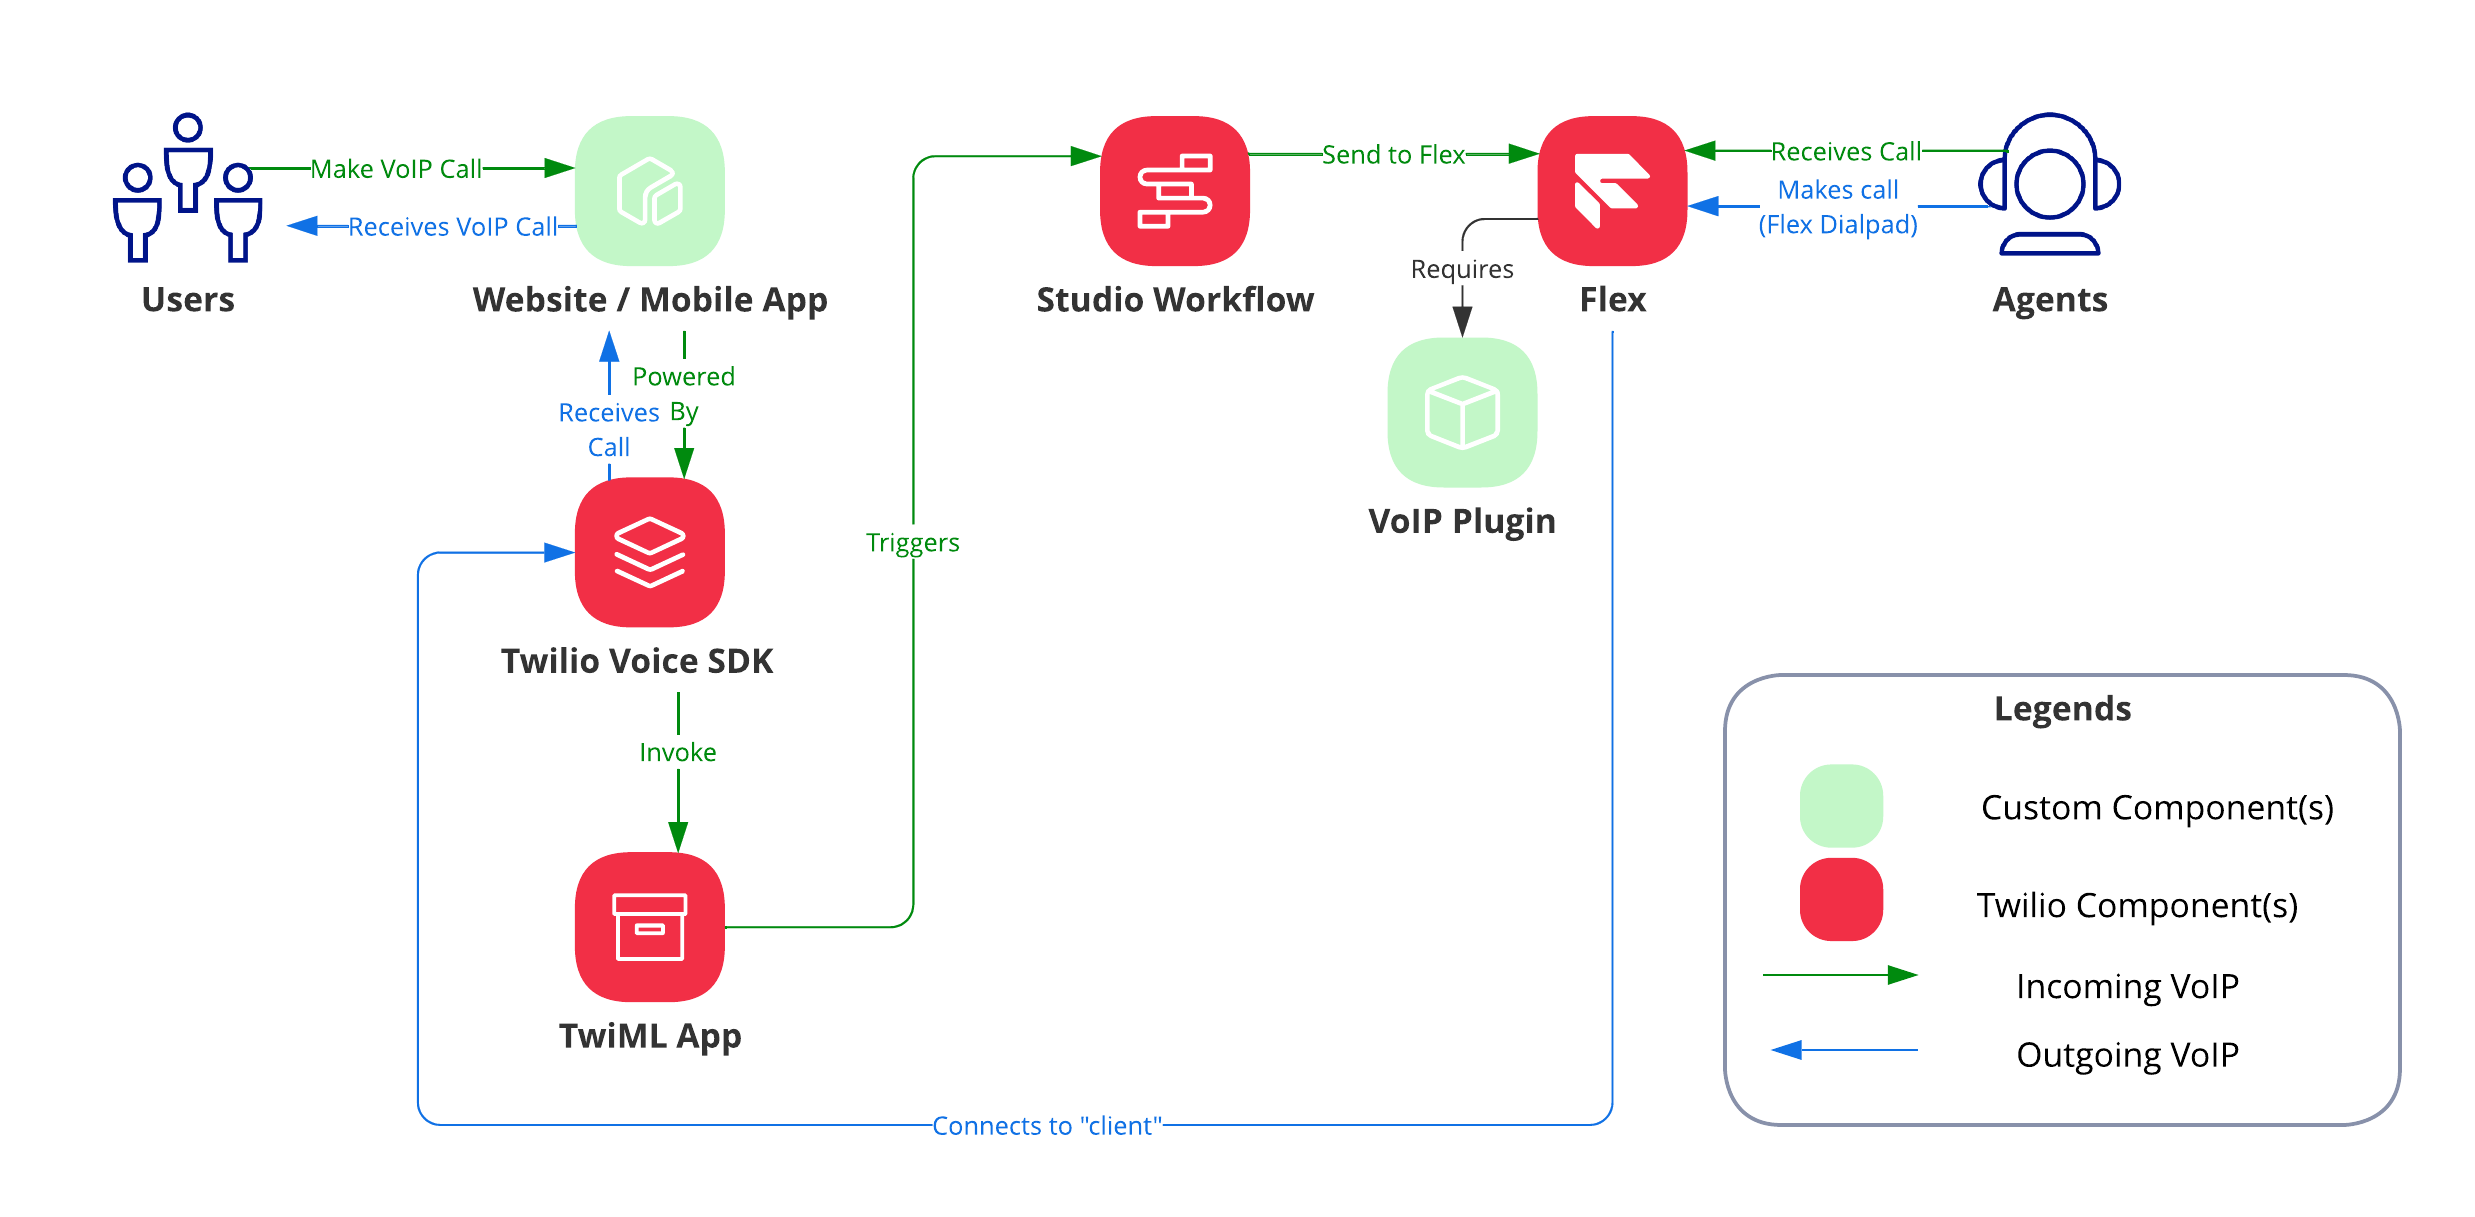
Inbound VoIP Calls to Twilio Flex (aka "Client-to-Flex")
To receive VoIP calls in Twilio Flex, there are several necessary components:
- Custom App: A custom end-user app (either a web or native mobile app) with a soft phone embedded that allows end-users to make and receive VoIP calls
- TwilML App: A serverless app responsible for directing all outgoing VoIP calls from a custom app to a Twilio Studio Flow
- Twilio Studio Flow: A flow to route outbound VoIP calls from the custom app into Twilio Flex. IVRs can also be configured in the Studio flow before hitting Twilio Flex.
- Twilio Flex: A Programmable Contact Center that enable agents to receive VoIP calls
In order to enable end users to make and receive VoIP calls, a custom frontend application must be embedded with a softphone. Fortunately, Twilio's Twilio's Programmable Voice SDKs makes this process straightforward.
To get started, generate an Access Token for each end user who needs to use the softphone. This token will also include a Voice Grant that specifies the outgoingApplicationSID, which indicates the TwiML App responsible for directing outgoing voice traffic from the custom frontend app. Once the Access Token has been generated, the softphone on the custom frontend app can be initialized using the Device object from the SDK. This will enable end users to start making and receiving VoIP calls seamlessly.
When a call is initiated from the custom app, the configured TwiML app will invoke a Studio Flow to process any Interactive Voice Response (IVR) configurations before routing the call to Twilio Flex via the "Send to Flex" widget.
For contact center agents on Twilio Flex to receive and handle VoIP calls, a Flex plugin is required to populate the from field of the incoming Task's conferenceOptions. This step is essential to ensure that all incoming VoIP tasks have the necessary attributes.
With the Flex plugin deployed, contact center agents on Twilio Flex will now be able to receive and handle VoIP calls successfully.
Outbound VoIP Calls to Client (aka "Flex-to-Client")
Agents on Twilio Flex can use the native dialpad to make outbound PSTN and SIP calls. However, to add the ability to make outbound VoIP calls, the configuration settings in Flex must be updated by setting enableClientCalling to true.
This can be achieved by using a Flex plugin that does the following:
In addition, it's important to populate the outbound VoIP's Caller ID with the Twilio Flex agent identifier. This ensures that outgoing calls are properly identified.
The resulting Flex VoIP plugin that enables both inbound and outbound VoIP calls on Flex is:
Step by step guide
This section will guide you to set up and configure VoIP calls on Twilio Flex using a web-based demo frontend.
Prerequisites
Before you can start building the solution, you'll need to set up a few accounts (and download a few tools).
- Twilio Flex Account (Guide) with Flex UI 2.x
- Native Flex Dialpad enabled on Twilio Flex Account (Guide)
- Node.js v16.x.x (Guide)
- Twilio CLI v5.4.1 or above (Guide)
- Twilio CLI Flex Plugin v6.0.4 or above (Guide)
- Twilio CLI Serverless Plugin v3.1.3 or above (Guide)
Getting Started
The solution consists of two main components:
- Twilio Flex Plugin (
plugin-voip): Twilio Flex plugin that allows agents to accept incoming VoIP calls and perform outbound VoIP calls to "client:" via the native Flex Dialpad - Web Frontend (
frontend-voip-to-flex-demo): Sample web interface that provides the ability to make and receive VoIP calls via Flex. Fully hosted on Twilio Functions.
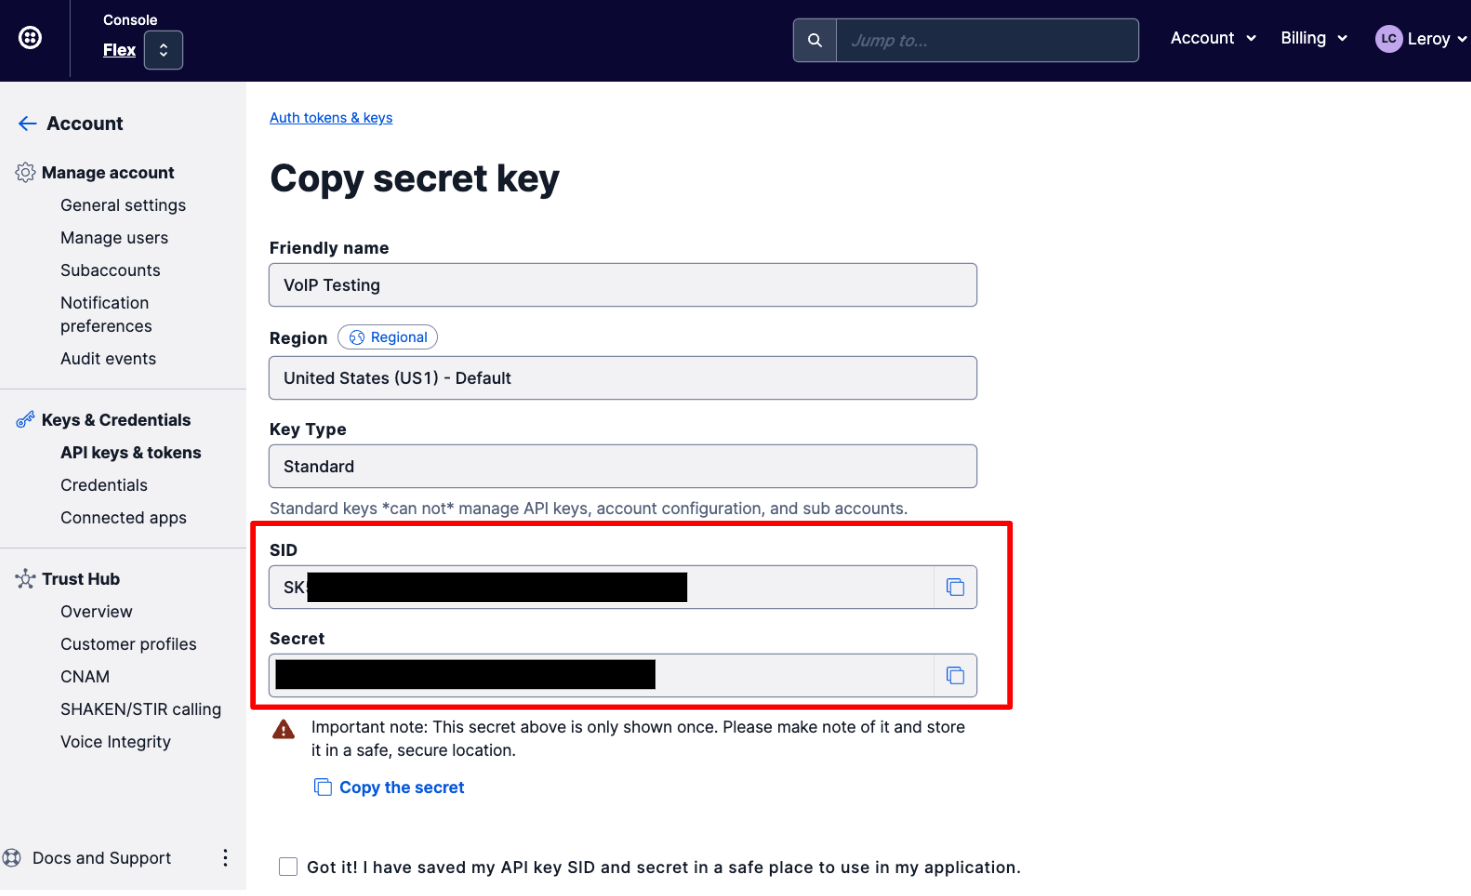
Step 1: Create a Twilio API Key and Secret
- Login to Twilio Console and copy down your Account SID.
- Next, on the top right, select Account followed by API keys & tokens. Click on Create API key.
- Enter
Flex - VoIPfor the Friendly name and leave everything as default.
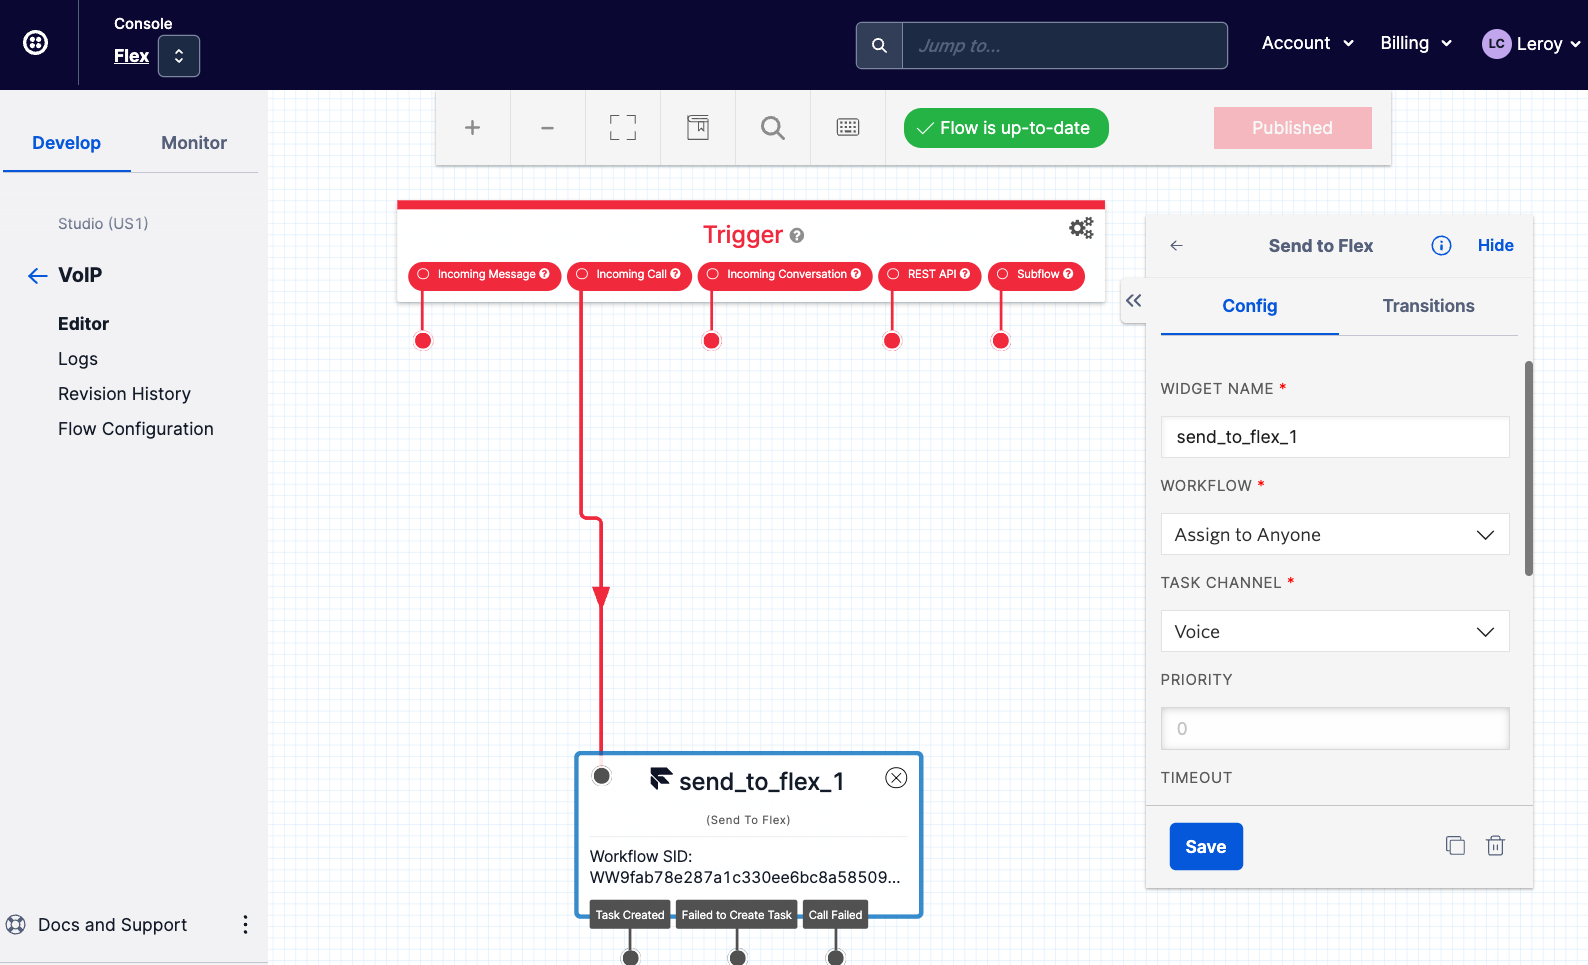
Step 2: Create a Studio Workflow
- Within Twilio Console and under Studio, create a new Studio Flow.
- Still within the Studio Flow, drag-and-drop the Send to Flex widget and configure the Workflow and Task Channel accordingly. For Task Channel, please choose Voice.
- Once created, connect the Incoming Call trigger to the Send to Flex widget and click Publish.
The Studio Flow should be configured similar to the screenshot below:
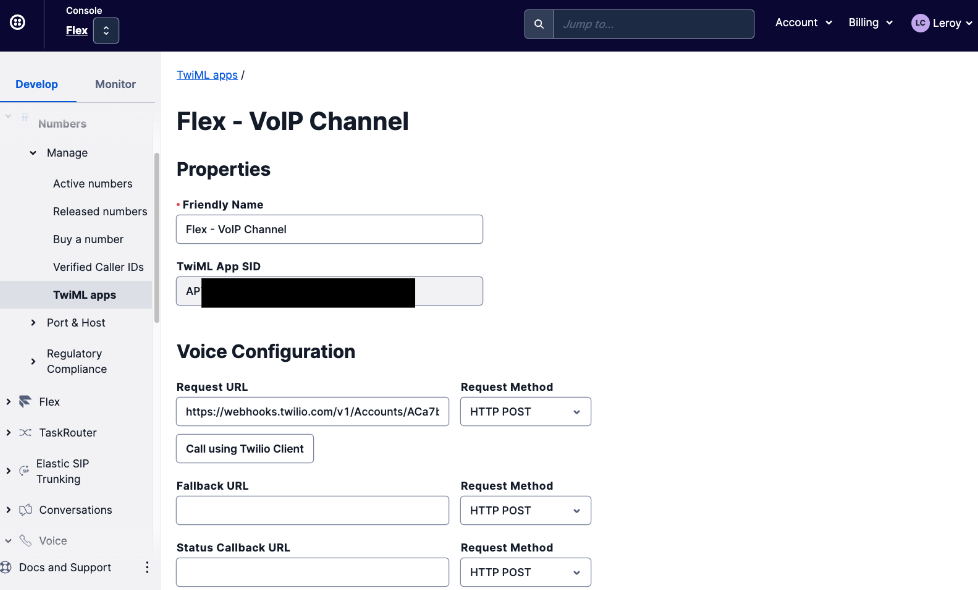
Step 3: Create a TwilML app
- Within Twilio Console and under Voice, select TwiML Apps which is under the Manage section.
- Click on Create new TwiML App.
Fill up the following:
- Friendly name:
Flex - VoIP Channel - Under Voice Configuration - Request URL:
https://webhooks.twilio.com/v1/Accounts/{{ACCOUNT_SID}}/Flows/{{FWxxxxxx}}. Replace{{ACCOUNT_SID}}with your Flex Account SID (from Step 1) and{{FWxxxx}}with Studio Flow SID (from Step 2)
Leave of the fields rest empty/default.
Step 4: Deploy Sample Web Interface for VoIP-to-Flex Demo
To configure the .env file, ensure that you have obtained the following values before proceeding:
- Twilio API Key (
SKxxxxxx) - from Step 1 - Twilio API Secret - from Step 1
- TwiML App SID (
APxxxxx) - from Step 3
In your terminal, run the following commands:
Configure the .env file using your preferred code editor with all the required values. You can leave ACCOUNT_SID=xxx empty, as it will be populated by default during run time.
Before you deploy, ensure that twilio profiles:list has an active account set.
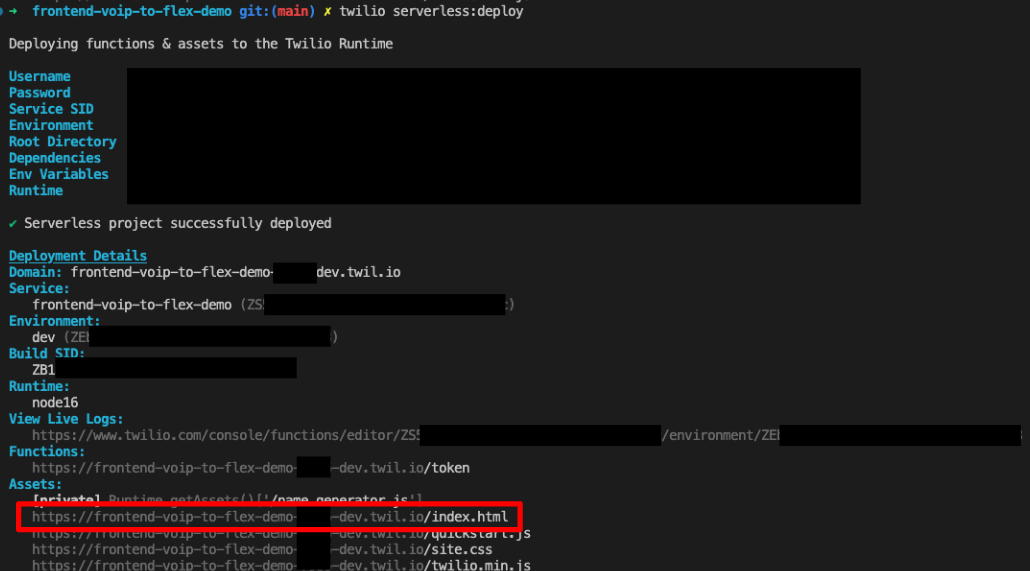
Once configured and ready to deploy it, go back to your terminal and issue the following command:
Once successfully deployed, visit the hosted index.html page to view your sample web interface to call or receive VoIP calls
Step 5: Deploy the Twilio Flex VoIP Plugin
On your terminal, perform the following:
Step 6: Done!
Congratulations, you can now make or receive VoIP calls in Flex! The full source code used in this guide can be found over here.
You are now ready to start testing the VoIP channel integration.
Demo inbound VoIP call into Flex
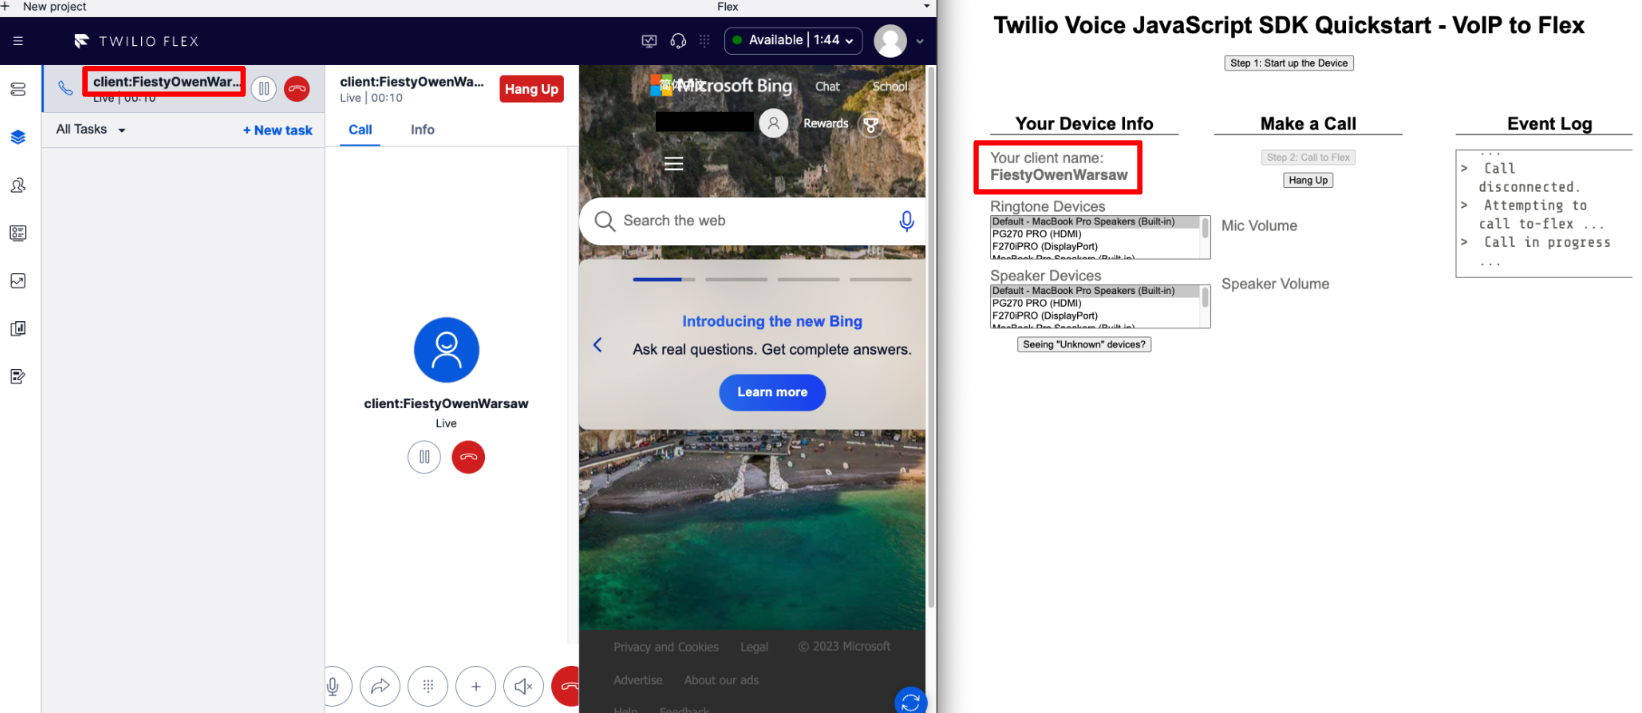
- Login to your Flex agent interface and set yourself to be of an
Availablestatus - On your browser, open the hosted web interface URL (from Step 4)
- Click on the Step 1: Start up the Device button. You should be seeing
Twilio.Device Ready to make and receive calls!under the Event log - Click on Step 2: Call to Flex
- You should be seeing the call coming into Flex !
Demo outbound VoIP call to client
- On your Flex agent interface, click on the dialpad button
- In the phone number field, input
client:<<CLIENT_NAME>>and click call.<<CLIENT_NAME>>can be obtained underYour Device Infoin your sample web interface. - The call should now be coming into your sample web interface
After successfully enabling inbound and outbound VoIP in Flex, you can include additional channels in Flex by referring to other blog posts that provide guidance on integrating Discord and Telegram.
Leroy is a seasoned solution architect with a knack for designing scalable architectures on the cloud. He is currently part of the Flex Solution Engineering team for APJ, focusing on driving joint Go-to-Market motions with partners. Leroy can be reached at lechan [at] twilio.com.
Related Resources
Twilio Docs
From APIs to SDKs to sample apps
API reference documentation, SDKs, helper libraries, quickstarts, and tutorials for your language and platform.
Resource Center
The latest ebooks, industry reports, and webinars
Learn from customer engagement experts to improve your own communication.
Ahoy
Twilio's developer community hub
Best practices, code samples, and inspiration to build communications and digital engagement experiences.