Quickly Enable Your Employees to Work from Home Using Twilio Programmable Voice
Time to read: 9 minutes
October 05, 2021
Written by
Reviewed by

If your PBX solution does not natively allow for remote working and you need to act fast, this solution is for you. This tutorial shows you how to create a solution with Twilio Programmable Voice and a SIP softphone software or an SIP IP Phone that enables employees to work from their homes.
Configure the Programmable Voice SIP Endpoint
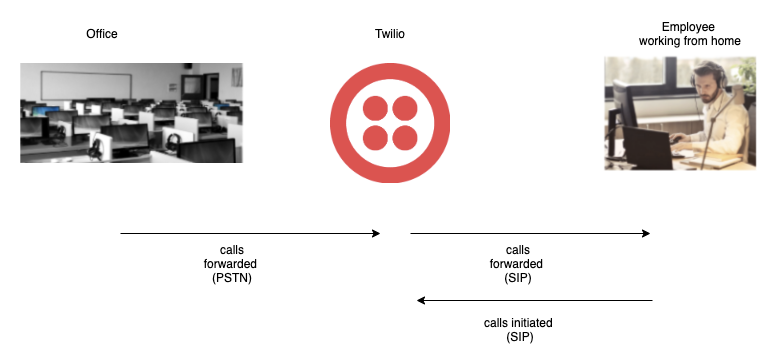
You can forward incoming calls to Twilio numbers registered to SIP endpoints, and use a free softphone as an endpoint while working from home, as shown below:
To get started with the project you will need the following:
- A Twilio account. Sign up for a free trial account and get a $10 credit.
- A call-enabled Twilio Phone Number.
- SIP endpoint (IP Phones (e.g. Obihai) or Softphones (e.g. Zoiper or X-Lite)).
Create the application
Go to twilio.com and sign up for a free account or log in to your existing account.
If you don't currently own a Twilio phone number with Voice functionality, you'll need to purchase one. Navigate to the Buy a Number page, choose the prefix you want to use under the “Search criteria” - “Search by digits or phrases” and click "Search."
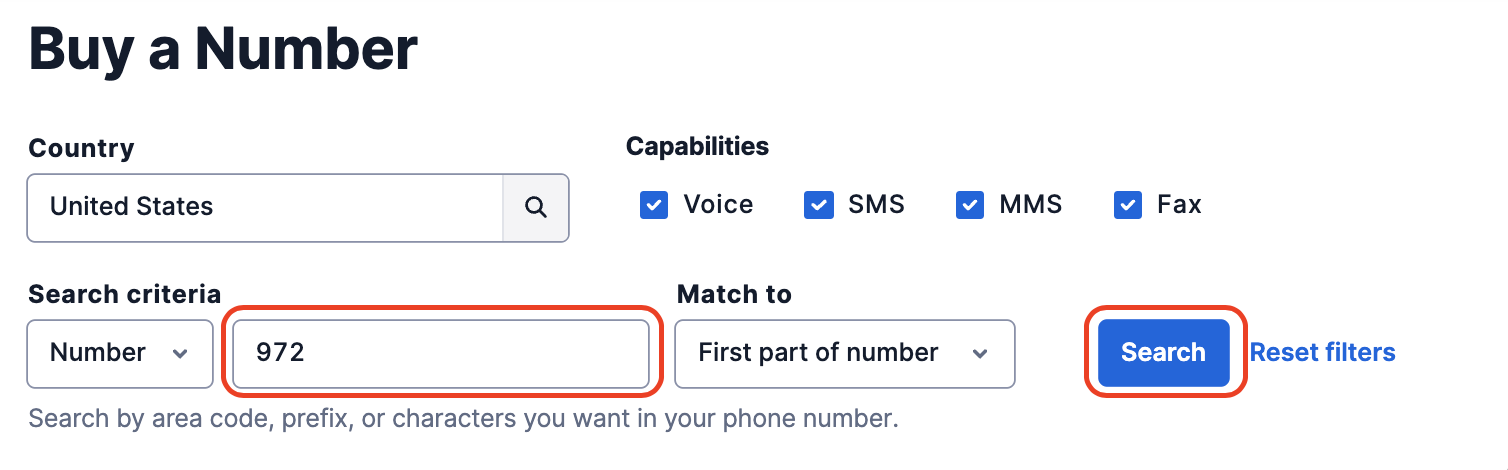
You’ll then see a list of available phone numbers and their capabilities. Find a number that you like and click "Buy" to add it to your account.

In this solution, we will need to buy a unique number for each employee you want to forward calls to. The employee can place and receive calls on this new Twilio number and also configure his/her office number to be forwarded to this new Twilio number.
TwiML Bins are a simple serverless solution that help you provide Twilio-hosted instructions to your Twilio applications. You can use Twilio Functions for this as it is outlined on this nice blog post, but in this case we want to keep things very simple to be implemented. In order to use TwiML bins for inbound and outbound calls, we must choose the same number we bought as a SIP domain user name (e.g. 19727872680@twiliosipblog.sip.twilio.com).
The next step is to create a TwiML bin to allow the remote worker to place outbound calls.
Go to TwiML Bins on Console:
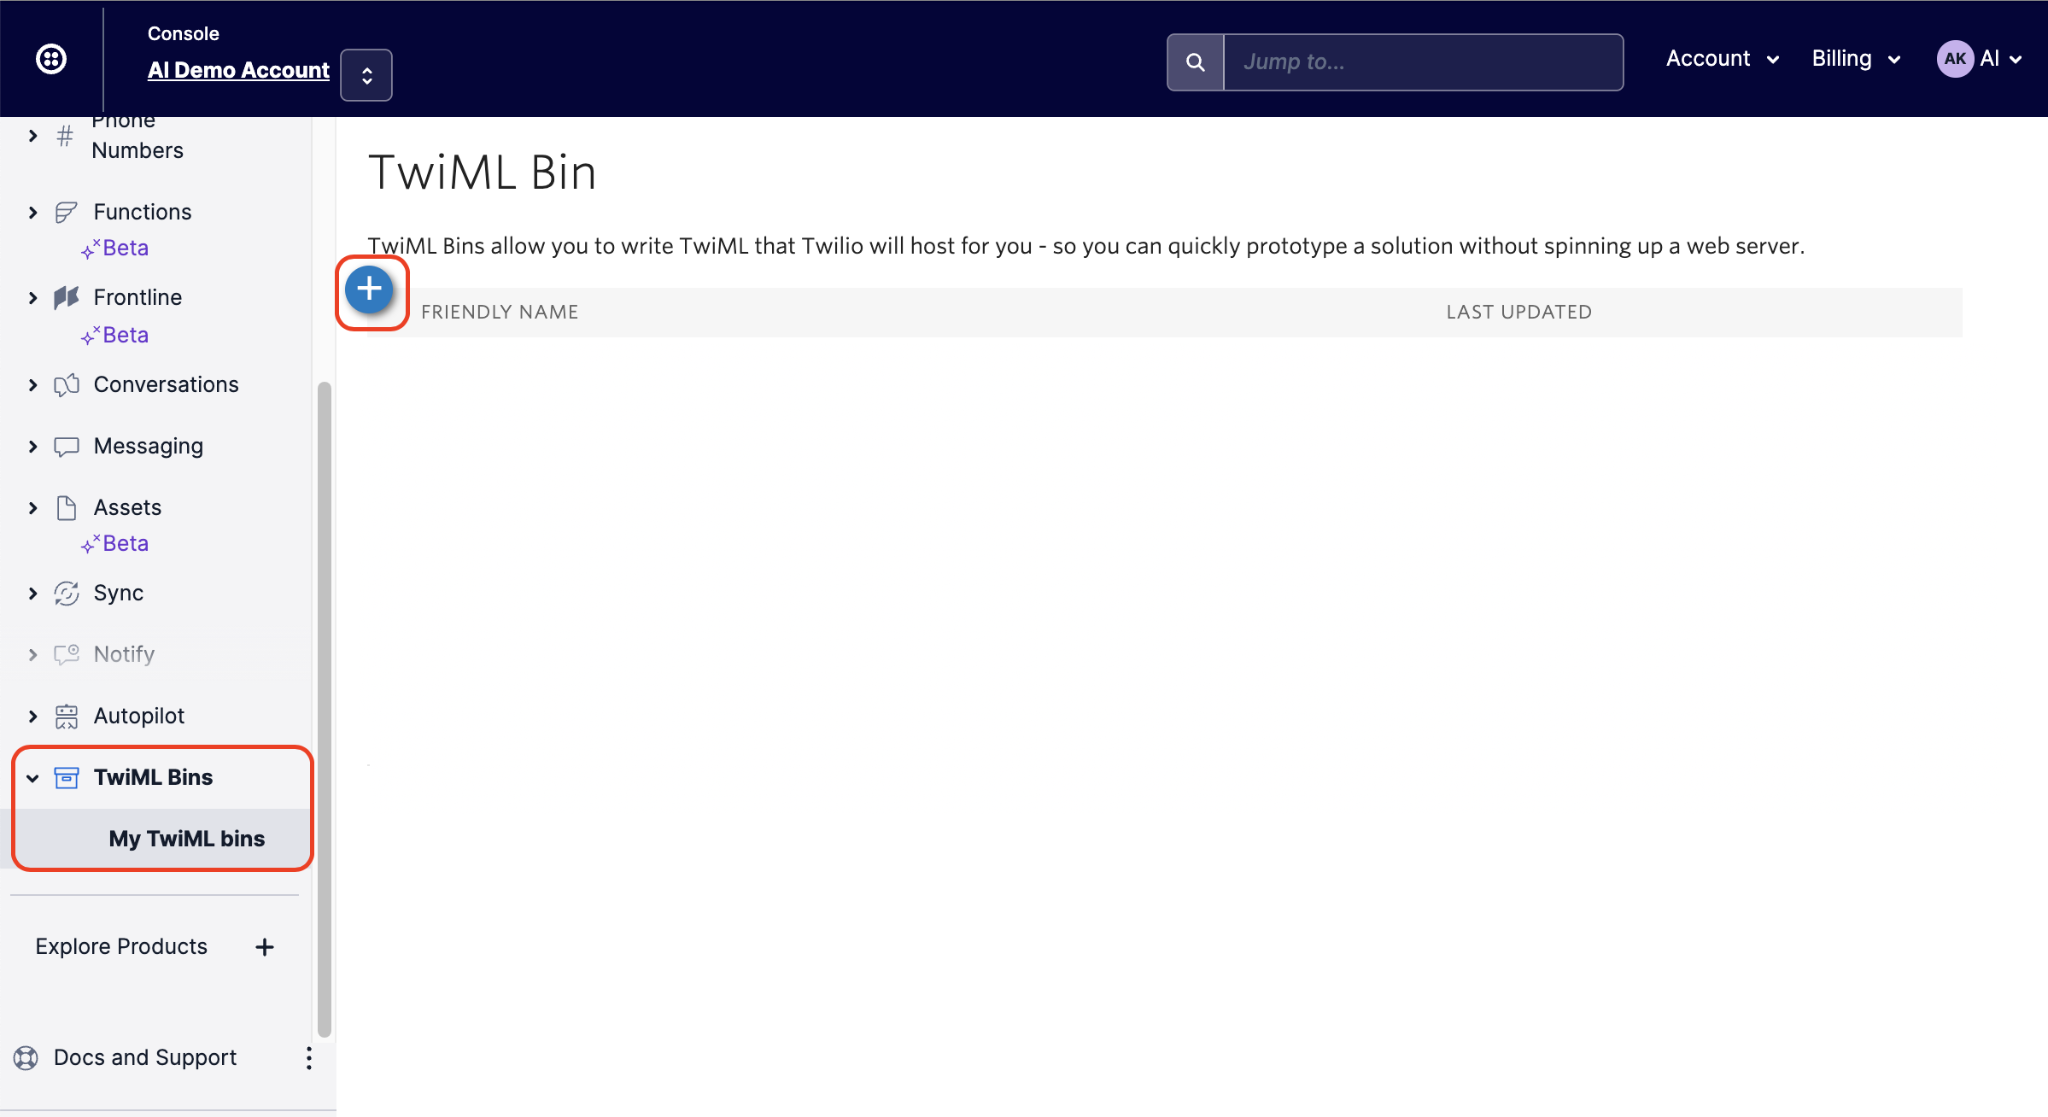
Select the “+” and create a TwiML bin for our outbound calls.
TwiML Bins have some built in mustache templates, such as {{To}}, {{From}}, {{#e164}} and others. You can find out more in our post, How to use templates with TwiML Bins.
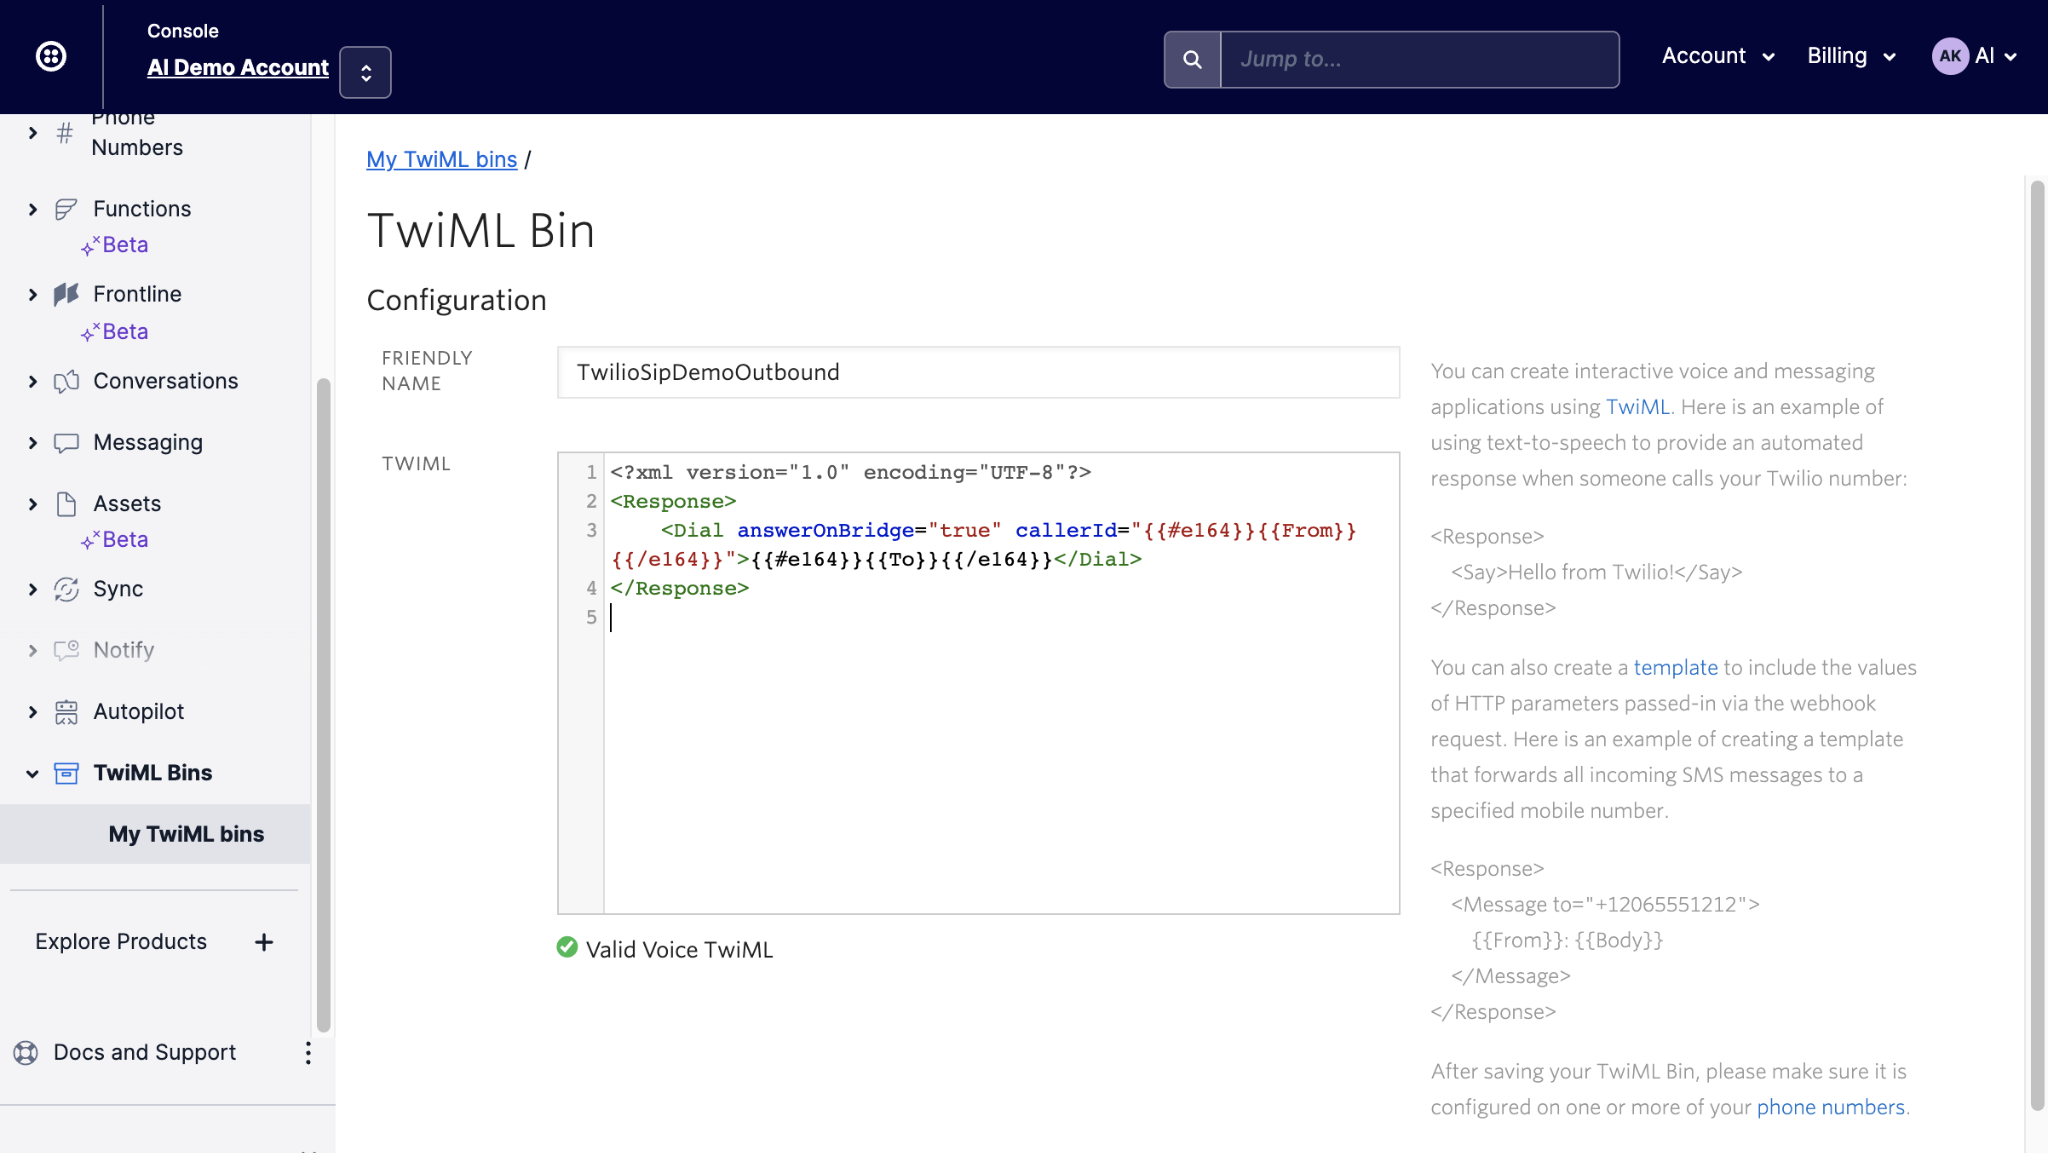
Give the TwiML Bin a friendly name like ‘TwilioSipDemoOutbound’. Paste in the TwiML below (replacing the existing content):
At the bottom of the edit box, it should say: ‘Valid Voice TwiML’ if everything went well. Click the ‘Create’ Button.
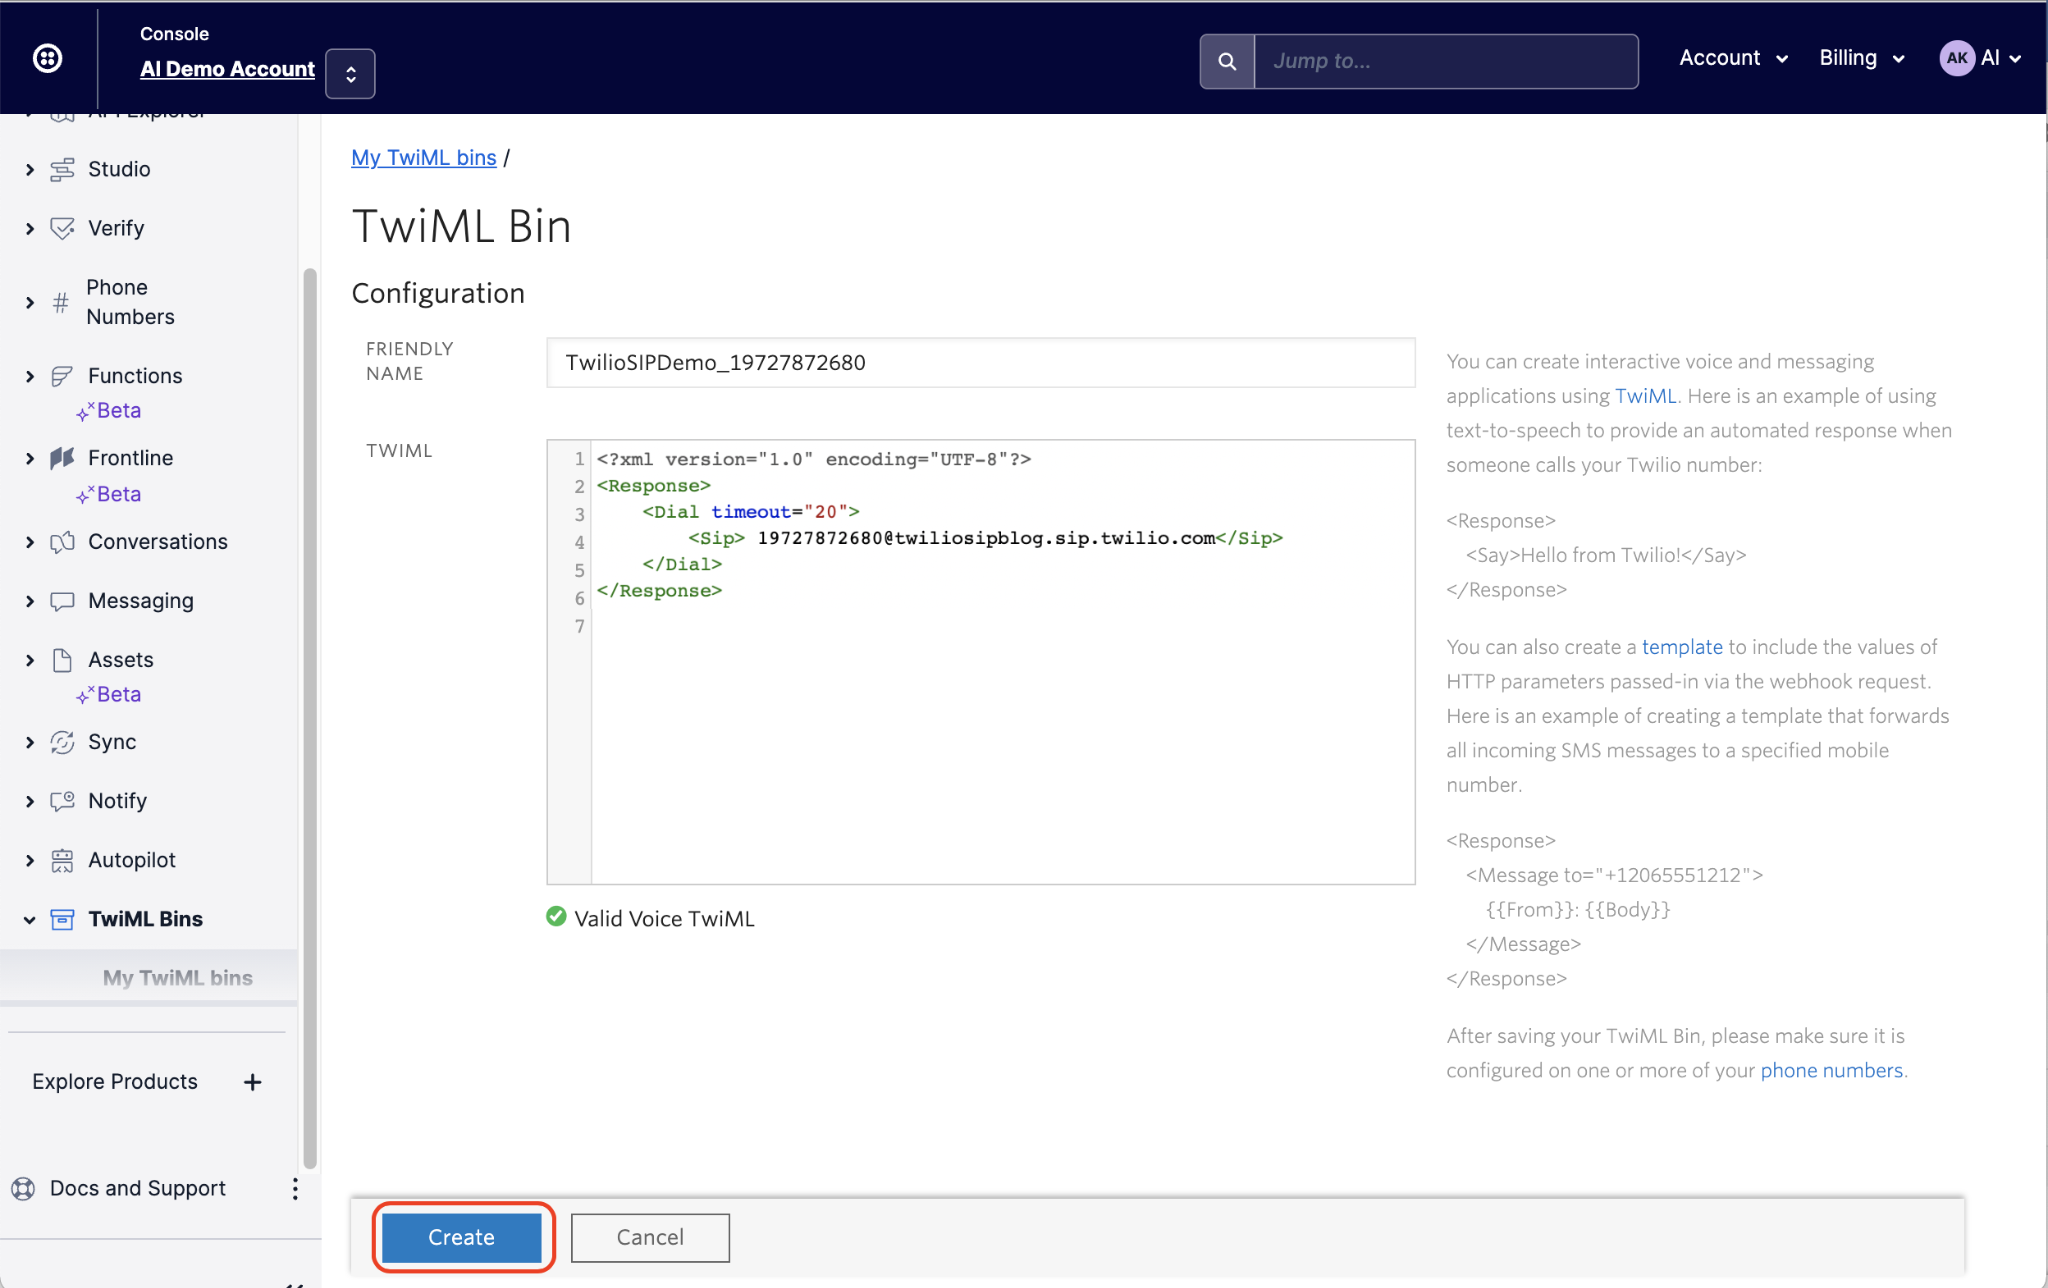
Go back to the TwiML Bin page and click on the “+” again. Give the TwiML Bin a friendly name like ‘TwilioSIPDemo_your number’, in this example we used ‘TwilioSIPDemo_19727872680’.
Paste in the TwiML below (replacing the existing content):
In our example we used:
At the bottom of the edit box, it should say: ‘Valid Voice TwiML’ if everything went well. Click the ‘Create’ Button.
Associate the TwiML bin to the number you purchased. Go to your Active Numbers and under the Voice & Fax, “A CALL COMES IN”, select the TwiML bin we just created:
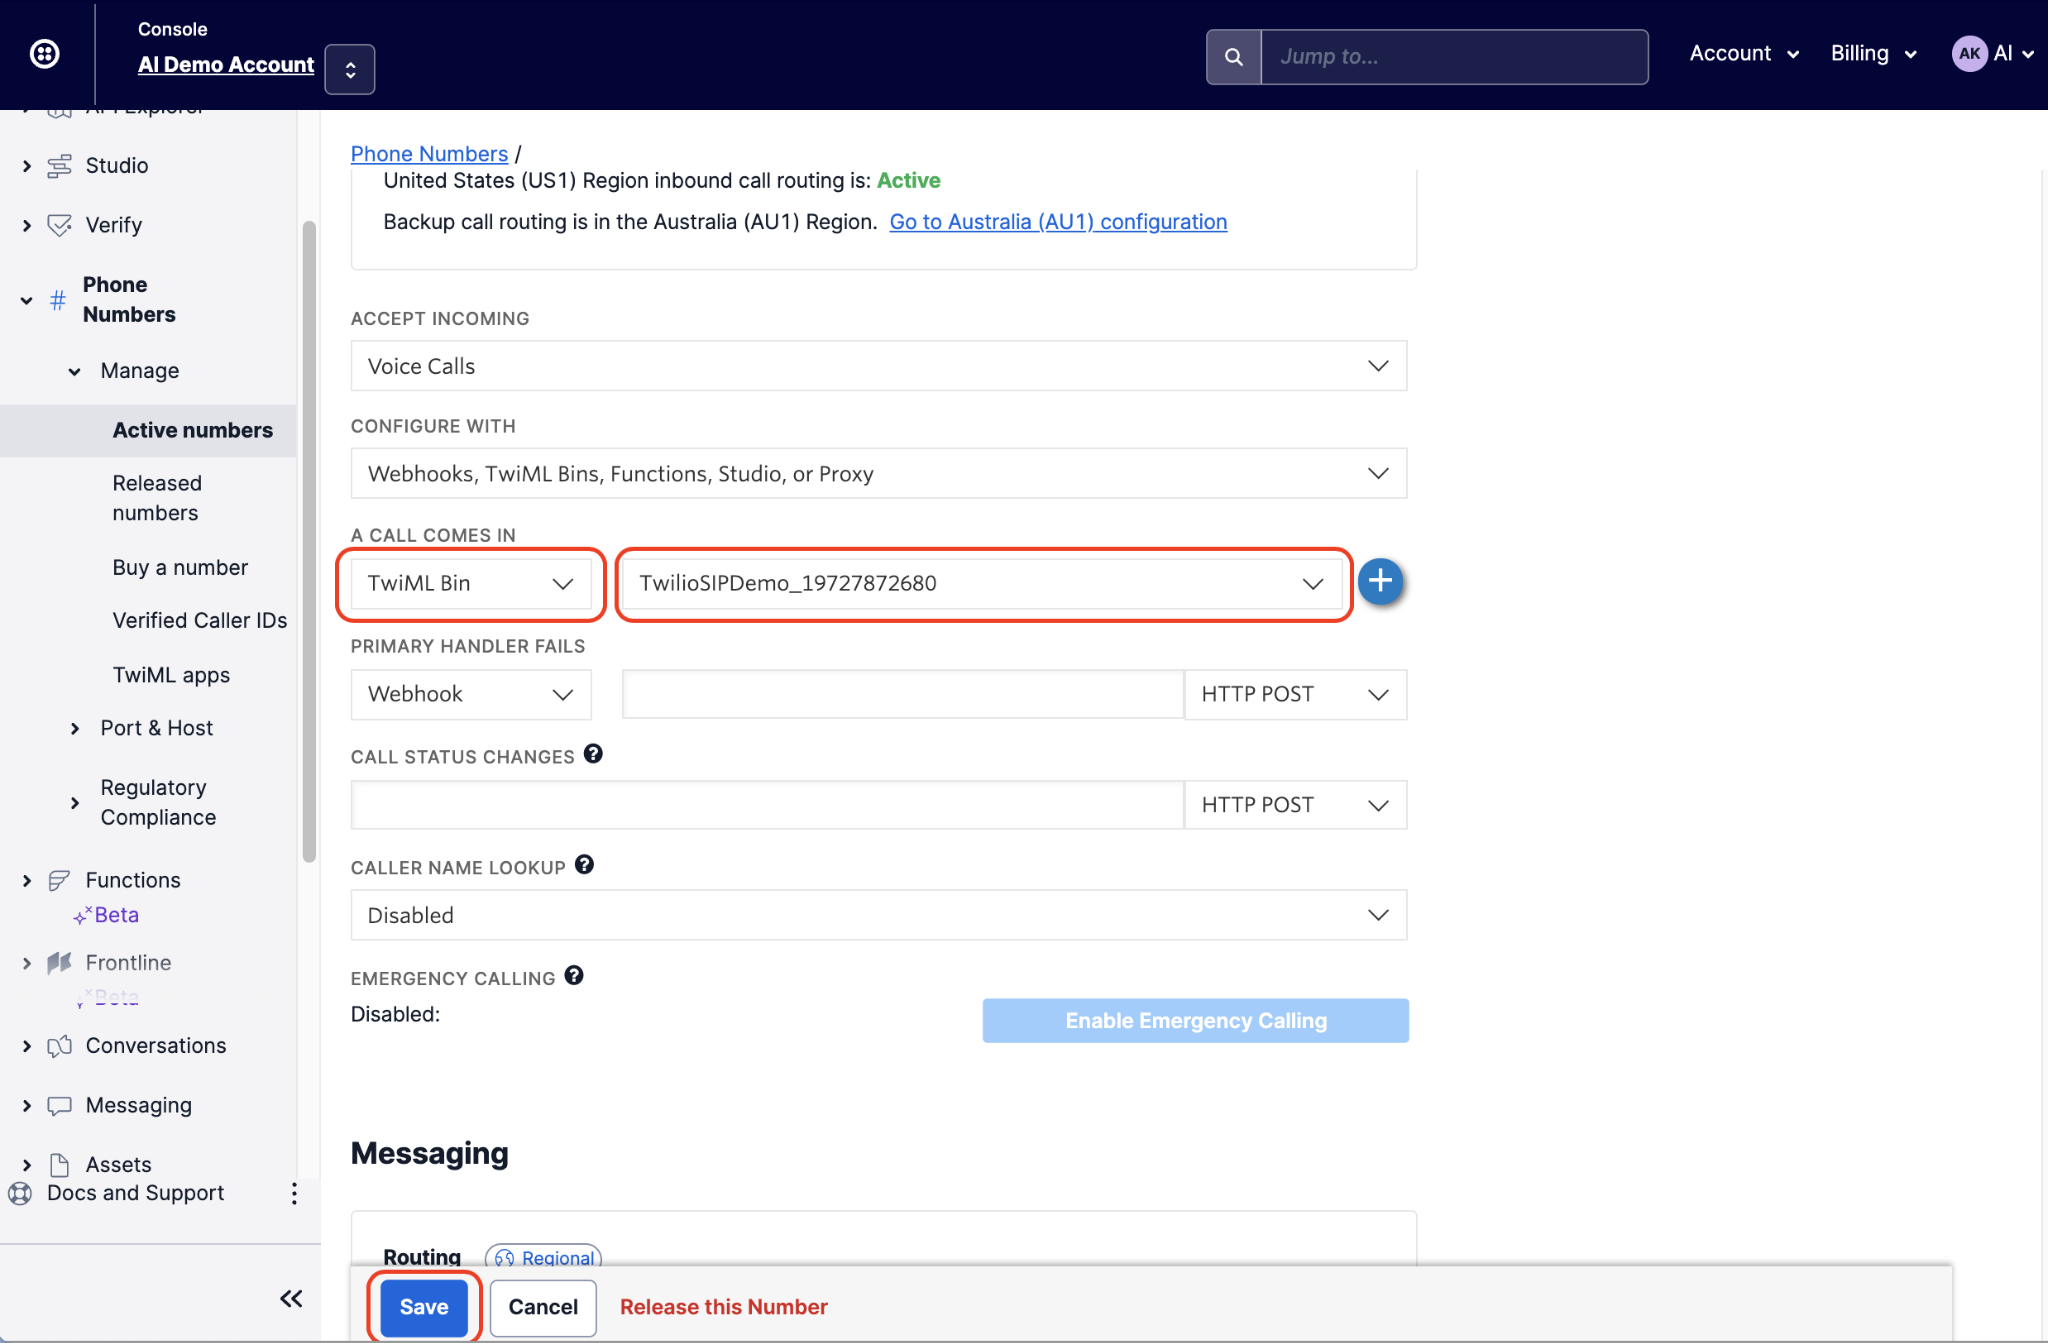
Click the blue "Save" button.
For each employee, you will need to create separate TwiML bins for inbound calls (PSTN to SIP) and associate them with their Twilio numbers.
The next step is to create a SIP domain for your account. A SIP Domain resource describes a custom DNS hostname that can accept SIP traffic for your account.
Think about this as your address for calls to reach you on the public telephone network. In VoIP (voice over IP), a SIP URI serves as your global unique address, similar to a phone number in the PSTN (public switched telephone network). We will need this to configure the softphones to register to your Twilio account.
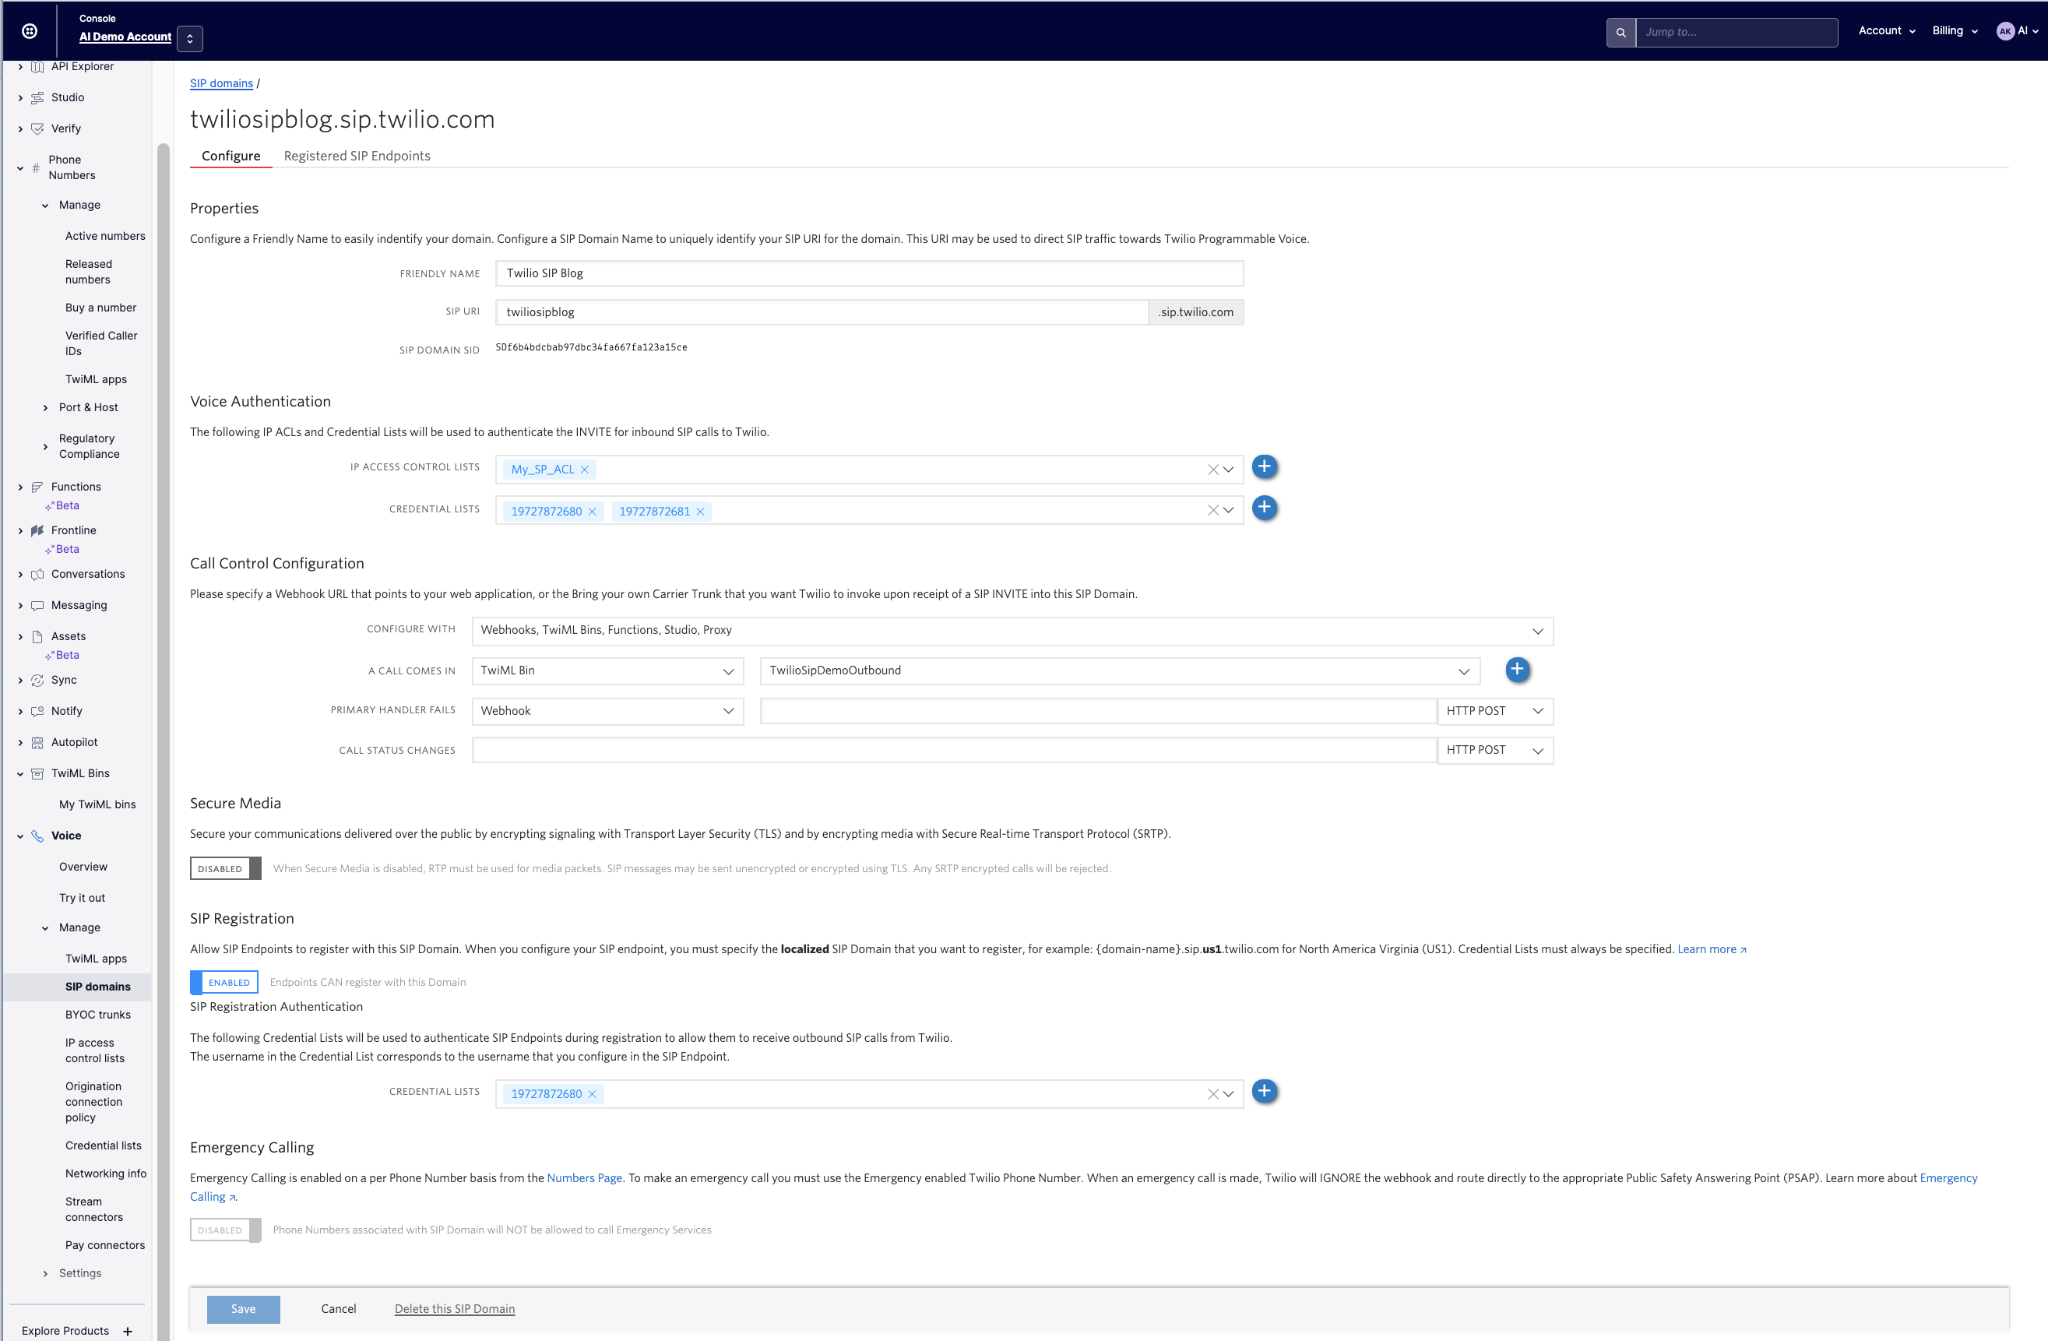
Go to the Voice SIP Domains. In this example, we will create the domain twiliosipblog.sip.twilio.com – you will need to specify the “twiliosipblog” this way. You should see a screen like this one:
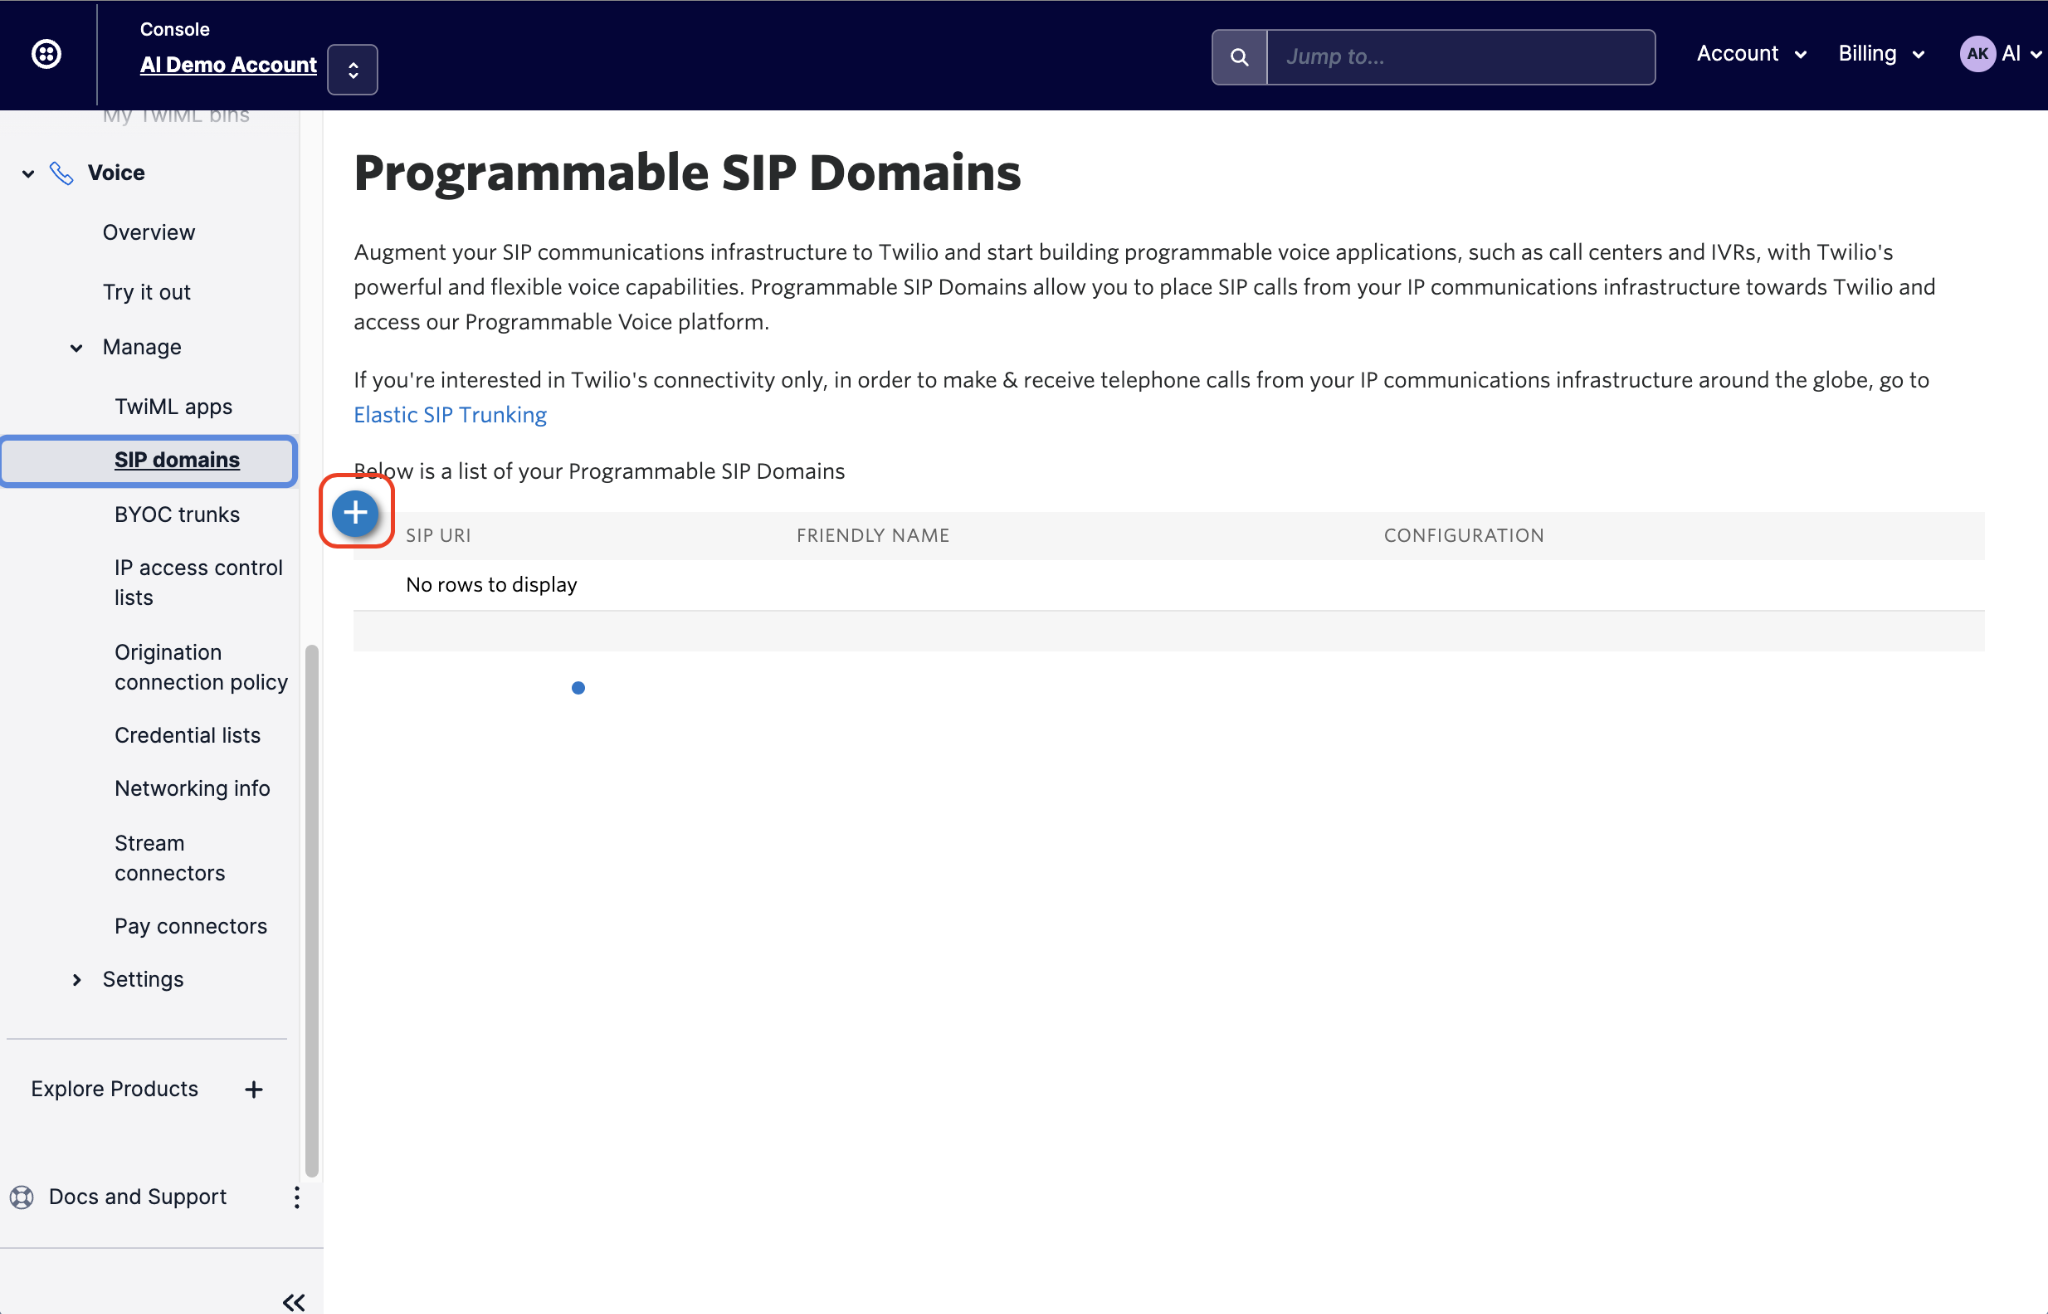
Select the “+”.
Under Properties - type a FRIENDLY NAME - in our case we used “Twilio SIP Blog”
For the SIP URI field - type a unique name for your domain. Check if the domain is available:

For example, "twiliosipblog” was available. This will create the SIP Domain twiliosipblog.sip.twilio.com.
Under Voice Authentication, click on the “+” sign and add an IP ACCESS CONTROL LIST. This is optional, but it is recommended for extra security.
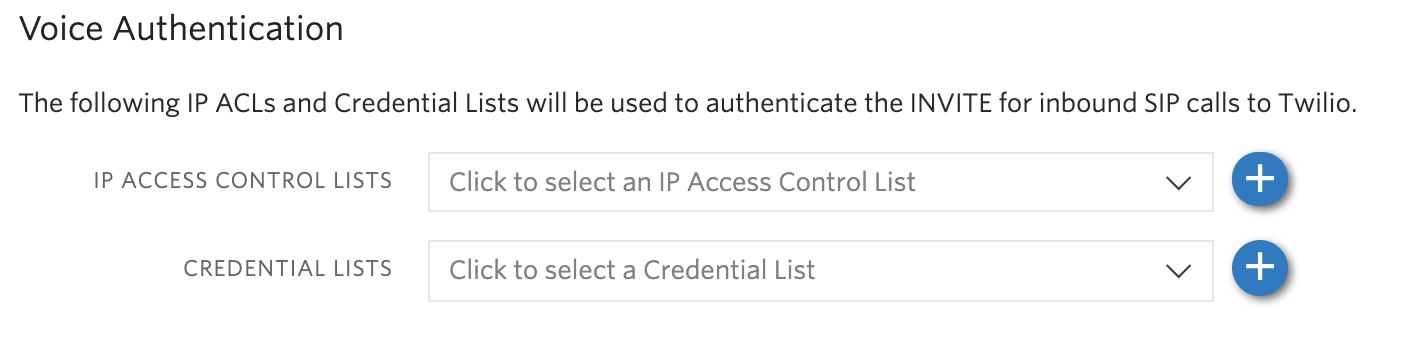
Create a new Access Control List which contains a list of IP Addresses resources that can access your SIP Domain. Requests to your SIP Domain from an IP address that is not in the ACL will be blocked.
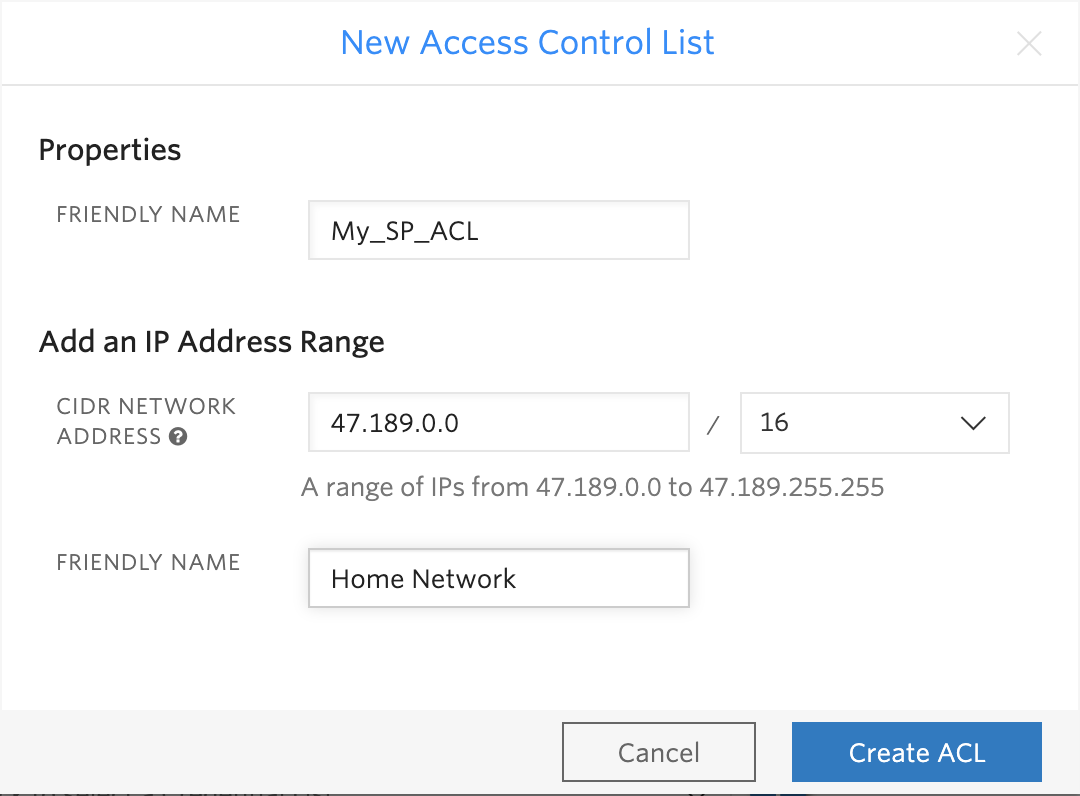
The “CIDR NETWORK ADDRESS” is the IP address range of your SIP clients.
Check with your employees which IP addresses their Service Provider assigned to them (e.g., 47.189.34.10/32). For each employee, you will need to add their IP addresses to this Access List. In this example, we chose to open access to a large block of IP addresses (for testing purposes - you can narrow down to unique /32 IP addresses later using the call logs and the IP addresses of the clients).
Click on the “+” for CREDENTIAL LIST. Create a new SIP Credential List resource, which contains the credentials of the employees who are allowed to reach your SIP Domain. Twilio will only allow traffic from employees who have their credentials in the credential list.
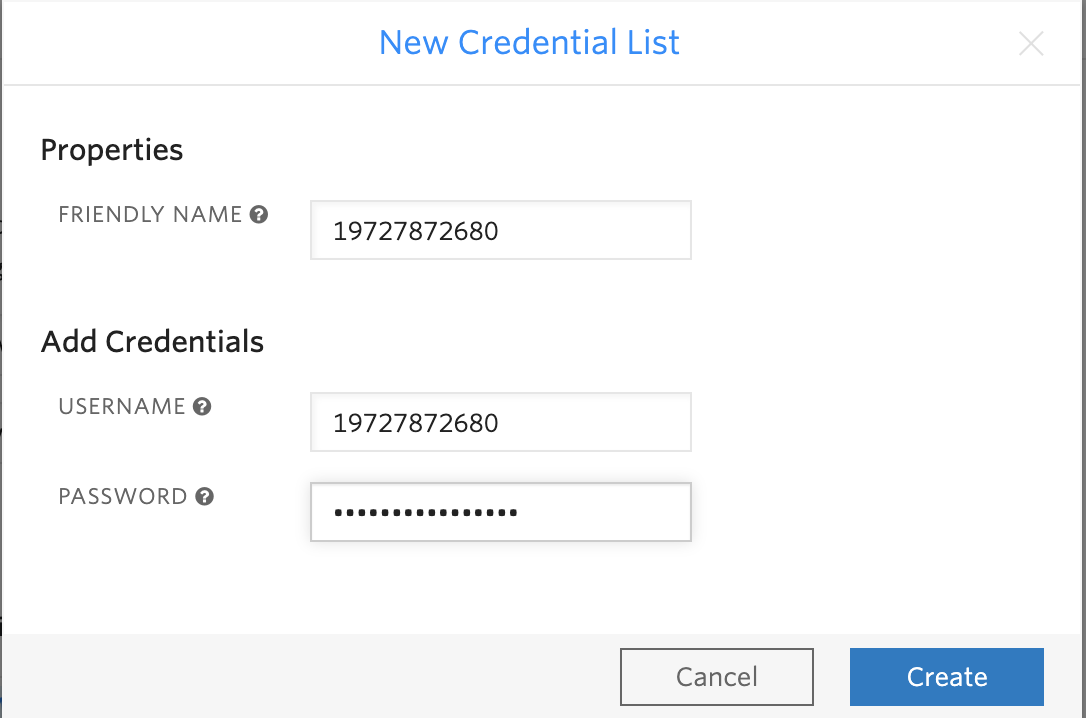
In this example, we used the username "19727872680" and password "Twiliosipdemo123".

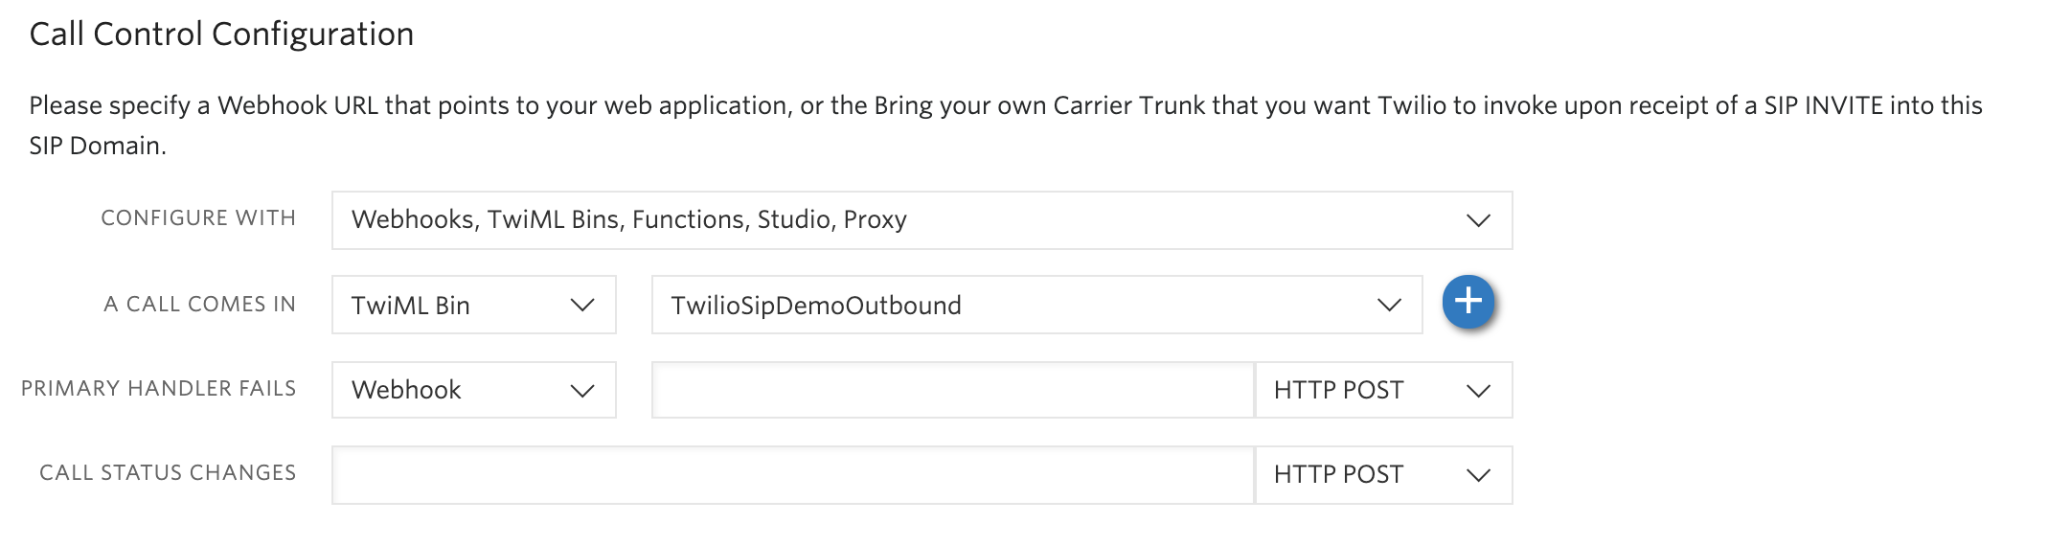
Under Call Control Configuration, select for “A CALL COMES IN” => “TwiML BIN” and then the TwiML Bin we configured for outbound calls “TwilioSIPDemoOutbound”.
For each employee, you will need to create separate usernames and passwords. And add to the CREDENTIAL LISTS. For example:
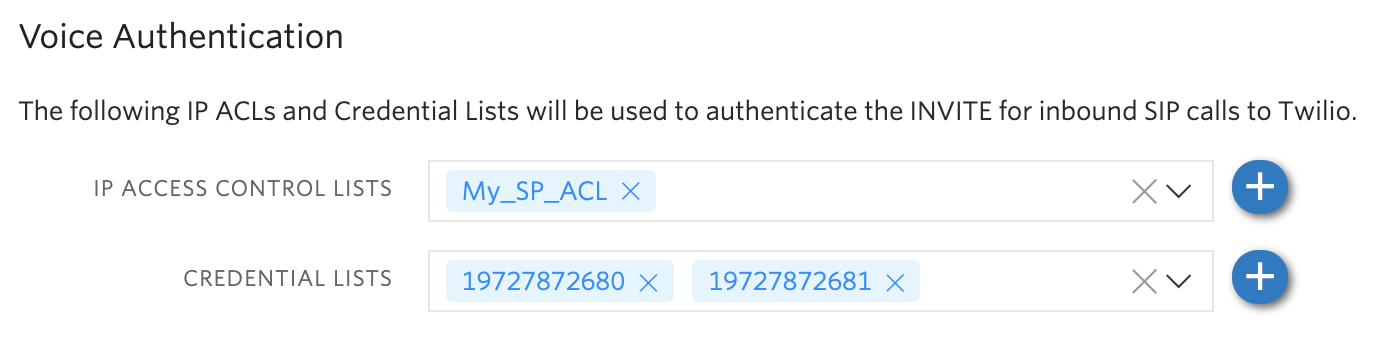
Under SIP REGISTRATION, make sure you turn SIP Registration to ENABLED and add your Credential Lists as well.

Hit the “Save” button.
Your new SIP DOMAIN should look like this:
Connect a softphone to our Twilio SIP endpoint
Next, we need to configure your SIP endpoint. This can vary depending on which end point you chose. There are many options available, softphones or IP phones. We’ll cover an example of a softphone in this section, and then an IP phone in the next section.
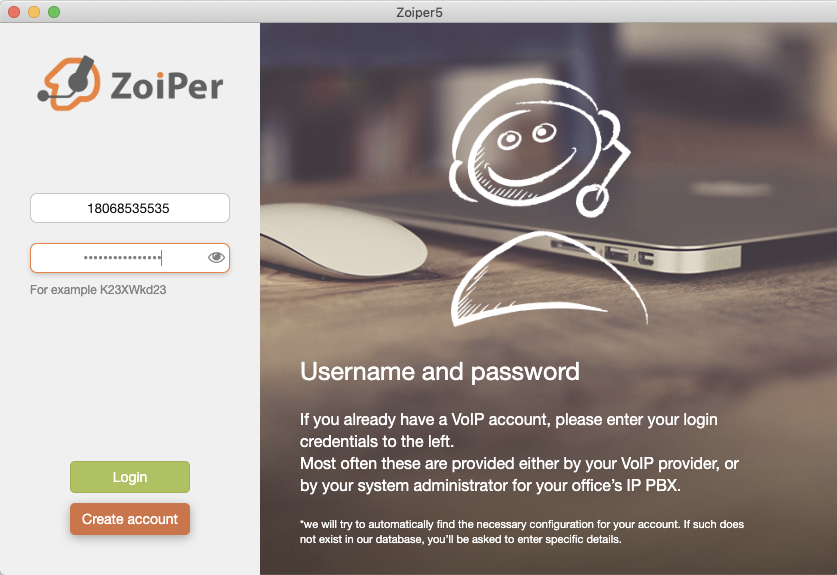
A softphone is an application that runs installed on a computer or and uses the internet to make calls. In this tutorial, we are using Zoiper’s softphone, which you can download here, but this configuration should work with any softphone of your choice.
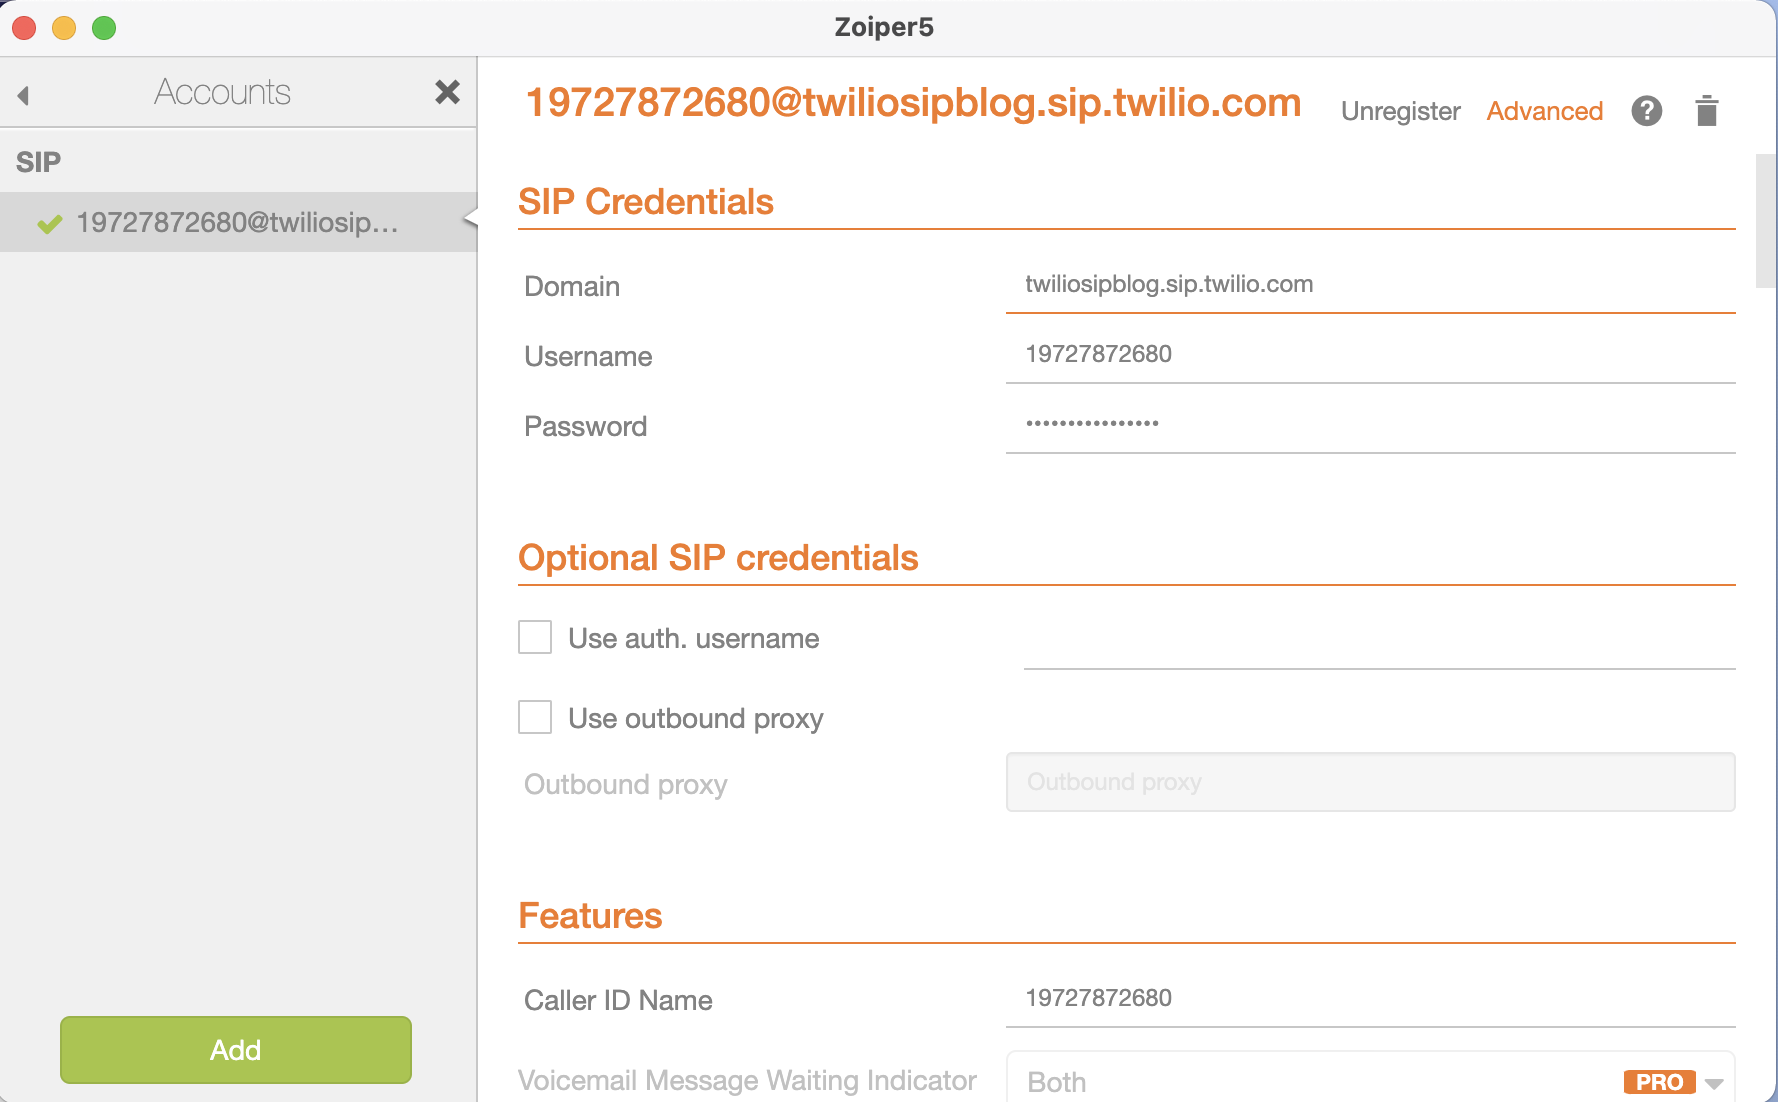
Download the Zoiper’s softphone, install and you will be prompted to add a username and password. This is the same username and password we used in your Twilio Credential Lists (username: 19727872680 / password: Twiliosipdemo123).
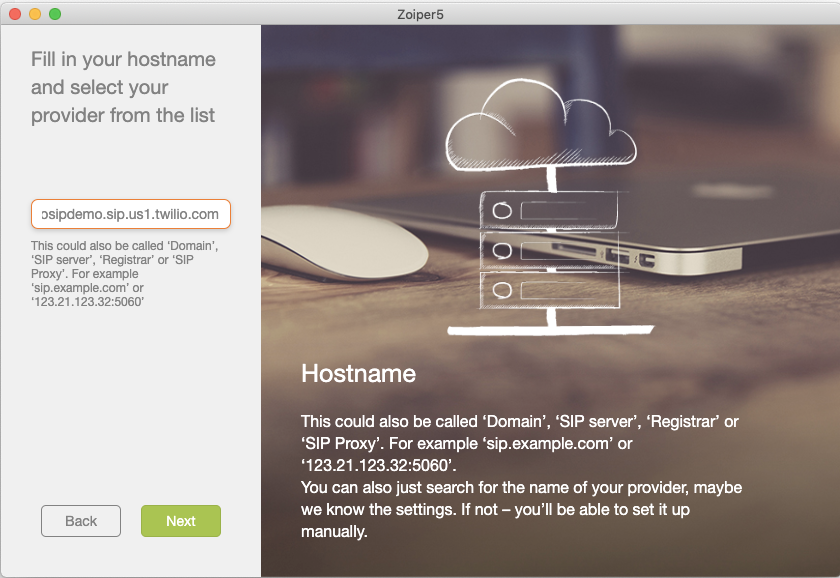
Hit “Login” instead of “Create account”. On the hostname, copy and paste the SIP Domain we just created: twiliosipblog.sip.twilio.com
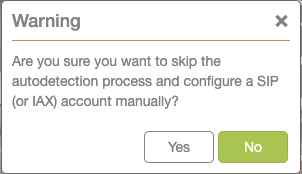
Hit “Next” and “Skip” on the next screen, then “Yes” on the warning.
Select “configure” and test your audio and microphone. On the configuration for the SIP account, select “Advanced” to see the “Caller ID Name” field. Enter the Twilio number for that user. In our example it is “19727872680”.
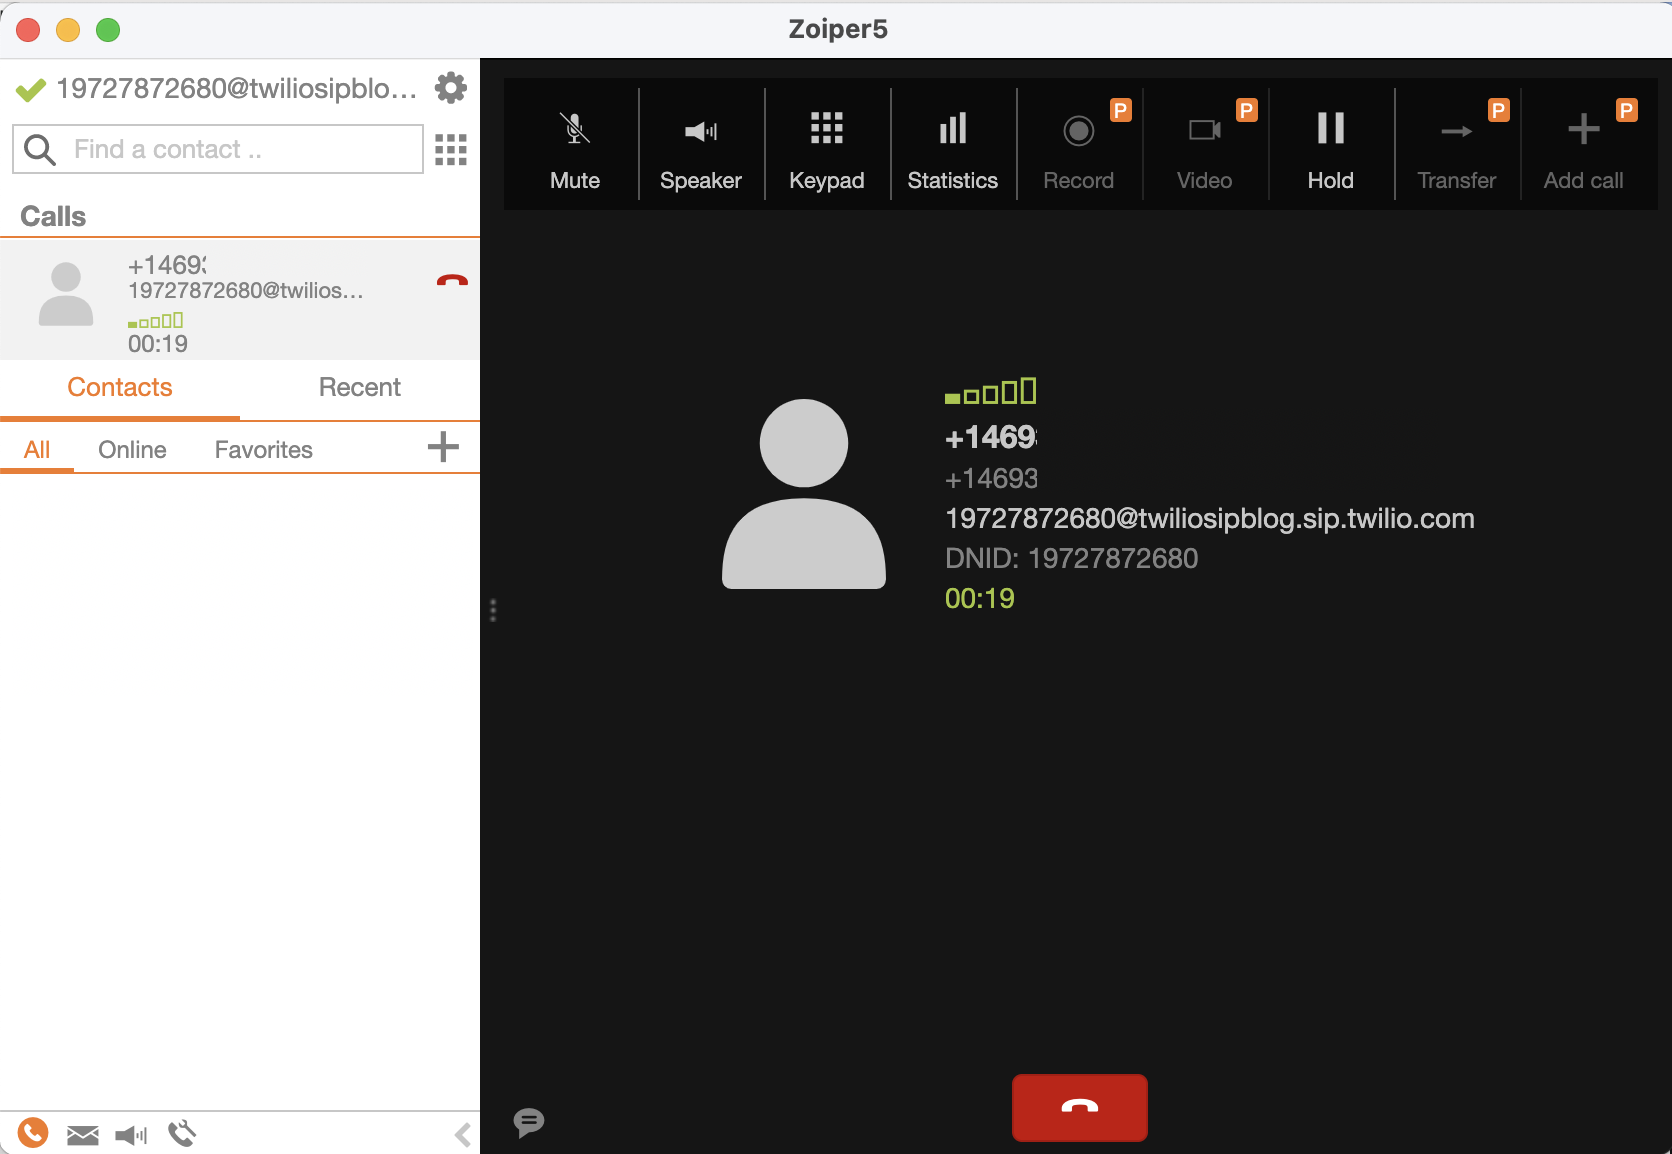
You should see your client registered correctly like this:
In case you do not see the green checkmark by your account, follow these troubleshooting steps:
First, check connectivity to the internet, for example:
Make sure to double check the SIP domain, username and password. You should also reset the application or try a different softphone application such as X-Lite.
For each employee, they will need to install the client and configure their unique username/passwords (e.g. employee 1 is 19727872680, employee 2 is 19727872681, …).
We are ready to try and see if it all works. Try calling your Twilio phone number from the PSTN (your cellular or home number). You should hear your SIP enabled softphone ring. Answer, and verify you have two way audio.
In case you do not hear audio on both directions, follow the troubleshooting steps:
- Check if there is a firewall or NAT (Network Address Translation) device - see if it is configured to permit packets to and from your SIP client:
- Signaling IP Ports: 5060 (UDP/TCP), 5061 (TLS)
- Media IP Port Range: 10,000 to 20,000 (UDP)
- Check if your client is using a codec supported by Twilio - G. 711 μ-law (PCMU) and A-law (PCMA)
- Try a different softphone
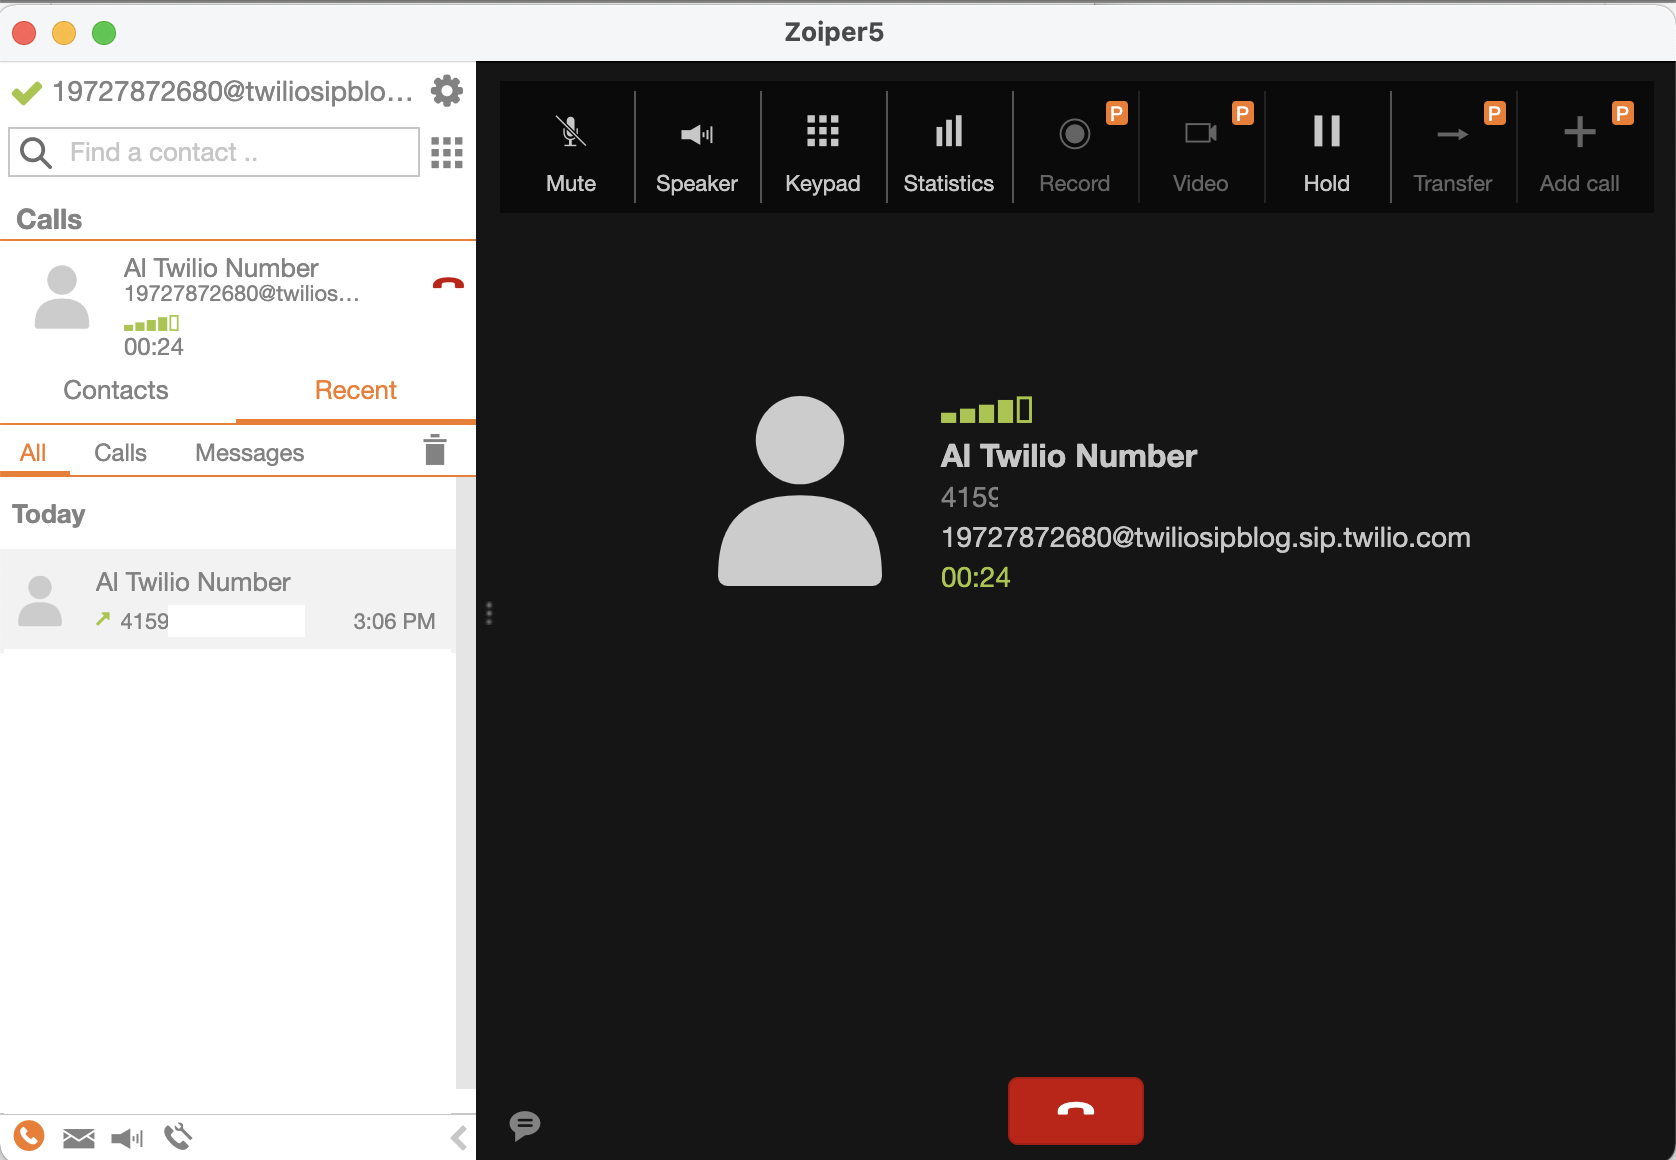
Try calling from your SIP enabled Softphone to the PSTN (your cellular or home number). You should hear the other end ring. Answer, and verify you have two way audio.
In case the call does not complete, follow the troubleshooting steps:
- Go to the debugger - check for the error message.
- If it is a “13214 - Dial: Invalid callerid value” - make sure you have configured the caller id properly on your softphone client. This is a good guide.
Finally, configure your PBX solution to forward the calls to your Twilio phone numbers. Test if a call to the extension defined gets forwarded to the correct Twilio number, and if the right SIP softphone rings, and when answered, audio is good.
We are now all set to work from home!
Connect an IP Phone to our Twilio SIP endpoint
Now that you’ve seen how to connect a softphone to Twilio for both inbound and outbound calls between the softphone and PSTN, let’s dive into how this works with an IP Phone instead of a softphone.
For our example IP Phone, we’re going to use an OBi2162 from OBiTALK, but the setup will be similar with other Obihai IP Phones. As for other IP Phones from different manufacturers (eg. Cisco, Grandstream, etc), each may provide different Bring-Your-Own-Device (ie. BYOD) web-based capabilities for configuring 3rd party VOIP settings, so please follow the manufacturer instructions for the initial setup of the IP Phone itself.
Now, to get started with our OBi2162 IP Phone, the first step is to connect it to the internet. This particular phone is wireless with a touchscreen, so setting up wifi is as simple as any other wireless device these days.
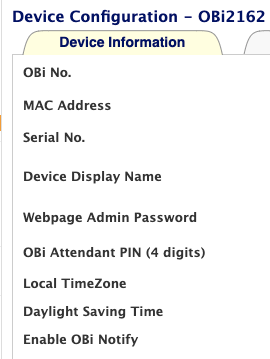
Next, hop onto a web browser and set up an OBiTALK account (unless you already have one). Once you’ve created an account, navigate to the Configuration Dashboard and select your OBi2162 (or specific IP Phone). This will take you to the Device Configuration, where you can read your OBi No., MAC Address and Serial No., and edit the additional settings (eg. Device Display Name).
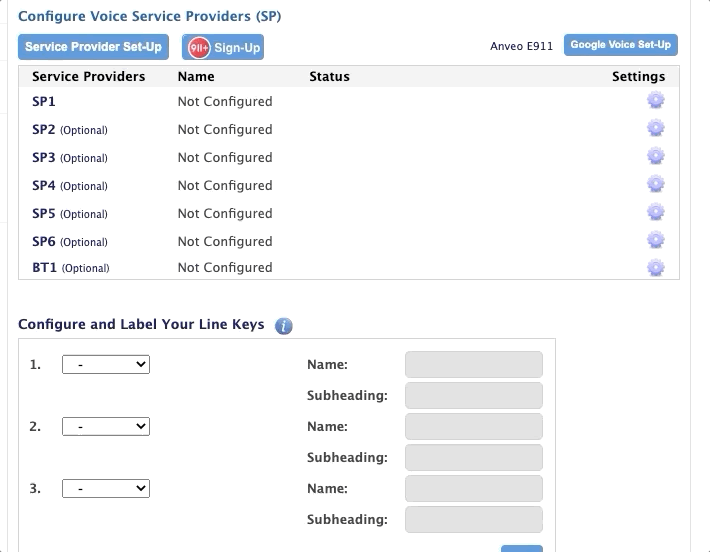
From here, you can begin to configure the IP Phone with Twilio by selecting “Service Provider Set-up” -> OBiTALK Compatible Service Providers -> Twilio. Notice the settings provided to you include a Domain, Username, and Password (there are other settings for more advanced users, but we’ll stick to the basics here)
The Domain will be the same as your Twilio SIP Domain prefix (ie. your SIP URI prefix as configured in the Twilio console), and the Username and Password will be the same as your Credential List for your Twilio SIP Domain.
The Twilio setup from earlier in this post shows you how to configure a SIP Domain and setup TwiML Bins for both inbound and outbound calling, so you can simply pause here, repeat those steps with an available domain name of your choosing, and then finish this Twilio setup from within ObiTALK.
Once you’ve finished the setup within OBiTALK, hit the Submit button (make sure your Obihai IP Phone is connected to the internet during this step). The setup will then asynchronously update your IP Phone over the internet with the Twilio settings, and Register the Twilio SIP Domain with OBiTALK. While this is occurring, you should notice your IP Phone restarting and applying the settings, and when finished, your IP Phone should now be set up!
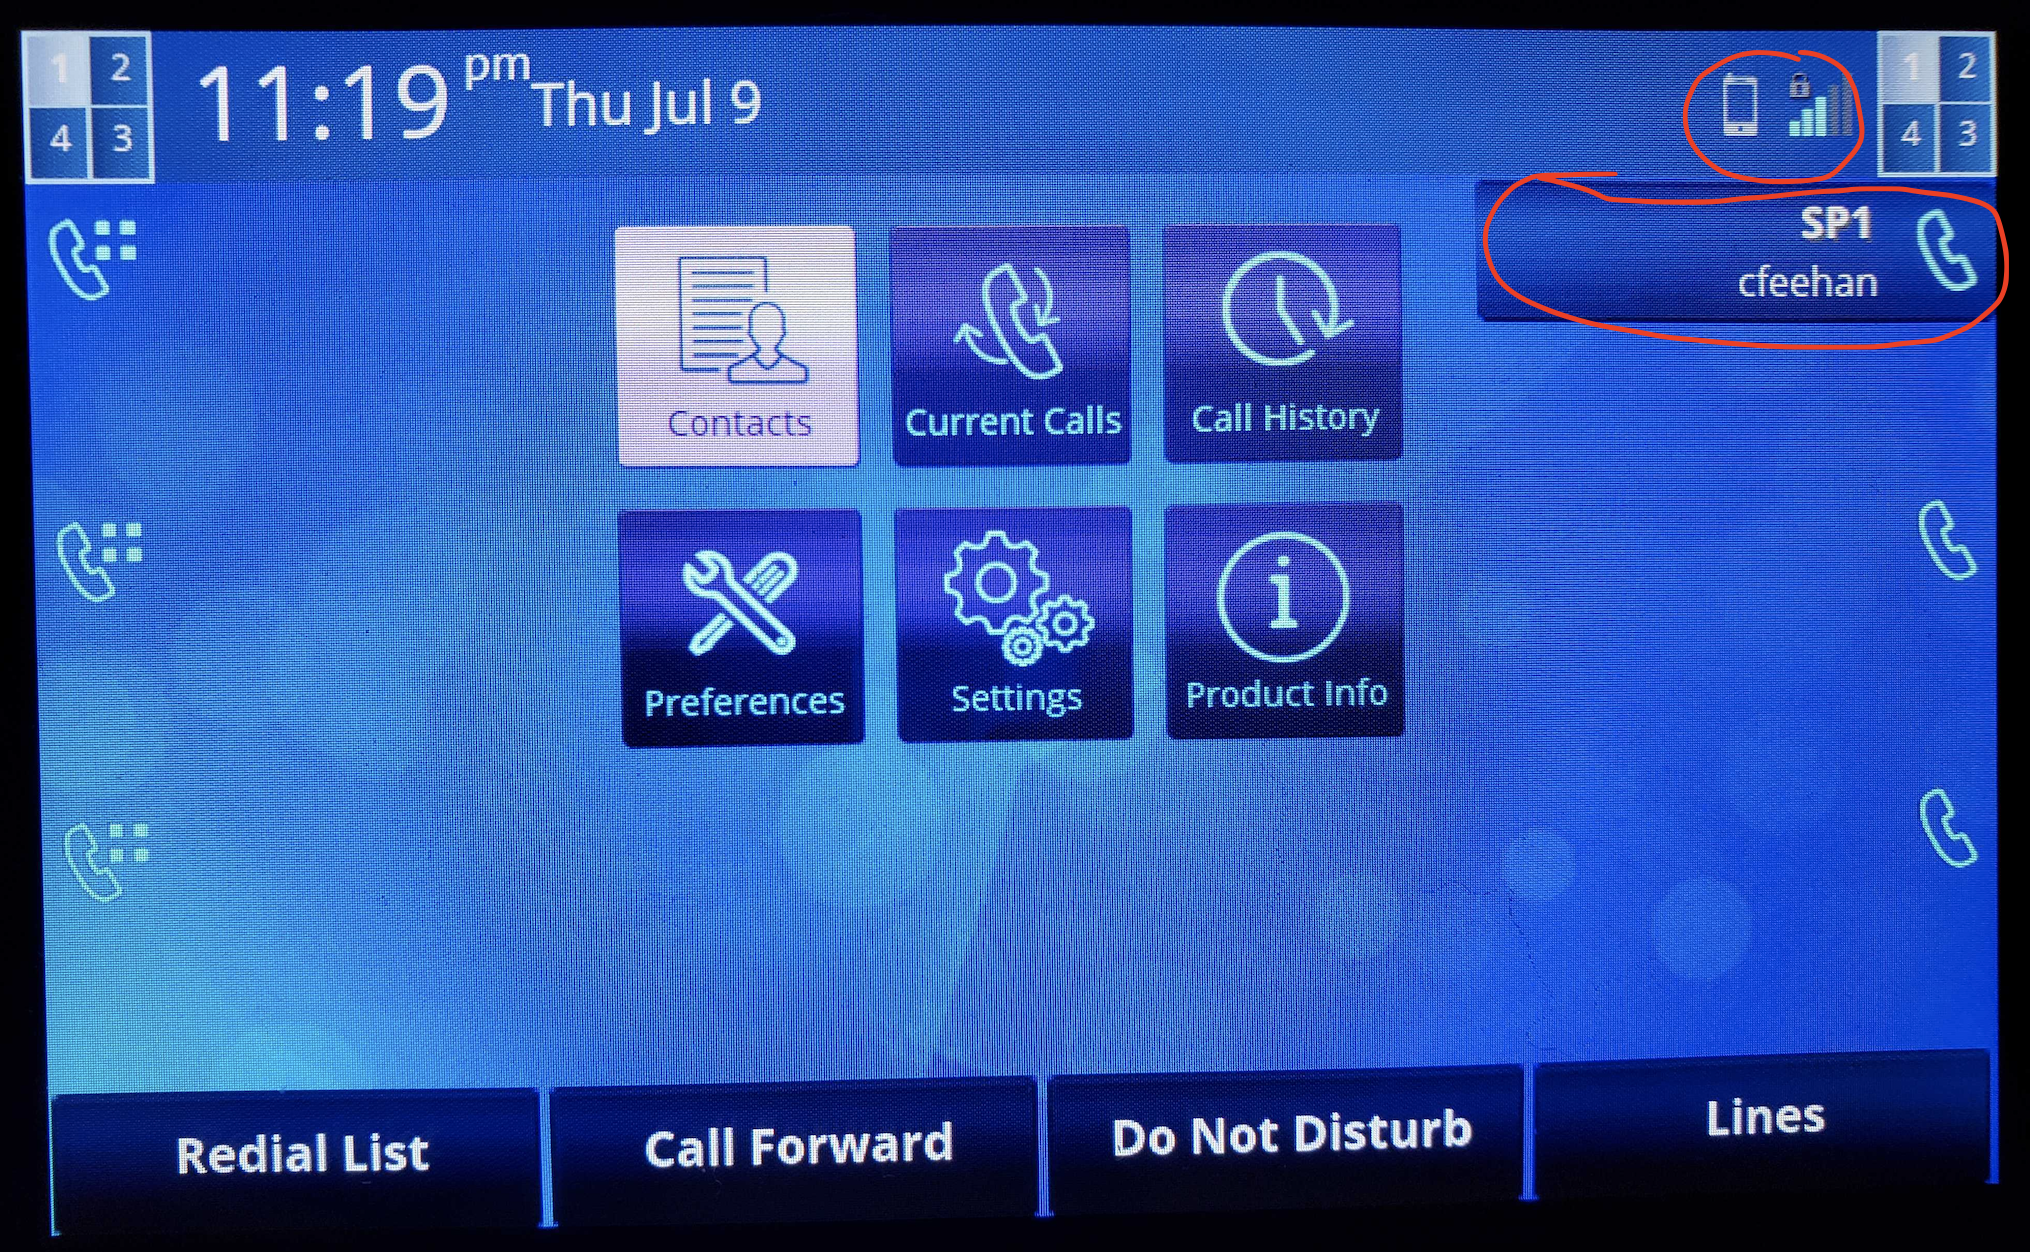
For the OBi2162 specifically, you should see something like the below, where the phone shows it's connected to the internet, and the phone line (eg. SP1) has your username displayed.
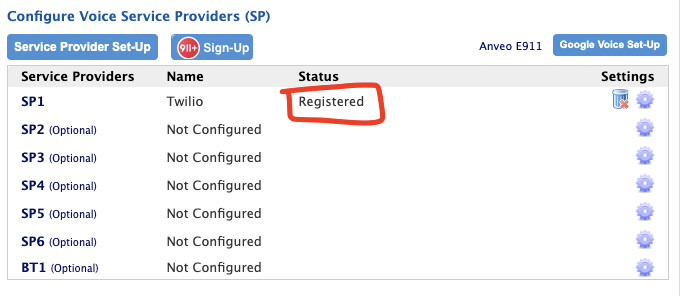
In OBiTALK, your Twilio Status should show as “Registered”.
That's it! Now you should be able to place calls from your Obihai IP Phone to the PSTN and also from the PSTN to your IP Phone.
Note: If you run into problems with Registration, you may need to restart your device, reconfigure the internet connection, or double check your Twilio settings from within the Twilio Console or within OBiTALK. If you’re having trouble with inbound/outbound calls, make sure your TwiML Bins for both inbound and outbound are setup properly per the instructions in this blog.
Example of Obihai’s phones:
https://www.amazon.com/OBi202-2-Port-Adapter-Support-Service/dp/B007D930YO/
https://www.amazon.com/Obihai-OBi1022-Phone-Power-Supply/dp/B00TEJOYYQ/
https://www.amazon.com/Obihai-OBi2000-Gigabit-Phones-OBi2182/dp/B076JKV5CL/
Follow this guide to configure the Obihai with Twilio:
https://twilio-cms-prod.s3.amazonaws.com/documents/Give-Your-OBIHAI-Phone-Telephone-Connectivity.pdf
Guides for other IP Phones are here:
https://www.twilio.com/docs/voice/api/sip-registration#configure-your-sip-endpoint
Use Twilio Programmable Voice to enable working from home
In this blog post, you have learned how to use Twilio Programmable Voice to create a simple solution to allow employees to work from home.
Possible alternatives
- Consider using Twilio Functions instead of TwiML bins if you have a large number of extensions or if you desire to use a custom SIP user name to detect the "From" parameter and do logic off of it.
- Use X-Lite/Bria as a softphone instead of Zoiper.
Additional resources
The following reference resources will provide you with in-depth information on some of the topics mentioned in this post:
- Programmable Voice – The Twilio documentation includes quickstarts for popular programming languages, including C#, and reference information on advanced features.
- TwiML for Programmable Voice – The documentation for TwiML, the Twilio Markup Language, will tell you all about the special XML tags you can use to build programmable voice applications.
- Registering a SIP Phone Directly to Twilio (and so much more...)
Al Kiramoto is a Solutions Architect at Twilio. He lives in Dallas - TX and enjoys working with customers and solving business problems - besides a good barbecue and TexMex food. He can be reached at akiramoto [at] twilio.com
Chris Feehan is a Solutions Architect at Twilio. Chris has a history of architecting and building custom solutions and integrations for customers in both the public and private sectors. Chris can be reached at cfeehan [at] twilio.com.

Related Resources
Twilio Docs
From APIs to SDKs to sample apps
API reference documentation, SDKs, helper libraries, quickstarts, and tutorials for your language and platform.
Resource Center
The latest ebooks, industry reports, and webinars
Learn from customer engagement experts to improve your own communication.
Ahoy
Twilio's developer community hub
Best practices, code samples, and inspiration to build communications and digital engagement experiences.