Enhancing the User Experience of iOS Chat Apps using Swift
Time to read:
February 17, 2016
Written by
This post is part of Twilio’s archive and may contain outdated information. We’re always building something new, so be sure to check out our latest posts for the most up-to-date insights.

In our previous post about designing chat apps we started with the iOS Quickstart for IP Messaging and improved on the user experience by using SlackTextViewController. We ended up with a well-designed foundation for a full-featured chat application that we will build upon in this post. The goal at the end of the series is to have a polished and complete chat app solution for iOS built using Swift. In this post we’ll add some polish to the loading experience and add some more features to the chat experience like autocompletion and message editing. Here’s a look at what we’ll be adding:
What You’ll Need
First, you’ll need a free Twilio account. Sign up for one here. Next, you’ll need the completed application from Designing Chat Applications for iOS Using Swift. You can get clone that from Github. You’ll also need the token server described here. You can take a shortcut and just get these running from those links or you could go through the original post and learn how everything works. It’s your choice but I’ll wait while you get it working.
Yay you’re back! Now that you have everything running let’s look at what you just set up:
- IP Messaging service set up through Twilio
- Backend application for obtaining tokens
- Swift iOS application that authenticates a user with the IP Messaging Service using a random name and joins a chat channel named ‘general’ and displays the chat in SlackTextViewController.
Note: all of the code for this blog post was written for iOS 9.2 using Xcode 7.2.1.
Loading…
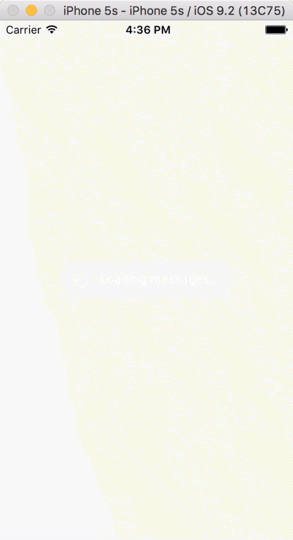
When our application loads it needs to load all of the messages that have been sent in the general channel. As the chat history for the channel grows this method will take longer to complete. In this section we’ll use the SwiftOverlays CocoaPod to add an overlay while these messages load.
First we need to add the SwiftOverlays pod. Open the Podfile file that is inside the Pods project and add the following highlighted line:
Next, from the project folder run the following terminal command to install the pod (you can leave Xcode running):
Open up ViewController.swift and add this import statement to make the SwiftOverlays library available in our ViewController:
Add the following line to viewDidLoad in ViewController to show an overlay to let the user know the messages are loading:
Now at the bottom of the ipMessagingClient:channelHistoryLoaded: method add this code to turn off the overlay:
That’s all we need to do for this feature. Build and run the application and you should see a loading message as the messages load. It’ll look like this (you’ll get the full effect if you send some messages and relaunch):

You Autocomplete Me
One of my favorite chat app features is autocompletion for usernames. Mentioning someone in a message is so common that not having autocompletion in a chat app would be a huge drain on usability. Thankfully SlackTextViewController makes this feature a breeze to add and IP Messaging gives us all the info we need to enable it. The first thing we need in order to make this work is a list of the users that are members of the general channel. Start by adding an array of strings to store the usernames as well as a search results array to the top of ViewController right under where we declared the messages array:
We now need to store the usernames into the users array. We’ll load the full initial list of general channel members when the channel history loads. Add the following highlighted code to ipMessagingClient:channelHistoryLoaded::
We also need to add and remove members as they join and leave the general channel. Let’s add two methods that handle these cases (make sure you’re adding these to the TwilioIPMessagingClientDelegate extension towards the bottom of the file):
Next we need to set up the autocompletion view. The autocompletion view is a UITableView that SlackTextViewController uses to present autocomplete suggestions to the user. We use the same methods to set it up that we used for the main messages table view. To make it work we first need to register a cell that the table view will use to display the usernames. Since we only need to display text we’ll reuse the same MessageTableViewCell that we created to display messages. In viewDidLoad under the line where we register the cell for the messages table view add the following line to register the class for the autoCompletionView’s cell:
Now we need to modify the UITableView methods in ViewController so that they handle the autoCompletionView as well as the default tableView. We’ll start with the tableView:numberOfRowsInSection method:
Next we need to configure and return the cell for the autocompletion rows. We’ll also refactor the configuration for the standard table cells using messageCellForIndexPath. Update tableView:cellForRowAtIndexPath and add the messageCellForIndexPath and autocompleteCellForIndexPath methods:
messageCellForIndexPath: is just the same table view cell configuration code we already had, but autocompleteCellForIndexPath: is new for our autocompletion view. If the prefix being used for autocompletion is ‘@’ than we configure the cell to display the username for the corresponding item in the searchResults array. We also set the selectionStyle to .Default since we want the cell to be selectable.
There’s one more method related to the autoCompletionView and that’s heightForAutoCompletionView which determines how big the autocompletion view should be. Let’s add it to ViewController:
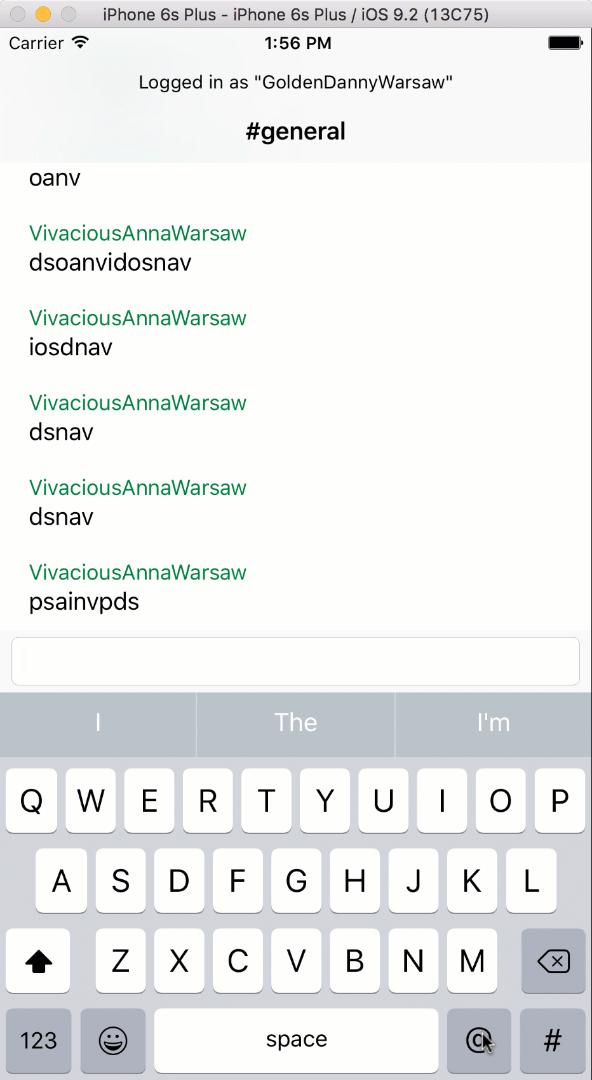
Now we’re ready to populate the autocompletion view when a user types a registered prefix character. We’ll register @ to begin autocompletion of usernames. Add the following code to the viewDidLoad method of ViewController:
Next we’ll override the didChangeAutoCompletionPrefix:andWord: method which is called when the user types a registered prefix and any characters after the prefix:
In the highlighted section we return the full user list if the user typed only ‘@’ and a filtered list if they have typed characters after the ‘@’. All we have left to do is handle when the user taps an autocompletion row. We’ll do that using tableView:didSelectRowAtIndexPath. Add this code to ViewController:
The highlighted code inserts a ‘:’ if the prefix was typed at the beginning of the message since this means the person is probably directing the message at the user instead of just mentioning them. Otherwise we add a space and return the username which will get added to the entry text view. Now we have autocompletion for usernames. It looks like this if you’ve done it successfully:
I’m Going To Need To Edit That Message
Users make mistakes when entering messages into a chat app. A good application will allow the user to fix them when they do. Thankfully Twilio IP Messaging and SlackTextViewController support message editing so we can easily add this to our application. We’ll start by adding an indexPath property to our MessageTableViewCell so that we can access the row number that corresponds to the cell when the user long presses on it to start the editing process. Add this code to the top of the MessageTableViewCell class:
Back over in ViewController.swift add the following highlighted code to messageCellForIndexPath to store the indexPath in the created cell and register a long press recognizer:
When the user presses and holds on a message cell the method didLongPressCell: will get called. Let’s add that method now:
There’s a lot going on in this method so let’s break it down. Lines 2-5 create a UIAlertController that will pop up from the bottom of the screen. Next we get the cell that was pressed and find the message for that cell. The highlighted section creates the 3 actions that can be added to the UIAlertController. The edit action calls editCellMessage which we will write in a moment. The copy action allows the user to copy the message text and the cancel action allows them to cancel the long press operation. We only add the edit action to the alertController if the user is the author of the message. Then we present the alert controller. Now we need to allow the user to edit the message by populating the text entry field with the message to edit. First, we’ll store a copy of the message object by adding an editingMessage property to the ViewController class:
Now we’ll add editCellMessage to set the entry field text to the message being edited:
If the user presses Save then we’ll commit the edit by updating the message body and reload the table. This takes place in didCommitTextEditing::
If the user cancels we’ll just let the superclass provide default behavior to dismiss the keyboard in didCancelTextEditing:
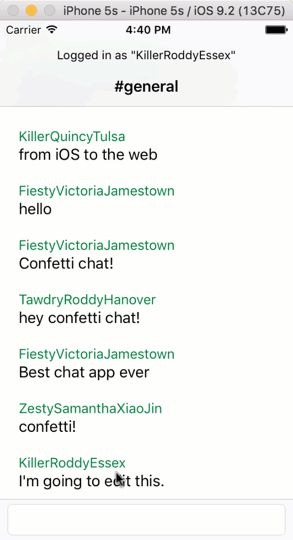
And that’s it, now our user can edit those pesky mistakes. If all has gone well, the editing process should look like this:
What’s Next?
In this post we added a few more usability features to our iOS chat application. While our application has gotten a lot closer to a full-featured and well-designed chat application we still have some features left to add. While you wait for the next post in this series, try the following next steps on your own:
- Create a channel list (either on it’s own page or in a slide out menu like Slack)
- Add user management with a login page.
- Once you have users, add avatars to the table view cell.
- Join us at Twilio Signal which is our software conference coming up in May. We have an exciting lineup of speakers and an out-of-this-world party you won’t want to miss. Sign up today using the promo code BSCHOOLEY20 for 20% off your ticket. Need to convince your boss? Try this letter.
I am really excited to see the chat applications you build with IP Messaging. Let me know what you’re building. You can reach me via email (@brentschooley).

Related Resources
Twilio Docs
From APIs to SDKs to sample apps
API reference documentation, SDKs, helper libraries, quickstarts, and tutorials for your language and platform.
Resource Center
The latest ebooks, industry reports, and webinars
Learn from customer engagement experts to improve your own communication.
Ahoy
Twilio's developer community hub
Best practices, code samples, and inspiration to build communications and digital engagement experiences.