Getting started with Android Things
Time to read:
January 25, 2017
Written by
This post is part of Twilio’s archive and may contain outdated information. We’re always building something new, so be sure to check out our latest posts for the most up-to-date insights.

Android Things makes it way easier to build IoT applications using the Android Framework and the tools you already know. Let’s have a look at how to flash Android Things to a Raspberry Pi 3 and build our first application.
Our tools
We’ll use the following tools throughout the tutorial:
- Android Studio
- A Raspberry Pi 3 with no flashed image
- A micro SD memory card with at least 8GB and an adapter so you can flash it
- The latest Android things preview image for Raspberry Pi. Download it here
- SD Card Formatter installed
- An ethernet cable connected to your router
- A monitor and keyboard to hook up to your Pi
I have completed this tutorial using a Mac, so the software described will likely not work on Windows or Linux, but you should be able to find equivalents if you’re on a different OS.
Flashing the Android Things image
Extract the files from the zip file you downloaded from the Android Things website and you should end up with a file called iot_rpi3.img. This is an image file and we will flash it to our memory card. If you have the file, feel free to skip the next section and head straight to formatting the memory card..
I don’t have iot_rpi3.img!
When trying to extract the file you may hit a perpetual issue where you’ll end up with a file called androidthings_rpi3_devpreview_4.zip.cpgz. Extracting that file would then create another file called androidthings_rpi3_devpreview_4 1.zip.
Unzipping the file with 7zip via terminal however solves this issue. To install 7zip and extract the file run the following:
Formatting the memory card
Once you’ve extracted the disk image from the zip file, we need to format the memory card and and install the disk image on it. If your memory card already has something on it, and that “something” is another Raspberry Pi image, you may see the message:
The disk you inserted was not readable by this computer.
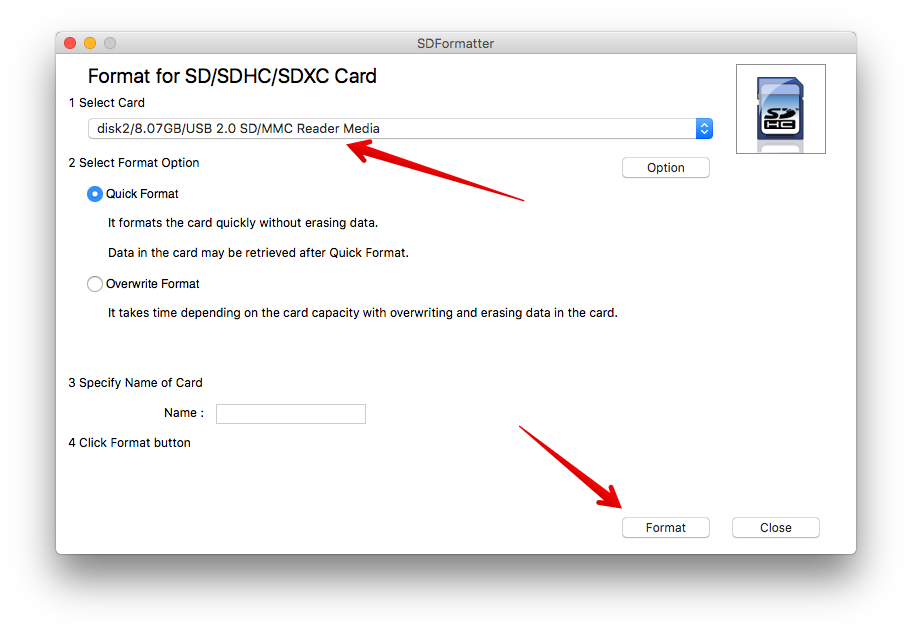
To solve that issue, open SDFormatter, select the SD Card and click Format.
After the disk is formatted we need to identify where we want to install the image. In your terminal run diskutil and make a note of the disk number assigned to the memory card.
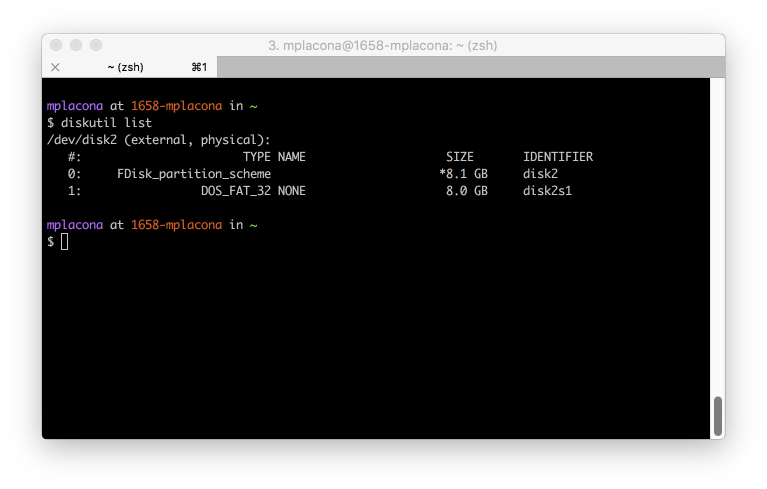
On my machine you can see that the memory card is disk2.
Now that we know which disk number our card has been assigned, it’s time to unmount that disk so we can flash it. In terminal run:
To flash the image to disk run the following command in the same directory where the Android Things image was extracted:
This process will take anything from 5 to 15 minutes depending on the size and speed of your memory card. Get yourself some coffee, we’re nearly done.

When the process completes, you should get a message pop up saying
The disk you inserted was not readable by this computer.
Great, we’re done with this bit.
Booting up the image
Now that our image has been installed to the memory card, we’ll put it in the Raspberry Pi 3 and boot to check that everything is running as expected.
It’s a good idea to connect an HDMI cable your Pi at least for a bit while we set it up. It will save us from having to guess whether things are running as expected or not.

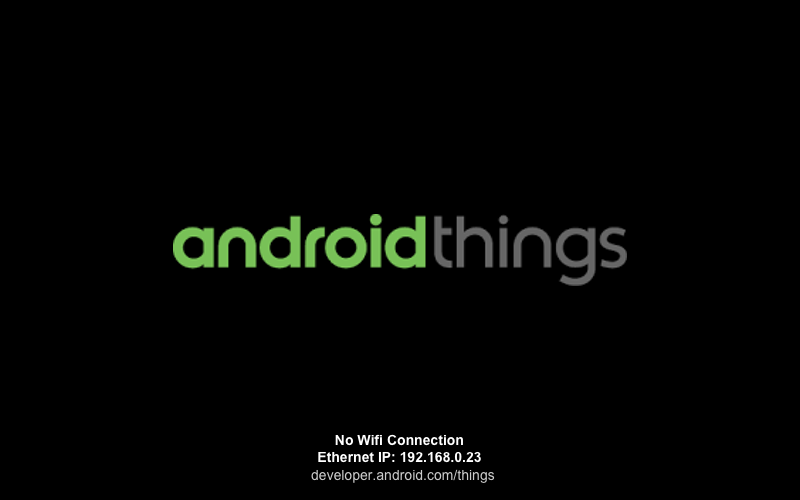
If you see a splash screen that resembles the one above you’re doing great!

Bringing the “I” back to IoT.
We’ve successfully imaged the memory card and used it to boot the Pi, but notice the splash screen says “No Wifi Connection” and “No Ethernet Connection”. We need to solve that connecting our Pi to the network.
Power down the Pi momentarily by unplugging its micro-usb cable and connect an ethernet cable. Power it again and you will see that it has an assigned IP address. ?
Back in your terminal run the following:
Android.local is automatically broadcast by the Raspberry Pi, and should resolve to the IP address assigned to your Pi on port 5555. If that doesn’t work for some reason, you can just use the Raspberry Pi’s IP address and port, which in the example above is 192.168.0.23:5555.
However, staying connected to a cable makes our device slightly less portable, so let’s connect our Pi to WiFi.
Making the “I” in IoT wireless
Still in your terminal enter:
Replace <Network_SSID> with your network name and <Network_Passcode> with your network’s password. Ensure that this is a 2.4GHz network because the Raspberry Pi 3 unfortunately does not support 5GHz.
You will see that your Pi now gets an IP address assigned to it soon after you run it. You can now remove the ethernet cable but you will need to restart the Pi before you can connect to it.
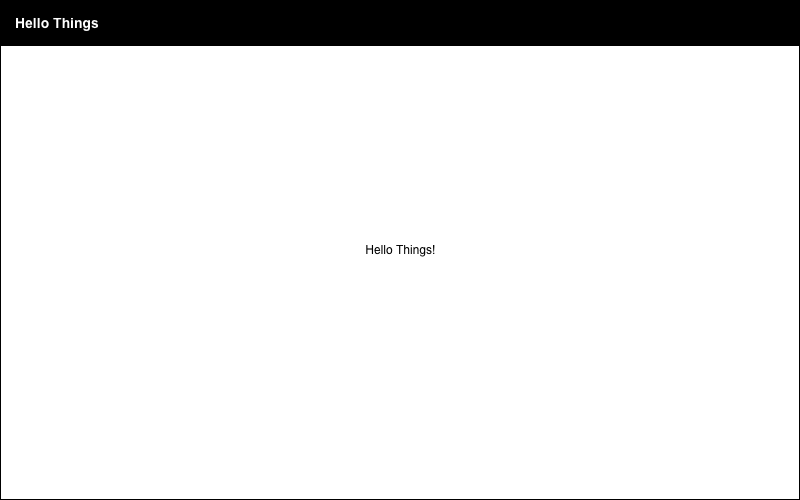
Hello, Things!
Finally, let’s test that Android applications can run properly on the Raspberry Pi. To do that we can write and run a simple application. You can write the code yourself or clone this application’s repository here.
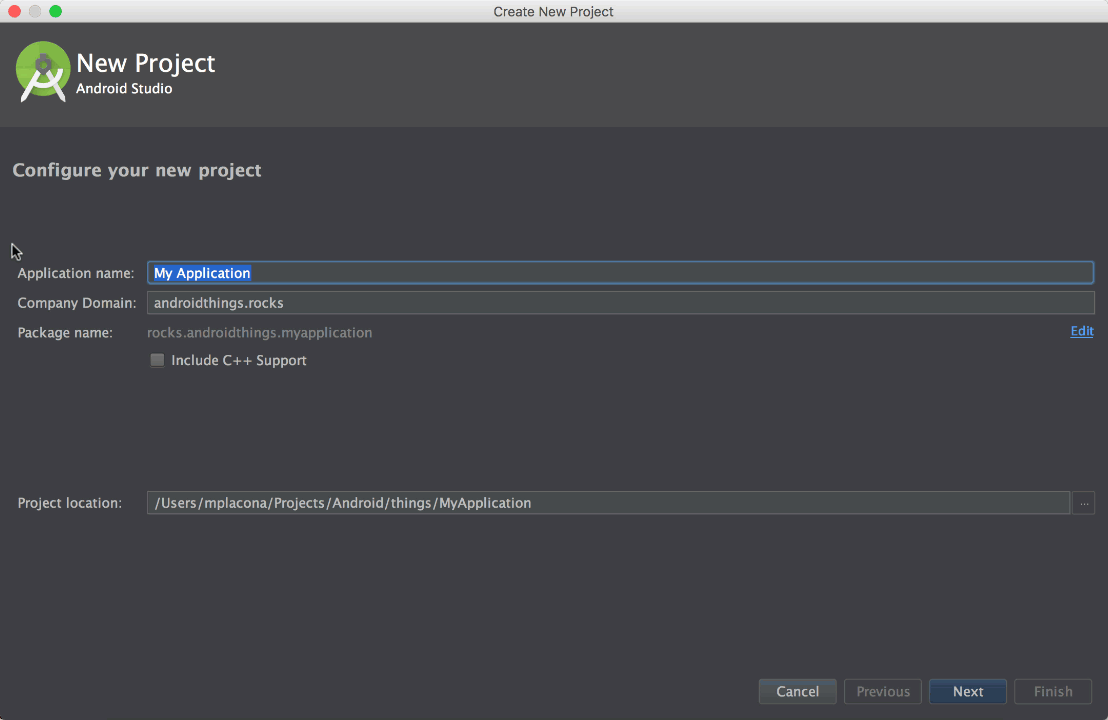
Open Android Studio. Create a new project called Hello Things. Android Things runs on API 24 and above and we will start with an empty activity.
In the application level build.gradle add a dependency to Android Things.
To the application’s manifest add an entry to the shared library and modify the intent filters.
In hellothings/MainActivity.java, change the onCreate method to list all the available GPIO ports on our Raspberry Pi.
This line of code will return a list of every available General-purpose input/output (GPIO) in our Raspberry Pi. Click run or hit CTRL+R.
On the screen, you will see that the activity called Hello Things was started.
Only the beginning
If you, like me, had a Raspberry Pi gathering dust then this is the perfect chance to use your existing Android skills to get into IoT. The Android Things platform is immense and there’s a lot more real life applications we can build.
How about securing your house and getting the Pi to send you an MMS whenever someone walks past a camera? Or how about controlling some of the lights around your house? I would love to see what you come up with. Hit me up on Twitter @marcos_placona or by email on marcos@twilio.com to tell me about it.

Related Resources
Twilio Docs
From APIs to SDKs to sample apps
API reference documentation, SDKs, helper libraries, quickstarts, and tutorials for your language and platform.
Resource Center
The latest ebooks, industry reports, and webinars
Learn from customer engagement experts to improve your own communication.
Ahoy
Twilio's developer community hub
Best practices, code samples, and inspiration to build communications and digital engagement experiences.