Getting started with Programmable Chat in Android

January 08, 2016
Written by

twilio_android_ipmessaging

Context is everything. There’s nothing more annoying than using a mobile application and being told you need to switch to a different application to communicate with other users or talk to technical support.

This often happens when using an application that has a chat or contact-us button in it but clicking takes you elsewhere far away from the app. How many times have you had to contact support and found that by clicking the support button you were taken to a webpage where you had to login again or worse even, to your native dialer?

More often than not the page is not even mobile friendly. That’s if you’re not taken directly to your email application or their Facebook page. And all it takes is someone calling or sending a text message in the middle of this process and you have no idea what you were doing anymore.

Well I have good news! It turns out that with new Programmable Chat from Twilio you can keep your app communications in context. This doesn’t only let you provide contextual information to your users, but also guarantees you have complete control of the experience while keeping the user engaged with your app for as long as possible.

All you need is a Twilio Account and a backend to generate access tokens. You can follow Twilio Programmable Chat QuickStart which will show you how to build a backend that will generate the access token for you. Or alternatively if you just want to download and run a backend you can clone any of our quickstarts:

You can use the links posted in each of the quickstarts to help you generate the necessary authentication keys. I will be using the .NET quickstart for this blog post so have generated by keys according to the links here.

To make our backend available from outside our local environment we will be using ngrok. Once you have your backend running locally, run the following in a new terminal window:

ngrok http {PORT}

Once that’s running, copy the url generated for you and load it up on a browser of your choice.

Regardless of the language you’re using, you have now just been dropped on a sample chat app that has the entire authentication and token generation handled for you.

From this point you can follow along with an existing Android app you already have or by working on the sample app I’ll tell you about next.

Alternatively if you want to run the application directly without having to follow all the steps below, you can just download it from the GitHub repo here and run it.

Getting the sample app

Instead of walking you through how to build an Android app, I thought it would be a good idea to show you how to add Programmable Chat to an existing app.

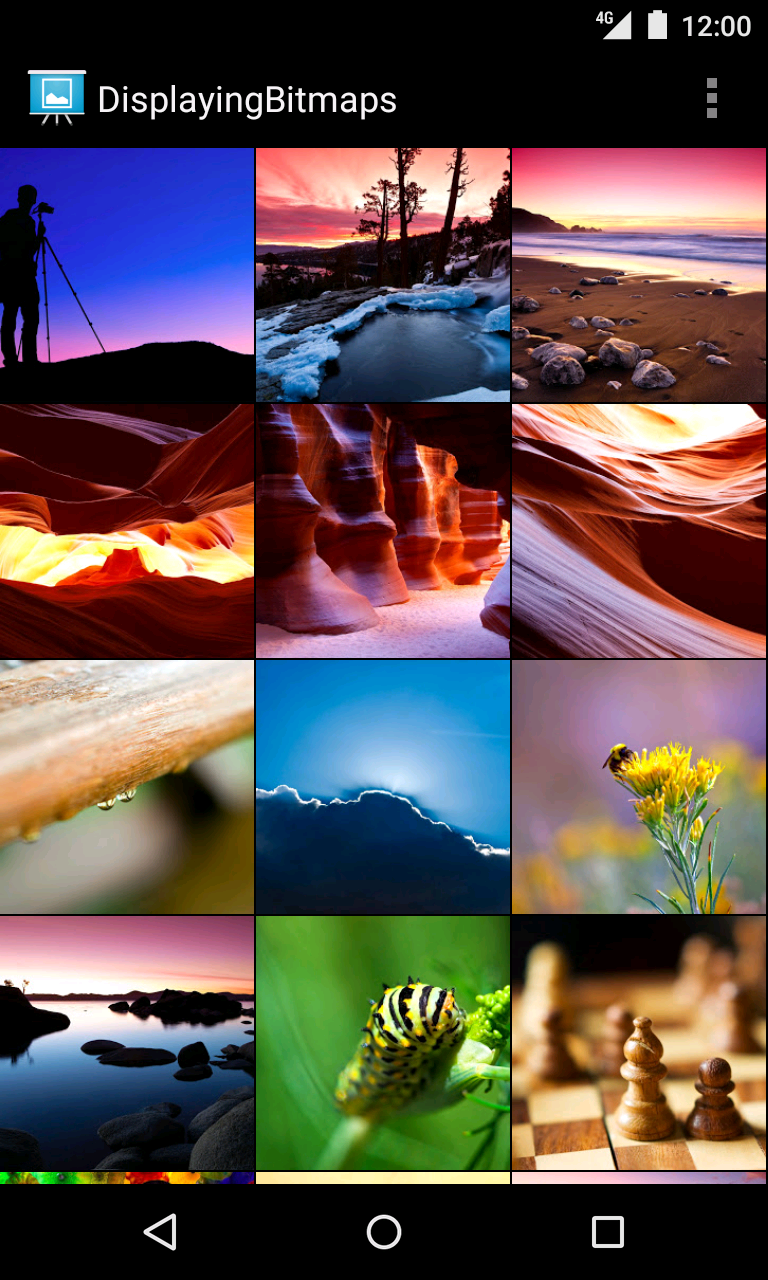
We will be using the Android Displaying Bitmaps Sample. I chose to use this app as it’s commonly used for teaching purposes and I think it would be great to be able to talk about some of the amazing images on it with other photography enthusiasts.

If photography isn’t your thing Google also has a bunch of other code samples you could use as a jumping off point for integrating Programmable Chat.

Now that we’ve decided which application we’re going to use, let’s clone it so we can start modifying it. From your terminal, clone the GitHub repo to wherever you want to store your app. I usually store mine to ~/Projects/Java.

git clone git@github.com:googlesamples/android-DisplayingBitmaps.git

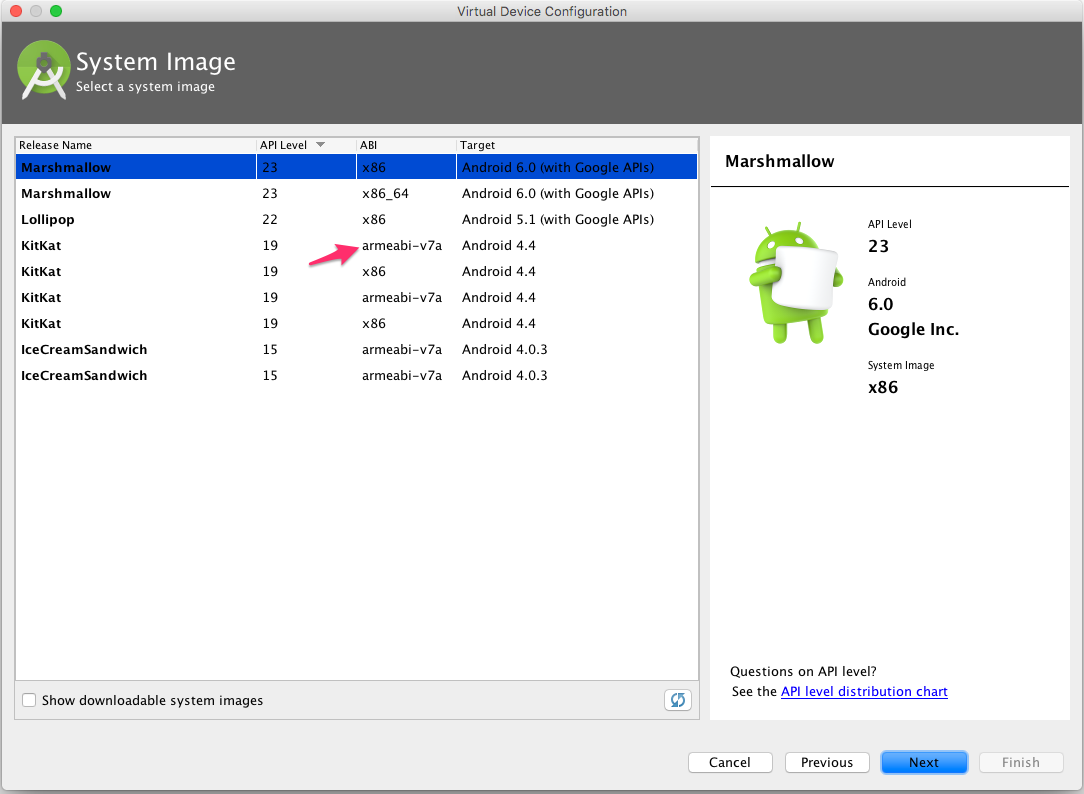
Once that is completed open it up with Android Studio. You can find a download link for your favourite operating system here if you don’t already have it installed. I usually like to run my applications directly on my phone, but you can find options about how to run it on emulators here.

If you decide to go this way make sure you’re using an emulator that uses armeabi-v7a architecture for the application to work.

Running the application should display a GridView with a bunch of pictures that when clicked shows you details of each of these pictures.

We will now change this application so users can join a conversation channel and chat about each of the images with other users on the application.

Adding a chat option

In Android Studio make sure you’re using the Project view and open up the file src/main/res/menu/main_menu.xml and add a new item to the menu.

<item
   android:id="@ id/discuss"
   android:icon="@android:drawable/ic_menu_help"
   android:showAsAction="never"
   android:title="Discuss"/>

Now open src/main/java/com/example/android/displayingbitmaps/ui/ImageDetailActivity.java and on the method onOptionsItemSelected create a new case statement called discuss as follows:


@Override
public boolean onOptionsItemSelected(MenuItem item) {
   switch (item.getItemId()) {
       case android.R.id.home:
           NavUtils.navigateUpFromSameTask(this);
           return true;
       case R.id.clear_cache:
           mImageFetcher.clearCache();
           Toast.makeText(
                   this, R.string.clear_cache_complete_toast,Toast.LENGTH_SHORT).show();
           return true;
       case R.id.discuss:
           final Intent i = new Intent(this, ChatActivity.class);
     i.putExtra(ImageDetailActivity.EXTRA_IMAGE, extraCurrentItem);
           startActivity(i);
	     finish();
   }
   return super.onOptionsItemSelected(item);
}

We’ve created a new menu entry that upon click will take the user to a chat page. Still on that file modify its member variables so we get access to the image ID. You can do that by adding a new variable to the top of the class called extraCurrentItem.


private ImagePagerAdapter mAdapter;
private ImageFetcher mImageFetcher;
private ViewPager mPager;
private int extraCurrentItem;

Now we need to be able to assign it, so remove the final and int keyword from:

final int extraCurrentItem = getIntent().getIntExtra(EXTRA_IMAGE, -1);

The chat page will be a new Activity we will create in a bit.

Importing the SDK and resolving dependencies

Before we start with the chatting activity we need to make sure we have imported the Twilio Android SDK. You can download it from here.

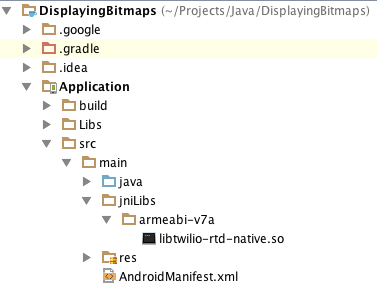
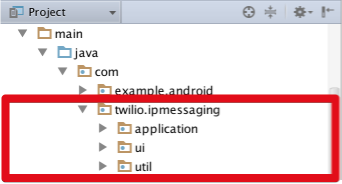
Once you have downloaded and decompressed both, you should have a directory called libs. From the twilio-rtc-common directory move armeabi-v7a to a new folder in Application/src/main/ called jniLibs. Your structure should now look like this in Android Studio.

Still from the twilio-rtc-common directory move twilio-common-android.jar into a new directory in your project called Libs under Application/. From the twilio-ip-messaging-android directory copy libs/twilio-ip-messaging-android.jar to the Libs folder you’ve just created.

Now we need to tell Android Studio where to find our libraries. You can do that by opening up the build.gradle file that is inside the Application directory and adding a couple of lines to it so it syncs and resolves the dependencies.


dependencies {
   compile 'com.android.support:support-v4:23.0.0'
   compile 'com.android.support:gridlayout-v7:23.0.0'
   compile 'com.android.support:cardview-v7:23.0.0'
   compile 'com.android.support:appcompat-v7:23.0.1'
   compile 'uk.co.ribot:easyadapter:1.5.0@aar'
   compile files('Libs/twilio-ip-messaging-android.jar')
   compile files('Libs/twilio-common-android.jar')
}

Now that we have imported the libraries into the project, we need to modify the AndroidManifest.xml to add a service tag to it. We add this so the messaging part of our application is always running in the background. That way you don’t need to have the app open in order to get new messages.

Open up AndroidManifest.xml and add the following after the last activity on it.

<service
   android:name="com.twilio.ipmessaging.TwilioIPMessagingClientService"
   android:exported="false" />

Let’s also take this opportunity to create a few directories we will be using later on. This way any of the new files we create get created on a new package. You can do that manually or via terminal. From the src directory run:

cd main/java/com/; mkdir twilio; cd twilio; mkdir ipmessaging; cd ipmessaging; mkdir application; mkdir ui; mkdir util

Persisting global variables

Android apps don’t maintain state by default which means you can’t persist global variables throughout the application’s lifespan. Because we’re going to initialise the SDK soon our app will need to be modified so it can behave like that. We will create a new class called TwilioApplication under src/main/java/com/twilio/ipmessaging/application and put the following code in it.

package com.twilio.ipmessaging.application;

import android.app.Application;

import com.twilio.ipmessaging.util.BasicIPMessagingClient;

public class TwilioApplication extends Application {
   private BasicIPMessagingClient rtdJni;
   private static TwilioApplication instance;

   public static TwilioApplication get() {
       return instance;
   }

   @Override
   public void onCreate() {
       super.onCreate();
       TwilioApplication.instance = this;
       rtdJni = new BasicIPMessagingClient(getApplicationContext());
   }

   public BasicIPMessagingClient getBasicClient() {
       return this.rtdJni;
   }

   public BasicIPMessagingClient getRtdJni() {
       return this.rtdJni;
   }
}

Now open AndroidManifest.xml and add a new permission request for wifi state, and change the Application tag to have a new attribute called android:name. Make its value be com.twilio.ipmessaging.application.TwilioApplication.


<uses-permission android:name="android.permission.ACCESS_WIFI_STATE"/>

<application
android:name="com.twilio.ipmessaging.application.TwilioApplication"
android:allowBackup="true"
android:description="@string/intro_message"
android:icon="@drawable/ic_launcher"
android:label="@string/app_name"
android:theme="@style/AppThemeDark">


You may have noticed that when you created the TwilioApplication class, one of the dependencies was not satisfied. This is because we’ve still not created our client – BasicIPMessagingClient. We will get to it soon.

Initialise the SDK and Authenticate

To start sending and receiving messages, we first need to make sure we’re authenticated with Twilio’s servers. We will be using the backend we created earlier to generate access tokens our application can then use to authenticate.

In src/main/java/com/twilio/ipmessaging/util create a new Java class, name it ILoginListener and choose its kind to be Interface. Replace its contents with the following class definition.

package com.twilio.ipmessaging.util;

public interface ILoginListener {
   public void onLoginStarted();

   public void onLoginFinished();

   public void onLoginError(String errorMessage);

   public void onLogoutFinished();
}

We will implement this interface later when we work on the login for our chat. The login is done via HTTP so we will need a way to make HTTP requests. There are a few different libraries that will help you with that but the Twilio engineers have created a really simple HTTP wrapper for this.

Copy the code from this gist and paste it in a new file called HttpHelper.java under src/main/java/com/twilio/ipmessaging/util/.

The last piece of the puzzle before we can work on our chat activity is to implement BasicIPMessagingClient.java. This is where the SDK initialisation will happen and we have already modified our application earlier to maintain this class’ state.

Create a new class called BasicIPMessagingClient.java under src/main/java/com/twilio/ipmessaging/util/ and make it implement IPMessagingClientListener and TwilioAccessManagerListener.

Now add the following imports and member variables to the top of it that we will use further down.

package com.twilio.ipmessaging.util;

import android.content.Context;
import android.os.AsyncTask;
import android.os.Handler;
import android.os.Looper;
import android.util.Log;

import com.twilio.common.TwilioAccessManager;
import com.twilio.common.TwilioAccessManagerFactory;
import com.twilio.common.TwilioAccessManagerListener;
import com.twilio.ipmessaging.Channel;
import com.twilio.ipmessaging.Constants.InitListener;
import com.twilio.ipmessaging.Constants.StatusListener;
import com.twilio.ipmessaging.IPMessagingClientListener;
import com.twilio.ipmessaging.TwilioIPMessagingClient;
import com.twilio.ipmessaging.TwilioIPMessagingSDK;

public class BasicIPMessagingClient implements IPMessagingClientListener, TwilioAccessManagerListener {
   private static final String TAG = "BasicIPMessagingClient";
   private TwilioIPMessagingClient ipMessagingClient;
   private Context context;
   private static String capabilityToken;
   private TwilioAccessManager accessMgr;
   private Handler loginListenerHandler;
   private String urlString;

   public BasicIPMessagingClient(Context context) {
       super();
       this.context = context;
   }

   public void setCapabilityToken(String capabilityToken) {
       this.capabilityToken = capabilityToken;
   }

   public static String getCapabilityToken() {
       return capabilityToken;
   }

   public TwilioIPMessagingClient getIpMessagingClient() {
      return ipMessagingClient;
   }

   // Interface implementations removed for brevity
}

We’ve just created a constructor for our class that will receive a Context as an argument and accessor methods that will hold the capability token we will generate next.

Create a new method called doLogin. We will call this method whenever a new user joins the chat.


private Handler setupListenerHandler() {
       Looper looper;
       Handler handler;
       if((looper = Looper.myLooper()) != null) {
           handler = new Handler(looper);
       } else if((looper = Looper.getMainLooper()) != null) {
           handler = new Handler(looper);
       } else {
           throw new IllegalArgumentException("Channel Listener must have a Looper.");
       }
       return handler;
}
public void doLogin(final ILoginListener listener, String url) {
       this.urlString = url;
       this.loginListenerHandler = setupListenerHandler();
       TwilioIPMessagingSDK.setLogLevel(android.util.Log.DEBUG);
       if(!TwilioIPMessagingSDK.isInitialized()) {
           TwilioIPMessagingSDK.initializeSDK(this.context, new InitListener() {
               @Override
               public void onInitialized() {
                   createClientWithAccessManager(listener);
               }

               @Override
               public void onError(Exception error) {
                   Log.d(TAG, error.getMessage());
               }
           });
       } else {
           createClientWithToken(listener);
       }
}

On the code above we’re checking whether the SDK has been initialised. If it hasn’t, we create new instance of the client and a new access manager. So create a new method called createClientWithAccessManager to the bottom of the class.


private void createClientWithAccessManager(final ILoginListener listener) {
       this.accessMgr = TwilioAccessManagerFactory.createAccessManager(this.capabilityToken, new TwilioAccessManagerListener() {
           @Override
           public void onAccessManagerTokenExpire(TwilioAccessManager twilioAccessManager) {
               Log.d(TAG, "token expired.");
               new GetCapabilityTokenAsyncTask().execute(BasicIPMessagingClient.this.urlString);
           }

           @Override
           public void onTokenUpdated(TwilioAccessManager twilioAccessManager) {
               Log.d(TAG, "token updated.");
           }

           @Override
           public void onError(TwilioAccessManager twilioAccessManager, String s) {
               Log.d(TAG, "token error: " + s);
           }
       });

       ipMessagingClient = TwilioIPMessagingSDK.createIPMessagingClientWithAccessManager(BasicIPMessagingClient.this.accessMgr, BasicIPMessagingClient.this);
       if(ipMessagingClient != null) {
           ipMessagingClient.setListener(BasicIPMessagingClient.this);
           BasicIPMessagingClient.this.loginListenerHandler.post(new Runnable() {
               @Override
               public void run() {
                   if(listener != null) {
                       listener.onLoginFinished();
                   }
               }
           });
       } else {
           listener.onLoginError("ipMessagingClientWithAccessManager is null");
       }
   }

Getting the token is done by making an HTTP request to the endpoint we created during the quickstart. We will do that by creating a new class at the bottom of this one called GetCapabilityTokenAsyncTask.


private class GetCapabilityTokenAsyncTask extends AsyncTask<String, Void, String> {

       @Override
       protected void onPostExecute(String result) {
           super.onPostExecute(result);
           ipMessagingClient.updateToken(BasicIPMessagingClient.getCapabilityToken(), new StatusListener() {

               @Override
               public void onSuccess() {
                   Log.d(TAG, "Updated Token was successfull");
               }

               @Override
               public void onError() {
                   Log.e(TAG, "Updated Token failed");
               }});
           accessMgr.updateToken(null);
       }

       @Override
       protected void onPreExecute() {
           super.onPreExecute();
       }

       @Override
       protected String doInBackground(String... params) {
           try {
               capabilityToken = HttpHelper.httpGet(params[0]);
           } catch (Exception e) {
               e.printStackTrace();
           }
           return capabilityToken;
       }
}

If the SDK has already been initialised, we can just call createClientWithToken and reuse the token we already have.


private void createClientWithToken(ILoginListener listener) {
       ipMessagingClient = TwilioIPMessagingSDK.createIPMessagingClientWithToken(this.capabilityToken, BasicIPMessagingClient.this);
       if(ipMessagingClient != null) {
           if(listener != null) {
               listener.onLoginFinished();
           }
       } else {
           listener.onLoginError("ipMessagingClient is null");
       }
}

If you want to just copy the code for this entire class, you can get the full source here.

It’s time to get chatty

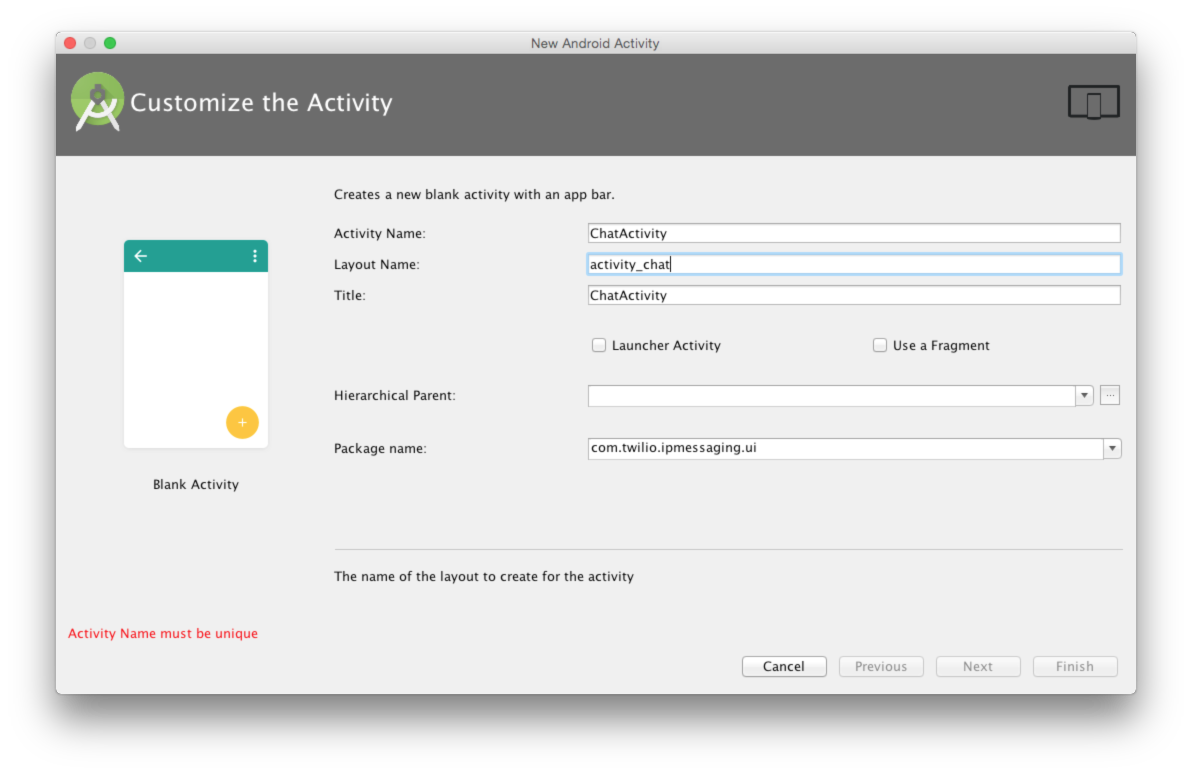
Create a new blank Android Activity called ChatActivity under src/main/java/com/twilio/ipmessaging/ui.


Open up its view in src/main/res/layout/activity_chat.xml and change it so it displays a ListView, a text field and a button as such:
<?xml version="1.0" encoding="utf-8"?>
   <RelativeLayout xmlns:android="http://schemas.android.com/apk/res/android"
       xmlns:tools="http://schemas.android.com/tools"
       android:orientation="vertical"
       android:background="#ffffff"
       android:layout_width="match_parent"
       android:layout_height="match_parent"
       tools:context="com.twilio.ipmessaging.ui.ChatActivity">
       <ListView
           android:id="@ id/lvChat"
           android:transcriptMode="alwaysScroll"
           android:layout_alignParentTop="true"
           android:layout_alignParentLeft="true"
           android:layout_alignParentRight="true"
           android:layout_above="@ id/llSend"
           android:layout_width="wrap_content"
           android:layout_height="match_parent" />
       <RelativeLayout
           android:id="@ id/llSend"
           android:layout_alignParentBottom="true"
           android:layout_width="match_parent"
           android:background="#ffffff"
           android:paddingTop="5dp"
           android:paddingBottom="10dp"
           android:paddingLeft="0dp"
           android:paddingRight="0dp"
           android:layout_height="wrap_content" >
           <EditText
               android:id="@ id/etMessage"
               android:layout_toLeftOf="@ id/btSend"
               android:layout_alignBottom="@ id/btSend"
               android:layout_width="match_parent"
               android:layout_height="wrap_content"
               android:gravity="top"
               android:hint="Say something"
               android:inputType="textShortMessage"
               android:imeOptions="actionSend"
               android:textColor="#d50000" />
           <Button
               android:id="@ id/btSend"
               android:layout_width="wrap_content"
               android:layout_height="wrap_content"
               android:gravity="center_vertical|right"
               android:paddingRight="10dp"
               android:layout_alignParentRight="true"
               android:text="Send"
               android:textSize="18sp" >
           </Button>
       </RelativeLayout>
   </RelativeLayout>

Now back in ChatActivity change the main class to implement ChannelListener, ILoginListener and IPMessagingClientListener. Android Studio will ask you to implement the interface methods, so you can let it generate the methods for you.

To the top of the class add the following member variables and imports so your class looks like this:


package com.twilio.ipmessaging.ui;

import android.app.ProgressDialog;
import android.database.DataSetObserver;
import android.os.AsyncTask;
import android.os.Bundle;
import android.app.Activity;
import android.util.Log;
import android.view.View;
import android.widget.Button;
import android.widget.EditText;
import android.widget.ListView;

import com.example.android.displayingbitmaps.R;
import com.example.android.displayingbitmaps.ui.ImageDetailActivity;
import com.twilio.ipmessaging.Channel;
import com.twilio.ipmessaging.ChannelListener;
import com.twilio.ipmessaging.Channels;
import com.twilio.ipmessaging.Constants;
import com.twilio.ipmessaging.Constants.StatusListener;
import com.twilio.ipmessaging.Constants.CreateChannelListener;
import com.twilio.ipmessaging.IPMessagingClientListener;
import com.twilio.ipmessaging.Member;
import com.twilio.ipmessaging.Message;
import com.twilio.ipmessaging.Messages;
import com.twilio.ipmessaging.application.TwilioApplication;
import com.twilio.ipmessaging.util.BasicIPMessagingClient;
import com.twilio.ipmessaging.util.HttpHelper;
import com.twilio.ipmessaging.util.ILoginListener;

import org.json.JSONObject;

import java.util.ArrayList;
import java.util.Arrays;
import java.util.Collections;
import java.util.Comparator;
import java.util.HashMap;
import java.util.List;
import java.util.Map;
import java.util.concurrent.ExecutionException;

import uk.co.ribot.easyadapter.EasyAdapter;

public class ChatActivity extends Activity implements ChannelListener, ILoginListener, IPMessagingClientListener {

   // Authentication
   private static final String AUTH_SCRIPT = "https://{your-ngrok-url}.ngrok.io/token";
   private String capabilityToken = null;
   private BasicIPMessagingClient basicClient;
   private ProgressDialog progressDialog;

   // Chat
   private static final String TAG = "ChatActivityTag";
   private List<Message> messages = new ArrayList<>();
   private EasyAdapter<Message> adapter;

   private ListView lvChat;
   private EditText etMessage;

   private Channel channel;

   private int currentImage;

   public static String local_author;


   @Override
   protected void onCreate(Bundle savedInstanceState) {
       super.onCreate(savedInstanceState);
       setContentView(R.layout.activity_chat);
   }

  // Interface implementations removed for brevity
}

Make sure you update the highlighted URL to match the one you’ve used for you backend.

Replace the contents of the very lean onCreate method with the logic that will try to authenticate


protected void onCreate(Bundle savedInstanceState) {
   super.onCreate(savedInstanceState);
   setContentView(R.layout.activity_chat);

   basicClient = TwilioApplication.get().getBasicClient();
   if(basicClient != null) {
       // Authentication
       authenticateUser();
   }

   // Chat
   currentImage = getIntent().getIntExtra(ImageDetailActivity.EXTRA_IMAGE, -1);

   // Message Text
   this.etMessage = (EditText) findViewById(R.id.etMessage);

   // Send Button
   Button btSend = (Button) findViewById(R.id.btSend);
   btSend.setOnClickListener(new View.OnClickListener() {
       @Override
       public void onClick(View v) {
           String input = etMessage.getText().toString();
           if (channel != null) {
               Messages messagesObject = channel.getMessages();
               final Message message = messagesObject.createMessage(input);
               messagesObject.sendMessage(message, new StatusListener() {
                   @Override
                   public void onSuccess() {
                       Log.e(TAG, "Successful at sending message.");
                       runOnUiThread(new Runnable() {
                           @Override
                           public void run() {
                               messages.add(message);
                               adapter.notifyDataSetChanged();
                               etMessage.setText("");
                               etMessage.requestFocus();
                           }
                       });
                   }

                   @Override
                   public void onError() {
                       Log.e(TAG, "Error sending message.");
                   }
               });
           }
       }
   });
}

The code above authenticates the user upon loading the activity and checks whether the send button has been clicked. In case it has it will try to publish the message.

Create a new method at the bottom of the class called authenticateUser and add the following to it:


private void authenticateUser() {
   try {
       new GetCapabilityTokenAsyncTask().execute(AUTH_SCRIPT).get();
   } catch (InterruptedException | ExecutionException e) {
       e.printStackTrace();
   }
}

Now create a class on the same activity called GetCapabilityTokenAsyncTask and add the following to it:


private class GetCapabilityTokenAsyncTask extends AsyncTask<String, Void, String> {
   private String urlString;
   @Override
   protected void onPostExecute(String result) {
       super.onPostExecute(result);


       new Thread(new Runnable() {
           @Override
           public void run() {
               ChatActivity.this.basicClient.doLogin(ChatActivity.this, urlString);
           }
       }).start();
   }

   @Override
   protected void onPreExecute() {
       super.onPreExecute();
       ChatActivity.this.progressDialog = ProgressDialog.show(ChatActivity.this, "",
               "Logging in. Please wait...", true);
   }

   @Override
   protected String doInBackground(String... params) {
       try {
           urlString = params[0];
           capabilityToken = HttpHelper.httpGet(urlString);

           JSONObject responseObject = new JSONObject(capabilityToken);
           String token = responseObject.getString("token");
           ChatActivity.local_author = responseObject.getString("identity");

           basicClient.setCapabilityToken(token);
       } catch (Exception e) {
           e.printStackTrace();
       }
       return capabilityToken;
   }
}

Notice how we make an HTTP request using the URL we defined on authenticateUser and then set the capability token for our client to be the result of that. We also get the user information from the quickstart to set a username for each of the users. If you already have a concept of usernames in your app, you could just use that instead.

You may also have noticed that on the onPostExecute method we are making a request to basicClient.doLogin(). basicClient is an instance of BasicIPMessagingClient and earlier we’ve implemented a call to onLoginFinished on it, which we’re just about to use now. Replace the contents of onloginFinished with the following:


public void onLoginFinished() {
   ChatActivity.this.progressDialog.dismiss();
   basicClient.getIpMessagingClient().setListener(ChatActivity.this);

   final String channelName = "TestChannel" + String.valueOf(currentImage);
   Channels channelsLocal = basicClient.getIpMessagingClient().getChannels();
   // Creates a new public channel if one doesn't already exist
   if (channelsLocal.getChannelByUniqueName(channelName) != null) {
       //join it
       channel = channelsLocal.getChannelByUniqueName(channelName);
       channel.setListener(ChatActivity.this);

       // Listen for channel join status
       StatusListener joinListener = new StatusListener(){
           @Override
           public void onSuccess() {
               runOnUiThread(new Runnable() {
                   @Override
                   public void run() {
                       setupListView();
                   }
               });
               Log.d(TAG, "Successfully joined existing channel");
           }

           @Override
           public void onError() {
               Log.e(TAG, "failed to join existing channel");
           }
       };

       // join the channel
       channel.join(joinListener);
   } else {

       final Map<String, String> attributes = new HashMap<>();
       attributes.put("topic", "Discussion on image : " + String.valueOf(currentImage));

       Map<String, Object> options = new HashMap<>();
       options.put(Constants.CHANNEL_FRIENDLY_NAME, channelName);
       options.put(Constants.CHANNEL_UNIQUE_NAME, channelName);
       options.put(Constants.CHANNEL_TYPE, Channel.ChannelType.CHANNEL_TYPE_PUBLIC);
       options.put("attributes", attributes);

       channelsLocal.createChannel(options, new CreateChannelListener() {
           @Override
           public void onCreated(final Channel newChannel) {
               Log.e(TAG, "Successfully created a channel with options");
   channel = newChannel;
               runOnUiThread(new Runnable() {
                   @Override
                   public void run() {
                       setupListView();
                   }
               });
           }


           @Override
           public void onError() {
               Log.e(TAG, "failed to create new channel");
           }
       });
   }
}

We check whether a channel already exists for that image and if it doesn’t we just create it. When a channel is loaded we also load all the messages and then join it.

Upon joining a channel, we call setupListView so all the messages on that channel get displayed on the screen. Create a new method called setupListview in the main class and add the following to it.

private void setupListView() {
   final Messages messagesObject = channel.getMessages();

   if(messagesObject != null) {
       Message[] messagesArray = messagesObject.getMessages();
       if(messagesArray.length > 0 ) {
           messages = new ArrayList<>(Arrays.asList(messagesArray));
           Collections.sort(messages, new CustomMessageComparator());
       }
   }

   adapter = new EasyAdapter<>(this, MessageViewHolder.class, messages,
           new MessageViewHolder.OnMessageClickListener() {

               @Override
               public void onMessageClicked(Message message) {
                   // TODO: Implement options for deletion or edit
               }
           });

   // List View
   lvChat = (ListView) findViewById(R.id.lvChat);
   lvChat.setAdapter(adapter);

   if (lvChat != null) {
       lvChat.setTranscriptMode(ListView.TRANSCRIPT_MODE_ALWAYS_SCROLL);
       lvChat.setStackFromBottom(true);
       adapter.registerDataSetObserver(new DataSetObserver() {
           @Override
           public void onChanged() {
               super.onChanged();
               lvChat.setSelection(adapter.getCount() - 1);
           }
       });
   }
   adapter.notifyDataSetChanged();
}

Now all the messages loaded on that channel will be added to the list view. Those messages aren’t always ordered however so just above the new method create a new comparator class. This will help us order the messages prior to adding them into the view.

private class CustomMessageComparator implements Comparator<Message> {
   @Override
   public int compare(Message lhs, Message rhs) {
       if (lhs == null) {
           return (rhs == null) ? 0 : -1;
       }
       if (rhs == null) {
           return 1;
       }
       return lhs.getTimeStamp().compareTo(rhs.getTimeStamp());
   }
}

Another one of the setupListView method responsibilities is to make sure our ListView is properly bound to an adaptor to display the messages. We will create a view for this adaptor now by going to src/main/res/layout/ and creating a new file called message_item_layout.xml with the following code.

<?xml version="1.0" encoding="utf-8"?>
<LinearLayout xmlns:android="http://schemas.android.com/apk/res/android"
   android:layout_width="fill_parent"
   android:layout_height="wrap_content">

   <LinearLayout
       android:id="@ id/singleMessageContainer"
       android:layout_width="fill_parent"
       android:layout_height="wrap_content"
       android:orientation="vertical">

       <TextView
           android:id="@ id/txtInfo"
           android:layout_width="wrap_content"
           android:layout_height="30sp"
           android:layout_gravity="right"
           android:textColor="@android:color/darker_gray"
           android:textSize="12sp"
           />

       <TextView
           android:id="@ id/body1"
           android:layout_width="match_parent"
           android:layout_height="wrap_content"
           android:layout_gravity="center"
           android:layout_margin="5dip"
           android:background="@drawable/bubble_b"
           android:paddingLeft="10dip"
           android:textColor="@android:color/primary_text_light"
           android:visibility= "gone">
       </TextView>

       <TextView
           android:id="@ id/body"
           android:layout_width="wrap_content"
           android:layout_height="wrap_content"
           android:layout_margin="5dip"
           android:background="@drawable/bubble_b"
           android:paddingLeft="10dip"
           android:text="Hello bubbles!"
           android:textColor="@android:color/primary_text_light" />

   </LinearLayout>

</LinearLayout>

This new view will use a couple 9-patch images to display a bubble around the text. You can download these images here and place them under src/main/res/drawable-xhdpi.

We just need a view holder to display the messages in the listview correctly. Create a new class called MessageViewHolder.java in src/main/java/com/twilio/ipmessaging/ui/ and add the following code it it.

@LayoutId(R.layout.message_item_layout)
public class MessageViewHolder extends ItemViewHolder<Message> {

   @ViewId(R.id.body)
   TextView body;

   @ViewId(R.id.txtInfo)
   TextView txtInfo;

   @ViewId(R.id.singleMessageContainer)
   LinearLayout singleMessageContainer;

   View view;

   public MessageViewHolder(View view) {
       super(view);
       this.view = view;
   }

   @Override
   public void onSetListeners() {
       view.setOnClickListener(new View.OnClickListener() {
           @Override
           public void onClick(View v) {
               OnMessageClickListener listener = getListener(OnMessageClickListener.class);
               if (listener != null) {
                   listener.onMessageClicked(getItem());
               }
           }
       });
   }

   @Override
   public void onSetValues(Message message, PositionInfo pos) {
       StringBuilder textInfo = new StringBuilder();
       if(message != null) {
           String dateString = message.getTimeStamp();
           if(dateString != null) {
               textInfo.append(message.getAuthor()).append(":").append(dateString);
           } else {
               textInfo.append(message.getAuthor());
           }
           txtInfo.setText(textInfo.toString());
           body.setText(message.getMessageBody());

           // Check for current author
            if(message.getAuthor().compareTo(ChatActivity.local_author) == 0 || message.getAuthor().equals("")){
                body.setBackgroundResource(R.drawable.bubble_a);
                singleMessageContainer.setGravity(Gravity.END);
            }else{
                body.setBackgroundResource(R.drawable.bubble_b);
                singleMessageContainer.setGravity(Gravity.START);
            }
       }

   }

   public interface OnMessageClickListener {
       void onMessageClicked(Message message);
   }
}

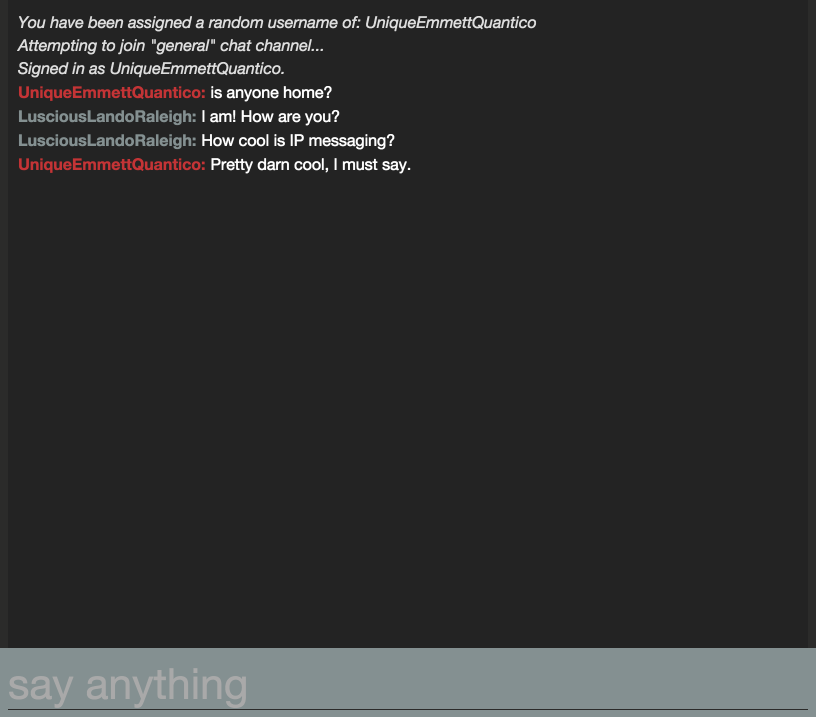
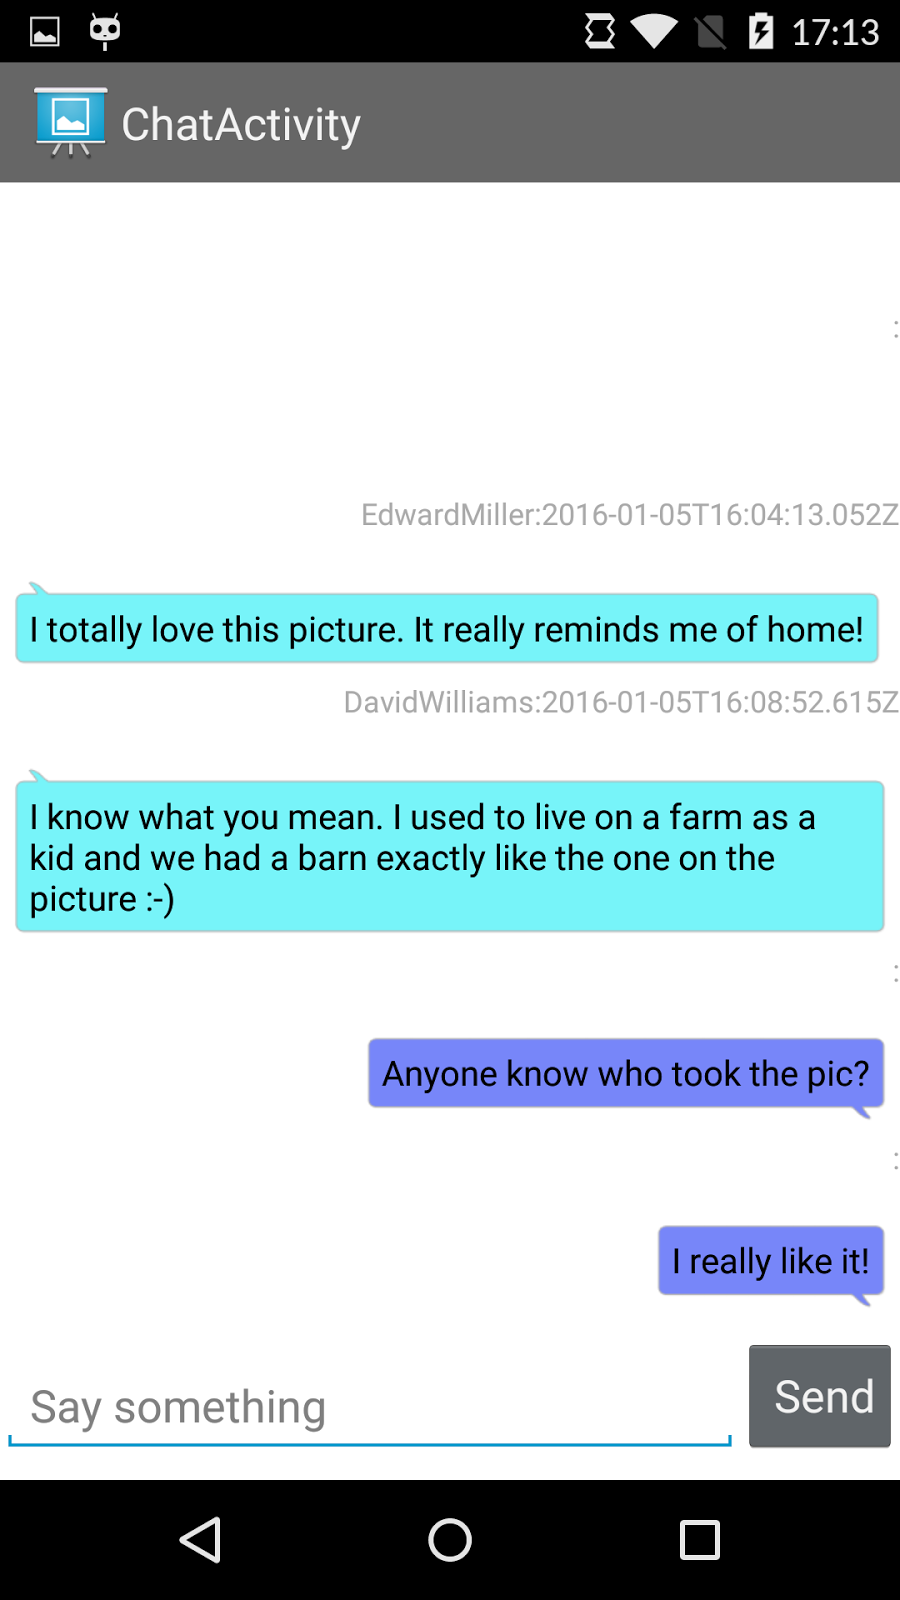
It’s time to run the app. Once it loads up choose one of the pictures and on the top right tap on the menu and choose discuss.

You will notice that the chat screen will be displayed and your keyboard loaded. Write any message and hit send. Now is also the time to send the app to some of your friends so they can chat with you.

Screenshot_2016-01-05-17-13-42.png

You own the experience

We started off with an application that would merely let you see amazing pictures but offered no way of interacting with other users looking at them.

We then changed it so the users never have to leave the app and all the communication is centered around a single piece of content inside the application. Context here is the key to keeping your users in your app for as long as you can.

How would you change your app to let your users talk to each other? Maybe you could have a support channel where your users can talk to you directly when they have questions or want to report bugs? Or maybe you could display the messages sent by your app on a big message board.

I would love to see what you come up with, and how you modify your apps to keep conversation in context. Hit me up on Twitter @marcos_placona or by email on marcos@twilio.com to tell me about it.